Кракен купить порошок
Автор: Полина Коротыч. Иногда создаётся такое впечатление, что в мировой сети можно найти абсолютно любую информацию, как будто вся наша жизнь находится в этом интернете. Комментарии Boor123 Сегодня Птичка в клетке! Гипермаркет Ашан. Ассортимент товаров Платформа дорожит своей репутацией, поэтому на страницах сайта представлены только качественные товары. Так же официальная ОМГ это очень удобно, потому что вам не нужно выходить из дома. Что такое OMG! Особенности лечения. Не нужно - достаточно просто открыть браузер, вставить в адресную строку OMG! Все зеркала onion. Вся ответственность за сохранность ваших денег лежит только на вас. В этом видео мы рассмотрим основной на сегодняшний день маркетплейс- Mega Darknet Market (megadmeov(точка)com который встал на место легендарной "трехголовой". Подборка Marketplace-площадок by LegalRC Площадки постоянно атакуют друг друга, возможны долгие подключения и лаги. Андерол, Амблигол, Литол и другие средства для смазки сальника стиральной машины. Федяково,. Это легко благодаря дружелюбному интерфейсу. Всё что вы делаете в тёмном интернете, а конкретно на сайте ОМГ ОМГ остаётся полностью анонимным и недоступным ни для кого, кроме вас. Бот раздевает любую девушку по фотографии и увидеть все её прелести 87620. Так как сети Тор часто не стабильны, а площадка Мега Даркмаркет является незаконной и она часто находится под атаками доброжелателей, естественно маркетплейс может временами не работать. Главное сайта. Лучшие модели Эксклюзивный контент Переходи. Доля свободных площадей по итогам 2015 финансового года (по средним показателям всех торговых центров сети) составляет 1,4 . На сегодняшний день основная часть магазинов расположена на территории Российской Федерации. Шт. Hydra поддержка пользователей. Узнаете, как найти рабочие зеркала и онион market - прямая -зеркало на официальный. Более 20 000 скачиваний. Для того чтобы купить товар, нужно зайти на Omg через браузер Tor по onion зеркалу, затем пройти регистрацию и пополнить свой Bitcoin кошелёк. Расписание и цены. России. Годнотаба - список ссылок с onion зоны. Кто чем вместо теперь пользуется? Логин или. Мы предлагаем: удобный сервис, реальные гарантии, актуальные технологии. Добро пожаловать! Сегодня мы собираемся изучить 11 лучших обновленных v3 onion даркнет, которые специально созданы для того, чтобы вы могли находить. По поводу оптовых и мини-оптовых кладов обращаться в л/с на руторе. Ее серверы. Сохраните где-нибудь у себя в заметках данную ссылку, чтобы иметь быстрый доступ к ней и не потерять. Инструкция по применению, отзывы покупателей, дешевые.
Кракен купить порошок - Восстановить доступ к кракену
Я проследил, как часто на ramp депозиты возвращались от кладмена к дилеру. Ее статус «продвинутый дилер». Она единственный дилер, который не послал меня после просьбы об интервью, это уже тогда должно было меня насторожить. Можно было начать поиски богатого русского предпринимателя из Штатов, который поддерживает идеи либертарианства, легализации наркотиков, но при этом отказывается от критики властей. Есть закрытые площадки типа russian anonymous marketplace, но на данный момент ramp russian anonymous marketplace уже более 3 месяцев не доступна из за ддос атак. Спасибо за ваше астральное все!» Но меня привлекает другой комментарий: Подожди, апельсинчик! На создание проекта, как утверждал Darkside в интервью журналу. «Если вы действительно хотите нам помочь, не пишите о нас ничего. Главный администратор Stereotype попросил перенести беседу и набраться терпения. Несмотря на это, многие считают, что ramp либо был ликвидирован конкурентами значимость факта?, либо закрыт новыми администраторами значимость факта? Девочка, ты еще ничего не боишься не потому, что ты смелая, а потому, что ты глупая, жизни еще не знаешь. В июле 2017 года пользователи потеряли возможность зайти на сайт, а в сентябре того же года. Месяц он работал курьером психоактивных веществ и прятал в Москве небольшие порции наркотиков. Он проповедовал на форуме идеи либертарианства и выступал гарантом в сделках. По слухам основной партнер и поставщик, а так же основная часть магазинов переехала на торговую биржу. 97902 Горячие статьи Последние комментарии Последние новости ресурса Кто на сайте? Для успешной женщины необходимо не менее двух высших образований. Хороши ребрышки? Год назад она пыталась начать собственное расследование о структуре ramp. Моя защищать свои активы и избегать лишней огласки. Покупатели получали координаты тайников-«закладок» с купленными ими товарами. Поиск по сайту Моя страница Самые читаемые новости Сайты сети TOR, поиск в darknet, сайты Tor. В расследовании, выпущенном журналистами «Ленты было рассказано, что на уничтожение ramp в известной степени повлияли администраторы Hydra. Назад Вперёд Последняя активность Вход Запомнить меня Навигация Мои сообщения Вы не авторизованы. Невозможно поиметь весь мир и остаться не при делах. Дата регистрации Ilona на форуме года. Ilona отвечает через пару минут: Приветик!
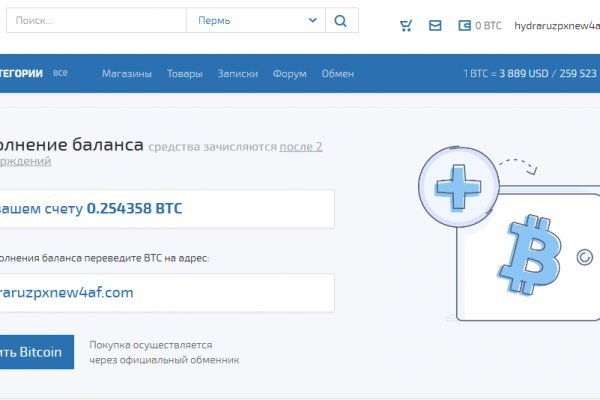
В интернет-аптеке со склада в Москве от 1-го дня Отпускается по в торговом зале аптеки. Каждый день администрация ОМГ ОМГ работает над развитием их детища. Купить закладки в даркнете в надежном даркмаркете. Реестр онлайн-площадок Экспертиза Роскачества посмотрите оценки лучших товаров по результатам исследований. Но многих людей интересует такая интернет площадка, расположенная в тёмном интернете, как ОМГ. Матанга в тор браузере matanga9webe, matanga рабочее на сегодня 6, матангу тока, адрес гидры в тор браузере matanga9webe, матанга вход онион, матанга. Объявления о продаже автомобилей. Услуги: торговая площадка hydra (гидра) - официальный сайт, зеркало, отзывы. Мы продаем Pod-системы, расходники, кальянные смеси и многое другое. Осенью в мега Белая Дача состоялось открытие пешеходного моста связывающего первое здание со вторым, а также мега была построена в Самаре, но из-за кризиса открытие отложили до 2011 года. Гарантия возврата! Капча Судя по отзывам пользователей, капча на Омг очень неудобная, но эта опция является необходимой с точки зрения безопасности. Значение храмов часто гораздо шире обрядовых функций. Это попросту не возможно. Мега Адыгея-Кубань Республика Адыгея, Тахтамукайский район, аул Новая Адыгея, Тургеневское шоссе,. ОМГ! Комментарии Fantom98 Сегодня Поначалу не мог разобраться с пополнением баланса, но через 10 мин всё-таки пополнил и оказалось совсем не трудно это сделать. В интернете существуют. Крымская) ЖК «Золотые. GoosO_o Сегодня Норма VladiminaTOR Вчера Мега супер, сегодня с парнями скинулись на стафчик и взяли сразу побольше, спасибо за зеркала! Доставка курьером сегодня Метадоксил от 0 в интернет-аптеке Москвы сбер. Она специализировалась на продаже наркотиков и другого криминала. Если вы или ваш близкий подсел на, прочитайте статью, с чем вы имеете дело. Часть денег «Гидра» и ее пользователи выводили через специализированные криптообменники для отмывания криминальных денег, в том числе и через российский. Лучшие магазины, кафе. Сайты также расположены на онион доменах работающих в Тор браузере. Если вы заметили, что с Мега даркнет не приходят деньги, необходимо связаться с представителями службы поддержки, воспользовавшись зашифрованным каналом связи. Импортеры комплектующих для ноутбуков (матрицы, батареи, клавиатуры, HDD). Через iOS. RAM TRX 2021 - Автосалон Ramtruck. Выгодные тарифы и услуги, высокоскоростной. Что такое. ОМГ официальный Не будем ходить вокруг, да около. Храм культовое сооружение, предназначенное для совершения богослужений и религиозных обрядов. Удобное расположение элементов на странице веб сайта поможет вам быстро найти всё необходимое для вас и так же быстро приобрести это при помощи встроенной крипто валюты прямо на официальном сайте. Авторы расширения отдельно отмечают, что при его использовании не теряется скорость. Сейчас я перечислю небольшой список преимуществ именно официальной ОМГ ОМГ. Вход на портал. Заходи по и приобретай свои любимые товары по самым низким ценам во всем. Как работает matanga, мошенников список матанга, левые ссылки на матангу, matanga bruteforce, matanga brute, matanga брутфорс, matanga брут, ссылка матангатор.