What can you cook from squid: quick and tasty
Sometimes they ask how to do Neodymium magnet do it yourself. Let's try to figure out, as far as possible, and what the general process of producing such products is.
So, the devices we sell consist of an alloy that is 70% iron and almost 30% boron. Only a fraction of a percent in its composition falls on the rare earth metal neodymium, natural deposits of which are extremely rare in nature. Most of them are in China, there are still only a few countries, including Russia.
Before making neodymium magnets, manufacturers create molds for them out of sand. Then the tray with molds is poured over with gas and subjected to heat treatment, due to which the sand hardens and retains its future shape on its surface. metal blank... These forms will later be filled with red-hot metal, from which, in fact, the necessary products will be obtained.
Now let's take a direct look at how a neodymium magnet is made. Unlike ferromagnetic products, the metal does not melt here, but is sintered from a powder mixture placed in an inert or vacuum environment. Then the resulting magnetoplast is pressed with a simultaneous exposure to an electromagnetic field of a certain intensity. As you can see, even at the initial stage of production, it is noticeable that the question of how to make neodymium magnets at home sounds inappropriate. Operations and equipment used are too complex. It is hardly possible to create such conditions at home.
After the workpieces are taken out of the molds, they are subjected to machining- are carefully sanded, then to improve the coercive force of the products, they are fired.
Finally, we come to the last steps, which will help to definitively answer the question of how neodymium magnets are made. The sintered NdFeB alloy is again machined with a special tool. During operation, a cooling lubricant is used to prevent overheating or ignition of the powder.
A protective coating is applied to the magnets. This is due, firstly, to the fact that the sintered metals are quite brittle and must be strengthened, and, secondly, the metal will be protected from corrosion processes and other environmental influences. So manufacturers worry in advance about how to make a neodymium magnet stronger and more durable. The coating can be copper, nickel, zinc. In the last phase of the production process, magnetization is applied by means of a strong magnetic field. Further - they go to the warehouse, and from there to customers.
So, after we examined the production process in more or less detail, it became clear that, probably, one should not seriously ask the question “how to make a neodymium magnet at home”. Indeed, this requires not only the presence of certain knowledge, but many complex units.
In this article, I want to tell you how you can make a cute fridge magnet with a photo. And not only to manufacture, but also to sell profitably.
My site was originally dedicated to sublimation printing. But this does not mean at all that you can earn money only by selling mugs, plates, puzzles and other sublimation products. There are a lot of ideas! This is thermal transfer and the manufacture of watches with a photographic portrait and the printing of various calendars and much, much more.
The first article is about magnets.
Most of all, in the manufacture of vinyl magnets, I am attracted by the simplicity (no equipment needed) and the chic price wrap. Judge for yourself - a magnet measuring 65 x 90 mm costs me less than 5 rubles. I sell it in kindergartens for 120 rubles!
There are different magnets - plastic, metal, sunset. We will be making a magnet based on magnetic vinyl. It looks like this:

In a nutshell, this is the most regular photo glued to magnetic vinyl.
Choose any photo frame and insert a photo of your child. You can draw a photo frame yourself or download it on the Internet. Don't forget about copyright only. Not all authors are allowed to make money on their frameworks and templates.
To make a magnet, we need the simplest tools:

This is a small piece of glass, a stationery knife and a metal ruler. And it's all? - you ask! Yes, that's enough to make good money. You don't even need to have your own printer. You can always order photo printing on the side. And your magnets from this will not become much more expensive. We'll count everything later.
A few words about magnetic vinyl. It is sold in rolls, usually 30 meters long. Such a roll is not only quite expensive but also very heavy. This increases shipping costs for those who order vinyl by mail or through a shipping company. Those who have a Zenon company nearby are more fortunate - they will sell at least half a meter of magnetic vinyl there. Agree, this is very convenient.
Magnetic vinyl is available in a variety of thicknesses. I recommend purchasing vinyl no thinner than 0.7 mm for making magnets. Thinner vinyl magnets look cheap and not solid.
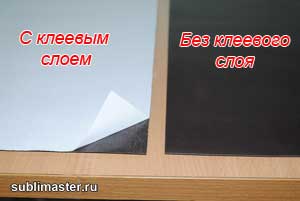
Also, magnetic vinyl comes with an adhesive layer and without an adhesive layer. With an adhesive layer, it has a protective film and, with an equal thickness, is slightly more expensive.
You just have to choose a bundle:
Adhesive Magnetic Vinyl + Plain Photo on Paper
Magnetic vinyl without glue + photo on self-adhesive photo paper.
I will use the second option. I have on hand a 0.75mm thick inkjet free vinyl from Privision.
So, let's start making our magnets.
I think finding a cute photo frame will not be difficult for you. Let's assume that you already have it. Adjust the photo frame to the size you want - mine is 65 x 90 mm. With this size, 9 magnets can be placed on an A4 sheet. Of course, you can choose absolutely any size.
You have also photographed the children. It remains to insert the photos into the frame. This can be easily done with or.
By the way, a large section will soon appear on the site about how to photograph children in kindergartens and schools and process photographs. Don't forget not to miss the announcement.
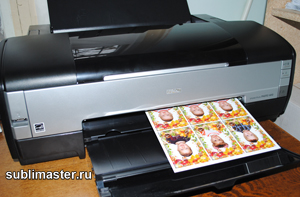
Photos are inserted, now they need to be placed on the sheet and printed. You can use Photoshop for this, but I like CorelDraw. I import one photo frame at a time and place it on A4 sheet. If you order more than one magnet, I duplicate the required number of times.

All photo frames are in place, self-adhesive photo paper is inserted into the printer. We are sending the sheet for printing! We print with ordinary water-based ink.
Now we will glue the photographic paper onto the magnetic vinyl. I preliminarily cut it into A4 sheets. More precisely, they turn out a little less - 20.5 x 29 cm. The width of a roll of magnetic vinyl is 61.5 cm. I cut it equally into three parts. And I deliberately reduce the length a little, given my size of the magnets, this is quite enough. You, too, try to calculate everything so that there is less waste.
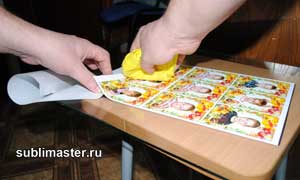
To make the photo paper lay flat on the vinyl without bubbles or wrinkles, just watch me do it and repeat.
First, turn the sheet face down and fold the backing paper about 15 mm along the short edge of the self-adhesive.
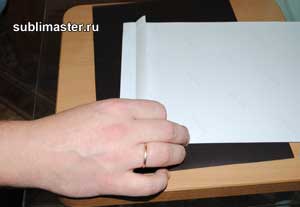
Now we turn the sheet over and, holding the edge with the folded back paper (preventing it from sticking), place the sheet evenly on the magnetic vinyl.

With the sheet in position, gently glue the edge of the sheet to the vinyl and iron it well with a dry soft cloth.
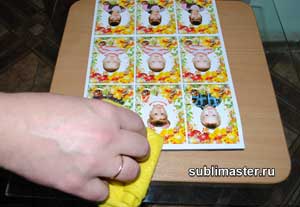
Now our sheet is securely attached to the magnetic vinyl and won't move anywhere. We place our left hand under the sheet, grab the edge of the protective paper and begin to smoothly pull to the side, exposing the glue layer, and with our right hand using a rag with progressive up and down movements, smooth the sheet against the vinyl.

So we smooth it to the end.
Set the resulting sandwich to one side for 15 to 20 minutes for the glue to set properly. The magnets can now be cut. A reciprocating cutter is ideal for this purpose, but it can be perfectly done without it.
A metal ruler and a stationery knife are what you need. To help the knife cut rather than rip the paper on the vinyl, keep the angle of the knife as close to the surface as possible.
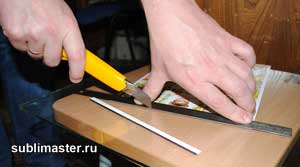
Refresh the knife blade by breaking off the blunt part. Usually I do this after cutting the next A4 sheet.
Here are the first nine magnets ready.

I put each magnet in a separate bag. I have them 75 x 120 mm. This bag costs a penny, and parents really like the individual packaging.

That's the whole process. As you can see, nothing complicated. Now let's do some math.
I bought 0.75 mm thick magnetic vinyl without glue at 310 rubles per linear meter (width 0.61 cm), which is 504 rubles for square meter or 30.3 rubles per A4 sheet (round up to 31 rubles).
I bought the self-adhesive for 100 rubles for 20 A4 sheets. So one sheet costs 5 rubles.
31 + 5 = 36 rubles.
36 rubles: 9 magnets = 4 rubles apiece!
Let me remind you that I sell them for 120 rubles. I know that some people sell similar magnets for 150 rubles.
Now a few words about quality. Water-based ink has a serious drawback - it fade rather quickly. Especially compatible ink. If your customers' refrigerator is by the window, then the magnet on its door can fade in a year. In this case, I would suggest that you print your photos in a darkroom and glue them onto vinyl with an adhesive backing. In this situation, the cost of your magnet will grow by 2 - 3 rubles, but it will not fade over the years.
Alternatively, the magnet can be covered with a thin cold laminate (laminate). This complicates the process a little, but the magnet looks great!
You can also get an inexpensive corner cutter and trim the corners of your magnets nicely.
In short, I gave you an idea. How you put it into practice is entirely up to you. Now you know how to make a magnet with a photograph. Take my word for it, such magnets are in constant demand in kindergartens and schools!
For a long time there has been a custom among travelers to bring magnets from their wanderings. Have you tried to create such a product yourself? In our article, we offer you 7 ways to create exclusive magnets.
Method one: image
Material that will be needed:
- interesting drawings (cut out a picture from magazines);
- glue;
- circle-shaped magnets with a diameter of 1.25 to 1.75 cm;
- glass circles (must match the size of the magnets).

All that needs to be done is to glue a picture to the magnet, and a glass circle on it. Glass mugs are sold at craft stores.

If a magnet shines through the picture, it will be advisable to add one more detail. Namely: prepare the mug the right size from white cardboard and glue it under the drawing.


Method two: they are alive
A DIY fridge magnet can be a living creature. To do this, you should prepare:
- magnet;
- hot glue gun;
- screwdriver
- cork plugs;
- small plants;
- some earth;

Manufacturing stages and features:
- Make a hole in the plug.
- In depth - to the middle of the plug. It is important not to damage the edges.
- Using a glue gun, glue the magnet to the cork.
- Submerge the earth in the resulting void and plant a plant.
- As a result, you got a kind of pot.

Remember to take care of the plant you planted. After all, it will grow up and ask to be moved to new house, and in the existing one you can grow a new flower.

Method three: magic clay
Making fridge magnets will not be difficult when you have the following materials at your disposal:
- magnets;
- polymer clay;
- ink;
- hot glue gun.

And these are the tools:
- Bakeware;
- rolling pin (or any other object that can be used to roll clay);
- sandpaper (you can use a nail file for a manicure);
- stamps.

To make a souvenir, you need to roll out the clay to get a sheet of approximately 5 millimeters in thickness. The pattern is applied to the material with stamps, and with the help of clay molds you need to cut out individual figures.


Method four: magnet in a bag
If scratches on your refrigerator bother you, you can easily prevent scratches by making a fabric magnet. Simple technique manufacturing will allow you to change the so-called bag as soon as you like.

All you need for such a small masterpiece is:
- magnets;
- colored patches;
- threads;
- needle;
- scissors.

First you need to create blanks for magnets from a flap. The size of the workpieces should be about 3 times the size of the magnet. The edge of the fabric must be folded and stitched so that the stitches lie as close to each other as possible. As a result, you got such a bag for yourself. Place the magnet inside, tighten the thread, tie it and cut it.

You can put a little cotton wool or foam rubber between the magnet and the fabric on the front side. Then the product will acquire volume.

Method five: wood is always in fashion


Prepare your tools:
- saw for wood;
- electric drill;
- drills to it;

Manufacturing technology is simple. It consists of the following stages:
- Saw the branch, thus creating "washers", the thickness of which is approximately equal to three centimeters.
- Sand the edges (if necessary)
- Drill a small hole about 3 cm deep in the middle of the washer.
- Glue the magnet into the hole.
- Drying time: 6 to 8 hours.

If desired, you can decorate the washers with a pattern or in another way.

Method six: ah, this is amazing Lego
To make a bright, colorful and functional souvenir, select the parts you like from the designer, prepare the required number of magnets and a hot glue gun.

The creation process is elementary: you need to glue the part to the magnet. However, there are 2 important factors to consider:
- DO NOT use magnetic tape. She is weak to hold the die. Such a magnet will not last long.
- Hot melt glue can be replaced with super glue.


It should be said that this product must dry for at least 24 hours. Such a bright magnet can be used not only by adults, but also by children.


Method seven: they also split
To create a magnet that will not only magnet, but which can be pinned, you need:
- magnetic tape;
- wooden clothespins;
- acrylic paint;
- thin brush;
- sparkles.

Now that you have everything ready, get to work. First, decorate the clothespin. Secondly, you can simply paint it with paint. Third, glue the tape on the other side. All ingenious is simple!

Photo of fridge magnets


The unique properties of some substances have always amazed people with their uniqueness. Particular attention was drawn to the ability of some metals and stones - to repel or be attracted to each other. Throughout all eras, this aroused the interest of the sages and the great surprise of ordinary people.
Starting from the 12th - 13th centuries, it began to be actively used in the production of compasses and other innovative inventions. Today you can see the prevalence and variety of magnets in all areas of our life. Every time we come across another product made of a magnet, we often ask ourselves the question: "So how are magnets made?"
Types of magnets
There are several types of magnets:
- Constant;
- Temporary;
- Electromagnet;
The difference between the first two magnets lies in their degree of magnetization and the time the field is kept inside. Depending on the composition, the magnetic field will be weaker or stronger and more resistant to external fields. An electromagnet is not a real magnet, it is just an effect of electricity that creates a magnetic field around the metal core.
Interesting fact: For the first time, research on this substance was carried out by our domestic scientist Peter Peregrin. In 1269 he published "The Book of Magnet", which described the unique properties of matter and its interaction with the outside world.
What are magnets made of?

For the production of permanent and temporary magnets, iron, neodymium, boron, cobalt, samarium, alnico and ferrites are used. They are crushed in several stages and melted, baked or pressed together until a permanent or temporary magnetic field is obtained. Depending on the type of magnets and the required characteristics, the composition and proportions of the components change.
Related materials:
How and from what is gasoline made?
Such production allows you to obtain three types of magnets:
- Pressed;
- Cast;
- Sintered;
Magnet making

Electromagnets are produced by wrapping a wire around a metal core. By changing the dimensions of the core and the length of the wire, the field power, the amount of electricity used and the size of the device change.
Component selection
Permanent and temporary magnets are produced with different field strengths and resistance to environmental influences. Before starting production, the customer determines the composition and shape of future products, depending on the place of application and the high cost of production. All components are selected to the nearest gram and sent to the first stage of production.
Smelting

The operator loads all the components of the future magnet into an electric vacuum furnace. After checking the equipment and the correct amount of material, the oven is closed. With the help of a pump, all the air is evacuated from the chamber and the melting process is started. Air is extracted from the chamber in order to prevent oxidation of iron and possible loss of field power. The molten mixture is poured into the mold on its own, and the operator waits for it to cool completely. The result is a briquette that already has magnetic properties.
Magnetic needle beds, curtain holders, all kinds of holders and organizers - and other ways to use magnets in handicrafts and everyday life.
1. Pincushion from a saucer and magnets

To make such a pincushion, you need a small ceramic, porcelain, plastic or metal saucer, a pair of magnets (the thicker the saucer, the larger and stronger magnets you need to take) and hot melt glue (option - superglue). Glue the magnets to the bottom of the saucer from the back. With the help of such a needle bed, it is convenient to store needles and pins, plus - you can easily collect scattered metal trifles from the floor.
2. Magnetic pincushion bracelet

A pin cushion bracelet with a magnet will act on the same principle as the previous version. Take a flat round magnet (you can remove any annoying one from the refrigerator door), wrap it with a cloth, as shown in the photo, make a bracelet of the required size from elastic tape and sew the needle magnet to the bracelet.
3. Concealed magnet clasp


Instead of a special magnetic clasp for a bag or cosmetic bag, you can use ordinary magnets - you need two magnets of the same shape and size. Before starting work, find out which sides are attracted to the magnets and mark the sides so as not to get confused. First, make a "pocket" of adhesive interlining or dublenine, hiding the magnet there. Then glue it from the inside out to the desired place on the part. Repeat with another magnet.
4. Fabric jewelry with magnets

A paper, fabric or thin plastic lamp shade can be decorated with a removable decor with magnets - you can always remove it or change its position to achieve a new effect. To fabric or paper decorative flower glue the magnet on the back. The second magnet will hold the flower on the lampshade. By the way, in the same way you can fix the badge on the blouse if you don't want to pierce it with a pin.
5. Magnetic pick-up for curtains

You will need a fly or cord, two magnets and two decorative elements under which you hide the magnets (these can be large beautiful buttons, fabric flowers, and so on). Glue a magnet to each end of the tape or cord with hot glue, and a decorative element on top. Pickup is ready.
6. Magnetic holder for scissors


Magnetic holder for kitchen knives scissors, metal rulers, stationery scalpels and other handicraft accessories will also help to keep in order. Glue or stick it wherever your tools are at hand, such as a wall above a table.
7. Organizer from tin cans with magnets

In such an organizer, you can store threads in skeins, ribbons and cords, small pieces of fabric, and so on. To make it, you will need several cans (if the edges are uneven, they need to be processed) and twice as many magnets. Glue a magnet to the bottom of each jar from the inside, glue the same magnets to the base that will hold the jars.
8. Organizer for beads and beads on magnets

Take a magnetic board or sheet of iron as a basis for such an organizer. Glue a magnet to the bottom of each jar. Now you can place them on the canvas in the order you want.