What can be cooked from squid: quick and tasty
This video is for all novice radio amateurs experimenters who would like to make a simple mini motor from available radio parts. Highly good way to keep your child entertained and to teach him technical knowledge. Be sure that your child will demonstrate their knowledge in physics lessons at school.
Let's assemble the simplest electric motor
Let's repeat the old school experiment. What needs to be prepared for homemade products:
Battery 2a. Enameled wire with a cross section of 0.5 mm. Magnet. Two pins, stationery tape, plasticine. Tool. First, let's make a coil. We wind it from enameled wire. We make 6-7 turns around the battery. We fix the ends of the wire with knots. Now you need to properly clean the varnish on the spool. it important point- the performance of the engine depends on the correctness of execution. We completely clean one end of insulation. The other is on the one hand. This side should line up with the bottom of the coil.
We fix the pins on the battery with tape. We check the contacts with a tester. Install the magnet. In this case, weak. Therefore, you have to raise it closer to the coil. We fix the structure on the table with plasticine. You need to position the coil correctly. When it is installed, the scraped end should touch the pin.
The principle of operation of the simplest micro motor
A magnetic field is generated in the coil. It turns out an electromagnet. The poles of the permanent magnet and the coil must be the same. That is, they have to push off. The repulsion force turns the coil. One end loses contact and the magnetic field disappears. The coil spins by inertia. Contact reappears and the cycle repeats.
If the magnets are attracted, the engine will not spin. Therefore, one of the magnets will need to be turned over.
We start the motor. We can add some practicality to this product. Attach a hypnotic coil to one end of the coil. Fascinating! You can make the famous thaumatrope with a bird in a cage.
Channel "OlO"
A more advanced homemade engine for studying electromagnetic phenomena
Video “99% DIY”. 
 We need a wine stopper. First of all, make a hole in the center. Cut out small planes on both sides. Place the knitting needle in the hole. We fix it with super glue. We wind electrical tape on the knitting needle. Place two pieces of copper wire inside the plug.
 It will be necessary to create a mini motor insulated thin copper wire... The master used a length of 5 m and a diameter of 0.4 mm. We wind in the 1st direction on the engine rotor. We remove the insulation from the terminals of the winding. We connect the wires to the contacts. We fix the winding with super glue. We give the contacts the following form. The motor rotor is ready.


Now we will make the case. This will require a wooden base and two small bars in which we make holes. Bars and glue them to the base. Install the engine rotor.
We will make mini motor brushes from two pieces of copper wire.


Why do I need two magnets. We glue on small wooden blocks. We glue the blanks on the base, leaving a minimum gap between the magnets and the winding. The electric motor is ready. Now let's move on to testing.

As you can see in the video shot, this miniature engine has a lot of backlash and does not have much power. But this is not important for such a homemade product, it is designed to study electromagnetic phenomena that are often superficial at school, without the use of special experiments. It is impossible to study a subject without visual and practical actions, especially when the question concerns electricity. Imagination is a weak helper here.
However, as you may have noticed, you can also attach some kind of drive to the motor shaft. For example, a fan will run. When you have mastered this video tutorial, you can proceed to a more advanced motor. Use bearings to reduce friction. Then the coefficient useful action a self-made device will be able to compete with industrial products of this kind.
The idea was born to make a mini fountain myself. The design of the fountain itself is a separate story, and this article will discuss how to make a pump for circulating water with your own hands. This topic is not new and has been described on the Internet more than once. I am only showing my embodiment of this design. If anyone is too lazy to do, then such pumps are sold on Aliexpress in the region of 400r (price as of February 2016).
So let's get started. A nasal drop vial was used as a body. Who cares, I will write the dimensions of some parts. So, the inner diameter of the bubble is 26.6 mm, the depth is 20 mm. A hole slightly larger than the diameter of the motor shaft is drilled in it from the back side, and a hole for water outlet (4 mm in diameter) on the side. First, a tube is attached to it on superglue, and then on hot melt, through which water will subsequently rise to the top of the fountain. Its diameter is 5 mm.
We also need a front cover. I drilled a 7 mm hole in the center. The whole body is ready.


A hole for the shaft is drilled in the base. The diameter of the base, you understand, should be less than the diameter of the body. I have about 25 mm. In fact, it is not needed at all and is only used for strength. The blades themselves can be seen in the photo. Made from the same box and cut to the diameter of the base. I glued everything with superglue.

The engine will drive the impeller. It was taken out, most likely, from some kind of toy. I don’t know its parameters, so I didn’t raise the voltage more than 5 V. The main thing is that the engine should be "quicker".

Tried another at 2500 rpm, so he raised the water column very low. Next, you need to collect everything and seal it well.

And now the tests. When powered by 3 V, the current consumption is 0.3 A in load mode (that is, immersed in water), at 5 V - 0.5 A. The height of the water column at 3 V is 45 cm (rounded down). In this mode, he was left in water for an hour.

Passed the test normally. How long it will last is good question, to which only time can answer. When powered by 5 volts, the water rises to a height of 80 cm.All this can be seen in the video.
Video clip
Separately about the noise. On land you can hear it quite well. Under water at 3 V, in complete silence, the pump noise is very slightly discernible. Behind the murmuring water, you can not hear it at all. So we can conclude that for a fountain, and for others, it is quite suitable. I was with you SssaHeKkk.
Discuss the article HOW TO MAKE A PUMP FROM A MOTOR
In this material, we present to your attention an overview of the video on making a typewriter with a motor.
So, we need:
- 3-volt motor from a cassette player;
- 3 penlight batteries;
- metal washer;
- insulating tape;
- toy car.

At the very beginning, we note that the author advises using a typewriter in which there is a mechanism that moves it forward after rolling back.
We disassemble the machine and cut out the mechanism mentioned above.

We take out the gear from the mechanism and glue it to the motor with a glue gun.


There should be another small gear on the shaft. The motor must be glued so that the large gear touches the small one.

We connect 3 batteries in series so that the minus of the middle battery is connected to the pluses of the extreme ones. You can connect the contacts using metal washers. The batteries can be connected to each other with electrical tape.

We assemble the body of the machine, not forgetting to remove the wires coming from the motor.

We connect the minus wire from the motor to the minus on the extreme battery.

Next, we take another wire and connect it to the positive contact of the second extreme battery.
We install a block of batteries on the roof of the car.

In order for the motor to work, and the machine began to move, you need to close the positive wire coming from the motor with a wire that was connected to the positive contact of the battery.
To find out what can be made from a motor, let's figure out what a motor is, how it works, and whether it is possible to make it at home. To make a motor, we need an enameled copper wire, two non-enamel pins, electrical tape, a magnet with a metallic sheen and a D-size battery. This article will help you understand, for example, how to make a machine out of a motor.
Making a coil
The hardest part of making a motor is making a coil. To do this, you need to take a wire and wind it around the battery in such a way that a tight ring is formed from the turns. There should be about fifty such loops. After that, the copper ring is carefully removed from the battery. The beginning and end of the coil, about 5-6 centimeters, should be wrapped around the ring and spread apart at an angle of 180 degrees. Then we clean sandpaper"Legs" of the coil, for removing the enamel.
Next, we take pins, electrical tape and a battery. We securely attach the pins with electrical tape to the minus and plus of the battery. We insert the prepared "legs" of the coil into the ears of the pins, so that the coil can rotate freely in the stand, but at the same time does not dangle much. And now the motor is ready.
Making a motor from a battery
Now that you know how to make a motor from a battery, you might think about where you can use it.
Many dads want to please their children and collect some kind of toy with them. It can be a car, helicopter or robot. Also toys with a motor can be made on a remote control.
Making a robot
Let's take a look at how to make a robot out of a motor. To do this, you will need some parts: two 1.5 volt motors, two batteries, two SPDT switches, three paper clips, a plastic or metal ball with a through hole, a case for batteries, wires. You can buy all these parts on the radio market, their cost will be about 400 rubles. When all the parts are purchased, then you can start making the robot.
First, we cut the wire into 6 centimeters, in total there should be 13 such wires. Next, remove the insulation of each wiring with a knife or pliers, one centimeter on both sides. Using a soldering iron, we fix three wires to the switches, and two to the motor. Now we need a battery case. It has a black and red wire on one side, and another wire needs to be soldered on the other side. Then we turn the battery holder upside down and glue the switches like the letter V. After that, we glue the two motors to the battery case. The motors must rotate forward. Now we unbend a large paper clip so that we get one wire, which we drag through the through hole of the plastic ball. This whole structure is attached to the battery holder. It is important to properly solder all the wiring, this is the most difficult and responsible process. The robot needs antennas so that it can react to the world around it and avoid obstacles. To do this, you can take two paper clips, unbend and attach them to the SPDT switches, use better with glue... It is better to protect the axles of the motors from breakdowns by wearing them in rubber. For this, insulation is suitable, it must be put on the axle. Well, a simple robot from a motor is ready. Batteries must be inserted to set the robot in motion.
If you are still wondering what to make of a motor, then we recommend that you independently and closely approach this issue: read various literature or just dream up. Use a little imagination, and you can collect an extraordinary thing! You can do this business with your child, because many children, especially boys, love to disassemble radio-controlled cars and make something interesting out of their motors. So why not join so an exciting activity? A motor can also be used to assemble a boat, a mill, and finally, a banal fan. Some craftsmen make such crafts that they even show them at exhibitions. So maybe you will get something that you can at least put on the shelf. However, it is not necessary to make plans and drawings here. A few video tutorials (of which there are a lot of them on the net) and you will quickly learn how to make simple but fun crafts. There will be something to surprise your family and friends!
Every day, creating something with your own hands is becoming more and more popular. So why not create a special thing when everything is conducive to it? At a time when women are diligently engaged in embroidery, sewing, knitting, quilling, men can only tinker, repair, improve.
What to make of a motor?
Some parts in a broken and unusable technique can be used at home. Quite often, men have a question about what can be made from a motor. In fact, there are a lot of options, the main thing is patience, the ability to work with technology and imagination.
As one of the options, you can make a great fan out of a motor. People also make cars, helicopters and other interesting things from this part. All that is needed for full-fledged work (especially for beginners) is special electronic circuits and radio parts. Of course, you cannot do this without faith in yourself and patience. It's not a fact that everything will work out the first time, but if you try, the result will delight the master for a long time.
Helicopter from a motor
Having decided on what can be made from a motor, it is worth thinking about how this thing is created. The stores sell special circuits and spare parts that will help you cope with this difficult task and figure out the little things. Sometimes it doesn't even fit in my head, from a motor, but in fact everything is very simple, you just need to pay due attention to this matter.

So, to make a solid helicopter, you need to stock up on the following materials: models with drawings, tools, a motor, glue, a power supply and a control panel. If the case is already ready, then all that remains is to place a motor in it and connect it to the control panel. After that, you need to try to start the helicopter, and then it will become clear whether it is ready for use or has some problems that need to be eliminated. In case of difficulties with connecting wires, it is better to contact knowledgeable person otherwise the parts may be damaged.
Men are often interested in what can be made from a motor, besides a helicopter. Let's consider another option.
Motor car
Making a car from a motor is very simple. This requires circuits and boards that are sold in special stores. After acquiring everything you need, you can get down to business. There are two options for making a typewriter: you can make the body yourself, or you can buy a ready-made one, which will facilitate the work of the master. By purchasing a set, a person receives car parts, wheels, wiring, spare parts, a control panel and the motor itself (if one is not available). It is worth noting that it will cost more than buying an ordinary ready-made machine, but you can also get great pleasure from the process itself.
Thus, it is quite obvious how to make a machine out of a motor - you just need to purchase a ready-made case and place the main part of the car there. Do not forget about the control panel, which must be properly connected to the toy. As a result, the person will receive homemade car, which will be cooler than any purchased one. In addition, it can be improved, repainted and decorated as your heart desires.

In addition to all of the above, the beauty of making a car from a motor is that the child will certainly appreciate all the efforts of the parent, after which he will be immensely happy. You can build a wonderful car with your children. This is a very entertaining and interesting activity. Consider what else can be done from the motor.
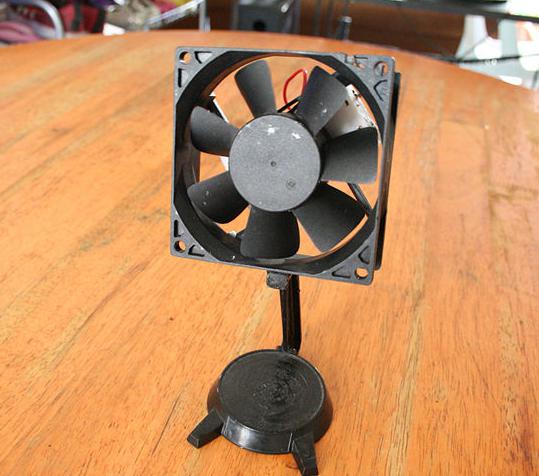
Fan
Self-made (this is what some men call themselves) are constantly trying to absorb as much new information as possible in order to make something new. It’s no surprise that they’re interested in that motor. To successfully complete this operation, you will need main detail constructions, battery, sleeve, flask and two old blanks.
First, blanks are used (cut along the radius), then gently using fire, you need to bend the blades. For the next stage of work, a champagne cork is perfect, which must be pulled over the motor shaft. After that, it is necessary to attach the blades to it and build a support for the fan. The motor and all other parts will be glued to the latter. So light and interesting way make a fan.
Conclusion
So it’s quite obvious that you can make a lot of amazing things out of a motor. The main thing is desire and patience. Also, don't be suspicious of fantasy and intuition. There is no need to be afraid to spoil the product! We advise beginners to use old unnecessary things (as is the case with a fan). Experiment, you will succeed!