What can be cooked from squid: quick and tasty
The construction of a two-, three-storey cottage requires a staircase. Without it, access to the basement, underground garage, attic will be problematic.
It is important not to forget that a ladder is difficult. engineering structure... Its design and construction cannot be carried out on a leftover basis. Placement, material, project is determined in advance. Wooden ladder on the second floor - the most beautiful option for your choice.
Private households are characterized by the use of two main types of stair climbs: marching and spiral. Marching flights - with one or more flights, separated by intermediate platforms. The most effective, but also the most expensive are the screw. It is recommended to involve specialists with relevant experience in their construction, calculation of the number and width of steps.
In this article, we will take a closer look at all the popular types of stairs, their advantages and disadvantages. But you need to start with the choice of wood:
- maple looks good, varnishing will accentuate the structure. But when bending, cracks and faults will appear on the surface;
- beech is considered one of the most durable options, but is not intended for use in conditions of high constant humidity;
- oak is both durable and beautiful. The only drawback is the high price;
- larch and pine - budget options... Approved for use subject to antiseptic treatment from rot and bugs.
How to make a wooden spiral staircase to the second floor with your own hands
If, in accordance with the plan of the house, the minimum space is allocated for the placement of interfloor transitions, the screw modification will be indispensable. It is mounted both in the center of a room, hall or corridor, and against a wall.
Types of spiral staircases
There are four main types, depending on the method of fastening the steps:
- directly to the central, supporting column, assembled from metal parts, lined with brick or stone;
- treads are placed on top of each other. Their intersection becomes the supporting column;
- with attachment to stringers or bowstrings. The center support can be omitted or used as an additional element to provide strength. Railings and bolts are used as a connecting link;
- the steps, in addition to the kosour or the central post, are attached to the wall.
The advantages of a spiral staircase
The first thing to mention is the elegant appearance... The number of design and decoration options is endless: from Gothic and wrought iron railings to hi-tech and postmodernism. There is no feeling of "heaviness", the light "transparent" construction does not distract attention, while visually "increasing" the height of the ceilings.
Do not forget about saving space. Not everyone has the opportunity to allocate half of the floor for the placement of the stairs. A modern technologies and materials allow you not to spend half the state on the organization of transitions from floor to floor.
Important points during construction
A spiral staircase is built subject to the following criteria:
- the distance between floors or intermediate platforms is at least 2 meters;
- for the manufacture of the central support, a pipe with a wall thickness of 4 mm or more is used. Column diameter - 50-60 mm or more;
- at the support, the depth of the steps is not less than 10 cm, at the railing - 40 cm. For treads in the shape of a rectangle, the optimal depth is 20 cm or more. One full revolution (3600) requires at least 12 steps up to 1 meter wide. Moving together at the same time is quite difficult, not to mention lifting or lowering furniture.
You can build a spiral staircase yourself. But calculating the number of treads, their height and turn requires special knowledge. To avoid mistakes and subsequent alterations, it is better to contact specialists, at least at the design stage. If you decide to go through all the stages on your own, listen to the following tips:
- the best material is beech or oak wood. It is distinguished by good strength, withstands decades of operation;
- there should be no sharp edges or chipping. After sanding and sanding, all wooden parts are covered with parquet varnish;
- the first baluster is not attached to the first step, but to the floor next to it for greater structural strength.
Straight wooden staircase to the second floor
One-flight flight is the simplest option for organizing movement around the house. It has both advantages and disadvantages. The advantages include:
- simplicity of design, ease of movement and a minimum of preliminary calculations. Even with a little experience, but with due diligence, the manufacture and installation of stringers can be completed in a few days;
- it is enough to make a sample of the tread and the riser, and then cut out all the details along them;
- if a space along the wall is chosen for placement, then one edge of the steps is advisable to be fixed to a brick or concrete partition to increase strength.
A drawback should also be noted. Ideally, the slope ranges from 26-450, and the staircase takes up a lot of space. You will have to decide where to place it and what to do with the space under the stairs.
Construction parameters
It is not worth neglecting the design stage even if it comes about 2-3 steps. The project helps to determine both the appearance and the total length and other technical characteristics... Regardless of the wishes of the owner regarding the design, the requirements of SNiP remain the same for all modifications of staircases:
- step height - no more than 20 cm. Both the riser and the tread are taken into account;
- depth - at least 25-30 cm;
- when calculating the width, they are guided by the dimensions doorways... The standard prescribes that a flight of stairs, designed to move one person, should not be narrower than 80 cm;
- boards are selected well dried with a thickness of at least 4 cm, without knots, cracks, and other defects that can lead to deformation. If you are ordering production of wood parts, make sure they are the same size, sanded, sanded and polished.
Why do you need a layout
Construction work begins with a plywood model. Do not give up on it if you lack experience. Better to spend a few extra days, but avoid fatal mistakes.
Exact copies of stringers, risers and treads are cut from plywood. They are assembled, "fitting" at the installation site. The sizes, ease of use, the location of the balusters under the railings are being specified. It is possible that you will have to add / reduce the number of steps, adjust the height of the lowest one.
The layout is ready, we proceed to work on the original
If you are satisfied with the plywood copy, go to work with the boards. You should not immediately install the stringers or bowstring in the place of permanent placement. The assembly is done on the floor. First, the risers are mounted, then the treads. The heads of fasteners (nails or wood screws) should not protrude above the surface.
For fastening to the floor and staircase, special mounting hinges or parts are used that are laid in the ceilings during the construction of the main building.
Upon completion of work on the steps, proceed to the installation of the railing: made of wood, metal, profile pipe. The specific option is selected taking into account the general style, wall material, floor. On each tread, experts recommend placing one baluster. The presence of crossbars is individual. It is advisable to install them if there are small children in the house, or the railings are made of metal. On wooden structure crossbars are superfluous.
Stairs with a turn of 90 degrees
If the space for placing a flight of stairs is limited or the structure turns out to be more than 10-12 steps, experts recommend making an intermediate platform with a turn of 90 or 180 degrees, mounted into the walls of the house from two or three sides.
Calculations of the number and width of treads are carried out in the same way as for a standard single-flight span with a small exception. Does the turntable consist of winder steps? They are designed like a spiral staircase. In the narrowest place, the depth is at least 10 cm, in the widest - 40 cm.
Graph paper is used to facilitate calculations. On it, in compliance with the scale, the upper and lower spans, the transition platform are drawn, the winder steps are laid. In the middle line, their depth is not less than 20 cm. Otherwise, it will be problematic to climb / descend. Are you critical of your own drawing skills? Refer to special calculation programs distributed free of charge.
If the turntable does not provide for the use of winders, a frame is prepared corresponding to the width of the flights. For fastening the platform frame, the following are used:
- one or two walls of the house;
- common stringer;
- support pillars. They are subsequently used as a base for a built-in wardrobe in the understairs space.
For reliability, it is recommended to make a rough version of plywood or waste wood. The swing ladder is a complex design. It is almost impossible to correct mistakes. On a plywood layout, it is easier to correct the number of steps or the angle of rotation if there are inaccuracies in the calculations.
Installation of stairs with a turn of 90 degrees
- kosour is attached to the wall with anchor bolts;
- support pillars are installed, if they are provided for by the project. They can be concreted into the floor and additionally reinforced with mounting loops with bolts;
- an external stringer is attached to the support pillars. At each stage, slopes are carefully checked, the presence / absence of deviations from the plan;
- on the stringers or bowstrings in the grooves, first the risers are attached, then the treads. For greater strength, it is recommended to glue all seams;
- the installation of the upper span ends with the installation of winder steps. The presence of gaps between structural parts is unacceptable;
- railings and balusters are installed last.
Wooden staircase to the second floor with your own hands with a turn of 180
In a private house, situations are not uncommon when there is no place for placing a straight flight staircase, and it is undesirable to build a spiral staircase. For example, elderly people live in the building. In this case, you should pay attention to modifications with a turn to 1800, made using one of two technologies:
- two marches "meet" on an intermediate interfloor area, the width of which is equal to the spans plus an additional gap separating them. The site can be solid (reinforced concrete slab) or wooden on supports or built into the wall. For each march, a standard calculation is performed;
- in place of the site there are winder steps that form a turn. The variant is more difficult to manufacture, but more ergonomic. When climbing / descending, you do not have to change the pace of movement. But, it must be borne in mind that the run-in treads have a trapezoidal shape. They are more difficult to navigate than standard rectangular ones.
Project development
on a sheet of graph paper, vertical and horizontal projections of the stairs are drawn in compliance with the scale;
- the steps of the upper and lower flights are marked, taking into account the requirements of SNiP in height, depth, width;
- Do the same with winders. In the simplest case, there will be four of them. But this option can be inconvenient if the site is large. Also, experts recommend making winders not only the steps directly on the site, but also some of the nearest marching ones, in order to make the movement more comfortable;
- the basis of the entire composition is a central support pillar with a section of 10 x 10 cm or more. Both the spans of the spans and the run-in steps in the narrow part are attached to it.
Installation of stairs with a turn of 180 degrees
Preparation of kosur with grooves for treads: two shorter and four long ones. The short ones reach the support pillar, the long ones reach the wall behind the transition platform. The braces of the lower span are anchored with anchor bolts to the supporting beam of the first floor floor. In the upper part - either to the post or to the wall. The braids of the upper span are attached to the ceiling, pillar and wall;
- for treads, risers (if any), a transition platform, a board with a thickness of 4 cm or more is used without knots, notches that can spoil the structure;
- all parts are cut according to a template, carefully polished. At the initial stage, risers are installed, then treads. For fixing, self-tapping screws with a flat head and glue are needed. Replacement of self-tapping screws with dowels is possible;
- transitional steps are installed. The wide edge is attached to the wall, the narrow part is attached to the support pillar;
- at the last stage, the railing is mounted. Holes are drilled in the steps. For fastening, bolts with a length of at least 10 cm or wooden studs are used. The lower (uppermost) baluster is located on the floor, even before the first step.
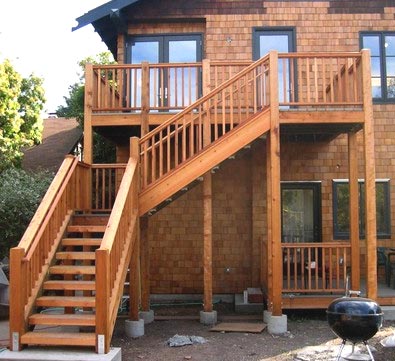
Street wooden staircase to the second floor
The construction of a wooden staircase on the street practically does not differ in technology from the process in the room. The type of structure is selected, the number of steps is calculated, the parameters of the transition platform. There are also nuances:
- wood does not like moisture. Excessive water absorption and rapid destruction can be avoided in several ways, for example, placed under a canopy. Choose wood types that are resistant to water, such as oak or larch. But at the same time, the project is significantly more expensive. You can make railings and treads from wood, and use metal or reinforced concrete for supporting structures;
- under the lower supports is equipped with a tape or. Otherwise, soil subsidence is inevitable. At the ends of the stringers, mounting loops are attached, followed by embedding in concrete. This will make the design more reliable.
How to paint a wooden staircase
The staircase is ready, the railings are installed, the steps are faced, decorative panels and strips, masking stringers and fasteners are mounted. It's time to move on to painting or varnishing.
Industry offers different variants paint and varnish solutions. Each of them deserves a separate consideration.
Alkyd paints
- dry quickly;
- the composition includes special substances with an antiseptic effect to protect against insects and putrefactive processes;
- allowed for indoor use, non-toxic, do not cause an allergic reaction;
- wide range of colors.
Acrylic paints
- drying time is minimal;
- there are no unpleasant odors;
- dyes do not change color and saturation when exposed to sunlight or artificial light;
- the color palette is able to satisfy the most sophisticated taste.
Oil paints
- minimum cost;
- the structure of the wood is not preserved during staining, the surface "does not breathe";
- with intensive use of the stairs, it will be necessary to periodically re-stain;
- dries for a long time while maintaining an unpleasant, pungent odor.
Enamel paints
- ideal for indoor work, as they dry very quickly;
- in the composition there are no toxins and elements that give a pungent odor;
- in the process of work, it is necessary to ventilate the room in a constant mode. It is advisable not to work during periods of rain or high humidity.
Lucky
- most of it is not recommended for use in outdoor conditions, as it does not withstand exposure to low temperatures;
- dry quickly;
- preserve and emphasize the structure of the tree;
- the surface is smooth (provided that at least 3 layers are applied) and shiny;
- it is better to choose alcohol-based options;
- The "yacht" modification cannot be used for interior decoration due to the high content of toxic substances and an unpleasant odor that persists for a long time.
Stain
- it is used both as an independent tool for wood processing, and as a base for paint;
- retains and emphasizes the structure of the original material, has fire retardant properties, especially in combination with layers of varnish.
Experts say that the best option for painting stairs indoors are alkyd paints. For greater effect, they are varnished on top.
Painting options
The staircase is painted in one of two ways:
- before installation. Each element is colored separately. Assembly work begins after complete drying. The main difficulty in this case is not to damage the paint or varnish layer during assembly, drilling holes;
- after installation. There are options here. If the second floor is residential, and the staircase is the only one, paint over the step. After the first "batch" has dried, proceed to the second.
If it is possible not to use the second floor yet, or an additional descent is provided, staining is carried out without gaps. This option is preferable, since there will be no different shades.
Regardless of the chosen method of staining, at least 5 hours must be added to the time indicated by the manufacturer. The direction of the strokes is along the grain of the wood.
The subtleties of staining pine stairs
Pine boards require special handling. Resin is actively released on their surface. If it is not removed before staining, the paint will lie unevenly, will not penetrate deep into the structure, and will darken in places over time. Removing the resin is a must.
For demineralization, a 25% acetone solution is used. It is applied to all surfaces, followed by wiping with a damp cloth. Apply paint or varnish after complete drying. If there is too much resin in some areas, it is recommended to cut and putty the surface for leveling.
General technology for painting a wooden staircase
- cleaning the surface from debris, construction dust, shavings;
- grinding, priming chips, cracks, scratches;
- after the soil has dried, a new sanding cycle is carried out with the removal of debris;
- Ideally, surfaces are primed again 24 hours after initial treatment. But this only applies to staining. Wood is not primed under varnish;
- paint or varnish is applied according to the manufacturer's instructions. It is not recommended to choose both too hot and rainy days for work;
- during the painting process, there should be no dripping drops on the surface;
- the varnish is applied in 3-5 layers.
When choosing a color, you need to focus on your own preferences, the style of the room, the design solution of the house. If steps or balusters of several colors are planned, then it is better to paint before the assembly process.
DIY staircase construction to the second floor difficult task but not hopeless. With a little effort, everything is done in a few days.
Sooner or later, they think about the issue of expanding the space and organizing the second floor in the building, whether it is or completing a full-fledged additional tier. In this case, you will definitely need steps leading to the upper floor, which will help to establish this item of necessity in a high-quality and safe manner.
Details and names of elements of a wooden staircase to the second floor of the house
Become the choice of many. It is not surprising, because they have an aesthetically pleasing appearance and are beneficial in terms of pricing policy.
What are the advantages
Such designs have a number of advantages that open up great opportunities for owners of private houses.
What are the disadvantages
It is worth considering the shortcomings of the material that can be encountered through negligence and with insufficient preparation.
These are the most popular negative sides wood products. Nevertheless, knowing them, you can warn yourself and get only benefit from the implementation of your plans.
How to independently draw a staircase diagram for a house
If you want to draw a diagram with your own hands, you should know some features that you should definitely pay attention to. You need to have at hand:
- Roulette;
- Felt-tip pen or chalk, with which marks will be made on the surface of the wall, floor;
- Pen or pencil;
- Paper;
- Ruler;
- Compass.
These accessories will be enough to make the necessary drawings for a wooden staircase in the house.
Step-by-step actions for drawing a drawing
When hands have reached and a person begins to draw drawings of wooden stairs to the second floor on a sheet of paper, you should proceed step by step:

Performing the actions step by step, adhering to the sequence, it will not be difficult to make a drawing of a wooden staircase.
What to look for
When making measurements, be sure to pay attention to the following factors:

Given these details, there is a possibility of drawing up the most accurate drawing of the stairs leading to the upper floor.
Outdoor wooden stairs
Of course, ladders fixed to the base of the house can be used to climb the top tier of the building. But this is unsafe and inconvenient. Therefore, if the entrance to the level of the second floor is planned to be organized not inside the space, but outside, then you should choose the most appropriate design of a wooden street staircase for your preferences.
In this case, you need to adhere to some rules, since being in an open space, a wooden staircase is very susceptible to the effects of natural factors. That's why:
Advantages
Those who have decided to place a wooden staircase on the street can note a number of advantages for themselves:

In this case, small errors are allowed, because the fact that the staircase turns out to be a little wider or longer plays a role in the house, and not outside it. Therefore, it is worth, of course, to carry out measurements, but in some indicators, the need is eliminated. For example, for the street, there is no need to measure the space from step to ceiling, which must be done in the house.
This is not a complete list of advantages, each home owner will note their own. However, along with positive sides there are also negative sides.
 Street staircase project to the second floor
 disadvantages
- Exposure to natural factors;
- Outdoor wooden stairs require careful maintenance.
Knowing the pros and cons, each home owner will be able to independently determine for himself whether to stake on the installation of stairs on the street or not.
V two-story house it is necessary to place a comfortable, safe and beautiful staircase. You can invite craftsmen or assemble from a ready-made kit, but we will tell you how to design and mount yourself.
Types of stairs - classification by shape
Stairs to the second floor in a private house differ in their shape. Several designs are used: with flights and helical. The former can be straight rotary 90 °, 180 ° or 360 °. Screws are compact, but they are inconvenient to use, especially for small children and the elderly. Marches are comfortable, but take a significant part useful area, especially straight ones. The space below them is often used as utility rooms. The easiest way to build a flight staircase.
It includes one or two flights with evenly spaced steps. Their number is 3-15, if there are more than one marches. On average, 8-11 steps are arranged on each march, with platforms between them. If there are more stairs with one flight of steps, it is also recommended to arrange platforms to increase strength. The steps are performed open or closed, with risers. Open ones are convenient when the width is insufficient.
Marching stairs can be performed with small turns, less than 90 °, and are called rotary. At a turn, instead of a platform, run-up steps are often arranged.
Ladders with bolts are popular - long rods with threaded ends. They serve to fasten the steps and fence of the structure, which is mounted in the wall. Are lightweight and aerial view, but actually very sturdy and reliable. The structure can be stretched over the entire wall, or it can be built compact. Due to the peculiarities of the mount, it is located only against the wall. It can be assembled from ready-made elements, it is better to entrust the installation to professionals.
Difficult to manufacture, but take up little space, they can be installed anywhere, even in the middle of the living room. Many people do this: the staircase is aesthetically attractive and becomes a decoration of the room. Known various designs these products, but for two-story buildings, a model with a rack and wedge-shaped steps is better suited. The rack is attached to the floor and ceiling, and steps to it in a spiral. On the side there is a handrail that repeats the screw shape of the product. The balusters are fastened to the handrails and steps.
Materials used - advantages and disadvantages
In addition to the shape, the material of the stairs plays an important role. The most affordable material with many advantages is wood. Fashion for him does not last for centuries. Wood products are durable, beautiful, decorate the house for many years. To maintain the appearance, the decorative coating should be renewed every few years. It is possible not to use paintwork, but to emphasize the structure of natural wood.
Between floors they are often arranged as a basis for fastening parts from other materials. Wood, marble, glass are used for steps. Bare metal is acceptable for the entire structure, but contact with it in a cool room is unpleasant. Metal stairs with glass railings look beautiful - light and airy. Glass and metal go well with wooden details from beech, teak, maple, cedar.
A new word in the manufacture of stairs is the use of special impact-resistant glass. It can withstand heavy loads and is completely safe to use. The design with a glass staircase only wins with its grace and elegance. It is very effective to use neon bulbs for illumination.

We select materials in accordance with the chosen interior style. Metal is suitable for classic minimalism and baroque. Modern and scandinavian styles prefer glass. Concrete and marble are typical for the loft and eclectic style. Concrete is extremely durable, experts make amazing things of incredible beauty out of it.
Product features - what parts does the staircase consist of?
A lot of details are included in the design of the staircase. Some of them are necessarily present in all products, others are specific, used only in some types. Even the simplest interfloor structure is not complete without supports and steps. The step has two parts: one of them is horizontal, the other is vertical. The horizontal one is called the step, the vertical one is the riser. The risers play the role of support for the step, but in some cases they do without them.
Marches from a number of steps are installed on supports. Two types of them are used: bowstring and kosour - beams, differing in location. The bowstring is placed so that it attaches the steps from the end, and supports the stringer from below. The supports are made of thick material: 50–70 mm. The kosoura have the shape of a file, the steps are placed on the horizontal platform, and the steps are placed on the vertical platform. There can be one central, when the steps rest on the wall, or two. The grooves in the bowstrings for the act and the riser are cut according to the template. The beams are pulled together with wooden or metal straps.

Stairs almost always have railings, although they are not required. But for the elderly, they are simply necessary. The railings are complemented with balusters - vertical supports between them and the steps. They are often not just a functional element, but play a role decorative decoration... They are made from various materials, different shapes. If there are small children in the house, balusters must be installed to protect them from an accidental fall.
For individual structures, details that are characteristic only of them are used. Spiral staircases cannot do without a rack. It runs from steel pipe or wooden, serves as the basis for the entire product. On some models, bolts are used to attach steps to the wall - special threaded pins.
Preparation for design - choice of type, fastening, dimensions
When starting production, they first decide which type of product is best to use, taking into account the existing conditions. For a private house, staircase options are possible:
- 1. Straight lines - easy to calculate and install, easy to use. Requires a lot of space.
- 2. Rotary with two or three flights and platforms between them. Turning the stairs 90, 180 or 360 degrees saves space.
- 3. Swivel winders - similar to the previous version. The role of the platforms is played by steps, up to 2 m 2 of area are additionally saved.
- 4. Screw - very compact, but not very convenient for use. Recommended for rooms with a small area.
We continue construction by choosing fasteners:
- bolts - mounted on the wall, the design is elegant, but withstands significant loads;
- rack - used in spiral or rotary structures as an additional mount;
- bowstring - the steps are installed in the internal grooves of the beam, the ends are closed;
- kosour - the upper part of the beam has a figured profile for supporting the steps on it, the ends are open.

- the height of the opening between the finishing floors of the first and second floors;
- the width of the opening, which, in addition to rectangular, can be round, oval, which is determined by the version of the product;
- height from the ground floor to the ceiling.
Calculations - building codes and formulas
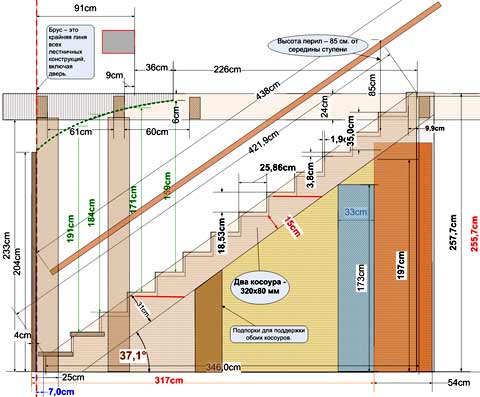
Let's show, using the example of a flight staircase, how to design a product. In order not to make mistakes, you should familiarize yourself with the building codes for the construction of stairs. They are developed by many years of practice and guarantee the safety and ease of use of the product. The main norms that should be adhered to when performing all calculations in the future:
- the slope of the marches is not more than 45 °;
- in width not less than 90 cm;
- the height of the steps does not exceed 20 cm, the depth is at least 25 cm;
- the sizes of all steps are the same;
- fencing with a minimum height of 90 cm;
- the location of balusters in a house with small children in 10-12 cm.
In rotary structures, the dimensions of the intermarch platforms are at least 75 cm, and the run-in steps, if used instead of platforms, are at least 20 cm wide.
Further work on the project continues on paper. We draw a plan of the first floor with an indication of all dimensions. On it we mark various ledges, niches, windows, doors, communications. When designing, we try not to overlap with supporting structures. We indicate the place of the beginning of the march on the first floor and the exit to the second. We try to put down as many dimensions as possible, which will facilitate further installation of the product.
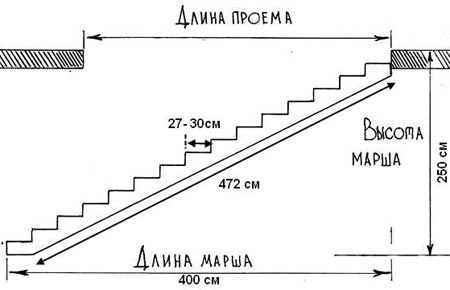
Then we work with the measurements that we made earlier. We calculate the number of steps: the height of the opening (the distance between the floors of the first and second floors) is divided by the height of one supeni. Example: an opening of 290 cm, a step of 18 cm. Dividing it, we get 16 steps.

We find out the length of the product: the number of treads (we have 16) is multiplied by their optimal depth - 25 cm. As a result, we get 4 meters. The length is such that in a small room there may not be enough space. If divided into 2 marches of 8 steps, you will need, taking into account the minimum size of the site 75 cm, almost half the area.
Finally, we find out the length of the supports, it does not matter if it is for stringers or bowstrings. We apply the Pythagorean theorem: c 2 = a 2 b 2. In this case, a is the length of the product (4 m), b is the opening (2.9 m). It is required to find out c - the length of the supports. We add squares a and b: 16 8.41 = 24.41. We take the square root of 24, 41, we get 4, 94 m - this is the required length of one support. If you do 2 marches, the length will be 3.5 m.
All calculations are applied to the drawing.
A simple solution is a straight flight staircase on kosoura
It is easier to mount on your own on kosoura with one straight march. True, at the base, its length will be at least 4 meters, and the span will exceed five. But if the size of the room allows, it will become a decoration of the house. The calculations of the product are given above, we will tell you how to make parts and assemble the structure with your own hands.
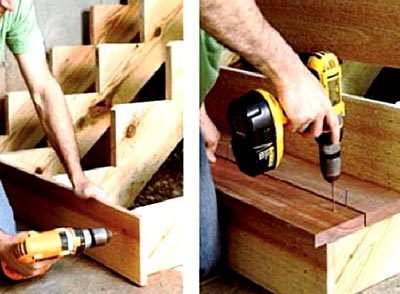
For kosour we take a dry workpiece from a hardwood board. We draw a template on cardboard or thin plywood, taking into account the shape of the protrusion and the angle of inclination. We attach it to the beam and cut the mount. At the ends of the stringers, we cut out the fastening grooves to the upper floor beam and the lower beam. We process the grooves sandpaper to remove burrs. In the prepared place on the floor, we fasten the support beam to the anchor bolts. For fastening stringers to ceiling beam you can install anchors on it or simply join by cutting.

For the manufacture of the act, we use a dry board with a thickness of 35 mm or more after processing, 20 mm is enough for the steps. The risers can be installed not along the edge of the act, but by deepening a little, then a wider board should not be cut. Alternatively, it is possible not to use risers, the design will be easier. We choose the length of the parts taking into account the width of the march plus the railing. We cut the edges on the actions, we grind the workpieces. First, the riser is attached to the kosoura, then the deed. We use wood glue and self-tapping screws. The glue is needed so that the ladder does not creak when walking.
We are starting to manufacture the railings. They consist of handrails and balusters. For balusters, we use square bars, if possible, we grind on lathe or buy beautiful carvings. They are installed on steps, usually one baluster each. We fix it with self-tapping screws, the caps of which are closed with decorative plugs.

The assembly is over, it was started to apply paints and varnishes, which at the same time protect the tree from moisture and perform decorative functions. Preliminarily, we grind the assembled product again, removing the smallest burrs, scuffs. For painting we use paint, varnish or a protective colorless composition, tinting agent. We choose paint, varnish such that they do not have the properties of creating a smooth surface. It is easy to get injured on slippery steps.
Spiral staircase - turnkey solution with drawings
Spiral staircase for self-made should be different simple installation and be safe. The width of the steps plays a decisive role in injury prevention. They are cross-linked in spiral structures, there are no intermediate platforms. There are several ways of fastening: on walls, on stringers, on bolts. They are quite complex for calculations and installation. The best and most reliable way to do your home is to mount it to a pole.
The structure is made of wood or metal. Wood product, varnished, looks very beautiful, gives comfort. Any hard wood can be used. For handrails, it is better to use a combination of wood and metal. For the steps, in addition to wood, metal, artificial marble, and glass are also used. Perfect for the rack metal pipe... The steps are attached to it with couplings, bolts or welding, depending on the material of the steps. Brick, concrete, wood are also used for the central post. The main thing is that it can withstand the load.
It should be observed to be comfortable and safe. One of the most important is the distance between the step on which a person stands and the one above his head. In order not to hurt your head, it should be 2 meters. The width of the staircase is chosen at least 90 cm; for dimensions of more than 1.5 m, the installation of a stringer will be required along the edge. The staircase opening should be 10 cm wider than the diameter of the stairs at each edge, so as not to scratch your hands, using the railing when you exit to the second floor. Below are the drawings for calculating the spiral staircase

The best type of spiral staircase is with a metal center support made of a pipe with a diameter of 50 mm. Your attention step-by-step instruction for its manufacture:
- 1. Install the support vertically, checking with a plumb line and level. TO wooden floor fasten with bolts, using fasteners, pour in concrete. Fastening in this way will ensure the reliability of the entire product.
- 2. We take another pipe of a slightly larger diameter in order to cut sleeves from it. We cut them perpendicularly with a height of 23–26 cm. The sleeves should be tightly placed on the rack. If it was not possible to select a pipe of the required diameter for the sleeve, you can weld on the rings for sealing.
- 3. Then we start making the steps. They must be the same. To achieve this, we make a jig from chipboard and a pipe equal in diameter to the sleeve.
- 4. Laying shaped tube into the conductor and connect by welding - the base for the site has come out. Then we connect all bases with sleeves by welding at the same distance from their edge. To maintain the distance, we use a conductor.
- 5. Weld a bracket equal in height to the distance between adjacent steps to the lower part of the base from the front. You can make and weld risers, which is somewhat more complicated.
- 6. String the sleeves with metal pads on the rack, fan them out. We weld the bracket from the upper step to the lower one.
- 7. We weld the sleeves together, install the railings with balusters. The fastening method depends on the material from which they are made. It is possible to use metal, wood, plastic or their combination.
- 8. After collecting all the elements, we clean the welding seams, cover the entire structure with nitro enamel. We cover the wooden parts with paint, if the texture is rich - with a colorless varnish or tinting agent.
Interfloor staircases for a person with elementary construction experience are easy to create, and the pleasure of the result will be great.
The popularity of wood in construction has many explanations; it is an environmentally friendly material with high performance. Building a wooden staircase with your own hands will take time and some knowledge.
There are many types of stairs, consider the installation of the most popular and demanded marching structure.
Preparatory work
Marching stairs are divided into two main types: one-flight and two-flight. These two structures can be assembled without the involvement of specialists.

Before construction, you need to decide on the following indicators:
- Height between floor slabs;
- What is the free area for installing the structure;
- What is the maximum load the ladder will be designed for;
- The type of railings and steps, as well as their width.
Tools and material
During the construction of the stairs, coniferous wood is used, due to its low cost and easy processing.
Required material
- Boards of the required dimensions are purchased according to the design of the staircase;
- Beam for steps more than 40 mm thick;
- Beam for stringers 5x25 cm;
- Beams for risers over 30 mm;
- Beams for treads over 30 mm;
- Handrails, balusters, railings;
- Self-tapping screws, screws and anchor bolts.
Necessary building tool
- Pencil, ruler, tape measure;
- Electric drill;
- Hacksaw for wood and metal;
- Hammer;
- Screwdriver;
- Plane and chisel;
- Sandpaper with different grain sizes.
Main construction details
The most significant element of a wooden staircase is a kosour, since almost all the load occurs on it. A bowstring can replace a stringer.

As wooden beams the steps are presented. Their design consists of a step and a tread, the shape of the steps can be different: rotary, rectangular or radius.
Balusters are used for fencing, the shapes can also be varied, everything will depend on the preferences of the owner.
Calculations of parts of a marching wooden staircase
At the first stage, a project is drawn and calculated required material... Designing is the most difficult and time-consuming technological process which can be divided into the following steps:

- Here you need to measure the height of the stairs, for this you will need to add the width of the interfloor overlap to the height of the ceilings;
- It is calculated what the height of the steps and the total number of steps will be. To calculate the steps, the total height of the structure is divided by the height of the steps;
- The most common and convenient tread width distance is considered to be 30 cm;
- For convenient operation, and so that furniture can be moved, it is recommended to choose a staircase width of 1.2 m;
- The length of the structure is calculated by multiplying the number of steps by the width of the tread;
- At self-installation an important size is the clearance height, the indicator should be at least 1.95 m;
- The length of the stringer is calculated by the formula: length of the structure x 2 + height x 2.
DIY wooden staircase installation
Step-by-step instructions for installing a wooden staircase with your own hands:

The assembly of the wooden staircase with your own hands is completed, all that remains to be done is to treat the tree with impregnations from insects and environmental influences, and then you can paint the structure.
Design features of a staircase with a turn
There are three types of staircase construction with a turn:
- Circular stairs are installed near the load-bearing wall, the rotation angle is 360 degrees. This type is not suitable for marching stairs, since the structure takes up a lot of space, and the height of the second floor will not allow installation, but it is ideal for the screw type;
- Wooden quarter-turn stairs are installed in the corner of the room, the angle of rotation will be 90 degrees;
- Semi-revolving structures are installed near the load-bearing partitions, the angle of rotation is 180 degrees.
The most common design of a staircase with a turn is presented in the form of 2 flights and several steps at the point of the turn. The middle stage of the turn in most cases serves as a sticking point.
To increase the comfort of movement along the wedge-shaped steps, special calculations are required for broadening in proportion to the winder steps due to the area of the straight lines. The design of the swing ladder will be complicated, but will significantly increase the comfort of descending and ascending steps. To build such a wooden staircase to the second floor with your own hands, you will need some experience and knowledge of installation technology, it is better to entrust this work to specialists.
Today we will consider making a staircase to the second floor with our own hands. A true master of his craft, Sergey Ermakov, shares his design experience. His professional approach to work and attention to detail deserve deep respect.
The story will focus on the construction of a staircase that has 2 marches (2 continuous rows of steps) and a platform between them.
How to make a staircase to the second floor
The construction of the stairs is carried out in several stages: first, the platform is mounted between the marches, then the main pillar is installed, then the lower and upper parts with steps follow in sequence, and the railing is installed at the end.
Installation of the platform between marches
It is necessary to start making the stairs with the marking of the site, it must be strictly horizontal. To do this, using a level (at the height where the site will be), the horizon is marked on the wall:

It is advisable to choose the height of the platform in such a way that both flights of the stairs are the same, in this case, it will be convenient to climb the stairs.
According to the selected level (strictly horizontally), the bars are attached to the wall with large screws:

In this case, the holes for the screws must be drilled so that the screw enters the bar with effort, and then only screw it up, otherwise the screw will not pull the bar to the wall properly.
The screws, of course, cannot be a reliable support for the entire structure, therefore, it is necessary to fix vertical supports on all sides under the horizontal bars:

The main bearing pillar is made of 100x100 mm or 100x150 mm timber. A groove is cut out in it, and horizontal bars are attached to it with screws:

There are supports in all corners so that the load does not fall on the screws, but is transmitted directly to the floor:

When making a platform (and, in principle, when making the entire staircase), you need to use a square and a level more often, checking the corners and the horizon. If this is not done, the skew will accumulate, and in the future there will be a lot of all sorts of difficulties:


The accuracy is controlled by the bubble at the level:

From above, the fabricated frame is covered with a floorboard:

To fix the boards, you need to drill through holes in the trim and then screw in the screws from below:


In general, the use of glue will prevent the stairs from squeaking in the future, as is often the case. Waterproof wood glue "Titebond ll" is perfect for these purposes.
Installing the main post
To install a large pillar, you need to make a nest for it on the site:

The very technology of installing the pillar is quite tricky. We need to jack up the ceiling a little using a long lever (horizontal board) and a vertical board next to our post. Next, install our pillar, remove the vertical board, and, thus, our pillar will be clamped (by the spacer) between the ceiling and the platform:

The upper and lower parts of the pillar (the places of adhesion to the platform and the ceiling) also need to be coated with glue.
Installing the bottom of the ladder
Next, you need to go to the installation of the bottom of the ladder, starting with the bowstring. The bowstring is the visible part of the staircase and must be curved, smooth, white, free of knots and blues. To prevent the staircase from being skewed, the boards intended for the bowstring must be of the same width:

This is achieved by slicing them together. It is necessary to fold two planks and scrape them with an electric plane.
In order to determine the angle of inclination of the upper flight of the stairs, a straight long rail is taken. That is, this is how the bowstring of the upper march will be located:

At one end, the upper flight will stand on the site, and the other will rest on the wall. Thus, it is possible to roughly determine the angle between the horizon and the slope of the upper march, and fix it using such a simple tool: a wooden square with a lamb for fixing the angle:

This corner is very useful for marking the bowstring of the lower flight of the stairs, so that this flight is the same angle as the upper one!
So, the bowstring of the lower part of the ladder must be set at the same angle:

After marking and cutting out, you should get such a parallel abutment to the floor:

and the right angle of abutment to the site:

After making sure that the cuts are made correctly and the bowstring fits well both to the floor and to the platform, you need to prepare a second bowstring with the same cuts in the same way.
Further, on both bowstrings is marked symmetrical pattern, indicating the installation sites of future steps and risers. So far, this is only a markup, but it must be done carefully enough, since soon all this will need to be hollowed out. If a symmetrical pattern does not work, then something went wrong, and you need to repeat the operation until complete symmetry is achieved:


Then, using a circular saw, according to a previously made drawing, cuts are made: those that are accurate from the edges, and any in the middle. This is done so that later the tree would be easier to select with a chisel:

Thus, after the passage of one and the other aunt, we get the following sample for the installation of steps and risers:

After all the steps are prepared in size, you need to lay both bowstrings on the floor, and install the steps in the formed grooves. The ends of the steps are also coated with glue and fixed obliquely from below with screws:


When the steps are installed, the risers are inserted:

The joints of the risers to the steps are also coated with glue. The glue should be applied sparsely so that it does not squeeze out when closed. wooden surfaces- this will interfere with further staining the stairs (stains will appear in the place of the squeezed out glue).

The made lower flight of the stairs is attached to the platform and screwed with screws from the back side:

Then it is better to cover the surface of the new steps with hardboard so that you can walk freely on them and continue construction works, because otherwise the steps may wear out enough over the entire time and they will have to be sanded before being coated with a stain or varnish.
Installing the top of the ladder
Making a bowstring for the upper span is done in much the same way as for the lower span. The bowstring is installed with one end on the platform, and with the other on the floor of the second floor. A small stock is released on both sides:


It is checked again with the help of the tool the angle of inclination of the aunt. The upper bowstring should be at the same angle as the lower one:

On the upper span, the steps are best inserted in place when both bowstrings are already in place. You can, of course, carry out the assembly on the floor, but the ladder becomes very heavy and it will simply not be possible to lift it:

Railing installation
Now it's time to install a post to the bowstring of the lower span, on which the railing will be held on one side. The post is placed on the floor, adjacent to the string. Using a pencil, you need to outline the edges for cutting a groove:

After sampling, we get such a groove with a depth of about 1.5 cm.Here, three holes for the screws are immediately drilled:

The groove, part of the bowstring, and the base of the floor, where the post will stand, are also coated with glue. The pillar is pressed tightly to the floor and to the bowstring and pressed, while you can lightly tap with a mallet:

On the second floor, the post is installed in much the same way. A groove is made using a chisel, the excess is selected, holes for screws are drilled. The resulting groove and the upper part of the bowstring are also coated with glue:


Here you can see the construction of 2 pillars - everything is correct. Both pillars will support the top of the railing. From one pillar, the railing runs horizontally (at the top of the second floor). From the second pillar, the railing goes down, parallel to the bowstring.
To fix the railing on a semicircular post, you need to cut out the following piece using an electric jigsaw:

This corner of the part is cut off along the same square along which the steps were installed:

In order for one of the parts of the part to fit snugly against the round post, a semicircular groove is selected in it. First, the selection is carried out using a chisel, and then it is sanded with a machine to a semicircle:

We fix the part to the post with screws and apply the railing on top, not forgetting to pre-lubricate all joints with glue:

Before installing the balusters, you need to place them at the same distance from each other and mark the installation locations with a pencil:

It is advisable to drill holes in the balusters a little obliquely and screw the screws with a slight recession of the screw heads:

On the upper side of the baluster is also fixed:

Finally, a small space above the screw heads is closed with dowels, which are rubbed with sandpaper.
On the upper part of the bowstring, balusters are installed in almost the same way and at the same distance between themselves:

As a result, the staircase looks like this, and it only remains to paint it:

This is where our long story ends. I would like to thank the master once again for such a cool staircase, which he made with his own hands right in front of our eyes.