What can be cooked from squid: quick and tasty
The road and path network serves as a direction of the path, while connecting the zones of the site, and also serves as additional drainage for the entire site.
When creating tracks and pads, the following points should be considered:
Paths and platforms must be safe at any time of the year, in all weather conditions;
- the width must be at least 60 cm;
- the type of paving depends on their purpose;
- drainage must be organized from the road surface;
- the back side of the paving must have a side stop;
- the construction of the road and path network must be carried out in accordance with the developed project and in compliance with general construction norms and rules.
Paths and platforms may not have a hard and hard surface.
Paths and platforms have a non-rigid surface, in which the finish coating is made of bulk materials. Such materials include: crushed stone fr. 5-20 mm, screening, stone and granite chips, pebbles, decorative chips. Paths and areas with a non-rigid surface require constant repair and personal care. They are made mainly in forest areas, parks, squares, playgrounds, in areas of an ornamental garden.
Rigid pavement has paths and platforms made of natural or artificial stone, concrete, asphalt concrete, crumb rubber, paving slabs, wooden flooring. Such tracks are more practical in operation, require less self-care, are more durable, but at the same time, there are some peculiarities in the care and maintenance.
All tracks and platforms must have a longitudinal and transverse profile. It serves for the natural flow of water. The profile of the track should be convex in relation to the soil surface. Paths and landings can be two-profile (with a raised middle and slopes to the right and left) or single-profile (with a slope to one side, when one edge is higher than the other). The longitudinal and transverse slope should be 1 cm by 1 m, it is allowed to use the minimum slopes, which are 0.5 cm by 1 m.
Work on the arrangement of paths and sites can be divided into 2 stages: preparation of the base and installation of the topcoat. Preparation of the base includes sampling of soil to a solid base, if the sample needs to be made more than the height of the projected pie, then in this case it is necessary to increase the backfill layer over the sand. Geotextiles are laid at the bottom of the trough, then a sand-crushed stone pillow is made, with a layer-by-layer compaction with a vibrating plate. The height of the sand-crushed stone cushion depends on the type of soil on the site and the purpose of the track or site. At the same time, the width of the trough and sand-crushed stone cushion should be 10 cm larger on each side than the finishing coat.
The device of the finishing coating includes backfilling of bulk material on paths with a non-hard surface and laying of stone, tiles, concrete and other materials intended for a hard surface.
All paths and playgrounds are divided according to their functional purpose: pedestrian, automobile, sports and children's. They differ from each other in the main purpose, the degree of load, the thickness of the cake, as well as the topcoat. The production technologies for the construction of pedestrian, sports and playgrounds are the same.
Arrangement of pedestrian paths and playgrounds
Production technology for the construction of pedestrian paths and areas made of bulk materials:
1. Breakdown of the territory.
11. Compaction with a vibrating plate m = 220 kg or a manual rammer
12. Arrangement of a finishing layer of bulk material - 5-10 cm.
13. Compaction with a vibrating plate m = 220 kg or a rammer.
Technology for the production of work on the arrangement of footpaths and sites from paving slabs or paving stones:
1. Breakdown of the territory.
2. Beating of vertical marks.
3. Excavation to a solid base.
4. Compaction of the base with a vibrating plate m = 220 kg or a manual rammer.
5. Laying of geotextiles with a density of 120 g / m2.
6. Arrangement of a sandy base (coarse-grained alluvial sand) -20 cm.
7. Compaction with a vibrating plate m = 220 kg or a manual rammer.
8. Arrangement of crushed stone base (granite crushed stone fr. 20-40 mm) - 15 cm.
9. Compaction with a vibrating plate m = 220 kg or a manual rammer.
10. Razlintsovka crushed stone (screening or crushed granite fr. 2-5 mm) - 5 cm (as a layer in the thickness of the cake is not taken into account).
13. Arrangement of a cement-sand layer - 3-7 cm.
14. Laying paving slabs or paving stones (tiles or paving stones 4-8 cm thick).
The technology for the production of works on the arrangement of footpaths and platforms made of granite paving stones or clinker bricks:
1. Breakdown of the territory.
2. Beating of vertical marks.
3. Excavation to a solid base.
4. Compaction of the base with a vibrating plate m = 220 kg or a manual rammer.
5. Laying of geotextiles with a density of 120 g / m2.
6. Arrangement of a sandy base (coarse-grained alluvial sand) -20 cm.
7. Compaction with a vibrating plate m = 220 kg or a manual rammer.
8. Arrangement of crushed stone base (granite crushed stone fr. 20-40 mm) - 15 cm.
9. Compaction with a vibrating plate m = 220 kg or a manual rammer.
10. Razlintsovka crushed stone (screening or crushed granite fr. 2-5 mm) - 5 cm (as a layer in the thickness of the cake is not taken into account).
11. Compaction with a vibrating plate m = 220 kg or a manual rammer.
13. Laying clinker bricks or granite paving stones ( clinker brick or granite paving stones - thickness 4-8 cm).
15. Grinding of seams with sand (coarse-grained alluvial sand).
The technology for the production of work on the arrangement of footpaths and sites made of natural or artificial stone for mortar:
1. Breakdown of the territory.
2. Beating of vertical marks.
3. Excavation to a solid base.
4. Compaction of the base with a vibrating plate m = 220 kg or a manual rammer.
5. Laying of geotextiles with a density of 120 g / m2.
6. Arrangement of a sandy base (coarse-grained alluvial sand) -20 cm.
7. Compaction with a vibrating plate m = 220 kg or a manual rammer.
8. Arrangement of crushed stone base (granite crushed stone fr. 20-40 mm) - 15 cm.
9. Compaction with a vibrating plate m = 220 kg or a manual rammer.
10. Razlintsovka crushed stone (screening or crushed granite fr. 2-5 mm) - 5 cm (as a layer in the thickness of the cake is not taken into account).
11. Compaction with a vibrating plate m = 220 kg or a manual rammer.
12. Preparation of mortar (cement M400, coarse-grained alluvial sand, water in a ratio of 1: 3: 1-1.5, depending on the moisture content of the sand).
13. Laying natural or artificial stone on the mortar (stone thickness 4 cm - 10 cm).
Production technology for the construction of step-by-step pedestrian paths and sites from cobblestone cuts and concrete slabs:
1. Breakdown of the territory.
2. Beating of vertical marks.
3. Laying out slabs or cobblestone cuts.
4. Spot excavation to a solid base (for each saw cut or slab separately).
5. Compaction of the base with a vibrating plate m = 220 kg or a manual rammer.
6. Laying of geotextiles with a density of 120 g / m2.
7. Arrangement of a sandy base (coarse-grained alluvial sand) -15 cm.
8. Compaction with a vibrating plate m = 220 kg or a manual rammer.
9. Arrangement of crushed stone base (granite crushed stone fr. 20-40 mm) - 15 cm.
10. Compaction with a vibrating plate m = 220 kg or a manual rammer.
11. Razlintsovka crushed stone by screening or sand (screening granite, sand alluvial coarse) - 5 cm (as a layer in the thickness of the cake is not taken into account).
12. Laying cobblestone cuts or concrete slabs.
13. Arrangement of the lawn in the seams between the slabs.
Production technology for the construction of step-by-step footpaths and platforms made of Indian sandstone and concrete slabs for mortar:
1. Breakdown of the territory.
2. Beating of vertical marks.
3. Excavation to a solid base.
4. Compaction of the base with a vibrating plate m = 220 kg or a manual rammer.
5. Laying of geotextiles with a density of 120 g / m2.
6. Arrangement of a sandy base (coarse-grained alluvial sand) -15 cm.
7. Compaction with a vibrating plate m = 220 kg or a manual rammer.
8. Arrangement of crushed stone base (granite crushed stone fr. 20-40 mm) - 15 cm.
9. Compaction with a vibrating plate m = 220 kg or a manual rammer.
10. Preparation of mortar (cement M400, coarse-grained alluvial sand, water in a ratio of 1: 3: 1-1.5, depending on the moisture content of the sand).
11. Laying Indian sandstone or concrete slabs for mortar.
12. Sampling of crushed stone from the seams between sandstone and slabs - 10-12 cm.
13. Backfilling of fertile soil into the seams of the track or platform - 10-12 cm.
14. Compaction of fertile soil using a manual rammer.
15. Mixing seeds of lawn grasses with fertile soil in a 1: 1 ratio.
16. Backfilling of seeds with soil into the seams of the track bed - 1 cm.
17. Seed compaction with soil by hand tamping.
18. Watering.
Production technology for the construction of pedestrian paths and platforms made of rubber crumb:
1. Breakdown of the territory.
2. Beating of vertical marks.
3. Excavation to a solid base.
4. Compaction of the base with a vibrating plate m = 220 kg or a manual rammer.
5. Laying of geotextiles with a density of 120 g / m2.
6. Arrangement of a sandy base (coarse-grained alluvial sand) -20 cm.
7. Compaction with a vibrating plate m = 220 kg or a manual rammer.
8. Arrangement of crushed stone base (granite crushed stone fr. 20-40 mm) - 15 cm.
9. Compaction with a vibrating plate m = 220 kg or a manual rammer.
10. Razlintsovka crushed stone layer (granite screening) - 5 cm (as a layer in the thickness of the cake is not taken into account).
11. Compaction with a vibrating plate m = 220 kg or a manual rammer.
12. The device of the finishing layer of rubber crumb - 3-5 cm.
Arrangement of automobile tracks and platforms.
Production technology for the construction of paths and platforms for cars weighing up to 1.5 tons from bulk materials:
1. Breakdown of the territory.
2. Beating of vertical marks.
3. Excavation to a solid base.
7. Compaction with a vibrating plate m = 220 kg or a manual rammer.
10. Razlintsovka crushed stone (screening or crushed granite fr. 2-5 mm) - 5 cm (as a layer in the thickness of the cake is not taken into account).
12. Arrangement of the finishing layer from the dropout - 5-10 cm.
13. Compaction with a vibrating plate m = 320 kg.
Production technology for the construction of paths and areas for cars weighing up to 1.5 tons from paving slabs or paving stones:
1. Breakdown of the territory.
2. Beating of vertical marks.
3. Excavation to a solid base.
4. Sealing the base with a vibrating plate m = 320 kg.
5. Laying of geotextiles with a density of 160 g / m2.
6. Arrangement of a sandy base (coarse-grained alluvial sand) -30 cm.
9. Compaction with a vibrating plate m = 320 kg.
10. Razlintsovka crushed stone (screening or crushed granite fr. 2-5 mm) - 5 cm (as a layer in the thickness of the cake is not taken into account).
11. Compaction with a vibrating plate m = 320 kg or a manual rammer.
12. Preparation of a cement-sand mixture (coarse-grained alluvial sand, cement M400, in a ratio of 1: 4).
13. Arrangement of a cement-sand layer or a layer from the screenings - 5-7 cm.
14. Laying paving slabs or paving stones (tiles or paving stones 8-10 cm thick).
15. Compaction with a vibrating plate m = 20 kg.
16. Flushing of joints with sand or DSP (coarse-grained alluvial sand, cement M 400).
Production technology for the construction of paths and platforms for cars weighing up to 1.5 tons from granite paving stones or clinker bricks:
1. Breakdown of the territory.
2. Beating of vertical marks.
3. Excavation to a solid base.
4. Sealing the base with a vibrating plate m = 320 kg.
5. Laying of geotextiles with a density of 160 g / m2.
6. Arrangement of a sandy base (coarse-grained alluvial sand) -30cm.
7. Compaction with a vibrating plate m = 320 kg.
8. Arrangement of crushed stone base (granite crushed stone fr. 20-40 mm) - 30 cm.
9. Compaction with a vibrating plate m = 320 kg.
10. Razlintsovka crushed stone (screening or crushed granite fr. 2-5 mm) - 5 cm (as a layer in the thickness of the cake is not taken into account).
11. Compaction with a vibrating plate m = 320 kg.
12. Arrangement of the underlayment from the screenings 5-8 cm.
13. Laying clinker bricks or granite paving stones (clinker bricks or granite paving stones - 6-10 cm thick).
14. Sealing with a vibrating plate m = 20 kg.
15. Grinding of seams with sand (coarse-grained alluvial sand).
The technology for the production of works on the arrangement of paths and sites for cars weighing up to 1.5 tons from natural or artificial stone for a solution:
1. Breakdown of the territory.
2. Beating of vertical marks.
3. Excavation to a solid base.
4. Sealing the base with a vibrating plate m = 320 kg.
5. Laying of geotextiles with a density of 160 g / m2.
6. Arrangement of a sandy base (coarse-grained alluvial sand) -30 cm.
7. Compaction with a vibrating plate m = 320 kg.
8. Arrangement of crushed stone base (granite crushed stone fr. 20-40 mm) - 15 cm.
9. Compaction with a vibrating plate m = 320 kg.
10. Razlingtsovka crushed stone (screening or crushed granite fr. 2-5 mm) - 5 cm (as a layer in the thickness of the cake is not taken into account)
11. Compaction with a vibrating plate m = 320 kg.
12. Preparation of mortar (cement M400, coarse-grained alluvial sand, water in a ratio of 1: 3: 1-1.5, depending on the moisture content of the sand)
13. Laying natural or artificial stone on the mortar (stone thickness 8 cm - 10 cm).
14. Grouting or sweeping of joints (grout for stone or coarse-grained alluvial sand).
The technology for the production of works on the arrangement of paths and platforms for cars weighing up to 3 tons from paving slabs or paving stones to concrete:
1. Breakdown of the territory.
2. Beating of vertical marks.
3. Excavation to a solid base.
5. Laying of geotextiles with a density of 160 g / m2.
6. Arrangement of a sandy base (coarse-grained alluvial sand) -30 cm.
8. Arrangement of crushed stone base (granite crushed stone fr. 20-40 mm) - 30 cm.
10. Razlintsovka crushed stone (screening or crushed granite fr. 2-5 mm) - 5 cm (as a layer in the thickness of the cake is not taken into account).
12. Reinforcement (reinforcement d = 12 mm is taken, a volumetric mesh with a mesh size of 12 * 12 cm is knitted).
13. Installation of formwork.
14. The device of expansion joints.
15. Pouring concrete M300.
16. Dismantling the formwork.
17. Preparation of a cement-sand mixture (coarse-grained alluvial sand, cement M400, in a ratio of 1: 4).
18. Arrangement of a cement-sand layer or a layer from the screenings - 5-7 cm.
19. Laying paving slabs or paving stones (tiles or paving stones with a thickness of 8-10 cm).
20. Sealing with a vibrating plate m = 20 kg.
21. Grouting of seams with sand or DSP (coarse-grained alluvial sand, cement M 400).
Production technology for the construction of paths and sites for vehicles weighing up to 3 tons from asphalt concrete:
1. Breakdown of the territory.
2. Beating of vertical marks.
3. Excavation to a solid base.
4. Sealing the base with a vibrating plate m = 600 kg.
5. Laying of geotextiles with a density of 160 g / m2.
6. Arrangement of a sandy base (coarse-grained alluvial sand) -30 cm.
7. Compaction with a vibrating plate m = 600 kg.
8. Arrangement of crushed stone base (granite crushed stone fr. 20-40 mm) - 30 cm.
9. Compaction with a vibrating plate m = 600 kg.
10. Razlintsovka crushed stone (screening or crushed granite fr. 2-5 mm) - 5 cm (as a layer in the thickness of the cake is not taken into account).
11. Compaction with a vibrating plate m = 600 kg.
12. Spilling of crushed stone base with bitumen emulsion.
13. Laying of porous asphalt concrete from coarse crushed stone mixture - 7 cm.
14. Compaction with a roller.
15. Laying dense asphalt concrete from fine-grained crushed stone mixture - 5 cm.
16. Compaction with a roller.
Installation of a curbstone
The curbstone serves as a boundary line between the lawn and the bed of paths and areas, and also protects the edge of the road bed from destruction. It is made from natural stone, granite, concrete and reinforced concrete.
According to its purpose, the curb stone is conditionally divided into a garden curb and a curb stone. The garden curb is used for the construction of pedestrian paths and areas, and the curb is intended for the construction of the roadway and areas for car coverage. They differ from each other in size and the degree of load that they can withstand.
When installing a curb stone, it is necessary to make a sand-crushed stone pillow, taking into account all slopes. The bead must follow the design profile of the pavement. Steps in the joints of stones in the plan and profile are not allowed. The seams between the stones should be no more than 1 cm. The curb itself should be installed on concrete of a grade of at least M 250. After installing the curb stone, it is necessary to make concrete locks, and on the back of the curb, a side stop from the soil. The installation of the curbstone is carried out in parallel with the preparation of the base for the path or platform.
Technology of production of works on installation of a curb stone:
1. Breakdown of the territory.
2. Beating of vertical marks.
3. Excavation to a solid base.
4. Compaction with a vibrating plate m = 220 kg or a manual rammer.
5. Laying of geotextiles with a density of 120 g / m2.
6. Arrangement of a sandy base (coarse-grained alluvial sand) -10 cm.
7. Compaction with a vibrating plate m = 220 kg or a manual rammer.
8. Arrangement of crushed stone base (granite crushed stone fr. 20-40 mm) -10 cm.
9. Compaction with a vibrating plate m = 220 kg or a manual rammer.
10. Installation of a curb stone on concrete (concrete M250, thickness of the concrete layer 10 cm).
11. Construction of concrete locks.
12. Grouting with mortar.
In areas with pedestrian traffic, plastic curbs, board curbs and beams can act as boundary boards. They, in turn, are installed on a compacted sandy base 10 cm thick and fixed with special studs or reinforcement d = 6-10 mm.
This material is an excerpt from the upcoming book by Elena Rusu "Management of landscape works. Handbook of the foreman for landscaping and improvement".
Elena Rusu is the head of the company
From the site www.esosystеma.ru
Chapter 3. Technology of trail arrangement *
V.V. Komov, Ya. I. Orestov
3.1 Walkways, stairs and landings
General requirements
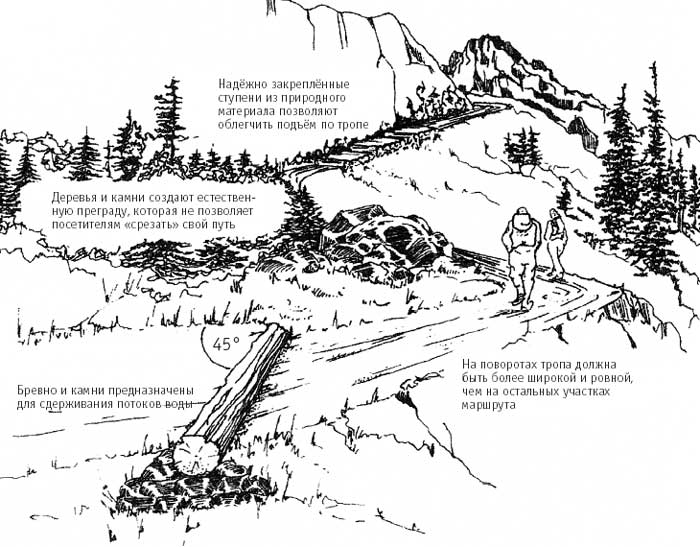
The choice of material and track width depends on the functional and natural characteristics of the route. It is most advisable to use local materials for road construction.
In the practice of landscaping parks and forest parks, standard values of the width of paths, multiples of 0.75 m, are accepted. The width of 75 cm is intended for one person to pass, and with a width of 1.5 m, two people can comfortably move along the path. When constructing eco-trails, the width of the paths can be approached less strictly.
“Setting up a trail starts with kneeling down and exploring the ground. Take a close look at what kind of soil you are dealing with, what the soil consists of, what can happen to it during rain. Determine where the water comes from on the trail and where it flows. Your main concern should be regulating the speed and direction of water flow. "
Mark Edwards, Department Route Coordinator natural resources Iowa
The efficiency of functioning of ecological paths and routes to a significant extent depends on the technical condition of the roadway. One of the main problems is the drainage of the walkway. It is carried out by adding crushed stone, sand or other materials with good cultivation capacity to its base, as well as by giving a transverse and longitudinal slope to the upper surface of the path.
Water stagnates on the surface of an improperly formed pathway. Visitors to the park walk around wet areas, resulting in detour paths.
Trails running downhill can turn into ditches for water to drain. If the slope is more than 7-10%, then in order to prevent soil erosion, it is necessary to build steps, platforms and barriers for the water flow.
The slope of the trail is usually expressed as a percentage: a slope of 1 percent corresponds to a decrease / increase of 1 centimeter per meter of roadway.
Sometimes, instead of percent, another unit is used - ppm, which is equal to one tenth of a percent.
A surface slope of up to 5% is optimal for lifting visitors (5% corresponds to a climb of 1.5 m on a 30 m path).
Recommended longitudinal slopes are from 0.5 to 8%, in some cases slopes can be up to 20%. With large slopes, the sections of the rise should alternate with horizontal platforms, and there are certain recommendations for the alternation of horizontal sections and sections with different slopes, by performing which you can make the rise comfortable.
The following diagram shows a section with alternating sloped and horizontal sections.
Rice. 3.1. Longitudinal slopes of footpaths
1 - Horizontal sections, 2 - Inclined elements with a slope of 1-1, 1-2 ..., A - starting point of the path
Longitudinal slopes in the sections of the rise should be increased gradually, at the same time coordinating their length with the value of the slope (see table):
| Longitudinal slope,% (i) | 1 | 2 | 3 | 4 | 5 | 6 | 7 | 8 | 9 | 10 | 11 | 12 | 13 | 14 |
| Section length, m | 1130 | 840 | 630 | 480 | 370 | 280 | 220 | 170 | 130 | 105 | 88 | 67 | 53 | 43 |
The use of the table can be illustrated by the following example: if we have a hill, to the top of which we need to lay a path, then it is advisable to arrange the first ascent from the foot as gently as possible - let us assume that this is a section with a slope of 3% (3 cm of ascent per 1 m of the path ). The length of such a section should not exceed 630 m (see table). The road should be traced so that after the ascent there is a horizontal section. Usually for this, the route is laid in a serpentine or spiral around the hill.
The next climb can be made steeper - let's say, with a slope of 9%, no more than 130 m in length, and so on, up to the top, with a sequential increase in the steepness of the sections and a decrease in their length.
This combination of slopes and horizontal sections allows you to alternate physical effort and rest and corresponds to the natural distribution of relief heights.
Ladder construction
Slopes over 20% are equipped with staircases with handrails. Ladders can be made of wood, earth, metal or natural stone. The most durable, but also expensive to manufacture, are metal structures. Steps and platforms, welded from a reinforcing bar with an interval of 15–25 mm, freeze less and do not reduce insolation (the intensity of sunlight falling on the surface) under the stairs. In addition, the metal supports are thinner, which means less damage to the plant roots during installation.
A comfortable ladder is calculated as follows:
value 2h + S, where h is the height of the steps in cm, and S is the width of the step in cm (tread), should be in the range from 60 to 67.
For example, if your step height is 13 cm, then the step width can be from 34 cm (60 - 13 x 2) to 41 cm (67 - 13 x 2).
The horizontal part of the step is called the tread, and the vertical (frontal) part is called the riser.

Rice. 3.2. The device of a wooden staircase
A simple and economical type of stairs is bulk. They require the preparation of an inclined base in the ground or building up a base from backfill. The slope in the ground should have a drainage layer 50–80 mm thick from the backfill. For backfilling, slag, sand, gravel, crushed stone, dolomite are used.
The risers fixed in advance with the sidewalls are placed in an inclined recess between the two levels of the site, and then slag or sand is poured up to the upper edge of the riser board and tamped. The possibility of sagging of the board is prevented with the help of pegs, which are best driven in from the inner (filled up) side of the board. In this case, the board is nailed to the pegs. The location of the pegs in the backfill gives the structure a more perfect and finished look (Fig. 3.3). Boards in this version are a permanent element of the staircase structure.

Rice. 3.3. Bulk ladder device
1 - bowstring; 4 - pegs; 2 - riser; 5 - drainage layer 3 - backfill;
As a material for strengthening the risers, natural stone, transversely laid or vertically buried logs can be used. If necessary, the side boards of the steps are also strengthened.
Concrete steps are easy to make on an inclined surface in wooden formwork from sidewalls and retaining boards. Retaining boards are installed vertically or with a slight slope. They form the riser surface. The formwork is removed after the concrete has hardened. For formwork, sheet metal can be used.
Arrangement of tracks and platforms
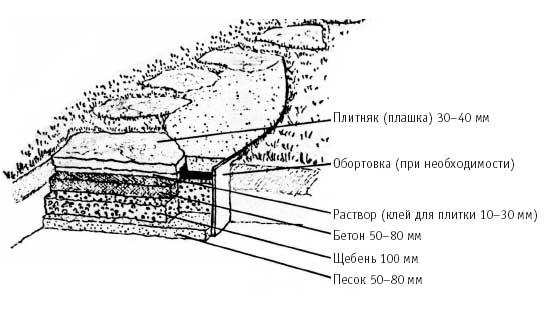
Delicious filling of "road pie"
Just like an ordinary pie consists of dough and filling, the road has several layers. The upper one, the “golden brown crust of the pie,” is asphalt or tiles or rubble, the layer on which our feet go. There is a "filling" under it - we do not see it, but it is it that makes the road dry and solid. The term "road cake" has become firmly established in the language of builders.
Who invented the road pie? The Roman legions conquered the ancient world not only by force of arms, but also by roads that survived two millennia later. And it is not surprising - sometimes the “filling” layer of the road “pie” reached 5 meters!
The track should be as flat and flat as possible along its entire length, without holes and protruding bumps, roots and other obstacles. In order to prevent the formation of puddles, the level of the trail should be raised above ground level and have a cross section slightly convex (3–5%) shape with a gable cross-section or slope towards discharge with the same slope.
To prevent damage to the soil and vegetation adjacent to the trail, it is recommended to sow the so-called "sports lawn" along the track - a mixture of grasses that are resistant to trampling. If necessary, you can plant a low hedge... This is especially necessary at the intersection of the path with unwanted spontaneously formed paths.

Rice. 3.4. Construction of stairs with concrete steps
1 - formwork sidewalls; 4 - support for a step with a canopy; 2 - retaining boards; 5 - pillow base 3 - stops (bars);
Cloth from gravel-sand mixture
If the trail goes on earthen, sandy and other "soft" soils, it is advisable to cover it from a sand and gravel mixture (ASG). For the construction of such a canvas, a trench 25-30 cm deep is formed, the width of the future path. If necessary, its sides can be sprinkled, which will make the bottom as gentle as possible, without sharp drops and steps. A layer of sand 7–10 cm thick is poured onto the bottom. The sand is moistened and rammed. Variants of the arrangement of such tracks are shown in Fig. 3.5, 3.6.
A layer of coarse - 40–70 mm - gravel or crushed stone is laid on the sand to the ground level and rammed. This layer is the main drainage system of the trail. The stability and durability of the future path will depend on the degree of compaction of this layer. Above the ground level, sides with a height of 5–7 cm are formed (from the ground, turf, boards, etc.), the space between them is filled with ASG. This mixture consists of sand (up to 30% by volume), fine gravel or pebbles of 10–20 mm in size and a binding component - powdered clay (15–30% by volume) or cement (up to 10%). This layer is also rammed to form the road surface. The difference in height between the edge of the ripping board and the natural soil is leveled by laying sod or simply adding soil. If necessary, an associated drainage can be made from one of the sides to which the surface runoff flows: to strengthen the side with a log, curbstone, etc. with waterproof materials, installing overflow pipes with a diameter of 100–150 mm every 30–50 m under the roadbed so that the water does not erode the path.

Rice. 3.6. ASG coating: with a side stone (above), with a hidden fringe (below). Cross section
Construction of gateways and slopes
... There was and is in Russia one more element, unknown in the West - off-road.
Even in the presence of stone and rubble, it is no laughing matter to lay hundreds and thousands of miles of paved roads. And there was no stone at hand in Russia, there was nothing to fill the "bed" with so that the granite cobblestone of a primitive cobblestone highway would not drown in the muddy clay. And the collection of these cobblestones in the fields (such a duty was imposed in some places on the peasants both in pre-revolutionary and in Soviet times) did not give the required amount of material. Therefore, in Russia there was such a difficult typology of roads: there were paved highways, and there were also unpaved, but well-maintained post roads, there were winding country roads filled with peasant carts, and there were slightly outlined field roads overgrown with grass.
In Russia, original ways of paving roads were worked out - gaty, bedrock and end pavement. The damp areas were rolled with bundles of rods and poles, and on the already impassable bogs, lodges lay down: thick logs were laid along the route in two rows, on them, one to the other, slightly hacked, transverse logs that made up the roadbed were laid, and two rows of logs were again placed on top along the edges, fastening the plank piece. On such "roads", and now lying in some places from the cutting areas, spokes flew out of the cart wheels, the rims diverged, axles broke and tremors and the soul of the rider barely kept in the body. In the cities, the central streets were paved with wooden ends - logs, cuttings of logs, sometimes hewn into six edges, and more often remained in round timber. On a sandy bed (it is good if there was sand nearby) tightly, one to the other, tarred ends were placed, poured on top with resin and sprinkled with sand. In the first months, such a pavement was rather smooth, although the cart wheels rattled slightly on it, and after a year some ends sagged, others warped, others began to rot and knocked out by the iron tires of the wheels, so that, moving down from the “comfortable” street into a lane, where there were no more ends, the rider sighed with relief from the bottom of his heart. And a year later it was necessary to pave the street again. The author of this book, who grew up in a small northern town, had to travel both along the end pavement on the main street, and along the gats and slopes in the damp Vyatka forests, and still fresh in my memory ...
(A. V. Belovinsky "Izba and mansions. From the history of Russian everyday life" http://www.booksite.ru/fulltext/izb/aih/oro/my/index.htm)
When the trail goes through humid wetlands, it is advisable to build gates and lodges. Gatiu used to be called flooring from branches, wood residues, on lightly rammed peat soil, and bedding- a road through the swamp, the base of which was longitudinal or transverse logs.
Photo 3.1.
Different authors have discrepancies in the definition of these terms, but we can agree that both types of road are raised above the ground flooring - and this gives us the opportunity not only to comfortably walk through the area with excessive moisture, but also to help protect tree roots from damage, preserve interesting species of mosses and lichens and other ground cover objects.
It is advisable to make the floorings lying on the ground from wooden blocks with a thickness not less than 40 mm or half-timber. It is possible to use old tires from wheels instead of transverse logs. They are durable, adhere well to the marsh surface and, with a sufficient width of the flooring, can be completely hidden under it. From the point of view of ecology, they are quite safe due to the high chemical inertness of the material.

Rice. 3.7. One of the possible decking designs
Decks raised above the soil on pillars (wooden or asbestos-cement with grouting) look very nice. They are generally quite durable.
It is advisable to make the width of the gates and lodges about 1 m. The laying of the flooring should be transverse, from tightly-fitting boards, with not large gaps (up to 1 cm) between them for water drainage.

Photo 3.2. Decking using asbestos-cement pillars
Step paths
Walkways look like individual flat stones or tiles spaced one step apart. They fit perfectly into the natural environment and are quite durable, provided the right technology and good quality limestone.
The advantages of such paths include the fact that they do not impede surface runoff at all, since the base under them can be made not solid, but along the contour of each tile. The disadvantages include low bandwidth: you have to go along such a path one after another. At the same time, such paths may well be used for exits from the main route of the ecological route to individual attractions.
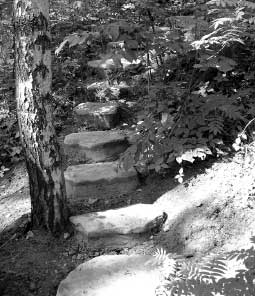
Photo 3.3.
For step paths, the most commonly used tile is called a "die", about 30 mm thick and about 40x40 cm in size.
The tiles should be located at a distance of 60–65 cm (between the centers of the tiles). The tiles are first laid out on the ground and tried to walk along the intended path. Unsuccessfully placed tiles can be immediately corrected and after that outline the most convenient contours of the future road pie. Most often, this can be done without a formwork device.
Ladders from a die also look very decorative and natural. In this case, each subsequent tile rises relative to the previous one to a height of 12-14 cm. As a rule, in this case, it is necessary to use temporary formwork to form the steps.
Placing the block directly on the ground is permissible only in sandy or sandy loam soil, with preliminary moistening and compaction of the soil where the load on the track will be insignificant.
Rice. 3.8. Treadmill technology
End tracks and platforms
In forest conditions, the end path, at first glance, seems to be the most obvious option. And beautiful, and the material at hand. In fact, the end track is one of the most difficult options for the roadway. Indeed, the butt - a cylindrical section of the trunk 10–30 cm high - is actually a piece of wood with all conducting vessels open from below and above. It is clear that decay and destruction of wood goes on rather quickly.
Only two species can retain their strength in such conditions without thorough processing: oak and larch. Firms that are engaged in the device of end coatings give long-term guarantees only for such species. Pine cuts, even well-processed ones, serve up to 3-5 years on end paths. And the cost of a larch end covering can be up to 50 euros per 1 m 2. The device of the end-covering is laborious and can be compared with the device of the path from the paving stones. In this case, the problem of the appearance of the coating arises, since the ends are easily rubbed with dirt and are practically not cleaned.
In addition, as the operation progresses, the ends tend to loosen and the track becomes less passable than just a dirt track.
Therefore, it is necessary to resort to end coatings with great care. It is advisable to arrange them only in dry places and to limit the area, not forgetting that this type of work requires significant labor costs.
The “trough” is dug under the end path so that the bottom of the ends lies on a sandy base 15–20 cm thick. The usual height of the cuts is from 10 to 30 cm. The “trough” is filled with coarse sand with a layer-by-layer rammer. The ends are laid on a rammed base and adjusted to each other, and the gaps between them are filled with smaller cuts. In this case, the extreme ends must necessarily rest on the fringe (the edges of the "trough", even rammed ones, must be additionally reinforced with a board or other material). Then the gaps between the cuts are filled with sand and additionally rammed.

Rice. 3.9. Approximate end cover design
It is necessary to provide for the construction of terraces on the sections of the trail running along the traverses of the slopes. It is desirable that the canvas lay on a natural base, while the terrace cuts into the slope to the width of the future path. The road surface on the terraces should be hard - wood or stone. The side walls of the terrace made of bulk material are reinforced with a retaining wall made of stone, wood or planting of easily rooted plants. It is advisable to lay the railings in two threads: at a height of 75–80 cm for adults, and 45–50 cm for children.
To comply with the permissible slopes, it is advisable to lay the trail according to the serpentine principle.
* This page contains information from the collection [" A trail in harmony with nature". Collection of Russian and foreign experience in creating ecological paths. M .:" R.Valent ", 2007. - 176 p.], Prepared by our colleagues from ecological center "Reserves", who kindly provided us with the opportunity to post this extremely useful information for all environmental educators on our website.
Paths and platforms - an obligatory element of improvement. The road and path network provides a comfortable movement around the site, connecting various elements of the garden: a house, a bathhouse, outbuildings, parking lots, etc. Playgrounds are organized in parking lots, in recreation areas, on sports and playgrounds, under gazebos and swimming pools.
Road and path network should be practical. All the main buildings on the site must be connected along the shortest distance with straight paths. The walkways must be wide enough for one or two people to pass. In the garden, you can organize narrow winding paths.
Depending on the functional purpose, the relief of the site, the characteristics of the soil, the level of occurrence groundwater, planned loads and financial capabilities of the customer, the construction of tracks and sites is carried out using different technologies from a wide variety of materials.
Parking for heavy vehicles and access roads are made of asphalt or concrete on a solid cushion of sand and gravel. As the main material for ordinary parking lots and main paths, paving slabs are used, laid on a sandy or sand-cement base. Secondary paths in the garden are made continuous or step-by-step from tiles, natural stone, crushed stone, sand, brick, boards, plastic modules, tree cuts and other materials.
The so-called "cushion" for paths, on which the paving material is laid, is formed from two main layers: drainage and leveling. Drainage layer, with a thickness of 5 to 35 cm, made of crushed stone, ASG or expanded clay, leveling - with a thickness of 5 to 30 cm from compacted sand or sand-cement. Layers of sand and gravel are separated from each other and from the ground by geotextiles. To increase the strength, a curb stone is installed at the edges of the tracks and platforms. To prevent the formation of puddles, wide paths and areas are made with a slight slope.
Paving slabs - the main material used for paving garden paths and areas. She is beautiful, strong and durable. When choosing paving slabs, you should pay attention to the method of its production, quality of raw materials, thickness, size, shape, color, pattern, surface texture and cost. Preference should be given to vibropressed paving slabs made at the factory from high-quality cement and reinforcement without impurities and inclusions. Low-cost vibrocasting tiles are often made in an artisanal way and do not always meet the customer's requirements. Its strength depends on the thickness of the tile. Surface texture affects walking comfort (smooth tiles can slip while rough tiles are more difficult to clean). The size and shape of paving slabs is a matter of taste. It is only necessary to take into account that the smaller and the more interesting the tile is in shape, the more difficult and expensive it is to lay it. When choosing a color, preference should be given to calm tones, since it is difficult to harmoniously fit bright paths and grounds with a complex pattern into the surrounding landscape.
Regional state autonomousprofessional educational institution
"Shebekinsky agrotechnical craft college"
PUBLIC LESSON
according to PM 02 "Conducting work on garden and park and landscape construction"
Topic: "Application modern materials in the device of tracks and areas with different types coatings "
Developed by: Muradova Olga Gennadievna,
teacher of special disciplines
non-qualifying category
Shebekino,
2016
Lesson plan
Lesson topic:
Lesson type: learning new material
Functions, goals and objectives of the lesson The lesson is a direct form of communication between the teacher and the students in the group.
Open lesson on the topic ""performs monitoring functions:
educational
guide,
formative.
The essence of the educational function is that the lesson expands the circle of students' knowledge about the purpose of garden paths, modern technologies and materials used in their construction.
The guiding function allows learners to use the acquired knowledge in real life, Everyday life, in professional activities.
The formative function develops in students the skills of thinking over the information received and assessing what is happening, helps to understand the essence of the topic being studied, teaches them to present their own opinion.
Lesson objectives:
- educational- to identify the quality and level of mastery of knowledge and skills obtained in previous lessons on the topic: " Arrangement of garden paths ",study modern materials for the device of garden and park paths, use the knowledge gained for their further application;
- educational - education of motives of labor, involvement in active practical activity; upbringing general culture, aesthetic perception of the world around, fostering a culture of educational work, self-education skills, economical use of time.
-developing: be able to classify, identify connections, formulate conclusions; develop cognitive interest; develop the ability to explain the features of the technology for the construction of the upper road surface, taking into account the decorative qualities and technological characteristics of materials,develop the ability to think productively and creatively, apply the knowledge gained in everyday life and professional activity.
- methodical: providing practical assistance to teachers in the development and design of an open lesson.
Lesson Objectives:
show, contribute to the formation of knowledge and skills of students.
expand the general and professional horizons of students.
Lesson form: collective
Technical equipment: PC equipped with software product:
- OC Windows XP
Microsoft Office PowerPoint;
projector;
demo screen;
sound speakers;
Educational and material support:
Didactic equipment: presentation “The use of modern materials in the construction of paths and sites with different types of surfaces», Video" Arrangement of paths in the garden: choice of material and design "," Landscape design, paving paths ", textbook: Teodoronskiy V.S." Garden and park construction and economy "- M., IC" Academy ", 2012
Teaching method: heuristic,explanatoryillustrative
Integration: garden and park art, design of objects of garden and park construction, ecological foundations of nature management, chemistry.
Number of hours - 1
Training and metodology complex
Working programm
Work thematic plan
Lesson plan
As a result of the lesson, students should know:
- the purpose of the garden paths, the principle of their layout, modern materials used for the top coatings of the pathspavement construction of planar elements of territory improvement
During the classes
1. Organizational part - 2 min: - greeting guests and students
2. Updating the previously studied material. Homework check10 min.
3. Motivation for upcoming educational activities
3.1. Message of the topic of the lesson - 1 min
Topic of today's lesson"The use of modern materials in the construction of paths and sites with different types of surfaces".
This is a combined lesson: we will consider the theoretical aspects of the topic, during the presentation demonstration you will learn a lot aboutthe use of modern materials in the construction of paths and areas with different types of surfaces,which began to be used to improve the quality of work performed, technologies for arranging garden paths.
3.2. Setting the goal of the lesson for students - 2 min
The purpose of our lesson is to studymodern materials for the device of garden and park paths,purpose of garden paths, coating technology, depending on the type and types of materials in accordance with the project.
Teacher:
In the previous lesson, we examined the main provisions of the arrangement of garden and park paths. Let's repeat them.
Questions to the audience on the previous topic:
Question 1: Tell us about the purpose of alleys, roads in parks, gardens, squares?
Answer - The purpose of alleys, roads in parks, gardens, squares is to provide convenient pedestrian connections of entrances with all functional zones, structures, devices and individual sections, to reveal the aesthetic advantages of green spaces and natural landscape while moving.
Question 2: What form are there garden paths depending on the planning solution of the landscaping project?
Answer - Depending on thecreation of the concept of the garden, its style solution, the project of improvement and landscapingdepends on what the garden paths will be. Straight-line alleys along the shortest path connect the garden objects and are suitable for regular gardens. They give the site a solemnity. For a landscape style, when organizing walking routes with viewpoints, winding paths will be appropriate.
Question 3: What% of the total balance of the park territory is allocated for roads, playgrounds, alleys?
Answer- In the general balance of the park's territory, 8-15% are allocated for roads and alleys, sites - 5-10%, outside the city - 2-4% and 1-2%, respectively. Their relative length is taken in the city 300-400 m / ha, outside the city 50-100 m / ha. In sports parks, these standards are increasing.
Question 4: What is the purpose of the main and secondary pedestrian paths and alleys in gardens and parks?
Answer- The main pedestrian walkways and roads connect the main entrances with the most visited objects, link functional areas with each other. The projected width is 5-50 m with a longitudinal slope of up to 40% and the provision of a pass up to 600 people / h. The passage of intra-park transport is envisaged.
Secondary pedestrian alleys and roads serve as intra-zone connections, connect secondary entrances with objects of attraction, and distribute visitors throughout the territory. The projected width is 3-12 m with a longitudinal slope of up to 60% and pedestrian traffic with an intensity of up to 300 people / h. Transport is possible.
Question 5: How wide and what longitudinal slope should the projected pedestrian roads have.
Answer- The width of park alleys depends on the number of visitors and is taken as a multiple of 0.75 m - the width of one traffic lane.Additional pedestrian roads and paths leading to separate park facilities are designed with a width of 0.75-3 m with a longitudinal slope of up to 80% and low-intensity pedestrian traffic.
Cycle paths for walking are designed with a width of 1.5-2.5 m with a longitudinal slope of no more than 50%, transverse 15-25%.
Roads for horseback riding, in carriages and sledges are designed with a width of 2.5-6.5 m, a longitudinal slope of up to 60% and an improved unpaved surface.
Parking lots are designed at the rate of 2-3 parking spaces for 100 one-time visitors to the park for the first stage and 5-7 for the estimated period. Forest parks have 2-4 and 7-10 parking spaces, respectively. Parking lots are divided into sectors by green spaces.
3. Scoring the topic of the lesson.
Creating a trusting atmosphere
Teacher:
Well done! Now open your workbooks and write down the topic of the lesson: "The use of modern materials in the construction of paths and areas with different types of surfaces. "(Explanation of the new topic is accompanied by a presentation - 15 minutes) (Slide number 1)
Students write down the technological regulations for the arrangement of tracks with different types of coatings in a notebook.After watching the presentation, you will answer the questions based on which you will receive grades for the lesson.
Teacher:
- striking in its diversity. Today, you can use a variety of elements to give the landscape originality, attractiveness and comfort. It is the paths that allow you to set a certain tone for the entire garden design, divide it into separate functional zones. Making them with your own hands is not so difficult, you can even use such simple materials as sea or river pebbles for this. different shades. ( Slide №2)
Appointment of garden paths ( Slide № 3,4)
are the main element of the garden composition; they create a perspective, close the visual perception of the site, this is not only a way to move around the garden, but also the ability to correctly divide the space into separate zones, set a certain tone for the entire garden design, give the landscape more attractiveness and originality. It is possible to make such paths on the territory of the site from any materials, they all differ in their own characteristics. Consider how to make the device of garden paths made of stone, concrete and even pebbles.
Types of garden paths (Slide №5)
Gravel and sand paths are comfortable and aesthetically pleasing. Today you can buy special coarse sand of various shades, which will give your garden an unusually attractive appearance. Gravel and sand paths are also convenient because they do not create dust when walking, but their surface will have to be smoothed periodically using ordinary garden rakes. To prevent the material from scattering, it is necessary to arrange a border of brick, stone or concrete along the perimeter of the paths.
It is better to take a clay mixture with sand as the basis for the path, which is laid on a layer of gravel of a small and medium fraction.
Cobblestone paths
Cobblestone paths. ( Slide №6)
Such schemes are among the most durable and reliable. The arrangement of garden paths from natural cobblestone is extremely simple, it is only necessary to prepare the base, and then lay the cobblestone. This can be done in a certain order, creating unusual mosaics, or in a chaotic manner, if the overall design of the landscape allows it.
The foundation for the path is made in this way:
after marking, a layer of sod is removed to the required depth, taking into account the thickness of the stone and bedding;
a layer of rubble is laid on the bottom, after which a pillow is made from a mixture of clay and sand, which allows you to reliably hold the cobblestone in place, creating a strong, durable base;
the stone must be paved in accordance with the selected type of pattern, but in any case, such a path will look elegant and stylish.
Natural stone paths (Slide №7)
Trackmade of natural stone looks very attractive and stylish. Large and small slabs of hewn granite and marble, paving stones and even pebbles of different shades can be used for this. The process of laying such a stone path can be carried out different methods:

Laying stone paths. ( Slide №8,9,10,11,12)
Large and massive stone slabs are laid on a sand cushion, pre-leveled and tamped. The gaps between the slabs can be filled with sand or left unfilled. It all depends on what kind of appearance is required. Today, paths in the country are popular, which are as close to nature as possible. To do this, after marking, it is necessary to remove a layer of turf of such a depth that stone slabs have. Sand is poured at the bottom of the base, the slabs after laying should be approximately half buried in the soil. Appearance such a path is very attractive, the slabs seem to be scattered among the bright green grass or yellow sand.
The second option is suitable for making natural pebble paths. In this case, the stone is held together with a concrete solution. The result is unusual, original tracks, often reminiscent of stone streams, meandering among the garden plants. In the same way, you can lay out platforms using pebbles of various bright colors.
After laying, such sites can resemble colorful panels with images of animals and plants or luxurious oriental carpets.
It all depends only on the imagination of the master himself.
Monolithic concrete slabs (Slide №13)
One of the options for constructing a path in the country is the use of concrete slabs. There are many options here, such plates can have various sizes and shapes, and be manufactured using different technologies.
The easiest option is to use large monolithic reinforced concrete slabs. But such a path is not very attractive, it can be used for an economic zone in the country, near the entrance.

Diagram of the device of the track made of concrete slabs: 1 - options for the dimensions of prefabricated slabs; 2 - profile of the track made of concrete slabs with a small gap: a - sand with a layer of 10–12 mm; b - concrete slab.
Design of a garden path made of attractive concrete tiles ( Slide № 14,15)
The construction of a garden path from attractive concrete tiles is more in demand. Such a tile can externally imitate the surface of natural paving stones, brick and stone, but you can make original and beautiful products with your own hands, thanks to which the path will become a real highlight of the entire landscape design.Tiles can be made using silicone or wooden molds and concrete mortar.
Manufacturing process:
It is necessary to prepare molds for tiles, which you can either buy at a hardware store, or make yourself out of silicone or wood.
For a concrete solution, you need to take sand, cement, dyes for concrete (the tile will become very bright and beautiful).
All components are mixed, after which the forms are filled with concrete mass. Future products should be left to dry in a room protected from the sun and precipitation.
After the tile is dry, it is removed from the molds and left until fully cured (about three to four weeks).
While the paving slabs are drying, it is necessary to mark a place for work, remove the fertile soil layer.
Laying the tiles is carried out as follows: first, a layer of cleaned sand is poured, moistened with water and compacted. After that, the tiles are laid out in the required way, after paving, all the cracks are filled with sand, it can be painted with pigments. The track is ready!
When paving, it is necessary to ensure that the surface is strictly horizontal,
Arrangement of a garden path from colored pebbles
( Slide № 16,17)
Garden paths can take the most different kind, it is not necessary to use paving stones or concrete tiles for this. There are very unusual way creation garden paths, which resemble bright oriental carpets, but are made from ordinary pebbles. To make such tracks, you do not need to have special skills or experience, you just need to come up with a pattern and prepare the simplest materials.
The first thing we need to do is take an ordinary pebble. The design of such garden forms can be different, ranging from the simplest two- or three-color paths with a geometric pattern to complex areas resembling luxurious carpets. For preparation, you can take small or large pebbles, its color can be different, today tracks with contrasting shades are popular. Sifting should be careful, since the accuracy of the picture depends on it.
So, to work on US you will need:
The pebble itself of the selected color in the estimated amount, you can take ceramic shards for decoration, for example, from a broken flower pot, old tiles left after finishing the bathroom or kitchen.
Consumables for preparation of the base. For mixing concrete mortar, you can use a ratio of 1: 4. For mixing, cleaned sand and cement are taken.
Boards for assembling a track template in the country. The width of such a board should be 30 cm, and the height - 5 cm. Such a frame will be fastened using ordinary nails.
Tools for the job:
shovel;
bucket;
Master OK;
rigid mesh, metal reinforced mesh, the dimensions of which should be approximately one cm smaller than the future size of the template for the walkway.
Territory markup: (Slide №18)
It is necessary to start work on creating a path in the country with a marking of the territory. The easiest option is to set up a straight path, for which it will be much easier for a novice master to create a template. If you want to make more complex shapes, then we advise you to first practice on a small path, in order to then confidently make a large and beautiful one. So, marking is the installation of wooden pegs along the edges of the future path, between which an ordinary rope will be stretched.
Stages of laying pebble paths. ( Slide № 19)
After that, remove the layer of fertile soil. This must be done due to the fact that the grass, sprouting through the pebbles, can ruin the drawing, indistinguishable and not very attractive. After the soil is removed, two or three layers of sifted sand should be poured onto the bottom. After laying, each layer is compacted and leveled, it will serve as a reliable base before applying the concrete solution.
It is recommended to fill the sand itself after the template is assembled from the board. This will make it possible not only to make the filling with a solution of higher quality, but also to preserve the exact contours of the path in the country. The formwork itself is disassembled after the mortar has set, after which the concrete will dry further. But back to the process of making our garden path.
After the sand, you should start cooking cement mortar, but this should be done in small portions, since laying out from a stone is a long process. If you pour the whole mass at once, then the concrete will harden before all the pebbles are laid out. It is recommended to start from one end of the track, although it all depends on the selected pattern. For example, for patterns in the form of a carpet, it is best to start from the center, and when laying out any complex images, it is necessary to first lay out templates on the surface of the solution, after which a pattern of stone should be laid sequentially on them in separate colors.
Pebble stacking methods( Slide № 20)
According to the first method, a template of colored stone is first laid out, which is then simply covered over with a prepared concrete solution. In this case, it is necessary to look so that the pebbles do not budge during the putty, and the pattern itself does not deform. Reinforced metal mesh is not always used, the pebble itself is placed on the edge.
The second method is that the solution is first laid out in small parts, it is imperative to use a metal wire mesh. After the concrete mass is poured into the template, you must immediately start laying out the pattern from the stone so that the cement does not have time to seize. The pebble is also placed on the edge, its direction should correspond to the direction of the picture. Then it is tamped down with a rubber mallet.
After the pebbles are laid out, you need to start filling the joints between the stone. Any excess that has fallen on the surface of the colored pebbles should then be carefully cleaned off with a prepared metal brush.
The form of wood for the track is removed after a day. At the time of concrete hardening, it is recommended to protect the path for the summer residence with a film.
Arrangement of garden paths made of wood ( Slide № 21)
The covering made of wood is picturesque, but short-lived, quickly gets dirty and cannot be cleaned. It can be recommended for little-visited areas of green spaces or for decorative purposes. Wooden coatings are common in cities located in forest areas, where industrial wood waste is used for these purposes. They use round timber of hard species that do not give in to decay (more often conifers), cut into cylinders of equal height 12-16 cm with a diameter of 10-50 cm, from which a mosaic coating is collected. A geometric pattern can be obtained using square, rectangular, hexagonal checkers. Seams are filled with vegetative soil and sand
preparation of the base of a garden path made of wood:
1), soil is selected to a depth of 10 cm and instead of it, crushed stone is first poured, and then sand. The latter is well compacted. Such a pillow is necessary for the rapid removal of moisture from under the wooden flooring.
3) When the base is ready, planks are laid on it, and it is better to combine different scraps in order to compose the necessary pattern from them. By the way, garden paths made from a cut of a tree trunk look pretty good.
Combined tracks- s a sign of creating masterpieces for gardens and parks ( Slide № 22,23)
4. Checking the understanding of the leading ideas of the lesson - 10 min
Reflection:
Teacher:
- I ask you to answer some questions.
Question 1: What kind of road surfaces are there?
Answer: The coverings are solid, panel and tiled.
Question 2: Give the classification of solid coatings
Answer: Continuous pavements are subdivided into unpaved, crushed stone or gravel and asphalt.
Question 3: What improved ground coatings are used in the practice of building garden and park alleys and roads?
Answer: In the practice of building garden and park alleys and roads, cement-soil, lime-soil and sand and gravel are used.
Question 4: What kinds of tracks do you know?
Answer: There are two types of paths for transport and walking.
Question 5: What kindrequirements for the top cover of alleys and roads?
Answer: Covering alleys and roadsmust be durable, resistant to weathering and stress, ensure the drainage of surface, storm, melt water and be convenient to operate. The surface is intended for pedestrians, so it should be smooth but not slippery.
Question: What determines the width of the tracks?
Answer: The width of the tracks depends on their purpose. The path leading to the house is 1 meter to 1.5 meters wide. Two adults should disperse on it without interfering with each other. For paths of secondary importance, for example, from the house to the garage, or from the house to the recreation area, a width of 80 centimeters to 1 meter is sufficient, step paths and paths between the beds in the garden are about 50-60 centimeters wide.
Question: What is the harmony of landscape compositions in your opinion?
Answer: A lotan important role in the creation of harmonious landscape compositions is assigned to the decorative characteristics of the coatings, which are chosen based on the purpose of the site, the characteristics of the landscape and the architectural and planning solution of the territory.
Question: What is the current classification of top pavements based on?
Answer: The existing classification of coatings is based on the nature of the application and the material.
Question: What requirements should the type of road surface meet?
Answer: The type of coatings must correspond to the purpose, sanitary and hygienic, aesthetic and economic requirements.
Question: Tell us about the advantages and disadvantages of crushed stone coatings?
Answer: Crushed stone is more durable. Crushed stone is covered with a layer of fine sifted crumbs (brick, granite, tuff) and rolled with rollers. The resulting colored bright coatings combine well with greenery, but in windy hot weather they get dusty, in wet weather they get soaked and carried away by streams of water, especially on the slopes, overgrown with grass.
Correction of students' answers
5. Grading according to the criteria. 3 min.
6. Closing remarks of the teacher
6.1. Lesson summary1 minute.
Lesson results: theoreticalknowledge of the structure of the road and path network (TTP) for their application in practice for a private plot, according to the planning conditions.
When planning any improvement object, it is impossible to do without the main elements - paths that are intended for walks and playgrounds - places for recreation. Do not forget that they can carry an important function and divert storm and melt water.
Types of garden paths
It is customary to share track on 5 classes:
— first class track- home. It is they who are entrusted with the main function - to receive the largest number of people;
— second class track- perform a supporting role. All of them depart from the main ones, they are created so that visitors evenly disperse throughout the territory;
— third class track- they fill the entire territory, are elements that collect disparate elements into a single picture - separate sites, important points with opening views;
— fourth grade track- most likely, you have already guessed that these are narrow paths created for the opportunity to retire;
— fifth grade tracks- they perform an auxiliary role, they exist to meet the economic needs associated with the care of green spaces, erected buildings, if space is available Catering- for the delivery of food products and, of course, with their help, the necessary building materials are brought up, etc.
If we consider city parks and forest parks, then all 5 classes can be found without much difficulty.
For boulevards, gardens with limited areas, squares, 3 first classes are often used.
In urban neighborhoods, grades 3 and 4 are most common.
As a percentage, alleys and roads at the facility cover an area of 5-25% of the entire territory.
Depending on the functions assigned to the territory, the number of visitors, they create the required number of roads of a certain class and their corresponding structures.
The most accepted size for main roads is 15 meters or more. For class 2 - from 4.5 to 15 meters, 3rd class - from 2.5 to 5 meters. Without a doubt, the area of each individual object must be taken into account. It is important that everything is in harmony.
In order for the tracks to serve as a drainage system, they are made with a slope, which depends on the material used when laying the track. For high quality pavements that do the job with ease, keep the cross slope low.
If it is concrete, tile or asphalt, then the slope is taken at 0.015-0.02. Small crushed stone - from 0.03 to 0.06 - the width of the road must be taken into account. When professionals are involved in laying the coating, they make them convex:
1.with dual slope;
2. single-slope profile.
The first option is used for roads of 1-2 classes.
The second is more often used for roads built on slopes.
Do not forget that there is a limitation for the longitudinal slope on the road, which cannot exceed an indicator of 0.07 - it is assumed that for every 10 meters of the length of the territory, the relief difference is 70 centimeters. If the specified rate is exceeded, then without fail, to facilitate movement, ladders are made.
When designing roads, it is necessary to competently decide their connection with areas where green spaces are present. For areas with heavy rainfall, it is recommended to make paths lower or at least on the same level with the landscaped area.
There must be trays along the entire length of the road, into which water will be collected. This avoids the accumulation of excess water, which can lead to a slowdown in plant growth and lead to waterlogging of the site.
In areas with less rainfall, it is necessary to make roads slightly higher than the rest of the area and without trays for collecting water. Thus, plants receive additional moisture, which is so necessary for full growth and development.
Types of garden and park grounds
Playgrounds- an integral element when creating a landscaping project. They perform various functions, they are used both for a quiet pastime, and for noisy events, etc.
When it comes to a recreation area, it may differ in its functionality:
— playground(experts recommend placing them in small, dry, elevated areas);
- for recreation of adults (the most developed type of playgrounds);
- for household needs (arranged at large landscaping facilities);
- playgrounds or glades where mass festivities or games take place.
The main types of construction of tracks and sites
Paths in gardens and parks, like playgrounds, consist of:
1. Land bed.
2. Clothes.
3. Drainage system.
1. Land sheet Is a recess formed after the excavation of the soil within strict limits, corresponding to the dimensions of the planned paths, areas and the height of the "clothes" of the roads.
2. Travel clothing in turn has several components:
- underlying layer;
- base;
- cover.
Underlying layer- sand is used for it, as a material with good ability to pass excess water, softens the loads exerted by people when they move.
Base- it is this element that is the most important, depending on which base will be chosen for the pavement, you can calculate its service life. Thanks to the base, it is regulated - how evenly the load on the ground bed will be distributed. The base material is most often chosen:
- crushed stone;
- broken brick;
- crushed granite;
- metallurgical slags.
3. Coating- the uppermost part of the pavement structure, which takes the main "blow". When choosing a coating, you should take into account the basic requirements for it:
- not subject to wet weather;
- does not form dust in dry weather;
- must be durable;
- have a decorative look.
In turn, the road surface is divided into:
— protozoa(from crushed stone, gravel, mixture of soil with cement powder);
— improved(made of concrete, stone, ceramic slabs, bricks, in certain conditions a monolith of concrete and asphalt is used).
As already becomes clear from the material used in improved road surfaces, they are laid in places where the largest number of people will pass, so they must withstand all the loads.
Now you can see that preference is given to coatings assembled from individual elements. They are considered simple and convenient to use, while improving the microclimate of the area, because water seeps well into the seams between the tiles and there is access to air, in contrast to a dense layer of concrete or asphalt pavement.
The leading position among the most durable materials with high decorative characteristics is occupied by slabs made of natural stone. Stone slabs and a variety of laying patterns give a picturesque look to such coatings.
It is logical to use it exactly where it is mined - this will significantly minimize material costs, while creating a luxurious piece of improvement.
Decorative, durable, but relatively expensive are coatings made of red building bricks or clinker.
At many landscaping objects, coverings of irregularly shaped concrete or stone slabs are arranged - "breccia" paving.
A prefabricated roof is usually made on a base of well-compacted rubble, or simply on a sandy base not thick< 10 сантиметров. На главных дорожках плиты обычно укладывают на цементный раствор по щебеночному основанию, оставляя минимальные зазоры между ними. На дорожках, выполняющих роль второго плана и вспомогательных, на площадках для отдыха, плиты можно укладывать не вплотную, а с промежутками в 2 – 3 см. Швы между плитками в этом случае заполняют растительной землей и засеивают семенами газонных трав. Выросшую траву скашивают одновременно со скашиванием газона. Такое покрытие в сочетании с газоном, цветниками и насаждениями отличается высокой декоративностью. Кроме того, оно более экономично по сравнению с покрытием, где плитки уложены впритык.
Covers of the simplest type are usually provided on secondary lanes. Paths with such coatings have a number of disadvantages: in rainy weather they get wet and therefore difficult to pass, in dry weather they get dusty and require constant moisture.
The clothing of the tracks and areas with the simplest covering should consist of four layers. The thickness of the lower layer is taken at least 6 cm, and crushed stone of large fractions is taken (grain diameter 2 cm). The top layer of the seedlings should be at least 1 - 2 cm thick.