What can be cooked from squid: quick and tasty
In this "Cross" article, you will learn how to make beautiful crafts from shells with your own hands, how to process them and how to decorate the interior of your home with products from shells in an original way.
Processing seashells before starting work
We bring from vacation a reminder of the sea in the form of a whole scattering of various shells. Shells can have different shapes, colors and even patterns - it depends on the glands that the molluscs have. The surface of the shells can also be different - rough, smooth, swirling, with stripes, in the form of a fan, etc.
How to clean shells of foreign odors and shellfish residues
Processed shells can be bought at the market or in the store.

If you brought them from the seashore or ocean, found them in a lake or river, then the shells must be processed.
If no shellfish remains in the shell, just soak it in a chlorine-containing solution (water and "Whiteness" in a 1: 1 ratio) for half an hour. If the shell has not cleared, then you can hold it in the solution for a longer time. Next, rub the sink with a small brush to remove the dark layer.
If there are clam tissue in the shell and there is a foreign smell, then it is necessary to carry out its thermal treatment: boil the sink for 5 minutes or warm it up in the microwave for 30-60 seconds. After these procedures, all unnecessary things should be removed from the sink with scissors or tweezers. Then you can proceed to the above procedure for processing the sink.
There is another way to clean shells from the remains of the shellfish. Send the folded shells to freezer for several days. After the freezing procedure, it is necessary to remove the clam tissue from the shell.
Post-processing of seashells
After cleaning and drying, the shells have a dull matte surface. You can give them an artificial shine (we'll talk about this below), or leave them as they are.
Use them as decoration for baskets, boxes, etc.


Photo from homedecordesigns.info
And also as independent interior items, such as stands, vases and flower pots:


Small items stands
It is quite easy to create various interior compositions with shells and starfish with the help of the Moment universal glue ...

… Decorate mirrors:

Shells look especially organic in tandem with natural materials, for example, wood and twine:

And children can take part in the creation of the simplest shell crafts. In the work you will need glue and thick cardboard for applications:


Coating shells with varnish
Seashells dried up from water look a little dull and lose their attractiveness. Glossy varnish gives them shine and a certain gloss, so they look brighter and more effective.

With the help of coating with mother-of-pearl, the shells are transformed and shine as if fresh from water.


As a cover for sinks, you can use acrylic lacquer(transparent or with mother-of-pearl), which is applied to the shell with an ordinary art brush. Acrylic adheres well and dries quickly, so it is great for decorating seashells.

Covering the shells with acrylic varnish, you can simultaneously cover them with free-flowing sequins (glitter), they will stick to the varnish and hold well, giving the shell additional texture and volume:

Aerosol varnish also suitable for covering seashells. Aerosol varnishes are colorless, as well as with golden and silver glitters.
It is better to work with aerosol varnishes in specially designated, well-ventilated rooms or outdoors.

Photo from seathingsventura.com

Photo from dekorella.hu
An alternative to the above varnishes can be nail polish... Even one that does not fit well will do.
In order not to stain your hands and the surface of the table, as well as to avoid sticking the shell to the kaolin surface, it is best to paint and dry by putting the shells on pencils or knitting needles in a pencil holder.
Galina Pchyolka demonstrates in his video tutorial how you can transform the most ordinary shells with nail polish:
You can combine both matte and varnished shells in your crafts.


How to make a through hole in shells
When making crafts, it becomes necessary to make small holes in the shells. This work is practically jewelry, since the shell is a fragile material and can crack or delaminate during the drilling process.
One rule must be observed: the thinner the shell wall, the smaller the hole should be and the accessories used (thread, fishing line, wire, etc.)
The shell hole can be made using automated and manual methods.
Using drill or screwdriver it is necessary to choose a drill with a diameter of 0.8 - 2 mm. The shell should be placed on a wooden or plastic board and secured with masking tape. The hole must be drilled directly over the tape. This will help prevent the shell from splitting.

The hole can also be made with clove and hammer... To do this, fix the shell with masking tape and mark the inside of it. Next, place the nail on the mark and gently tap on it with a hammer - you will get the initial hole. Next, you should move the nail back and forth until you get a hole of the desired diameter.
If you don't have a nail and a hammer at hand, you can replace them. needle, knitting needle or other available means.
You must follow safety rules and protect your eyes, as shell fragments can fly off in your direction and cause injury!

Once you learn how to make holes, you can create very beautiful jewelry from shells, for example, pendants, earrings, bracelets:


Jewelry accessories can be purchased at a craft store.


Chipped shells can be cleaned sandpaper or a sanding bar and make an original decoration out of such elements.


And also in the manufacture of jewelry: pendants, and even.


Crafts from shells in different needlework techniques
Shells can be bleached, but you can acrylic paints or enamel.
Before painting with paint, the treated shell can be coated with a primer, but this is not necessary. You can apply paint directly to the surface of the shell - so its natural pattern will be more clearly drawn under the paint.

It is better to pour the paint onto the palette in small quantities, adding in small portions if necessary, since acrylic paints dry quickly.
You also need to have different kinds brushes: wide - to paint over the shell completely and thin - to draw thin lines and blotches. When working, periodically wet the brushes in a glass of water.
Until the acrylic paint has dried on the shell, it can be easily wiped off. If the paint has already dried up, and you decide to make adjustments, then it is easy to paint over it with a different color.

All kinds of patterns (dots, squares or stripes) can be applied to the shells in accordance with the embossed pattern on its surface:

Also for painting seashells, you can use paint for painting porcelain or ceramics... Most often, products after using such a paint are subjected to heat treatment in the oven. In the case of shells, this is not required.

Coating spray paint- fast and convenient way give the shells the desired color scheme!

Photo from decoracion.facilisimo.com
From seashells and gold leaf make unique jewelry, for example, such pendants:

Photo from the site how-do-it.info


Decoupage of seashells is perfect for beginners to practice their skills.

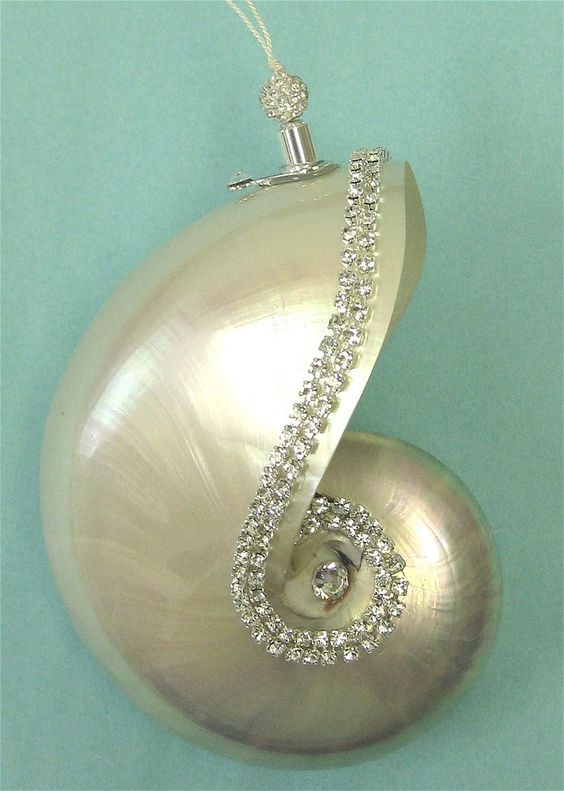
Inlaid seashells with rhinestones
As an example of "expensive" decor, shells are inlaid with rhinestones.

There is a special glue for rhinestones on sale, in addition to it you will need tweezers or a magnetic pencil for rhinestones.
Gluing with rhinestones is a painstaking process, so practice on small seashells and simple patterns

Chains of rhinestones are faster and easier to glue, because you do not need to glue each rhinestone separately:


You can decorate a Christmas tree with shells inlaid with rhinestones, wear them as jewelry and create truly chic interior items!
Christmas tree decoration from SeashellCollection

Photo frame for luxury interiors
Flowers, floating bowls and shell topiary
One of the most popular uses for seashells is through crafting.


In addition, you can use shells….

…. and create incredibly gentle flowers:


Channel Creator Club shows from seashells:
You can create shells of various shapes, sizes and colors!

Having supplemented the base of the bouquet with pearls, stones and beads, we get a beautiful never-fading:

Decor of photo frames and paintings from seashells
Decorated with shells brought from rest is the most relevant item for decoration.

The principle is the simplest: glue the finished frame around the entire perimeter with "Moment" or "Titan" glue, matching the shells to each other as beautifully as possible.

In this case, the frame can only be partially filled with shells ...

... or it can be decorated entirely:

Another way is to place the shells themselves in the frames, creating stylish ones in this way:

The idea can be more complicated:


Victor Bochkarev clearly demonstrates the technique of creating a collage with wax and shells:
If you do not dare to make such masterpieces yet, then you can quite make it out of shells.

Channel Vekoria Handmade teaches how:
Candles and candlesticks with shells
Wax candles can be decorated with shells on the outside, and gel candles on the inside.

Wax candles

Inside gel candle you can create real nautical stories! To do this, you first need to put on the bottom of a glass or bowl decorative ornaments and shells, and after that pour everything with a gel solution. Such candles are simply mesmerizing with their beauty!

To decorate a wax candle with shells, you need glue and a variety of shells and other decorations. But it's more practical to do candlestick, for example, from an ordinary glass cup, into which the candle itself will be inserted.

Photo from runningwithsisters.com
From shells of the same shape - for example, mussels - you can glue a candlestick in the form of a flower. To do this, take a round base, preferably from natural material such as wood. Glue the outer petals on it in a circle, then gradually move to the middle.
You can use both a glue gun (when gluing elements with rough surfaces), and universal glue "Moment" (if one of the surfaces is smooth - glass or plastic).
Do not forget to leave the center of the flower of the desired diameter in order to put a candle in it.

Candlesticks can be made from glasses turned upside down. Fill the glass with sand, shells, etc. decorative elements, then glue the bottom with thick cardboard and decorate with twine. To keep the twine on the glass surface, it is better to use the Moment universal glue. Candles can be wrapped with the same twine.

How to make the sea in a glass, see the video of the channel Recipes from MarMari:
The sink itself is a ready-made decorative candlestick.

Pull the wick out of the tea candles by the metal base at the bottom of the candle, and return the candles back to the mold.

The wick must be glued to the bottom of the shell in the center. Next, you should melt the paraffin. To do this, you need to boil water in a saucepan, then reduce the heat and lower the molds with paraffin into the water. Once the paraffin has melted, you can pour it into the sinks.
If the shells are unstable, then while pouring the paraffin, put them in an egg carton or fix with plasticine.

The paraffin should harden within 20 minutes.

Christmas toys in a marine style
Christmas toys in nautical style? Why not! This is a very popular option abroad.
By decorative elements, I mean rhinestones, stones, mosaics, shells and other nice little things that can be added to the decor.
Let's say you've created a beautiful seascape on canvas. Of course, for volume and realism, I would like to add a large beautiful shell and a couple of cobblestones (sorry, stones found on the occasion). Moreover, the dried starfish just asks for canvas. Only here you cannot glue these decorations on PVA. What kind of glue to take?
You've probably seen that in television master classes, designers usually use a "hot gun". You can buy it at a hardware store.
Gun glue is available in the form of rods. You load a pistol with them and plug it into an outlet. The glue starts to melt. Now pull the trigger and squeeze the liquid glue mass directly into the desired location on the canvas. And press the shell there. The glue hardens quickly and the shell is glued! All perfectly. What are the disadvantages?
Minus 1. The glue is very hot and stringy. Be careful yourself and do not give this tool to small children!
Minus 2. It is difficult to squeeze out a small amount of glue, so it sticks out from under small objects. Well, nothing, it's transparent.
Minus 3. The collage is beautiful. You hung it on the wall and you can't stop looking. Only in the evening suddenly the pebbles fell off one after another with a crash ... By morning, a shell followed them. The star, due to its dryness, lasted longer than others. And all due to the fact that not every hot melt glue is able to hold a heavy object of complex shape on a complex surface.
But the glue gun is indispensable for gluing light decorative elements with a "floristic bias", such as dried flowers, ribbons and other absorbent and loose material.
There are also options, such as Moment glue and various super-glues. You can use them, however, the pungent smell and the same viscosity are a little embarrassing.
You can try different mosaic adhesives. However, they are not all perfect. Some have a smell, others a color. Ideally, we need a transparent glue that is easy to use, odorless and provides reliable adhesion to the surface.
Perhaps the most convenient glue for gluing decorative elements is rhinestone glue. It is suitable for any surface, including fabrics; has no odor, because made on water based; it is convenient to use - they cannot be burned and it is easy to squeeze out, because it is packed in a soft tube with a thin nose. And, most importantly, it holds this glue really firmly. You can usually buy it in art stores, in the same place as all decorative materials.
Another great glue is clear acrylic gel. It can be matte or glossy. If you are working with a matte surface, it is better to use a matte gel (and vice versa). Acrylic gel meets all our requirements. The gel is produced in plastic tubes or glass jars. Usually I use gel for gluing large elements and it has never let me down! However, keep in mind that both the glue and the gel will take a long time to dry. If you are gluing a large object, and besides, an uneven one (such as a shell), you will need a lot of gel. The surface must be horizontal. Apply glue or gel, put a shell on it. If necessary, excess gel can be easily removed with a cotton swab. Leave the product to dry until the gel is completely dry (preferably for a day). If the elements are small, a small drop of glue or gel is enough. The glue will "grab" very quickly, the gel - a little longer.
I advise you to try these products, you will surely like them. Just do not forget to thoroughly dry and degrease the surface before gluing. And one more note: if the shell fell off along with the paint, then it's not about the glue. The reason is poor adhesion of the paint to the surface. That is why the surface should be prepared for painting.
I wish you creative success!
For several recent years I use shells as my main handicraft material. In the beginning, I used them to design photo frames and mirrors. This handmade photo frames with seashells are perfect for decorating your vacation photos.
I'll tell you how I do it.
So, if you have some shells lying around after a vacation at sea, you can stick them on frames for a photo - for yourself or as a gift for any holiday.
Take seashells and rinse them with running cold water... Some recommend rinsing the shells with acidified water and citric acid. I don't use this method. As a rule, the shells are rinsed with cold water quite well. In addition, at the end of the work I cover them with varnish, so they will shine like that.
Dry the shells and sort them. Look around the house for various little things that have nowhere to put, but it's a pity to throw them away: beautiful buttons, beads, lonely earrings, brooches, beautiful glass, etc. All these treasures can be integrated into the shell decor. You can also use plant seeds: eucalyptus, acacia, beans, etc.
I glue the shells on the frames using sanitary silicone (liquid nails) - this is the best glue, proven over the years of using frames. Sometimes I used a hot gun (hot melt), but, unfortunately, the shells often fall off, because the adhesion of hot melt glue to a smooth surface is not very strong. Some also use PVA glue, but since the area of contact between the shell and the frame is very small, in this case, the shells probably fall off even more often.
Now you need to place the shells on the frame, having understood approximately how they will lie and where. You can first expand only the largest elements, and then, when you glue them, fill in the gaps between them with small elements. You can build some figures, shapes from shells, or, for example, you can just lay them in random order. Also decide whether you will glue the shells only on the frame (option below) or also on glass, as in the option above. In any case, paper masking tape should be glued along the border of the glass or mirror so as not to stain the glass with silicone. If the glass is large, it is also best to cover the middle with newspaper or paper.

It is necessary to work with liquid nails in a well-ventilated area. this material has a pungent odor. The frame must lie on a horizontal surface, otherwise the shells will crawl downward, because liquid nails set within an hour or two. If you glue the shell with the convex side up, fill it with silicone from the inside and flip it over onto the frame. Remove excess silicone immediately with a paper towel. They say that glass stained with silicone can be cleaned with vinegar. I have not tried it myself, there was no need.
The most important thing is to try not to stain the shells themselves with silicone. the varnish does not adhere to silicone.
When the shells are finished gluing the frame, leave the frame alone for a few hours, after making sure that there are no traces of silicone on the shells.

The last stage of work is the coating of the shells with varnish. Dry shells have a rather pale appearance. The varnish gives them a “wet” look, which we are all used to seeing at the seashells on the beach. Most often I use a high gloss acrylic varnish. Sometimes I use pearlescent nail polish to give some of the shells the desired hue. V rare cases I use matt acrylic lacquer, but it does not give a "wet" effect.
Required materials for a nautical mirror
- Mirror(any form);
- Sea stars, river pebbles, various small shells. If it so happens that you do not have the opportunity to collect such materials immediately near the sea, you can buy ready-made sets in stores;
- Beads- pearls of different sizes;
- Adhesive composition(optimal - super glue);
- Adhesive paper or a bandage.
- The tools you need labor: scissors as well as tweezers.

How to decorate a nautical mirror
1. Before starting work, you need to clean the surface of the mirror with a glass detergent, it is advisable to thoroughly rinse the shells, river pebbles, this is quite important point, because the adhesive does not bond well oily or stained surfaces.

2. Using an adhesive bandage (or paper), make a frame on the mirror.

If necessary, you can also glue the shells on mirror surface, however, the advantage of this "frame" is that it will help you to clearly limit the place of gluing (it serves as a contour), and in case of an oversight, the bandage is easier to separate from the mirror than very fragile materials.

3. Let's start gluing small seashells. First you need to glue large shells to the frame. It is highly desirable that they are arranged symmetrically.
Try not to overload the frame, otherwise it will look overly bulky.

Before applying the adhesive to the material, attach the selected shells to the frame, create a few steps back at once, look at the mirror from afar. This will help you determine in advance which shells go well with each other.

The glue should be applied to the shells.

4. Moving away from the already glued large figures, attach small shells to the frame and, in addition, medium-sized sea river pebbles. Instead of river pebbles, you can also use very light, very flat pebbles sold in flower shops to decorate potted plants. Remember to leave room for the beads.

5. You need to glue the starfish carefully enough. The important thing is that they are quite fragile. Therefore, first it is much better to glue the stars onto an empty certain space, and only then place the rest around them.

6. It remains to fill the empty spaces with small small shells, pebbles, beads. For convenience, I advise you to use tweezers. This will make it easier to apply the adhesive to the small material.
Also, using tweezers, fill in all the other gaps with beads.
In the same case, if you cannot fill out absolutely everything empty spaces between small shells (for example, along the edges or even small "holes"), leave them empty - only thanks to the bandage frame, they will not be conspicuous.
For all those who live near the sea, there is an alternative option - to fill the "holes" with an adhesive and, accordingly, to fill them with clean sea sand. After some time, when the adhesive is completely dry, you will need to shake off the excess clean mountain sand. Another method is to use small, fairly light beads, for example, light cream, very light sand color tones, instead of pure sand.

7. Let's move on to the last stage of decorating the mirror in a nautical style. When all the materials are glued to the frame, it remains to wait until the adhesive dries. Following this, you need to clean the surface of the mirror, as well as the shells from the remnants of the adhesive.
Thereafter, the decorated frame can also be coated with a completely colorless varnish. However, this is not at all necessary: the varnish composition is needed to strengthen the structure.
Mirror in nautical style - photo


Cleansing
- If the shells are "dead" and there are no remains of shellfish in them, then they just need to be soaked in a solution of water and any chlorine-containing agent (eg, with bleach, "Duckling", etc.) in a 1: 1 ratio for 30 minutes. If the shells are very dirty or you want to remove the dark outer layer ( periostracum), then soak them longer. After soaking, brush the shells and rinse in clean water.
Drilling holes
To make some types of shell crafts (for example, wind chimes, beads, bracelets and other jewelry), you need to drill a hole in them. This task is quite simple, the difficulty lies only in the fact that the shells can crack or delaminate in the place of drilling.
Method 1. Choose a drill bit for a drill, screwdriver or straight grinder with a diameter of 0.8 - 2 mm. Place the shell on a wooden or plastic board and glue it down with masking tape. Drill a hole directly over the tape to keep the shell from splitting or delaminating.
Method 2. If you do not have a screwdriver or drill, then you can make a hole in the sink using a nail and a hammer. To do this, first glue the shell with masking tape, put a mark on the inside of the shell, then attach a nail and gently tap it with a hammer several times to make the initial hole. Next, widen the hole by moving the same nail back and forth inside it until you reach the desired diameter.


Materials:
- Masking tape or ordinary tape.
Instructions:
Step 1. Protect the mirror with paper and masking tape. At this stage, the frame can be painted if its original appearance does not suit you.
Step 2. Sort the shells by size to facilitate the creation of the future composition.
Step 3. First, glue the first row of small or medium-sized shells (about the same size) around the mirror.

Step 4. Now start gluing the largest shells. Beforehand, you can play with the layout options and choose the best one. If you are using epoxy glue, leave the frame to dry overnight after all the parts are glued on.


Materials:
- Cardboard;
- Scissors;
- Leg-split.
Instructions:
Step 1. Cut out the base for the heart-shaped panel from the cardboard.
Step 2. Use a knife or an awl to make two twine holes.
Step 3. Begin glueing the shells, trying to leave minimal gaps between them. Leave the eyelet holes open.

Step 4. Cut the twine to the desired length, thread the two ends of the rope through the holes from the inside of the panel and tie them in double knots.


Materials:
- Stretched canvas;
- Shells;
- Brush (optional).

Instructions:


Seashells are almost ready-made miniature candlesticks that are just waiting to be supplemented with paraffin and wick. You can use the resulting candles for a romantic picnic or just for interior decoration.

Materials:
Instructions:
Step 1. Remove the candle itself from the tin container, and then remove the wick from it by pulling on the metal base at the bottom of the candle (see photo). Set aside the wicks, and return the candles themselves to the molds.

Step 2. Glue each wick on double-sided tape or PVA glue in the center of the shell.
Step 3. Now we need to melt the paraffin to a completely liquid state. This can be done in three ways:
Step 4. Once the paraffin is melted, remove the molds from the heat and start filling the shells. It is best to use a pair of tongs or a pair of Chinese chopsticks for this. Do not forget to protect the surface of the table with a newspaper beforehand.


Topiary is a small decoration in the form of a tree in a pot. You can learn the principles of making topiary from shells with your own hands or from the following video tutorial.


If you have enough bivalve shells, you can make flowers out of them.


Materials:
- Glue gun;
- PVA glue (optional);
- Glitters (optional).

Instructions:
Step 1. Prepare the shells - wash them with soap, remove organic debris and, if desired, bleach them with chlorine-containing agents (see instructions at the beginning of the article).
Step 2. Paint the round base of the candlestick some neutral color, such as white.
Step 3. While the base is drying, sort your sink set by size.
Step 4. Begin gluing 1 row of shells on the sides of the base with thermal glue.

Step 5. When the first row is a little dry, start creating the second row, overlapping each new shell with the previous one and so that it sits between the two shells of the first row. As a result, you will have a staggered layout of the shells of two rows as shown in the photo.

Step 6. Glue the third and all subsequent rows according to the same principle, but not on the base, but on the joints of the shells of the previous row (the place is marked with an arrow in the photo below).

Step 7. When you have glued the last row, inspect the candlestick and add another row or two where you think you need it.
Step 8. Hooray, the seashell candlestick is ready! If you wish, you can additionally decorate it with sparkles. To do this, you need to do the following:

Idea 7. Create a wind chime

Materials:
- Twine, line, or any thread.
- A twig or wooden stick.
- Scissors.
- Hot glue gun or small hole drilling tool (drill with 2mm drill bit or just a needle and nail scissors).
- Shells.
Instructions:
Step 1. If you want the shells to be tied to the threads, then first drill holes in them (see Basic instructions at the beginning of the article). If you do not have a tool, and you are satisfied with the glue method of fastening, then immediately proceed to the next stage.
Step 2. Tie a twine to the branch as shown in the photo, measure about 7 cm in length from it and cut off the excess.

- If you use shells with holes, then the twine must be cut immediately to the desired length with a margin for knots.
Step 3. Glue the shell to the twine with a drop of thermal glue. Then glue another 7-centimeter thread of twine to the other end of the sink. Continue working until you are satisfied with the length of the first row.

- Shells with holes can be tied to a thread in at least two ways: by tying knots around or under the holes (the knot must be larger than the hole).
Step 4. Continue to hang the threads with shells to the desired number. That being said, you can play with the length of the rows to form, say, an arch or a ladder. In this case, the wind chime has alternating short and long strands.

Step 5. When the product is ready, tie another piece of twine at both ends of the branch.

Following the principles of this workshop, but by replacing the branch with a hoop or adding shells with starfish, beads, feathers and other decor, you can create more whimsical wind chime designs.

Idea 8. Making a bracelet from cowrie shell
If you have at least one cowrie shell, then you can make a boho bracelet for an arm or leg out of it with your own hands. You can buy all the accessories for such decoration in craft stores or in large sewing stores.

Materials:
- One cowrie shell;
- 1 m silk lace;
- Half a skein of floss in a contrasting color;
- Beads (in this master class, copper beads from an old bracelet are used);
- A pair of crimp ends with loops (designed for cords and bracelets);
- Clasp for jewelry (in the form of a ring or carabiner);
- Clasp ring (detachable);
- Scissors;
- Pliers.

Instructions:
Step 1. Drill a small hole at both ends of the cowrie (see Basic Instructions at the beginning of the article).
Step 2. Cut about 15 cm from the skein of silk lace and set aside this section for a while.
Step 3. Pass a silk string about half the length through one hole in the shell and tie a knot.

Step 4. Pass the other end of the cord through the middle of the sink and tie a knot at the second hole.

Step 5. Cut a few threads of the floss, collect them and fold the resulting bundle around the silk cord next to the shell as shown in the photo.

Step 6. Take a short piece of lace, wrap it tightly around the top of the folded floss, tie a knot and cut off the excess. You will have a brush. Fluff it up and trim with scissors if necessary.

Step 7. Start stringing beads on both ends of the bracelet. Once the desired length has been reached, fold the ends of the cords in half and tuck the resulting ends into the crimp ends.

Step 8. Use a pair of pliers to pinch the ends on the ends of the bracelet and then cut off the excess cord.

Step 9 Using pliers, attach the ring to one end piece and the clasp to the other. Your shell bracelet is ready!

Preserving seashells as a reminder of carefree days at the beach is best in the form of home furnishings, jewelry, and souvenirs. After all, they are such a beautiful, completely free, natural and durable material. In this material you will find 50 inspiring photos, 8 ideas and the same number of step-by-step DIY workshops on making shell crafts for beginners.
Basic instructions for preparing seashells
Cleansing
Before you start making crafts from shells, they need to be well prepared.
- If the shells are "dead" and there are no remains of shellfish in them, then they just need to be soaked in a solution of water and any chlorine-containing agent (eg, with bleach, "Duckling", etc.) in a 1: 1 ratio for 30 minutes. If the shells are very dirty, or you want to remove the dark outer layer (periostracum), soak them longer. After soaking, brush the shells and rinse in clean water.
- If the shells are "alive", that is, they have the remains of mollusks (albeit long dead) and have an unpleasant odor, then they must be thoroughly cleaned. To do this, immerse the shells in boiling water for 5 minutes, and then remove the remains of the shellfish using tongs, nail scissors, etc. There is also a second way: heat the shells in the microwave for 30 seconds, then try to remove the remains with tongs. If unsuccessful, continue heating the sinks in the microwave, checking the result every 10 seconds. When all remains have been removed, treat the sinks with chlorine according to the first instructions.
After finishing, inspect the sinks for chips and, if any, sand them with a sanding block, disc or sandpaper. If you want, you can add shine to them with clear nail polish or furniture, or with oil or grease cream. True, in this case, before processing the shells with glue, the gluing points will have to be additionally degreased with alcohol.
Drilling holes
To make some types of shell crafts (for example, wind chimes, garlands, beads, bracelets and other jewelry), you need to drill a hole in them. This task is quite simple, the difficulty lies only in the fact that the shells can crack or delaminate in the place of drilling.
Therefore, remember the main rule: the thinner the sink, the smaller the hole should be in it and, accordingly, the thread / accessories of the decoration.

To make such beads, you need to drill holes in the shells and string them on a silk cord, fixing the location with knots. Further, the ends of the laces will only have to be clamped in the crimp ends and fasteners to them.

To make such beads, you need to drill holes in the shells and string them on a silk cord, fixing the location with knots. Further, the ends of the laces will only have to be clamped in the crimp ends and fasteners to them.
There are two ways to make holes in shells - manual and automated.
Method 1. Choose a drill bit for a drill, screwdriver or straight grinder with a diameter of 0.8 - 2 mm. Place the shell on a wooden or plastic board and glue it down with masking tape. Drill a hole directly over the tape to keep the shell from splitting or delaminating.
Method 2. If you do not have a screwdriver or drill, then you can make a hole in the sink using a nail and a hammer. To do this, first glue the shell with masking tape, put a mark on the inside of the shell, then attach a nail and gently tap it with a hammer several times to make the initial hole. Next, widen the hole by moving the same nail back and forth inside it until you reach the desired diameter.

If you have neither a nail nor a hammer at hand, then use an ordinary needle, nail scissors or a knife and "drill" the hole by hand. The result will appear in about 10 minutes.
Idea 1. Inlay frames, frames and frames
Shells can be used to decorate the frame of a mirror, a picture or a photo frame. We present examples of such crafts in the next selection (scroll the photo to the right).


Today we suggest you decorate a frame for a mirror with shells, but by the same principle, you can decorate any photo frame or picture frame.

Materials:
- Small, medium and large shells and, if desired, additional decorations (for example, starfish, pearls, figurines of skates, etc.).
- Glue gun and a few sticks of glue or clear epoxy glue.
- Newspaper or any unnecessary paper to protect the mirror from the glue.
- Masking tape or ordinary tape.
Instructions:
Step 1. Protect the mirror with paper and masking tape. At this stage, the frame can be painted if its original appearance does not suit you.
Step 2. Sort the shells by size to facilitate the creation of the future composition.
Step 3. First, glue the first row of small or medium-sized shells (about the same size) around the mirror.

Step 4. Now start gluing the largest shells. Beforehand, you can play with the layout options and choose the best one. If you are using epoxy glue, leave the frame to dry overnight after all the parts are glued on.


Idea 2. Making a valentine panel
From the collection of shells of different shapes and sizes, you can make a panel in the form of a valentine. However, you can cut any other shape out of cardboard / plywood, say, the same seahorse or letter.

Materials:
- Glue gun or any glue with strong adhesion;
- Collection of river and sea shells;
- Cardboard;
- Scissors;
- Leg-split.
Instructions:
Step 1. Cut out the base for the heart-shaped panel from the cardboard.
Step 2. Use a knife or an awl to make two twine holes.
Step 3. Begin glueing the shells, trying to leave minimal gaps between them. Leave the eyelet holes open.
Step 4. Cut the twine to the desired length, thread the two ends of the rope through the holes from the inside of the panel and tie them in double knots.
In the next video, you can see a visual master class on making crafts from shells with your own hands in the form of a valentine panel.
Below are other ideas for creating a panel from shells.


Idea 3. "Painting" a picture on canvas
And here is another idea for creating a wall craft from shells.


Materials:
- Stretched canvas;
- Shells;
- Glue gun or other glue of strong adhesion, for example, "Moment";
- Template or stencil of the desired design, printed on paper;
- Acrylic paint for background creation (optional);
- Brush (optional).

Instructions:
- If you want to repeat the idea of the painting in this master class, then first create a background for the composition from seashells. To do this, use a brush and acrylic paint desired color. Wait for the background to dry and proceed to the next step.
- Fix the template or stencil to the canvas with masking tape, and then trace its outlines with a pencil.
- Start gluing the shells to the drawing without going beyond its borders.

Also see our other materials:

Idea 4. Cook candles for mini candlesticks
Seashells are almost ready-made miniature candlesticks that are just waiting to be supplemented with paraffin and wick. The resulting candles can be used for table setting, a romantic picnic, or just for interior decoration.


Materials:
- Sea or large river shells;
- Small round candles in tin molds;
- Water and a pot for a water bath;
- PVA glue or double-sided tape.
Instructions:
Step 1. Remove the candle itself from the tin container, and then remove the wick from it by pulling on the metal base at the bottom of the candle (see photo). Set aside the wicks, and return the candles themselves to the molds.

Step 2. Glue each wick on double-sided tape or PVA glue in the center of the shell.
Step 3. Now we need to melt the paraffin to a completely liquid state. This can be done in three ways:
- Bring the water to a boil in a saucepan, then reduce the heat to stop boiling and dip the molds into it.
- Place the candles on a low-heat stove and be careful not to burn the wax.
- Heat the paraffin wax with a hair dryer.
Step 4. Once the paraffin is melted, remove the molds from the heat and start filling the shells. It is best to use a pair of tongs or a pair of Chinese chopsticks for this. Do not forget to protect the surface of the table with a newspaper beforehand.

- If the shells are too unstable, and you are afraid that the paraffin will harden unevenly, then it is better to arrange the candles in the cells of the egg packaging or fix, for example, with soft clay that does not leave traces.
After about 20 minutes, the paraffin is completely solidified, and you can enjoy the light of the candles from the seashells.


Idea 5. We make a topiary in a marine style
Topiary is a small decoration in the form of a tree in a pot. You can find out the principles of making topiary from shells with your own hands in our master class or from the following video lesson.
And in this selection of photos you can get ideas for decorating a topiary from shells with your own hands in a traditional round shape or in the form of a Christmas tree.


Idea 6. Making a candlestick-flower
If you have enough bivalve shells, you can make beautiful flower-shaped candlesticks out of them.


Today we propose to make just such a craft from mussel shells.


Materials:
- Shells of bivalve molluscs;
- Any small diameter round base;
- Glue gun;
- PVA glue (optional);
- Glitters (optional).
Instructions:
Step 1. Prepare the shells - wash them with soap, remove organic debris and, if desired, bleach them with chlorine-containing agents (see instructions at the beginning of the article).
Step 2. Paint the round base of the candlestick some neutral color, such as white.
Step 3. While the base is drying, sort your sink set by size.
Step 4. Start gluing 1 row of shells on the sides of the base with thermal glue.
Step 5. When the first row is a little dry, start creating the second row, overlapping each new shell with the previous one and so that it sits between the two shells of the first row. As a result, you will have a staggered layout of the shells of two rows as shown in the photo.
Step 6. Glue the third and all subsequent rows according to the same principle, but not on the base, but on the joints of the shells of the previous row (the place is marked with an arrow in the photo below).
Step 7. When you have glued the last row, inspect the candlestick and add another row or two where you think you need it.
Step 8. Hooray, the seashell candlestick is ready! If you wish, you can additionally decorate it with sparkles. To do this, you need to do the following:
- Treat the shells with PVA glue on the inside or only along the edges.
- Sprinkle a generous amount of glitter on the craft, let the glue dry, and then shake off the excess.

Idea 7. Create a wind chime
Shells are an ideal material for making wind chimes, because the "chime" of such sea bells is very pleasant to the ear.

For a beginner grower, it is important to be clearly aware of the soil in which to plant a cactus. Often this understanding comes after a series of trials and failures. Not worth it ...

Fuchsia is a perennial plant native to Central and South America and New Zealand. Indoor fuchsia is a hybrid ...
Entry from: 9-21-2016
This year I finally made my old dream come true - I made a decor from seashells. I collected shells for a long time - from every trip to the sea I brought with me a certain amount of shells. Everyone was going to start making crafts from shells for the interior, but, as the saying goes - “the fees were short-lived” 🙂 The only thing was that the shells went to decorate miniature gardens in bowls, the creation of which I am fond of.
This year I was lucky enough to visit the sea not far from Anapa, in st. Blagoveshchenskaya, where we camped on a sandy spit. There were absolutely extraordinary shells - the kind I had never seen in my life. They were large, bright, some were even covered with limescale resembling coral formations.

Of course, all the time I was resting, I was enthusiastically engaged in the collection of this beauty, with the aim of subsequently making a decor from shells. Other shells are smaller, I collected on the Sea of Azov when we went to the port of Kavkaz near Taman to meet a comrade from the ferry.
When we returned from the sea, we stopped at Ikea near Krasnodar and there I bought two wooden mirrors, hoping to decorate them with shells. I started decorating a mirror with my own hands while on a trip - it's nice to do something creative on vacation, when there is a lot of free time. To do this, I only needed pva glue, shells and the mirror itself.

How to glue shells to glass
Many people are interested in me - how and with what glue shells can be glued to the glass - I will say with full responsibility that there is no better PVA glue.
You need to glue the shells like this: squeeze the PVA glue onto the surface (it should be thick and create a layer of millimeter 3 on the surface. This is exactly how, and not as many do - just smear the surface with a brush. In the latter case, the shells will fall off almost immediately.
But if you squeeze out the glue in a thick layer, then carefully put the shells in the glue (do not be afraid, this will not harm beauty), then they will stick very well. When the glue dries, its layer will become thinner and it will itself become transparent and invisible. In this way, I glued the shells to the mirror. Large orange ones are collected on the Black Sea, and small ones - on the Azov Sea.
See the shells themselves in macro photography - you can't see the glue at all!

This is the original mirror.

Well, and so it became after decorating with shells.

The next idea for execution is to make from shells. Fortunately, after the last trip I have a lot of them.
Preserving seashells as a reminder of carefree days at the beach is best in the form of home furnishings, jewelry, and souvenirs. After all, they are such a beautiful, completely free, natural and durable material. In this material you will find 50 inspiring photos, 8 ideas and the same number of step-by-step DIY workshops on making shell crafts for beginners.
Basic instructions for preparing seashells
Cleansing
Before you start making crafts from shells, they need to be well prepared.
- If the shells are "dead" and there are no remains of shellfish in them, then they just need to be soaked in a solution of water and any chlorine-containing agent (eg, with bleach, "Duckling", etc.) in a 1: 1 ratio for 30 minutes. If the shells are very dirty, or you want to remove the dark outer layer (periostracum), soak them longer. After soaking, brush the shells and rinse in clean water.
- If the shells are "alive", that is, they have the remains of mollusks (albeit long dead) and have an unpleasant odor, then they must be thoroughly cleaned. To do this, immerse the shells in boiling water for 5 minutes, and then remove the remains of the shellfish using tongs, nail scissors, etc. There is also a second way: heat the shells in the microwave for 30 seconds, then try to remove the remains with tongs. If unsuccessful, continue heating the sinks in the microwave, checking the result every 10 seconds. When all remains have been removed, treat the sinks with chlorine according to the first instructions.
After finishing, inspect the sinks for chips and, if any, sand them with a sanding block, disc or sandpaper. If you want, you can add shine to them with clear nail polish or furniture, or with oil or grease cream. True, in this case, before processing the shells with glue, the gluing points will have to be additionally degreased with alcohol.
Drilling holes
To make some types of shell crafts (for example, wind chimes, garlands, beads, bracelets and other jewelry), you need to drill a hole in them. This task is quite simple, the difficulty lies only in the fact that the shells can crack or delaminate in the place of drilling.
Therefore, remember the main rule: the thinner the sink, the smaller the hole should be in it and, accordingly, the thread / accessories of the decoration.

To make such beads, you need to drill holes in the shells and string them on a silk cord, fixing the location with knots. Further, the ends of the laces will only have to be clamped in the crimp ends and fasteners to them.

To make such beads, you need to drill holes in the shells and string them on a silk cord, fixing the location with knots. Further, the ends of the laces will only have to be clamped in the crimp ends and fasteners to them.
There are two ways to make holes in shells - manual and automated.
Method 1. Choose a drill bit for a drill, screwdriver or straight grinder with a diameter of 0.8 - 2 mm. Place the shell on a wooden or plastic board and glue it down with masking tape. Drill a hole directly over the tape to keep the shell from splitting or delaminating.
Method 2. If you do not have a screwdriver or drill, then you can make a hole in the sink using a nail and a hammer. To do this, first glue the shell with masking tape, put a mark on the inside of the shell, then attach a nail and gently tap it with a hammer several times to make the initial hole. Next, widen the hole by moving the same nail back and forth inside it until you reach the desired diameter.
If you have neither a nail nor a hammer at hand, then use an ordinary needle, nail scissors or a knife and "drill" the hole by hand. The result will appear in about 10 minutes.
Idea 1. Inlay frames, frames and frames
Shells can be used to decorate the frame of a mirror, a picture or a photo frame. We present examples of such crafts in the next selection (scroll the photo to the right).


Today we suggest you decorate a frame for a mirror with shells, but by the same principle, you can decorate any photo frame or picture frame.

Materials:
- Small, medium and large shells and, if desired, additional decorations (for example, starfish, pearls, figurines of skates, etc.).
- Glue gun and a few sticks of glue or clear epoxy glue.
- Newspaper or any unnecessary paper to protect the mirror from the glue.
- Masking tape or ordinary tape.
Instructions:
Step 1. Protect the mirror with paper and masking tape. At this stage, the frame can be painted if its original appearance does not suit you.
Step 2. Sort the shells by size to facilitate the creation of the future composition.
Step 3. First, glue the first row of small or medium-sized shells (about the same size) around the mirror.

Step 4. Now start gluing the largest shells. Beforehand, you can play with the layout options and choose the best one. If you are using epoxy glue, leave the frame to dry overnight after all the parts are glued on.
Idea 2. Making a valentine panel
From the collection of shells of different shapes and sizes, you can make a panel in the form of a valentine. However, you can cut any other shape out of cardboard / plywood, say, the same seahorse or letter.
Materials:
- Glue gun or any glue with strong adhesion;
- Collection of river and sea shells;
- Cardboard;
- Scissors;
- Leg-split.
Instructions:
Step 1. Cut out the base for the heart-shaped panel from the cardboard.
Step 2. Use a knife or an awl to make two twine holes.
Step 3. Begin glueing the shells, trying to leave minimal gaps between them. Leave the eyelet holes open.
Step 4. Cut the twine to the desired length, thread the two ends of the rope through the holes from the inside of the panel and tie them in double knots.
In the next video, you can see a visual master class on making crafts from shells with your own hands in the form of a valentine panel.
Below are other ideas for creating a panel from shells.


Idea 3. "Painting" a picture on canvas
And here is another idea for creating a wall craft from shells.

Materials:
- Stretched canvas;
- Shells;
- Glue gun or other glue of strong adhesion, for example, "Moment";
- Template or stencil of the desired design, printed on paper;
- Acrylic paint for background creation (optional);
- Brush (optional).

Instructions:
- If you want to repeat the idea of the painting in this master class, then first create a background for the composition of shells. To do this, use a brush and acrylic paint of the desired color. Wait for the background to dry and proceed to the next step.
- Fix the template or stencil to the canvas with masking tape, and then trace its outlines with a pencil.
- Start gluing the shells to the drawing without going beyond its borders.

Also see our other materials:

Idea 4. Cook candles for mini candlesticks
Seashells are almost ready-made miniature candlesticks that are just waiting to be supplemented with paraffin and wick. The resulting candles can be used for table setting, a romantic picnic, or just for interior decoration.


Materials:
- Sea or large river shells;
- Small round candles in tin molds;
- Water and a pot for a water bath;
- PVA glue or double-sided tape.
Instructions:
Step 1. Remove the candle itself from the tin container, and then remove the wick from it by pulling on the metal base at the bottom of the candle (see photo). Set aside the wicks, and return the candles themselves to the molds.
Step 2. Glue each wick on double-sided tape or PVA glue in the center of the shell.
Step 3. Now we need to melt the paraffin to a completely liquid state. This can be done in three ways:
- Bring the water to a boil in a saucepan, then reduce the heat to stop boiling and dip the molds into it.
- Place the candles on a low-heat stove and be careful not to burn the wax.
- Heat the paraffin wax with a hair dryer.
Step 4. Once the paraffin is melted, remove the molds from the heat and start filling the shells. It is best to use a pair of tongs or a pair of Chinese chopsticks for this. Do not forget to protect the surface of the table with a newspaper beforehand.

- If the shells are too unstable, and you are afraid that the paraffin will harden unevenly, then it is better to arrange the candles in the cells of the egg packaging or fix, for example, with soft clay that does not leave traces.
After about 20 minutes, the paraffin is completely solidified, and you can enjoy the light of the candles from the seashells.

Idea 5. We make a topiary in a marine style
Topiary is a small decoration in the form of a tree in a pot. You can find out the principles of making topiary from shells with your own hands in our master class or from the following video lesson.
And in this selection of photos you can get ideas for decorating a topiary from shells with your own hands in a traditional round shape or in the form of a Christmas tree.


Idea 6. Making a candlestick-flower
If you have enough bivalve shells, you can make beautiful flower-shaped candlesticks out of them.


Today we propose to make just such a craft from mussel shells.


Materials:
- Shells of bivalve molluscs;
- Any small diameter round base;
- Glue gun;
- PVA glue (optional);
- Glitters (optional).
Instructions:
Step 1. Prepare the shells - wash them with soap, remove organic debris and, if desired, bleach them with chlorine-containing agents (see instructions at the beginning of the article).
Step 2. Paint the round base of the candlestick some neutral color, such as white.
Step 3. While the base is drying, sort your sink set by size.
Step 4. Start gluing 1 row of shells on the sides of the base with thermal glue.
Step 5. When the first row is a little dry, start creating the second row, overlapping each new shell with the previous one and so that it sits between the two shells of the first row. As a result, you will have a staggered layout of the shells of two rows as shown in the photo.
Step 6. Glue the third and all subsequent rows according to the same principle, but not on the base, but on the joints of the shells of the previous row (the place is marked with an arrow in the photo below).
Step 7. When you have glued the last row, inspect the candlestick and add another row or two where you think you need it.
Step 8. Hooray, the seashell candlestick is ready! If you wish, you can additionally decorate it with sparkles. To do this, you need to do the following:
- Treat the shells with PVA glue on the inside or only along the edges.
- Sprinkle a generous amount of glitter on the craft, let the glue dry, and then shake off the excess.

Idea 7. Create a wind chime
Shells are an ideal material for making wind chimes, because the "chime" of such sea bells is very pleasant to the ear.

Materials:
- Twine, line, or any thread.
- A twig or wooden stick.
- Scissors.
- Hot glue gun or small hole drilling tool (drill with 2mm drill bit or just a needle and nail scissors).
- Shells.