What can be cooked from squid: quick and tasty
Despite the abundance of finishing materials, wallpapering walls remains the most common way of decorating. Having glued the wallpaper, you can very quickly transform the room: make the room light, "revitalize" the interior or place style accents.
To get the desired result, you must choose the right wallpaper and follow all the rules for carrying out repair work.
The choice of finishing material: features of different types of wallpaper
The wall decoration process begins with the selection facing material... If you have made a choice in favor of traditional wallpaper, you need to decide on the best option... All types of wallpaper on the construction market have certain characteristics. Based on the qualities of the material, the conditions of their operation and personal preferences, one must make a choice.

Paper wallpaper- the most popular type of wallpaper in the world. There are many advantages to canvases, but some disadvantages appear when using them. The main advantages include:
- loyal price policy allows you to frequently update the interior of the room;
- a wide range of colors and patterns;
- environmental friendliness and hypoallergenicity of the material - wallpaper is ideal for children's rooms;
- the material passes air well, thereby preventing the formation of mold.
Cons of paper products:
- the wallpaper quickly loses its original appearance- fade in sunlight, wear out and wear out;
- majority paper wallpaper can not be washed;
- this material is not suitable for use in "wet" rooms.

Advice. When planning pasting walls with paper wallpaper, it is better to choose modern duplex (two-layer) canvases. They are stronger and less prone to contamination. Some duplex wallpapers can be washed.
Vinyl wallpapers... Main advantages finishing material: moisture resistance and beautiful appearance. Such wallpaper is based on non-woven or paper, the top layer is treated with polyvinyl chloride. Vinyl wallpapers are produced in a wide range of patterns and textures (embossed).
Vinyl cover protects decorative trim from sun rays, humidity and reduces dust attraction. These wallpapers are better suited for corridors, bathrooms and kitchens. Most PVC canvases are paintable.
The disadvantage of vinyl wallpaper is poor permeability. PVC film does not allow air to pass through, walls do not breathe. As a result, the microclimate in the room is deteriorating, the room must be ventilated more often.
Important! Some manufacturers use innovative technologies and a vinyl-coated wallpaper with a porous structure is produced. This allows sufficient air to pass through the material.
Vinyl wallpapers are not cheap, but their high cost is fully paid off by a long service life - the coating retains its decorative effect for up to 10 years.
Today, several types of vinyl wallpaper are used:

- hard vinyl covering - a hard base is applied to the base that can withstand significant mechanical damage;
- smooth vinyl covering - forms a smooth, even surface, more susceptible to damage;
- silk-screen printing is one of the most spectacular types of wallpaper; hot stamping technology gives the impression that the wallpaper contains natural silk threads;
- foamed vinyl - is considered the most durable and dense, due to the deep embossed structure.
Non-woven wallpaper are made on the basis of cellulose and consist of 2 layers: non-woven and polymer coating... The combination of the two layers resulted in the following characteristics:
- high strength - non-woven wallpaper is stronger than textile and paper;
- the ability to hide wall irregularities and microcracks;
- the wallpaper is easy to stick - subject to the technology, the material does not deform and does not bubble;
- air transmission;
- choice of wallpaper texture - embossed or smooth;
- wallpaper fits well on plaster, wood, cement, slabs and other materials.
Important! Distinctive feature pasting with flesiline wallpaper - fixing on a wall covered with glue.
Textile wallpaper produced on the basis of flesilin and paper. From above, the base layer is covered with textiles (jute, polyester, linen, cotton, etc.). It is the top layer that largely determines the final cost of the finishing material. Fabric wallpaper plays not only a decorative role, it has sound and heat insulation properties.

With the help of such wallpapers it will be possible to create original interior... However, they also have negative sides:
- exactingness when gluing - it will be difficult for an inexperienced master to complete the work;
- intolerance to wet cleaning limits the scope of use of textile wallpaper.
Glass Woven Wallpaper- wall covering made of glass yarns of different thickness with subsequent impregnation. Glass fiber is a unique finishing material with a number of undeniable advantages:
- fire-fighting properties;
- naturalness and safety of use;
- high strength and resistance to any damage;
- durability - service life of about 30 years;
- dust-repellent and easy to clean;
- due to the woven structure, air is allowed to pass through.

How to glue fleselin wallpaper: step by step instructions
Preparation of the base
The process of pasting any wallpaper, including non-woven wallpaper, begins with a thorough preparation of the walls. This stage takes a lot of time, but the final result largely depends on the quality of its implementation. What activities are mandatory? The previous wall covering must be removed and the surface leveled.
Removing old wallpaper... You can use ordinary soapy water to soften the coating. To improve the effect, it is advisable to add a little wallpaper glue. Washable old wallpaper or very thick, first you need to trim a little, apply notches, and then moisten with soapy water. After such processing, leave the wallpaper for a while - the coating will swell and it can be easily removed with a spatula.
Sometimes the procedure has to be repeated several times. To facilitate the removal of wallpaper, you can purchase a special product developed for this purpose - the solution is well absorbed and "softens" the material.
Removing enamel and old paint... In "Khrushchev", "Stalin" and apartments of the Brezhnev era, walls covered with paint are often found. If the coating peels off well, then it is cleaned off with a spatula. However, in the overwhelming majority, it takes a lot of effort to remove old paint. The enamel is tapped with a hatchet and scraped off with a flat cutter or chisel.

Whitewashing removal. Water-based paint or whitewash is pre-moistened with soap and water, and then removed with a spatula. A thin layer of old whitewash can be easily washed off with hot water.
The next step is to align the walls. All irregularities, cracks and other defects must be plastered or putty. If the surface crumbles and crumbles, it is advisable to treat it with a bonding primer.
Required tools
To complete the work you will need:
- roulette;
- laser level or vertical plumb line with a cord;
- long pile roller;
- brush for smoothing the wallpaper;
- a plastic spatula with a soft edge for rolling wallpaper;
- construction knife for cutting wallpaper;
- metal spatula (narrow);
- foam sponge;
- glue tray;
- pencil;
- ladder.

Material calculation and wall marking.
To calculate the required amount of wallpaper, you should know the dimensions of the room. As a rule, the height of the ceilings ranges from 2.5 to 2.8 m, the length of the roll is 10 m. That is, one roll should be enough for three strips. Knowing the width of the roll and the perimeter of the room, you can easily calculate the total number of strips.
Most non-woven wallpaper has smooth, high-quality edges. Therefore, they are glued end-to-end. At the same time, the connection of panels looks like a single solid surface. To facilitate further work, it is advisable to apply markings.

From the corner of the room at a distance equal to the width of the roll (0.5 - 1.2 m), draw a vertical line. Use a level to check for evenness. The lines are applied all over the wall.
Stages of wallpapering
Important! Before cutting off the next canvas, you should measure the height of the walls in different places, for example, every 30-40 cm. Very often the walls have drops and the length of different cuts can differ significantly from each other.
If the wallpaper has a large pattern, then it must be selected. You can find out the size of the fit by looking at the pictogram on the label. When marking and cutting, it is important to control that the image matches and does not have to glue a piece of canvas from below or from above.
For example, if the required size of the fit is 48 cm, and the ceiling height is 2.5 m, then the length of each blank will be 2.88 m. According to the rules for “cutting” wallpaper, the length of the blank must be a multiple of the size of the fit, i.e. 48 cm, but not less than the height of the room.

After calculating, you can start cutting. Cover the floor with plastic wrap and roll the roll face down. Measure the length of the cut (in our example - 2.88 m) and make a notch with a knife. Using a long ruler, bend the wallpaper at the serif level, check the evenness of the fold and cut off the sheet.
Spread the next sheet and check the fit of the drawings of the two canvases. If the workpieces fit well, then a cut can be made.
Preparing the glue... For wallpapering, you need to choose an adhesive composition that matches the type of material: paper, vinyl, flesilin, textiles or fiberglass. Read the instructions before mixing the adhesive.
General procedure for preparing glue:
- Pour the dry mixture into a mixing container.
- Gently pour water into the powder in a thin stream, stirring with a whisk.
- Leave the mixture to infuse and mix again, removing the lumps.

Wallpapering... Direct pasting of walls is carried out in the following sequence:

How to glue the wallpaper: video
How to glue vinyl wallpaper: the nuances of doing the job
The procedure for gluing vinyl cloth is not much different from pasting with non-woven wallpaper. However, several nuances can be distinguished:
- The choice of glue must be approached responsibly. Vinyl wallpaper has the quality of stretching when glue is applied and shrinking after it dries. A poor-quality adhesive composition may not cope with such a load and the seams will simply disperse.
- When gluing, a moderate amount of glue is applied to the walls to prevent excessive stretching of the canvas.
- In some cases, it is allowed to apply glue not only to the wall surface, but also to the canvas itself.
- Special attention is paid to the seams. They must be carefully rolled out with a roller so that they do not disperse.
How to glue the wallpaper correctly: a photo of joining the canvases

How to glue paper wallpaper: features of cutting and gluing
The technology of pasting walls with paper wallpaper depends on their type: simplex or duplex. Single-layer simplex wallpaper is applicable only for perfectly flat walls - the canvas is very thin and all cracks and pits will be visible through it. Such wallpaper is overlapped. Duplex is glued only end-to-end.
The main requirement that must be met when working with paper wallpaper: after applying the glue to the sheet, it must be left to “ripen” for 2-7 minutes (the time depends on the density of the material).

When cutting wallpaper, pay attention to the presence of an edge. Some foreign manufacturers produce wallpaper with an edge only on one edge, domestic - on both. For dense canvases that are glued end-to-end, the border is cut on both sides, for thin wallpapers - on one side. It is convenient to cut the border on the chair - the unnecessary edge is removed, and the wallpaper rolls back into the roll.
Another nuance when working with classic wallpaper- wall decoration with borders. You can glue the decor only after the wallpaper is completely dry. It usually takes 12-32 hours for the paper to dry. This period depends on the amount of glue spread, the density of the material and the conditions in the room.
How to glue corners with wallpaper
Pasting the outer corner:
- Measure the distance from the last strip of wallpaper to the corner.
- Cut off a sheet of wallpaper that is 2.5 cm wider than the measured distance.
- Glue the strip, bending the excess wallpaper to the opposite corner.
- At a right angle, the remainder is glued end-to-end, in other cases - with an overlap along the vertical markings.
- Use a sharp knife to walk along the corner, attaching a ruler. At the same time, you need to press the edges. Remove clippings.

Internal corner finish:
The main rule: you should never lay a single piece of wallpaper at the corner. If this condition is neglected, then folds and bulges are formed.
- Measure the distance from the corner to the last strip of wallpaper and add 2 cm.
- Cut off the desired piece of wallpaper and glue it on the wall, grabbing the corner.
- Press the paper firmly against the wall by running a blunt object over it.
- Glue the remaining piece with a cut with a slight overlap on the adjacent wall.
- Attach a ruler to the junction of the walls and draw with a knife, removing excess material.
How to glue wallpaper back to back in the corners: video
How to properly glue glass fiber wallpaper
When pasting with fiberglass, it is important to follow some rules:
- The glue is applied to the wall, not to the canvas.
- For work, you need to use glue for heavy types of wallpaper.
- At first glance, fiberglass wallpaper has equivalent surfaces, but this is not the case. The front side, according to international standards, is turned inward on the roll. The seamy side of some manufacturers is marked with a blue or gray stripe.
- The time for complete drying of fiberglass is 24 hours.
- After drying, the wallpaper can be decorated and painted. It is advisable to pre-prime the surface - this contributes to the economical use of decorative material and paint.

- Before pasting walls or ceilings with wallpaper in damp rooms, the surface must be treated with a fungicidal mixture - this will protect the coating from the appearance of fungus.
- The readiness of the walls before gluing can be checked experimentally:
- stick a piece of polyethylene with tape to the wall;
- leave the cellophane for a day;
- if after 24 hours sweat appears inside the film, then it is too early to start pasting; if the cellophane remains dry, then the wall is completely dry and ready for further finishing.
- To avoid the appearance of folds and bubbles, the pasting must be performed under the following conditions:
- it is advisable to perform work at a temperature of 23-25 ° С;
- walls that have just been pasted over with wallpaper must be protected from drafts until the coating is completely dry;
- it is highly undesirable to get sunlight on the wallpaper.
How to properly glue the ceiling with wallpaper: video
Wallpaper gluing is considered the most simple option solutions, in the case of registration of the premises. The most important thing is that it is fast and beautiful. In addition, modern wallpaper will last for five years, or even more. Moreover, in the wallpaper construction market, one can find rather complicated developments of this finishing material. There are both simple, paper wallpapers, and more complex options, such as silk-screen printing or vinyl wallpapers, for example. You can even glue washable wallpaper and then many problems are solved.
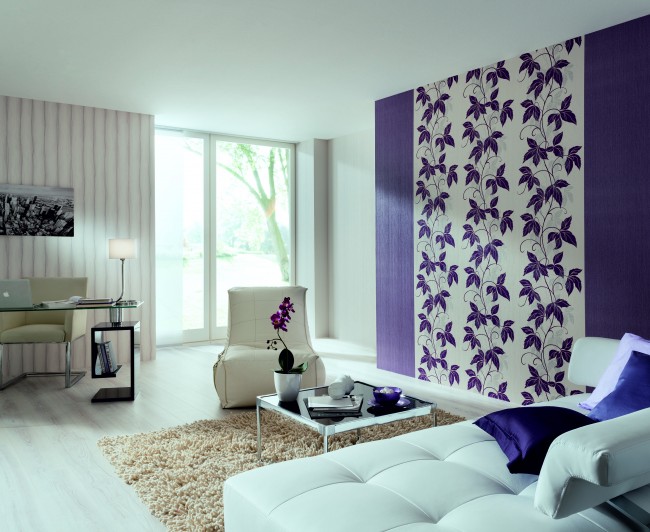
It would seem what else you can think of: take wallpaper glue, especially since there is a very wide selection both in color, pattern and texture. No, they came up with it. In addition to the fact that they began to glue wallpaper of various colors on different walls, so they also began to glue two types of wallpaper on each wall, differing in both color and texture. This is the so-called combined wallpapering, which belongs to the latest trend in interior decoration. This approach allows you to significantly diversify the design of the premises, highlighting separately some of its parts or some objects. In this regard, the gluing of two types of wallpaper is more and more relevant: in our time it is fashionable, since the decoration of the room turns into a very interesting process.
 The options for gluing wallpaper on walls in various combinations are almost limitless.
 Any technology for the decoration of premises rests on certain rules. The same applies to wallpapering, especially with combined wall decoration. If the wallpaper is chosen correctly, then the end result will certainly be harmonious and attractive. In any case, there will be an opportunity to surprise relatives and friends.
How ceiling height affects the choice of wallpaper
The height of the ceilings must be taken into account when choosing a pattern and type of wallpaper. With a ceiling height below 2.5 meters, it is better to opt for light-colored wallpaper that does not have coarse texture and large patterns. At very low ceilings, wallpapers with light basic tones with a mild pattern or texture, as well as with the presence of vertically arranged patterns or stripes, will look harmonious. They can be placed both on one wall, and on two or even three, which will visually raise the height of the ceilings.
 Vertical stripes visually raise the ceilings.
 The presence of high ceilings, from 3 meters and above, requires a completely different approach. Wallpaper with a large pattern stretched in width will look great here. Alternatively, a very harmonious result can be obtained with a horizontal separation of the walls, when different drawings are located not vertically, but horizontally: in the upper and lower half of the walls, or rather not half, but one third. The presence of various wallpaper models allows you to choose exactly those wallpapers that will look modern and harmonious.
How does the size of the room affect
When choosing wallpaper, you need to take into account the width and length of the room, including the geometry, if the room is not standard, which is very rare. Basically, there are rooms that do not have large dimensions, but if it is a large room, then you should opt for dark shades and rich colors. This approach allows you to visually reduce the size of the room. As a rule, wallpapers of dark shades with a large, but light pattern, on the theme of nature, abstraction or geometry, look harmonious.
 Horizontal stripes expand the room visually.
 In the presence of small rooms, everything is quite the opposite: you have to use light colors, with a small texture and a small pattern that does not stand out very much. Here, the geometry of the room should also be taken into account: if it is long and narrow, then it must be visually aligned. To do this, lighter wallpapers are glued to shorter walls, and so that they are found on longer ones. This will visually level the room.
 The distant wall seems to be closer due to the fact that the wallpaper goes behind the wall.
 In order to somehow, at least visually correct the geometry of the living room, they resort to different options... For example, if the entrance to a narrow room is located on the side of a long wall, then the opposite wall stands out, with the center in the middle. At the same time, those wallpapers that are intended for narrow walls are glued closer to the corners. This approach will visually expand the room on one narrow side, and narrow it on the wider side.
Selection of texture
If you glue wallpaper in two colors, then it is better to choose wallpaper that has the same texture, but different colour and drawing. If the docking is carried out strictly in the corners, then this is not very important, but if the wallpaper has to be docked directly on the wall, then the differences in texture will be very noticeable. Therefore, this approach is not suitable if required high quality work performed.
 When using explicit structures, it is desirable that they be of the same type.
 The selection of glue also plays an important role, especially when choosing wallpaper of different types. In any case, you can buy glue in the store where the wallpaper is sold. For different types of wallpaper, and different types adhesives. But, in order not to bother especially, it is better to take universal glue. It is suitable for any type of wallpaper, which can ensure the proper quality of work, regardless of the type of wallpaper.
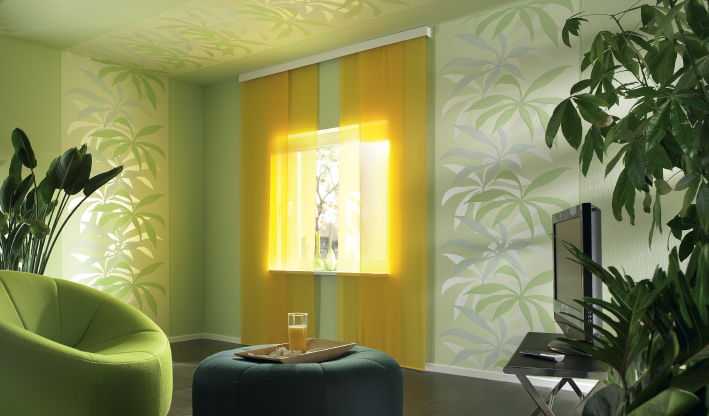
Light and dark room
If the room is too light, then it is not necessary to paste over all the walls with dark wallpaper. It is enough to paste over the wall opposite the window with dark wallpaper, and leave the rest light. Then this feeling of oppressive atmosphere, which radiates dark wallpaper present on all walls.
 A dark wall against the window creates a shading effect for the entire room.
 Sometimes they do the opposite and stick light wallpaper on the wall opposite the window, if you want to make the room lighter. In this case, it all depends on the location of the room relative to the cardinal points. The more sunlight enters the room, the brighter the room.
Wallpaper layout techniques
There are many options for gluing two types of wallpaper. The main thing here depends on the presentation of the future "picture" that you want to see in your room.
Combination vertically
As a rule, the presence of vertical stripes, as it were, raises the ceiling visually, but this does not mean at all that stripes should be present on all walls. Modern design allows stripes to be present only on one wall, and wallpaper with a barely noticeable pattern or texture is glued to all other walls.
 If the ornament is placed vertically, it creates the illusion of high ceilings.
 Many people glue wallpaper with a vertical pattern, distributing it evenly over all walls. From the photo you can see that the spacing can be different on different walls.
 Option for gluing wallpaper, with alternating vertical stripes.
 The stripes can be unequal, both in width and pattern, and in color. In this case, the texture of the selected wallpaper should not differ, otherwise a harmonious combination will not come out. As a rule, in such cases, they buy wallpapers from one collection. This is due to the fact that some firms produce wallpapers with several patterns that are combined with each other, but at the same time differ in color. From one collection, you can choose 2-3 tones that have the same type of patterns. As a rule, this is enough to modern style arrange your accommodation.
 The second variant of the color scheme of the same collection.
 In the photo below you can see the option of using three types of wallpapers from one collection. Here you can see that the combination is just perfect. This indicates that the wallpaper was tested before it went on sale. In some of the other photographs, the wallpaper comes from the same collection. This approach simplifies the selection of wallpapers with different textures.
 Three types of wallpaper gluing.
 To make the ceiling appear taller, there is another way to apply wallpaper. He assumes that one of the stripes is on the ceiling, blurring the border of the transition, which is why a similar illusion is obtained.
 The strip on the ceiling moves the borders.
 To better understand how the placement of stripes affects the visual picture of changes in the geometry of the room, you should look at the figures. The figures correspond to the top view.
 Options for gluing two types of wallpaper.
 These are absolutely working options that will never let you down and will always look very harmonious. Similar options have been tested more than a dozen times, and each time the result met all expectations. Naturally, there are many more options. Although everyone will be able to offer their own version, departing from the standards.
Combining horizontally
Horizontal division is also not a bad option, referring to the design classics. It has been used for a long time, but with the advent of wide choice colors and textures, this approach has received a completely new impetus in the application. This design solution is suitable for rooms with a small area, but high ceilings. As a result, it is possible to get rid of the feeling of a "well". Only one horizontal strip can help this. It can run at the height of the window sills, although its location classically corresponds to 1/3 of the height of the walls, therefore it can be located either at the bottom or at the top. Divide in half is not considered successful.
 The presence of a horizontal stripe.
 Very often the classics are violated and the stripe is placed at eye height. Various decorative elements are attached at the same height. Sometimes it looks quite good. Sometimes, in this way, corridors and hallways are decorated.
 Sometimes you just need to visually lower the height of the ceilings.
 The division zone can be at the top. In this case, the lower area is dark, and the upper one is light, and sometimes vice versa, as evidenced by the lower photo.
 Highly interesting way gluing wallpaper.
 As a rule, options for combining other types of wallpaper when combined horizontally have the following formula:
- The bottom 1/3 is striped wallpaper and the top is wallpaper with a small pattern.
- The bottom 1/3 is a small drawing, and the top is plain wallpaper or large monograms.
- Bottom 2/3 - wallpaper with a large pattern, and the top is plain.
 One of the options for horizontal division (classic).
 Division into zones
If you use several types of wallpaper, then you can highlight certain zones, depending on the functional belonging. Alternatively, these are studio apartments, where the option with the allocation of zones, such as a dining room or a recreation area, simply suggests itself, while not forgetting about the area where food is prepared.
 The recreation area is highlighted especially brightly.
 A similar approach can be applied in children's rooms, where it makes sense to highlight a play area, sleeping area or table area. This approach is also relevant if two children live in the nursery. Naturally, it is necessary to take into account the wishes of the children, if they are old enough.
 Allocation of zones in the children's room.
 This option allows the use of wallpaper of various textures. In this case, you should not use a molding for separation. It is advisable to dock the wallpaper in the corners, otherwise the docking places will not look very attractive.
Panel or decorative inserts
Sticking fashion in one room different wallpapers has existed for a long time. But in the past, wallpapers were made of fabrics, so they were framed, in the form of a panel. Only rich people could afford such a pleasure, since wallpaper cost a lot of money. This approach to wallpapering has survived to this day. This design is considered classic. The material for the formation of the panel can be silk-screen inserts, as well as embossed or textured, expensive wallpaper.
 Classic: panel-style living room decoration.
 To support this style, it is really possible to arrange wallpaper of a different color or texture in a molding frame. As a rule, this option is also suitable for other styles, such as Provence or country.
The Art Nouveau style, which is considered more modern, also allows the form of a panel, but with a more different approach to the design of the frame.
 Modern interior: a panel from wallpaper of a different color.
 Another interesting option is pasting niches. In this case, wallpaper for niches can have a completely different texture, depending on the style used.
 An interesting option is pasting a niche with wallpaper of a different texture and color.
 And yet, in any case, one rule should be adhered to: it is advisable to use wallpaper from the same collection, this is the only way to get an excellent result. You can choose the wallpaper yourself, but it is better to contact a professional.
Placement of color accents
There are several approaches to highlighting some elements in color. The first approach is associated with the distraction of attention from some element that looks inharmonious or stands out unpleasantly. For example, you can take uneven walls. This is especially true in old apartments, where surfaces can be sloped. So that these irregularities are not striking, wallpaper of a different, very attractive color and pattern, and possibly very bright, is glued to the wall opposite.
 Accent placement: pasting walls with wallpaper of different colors.
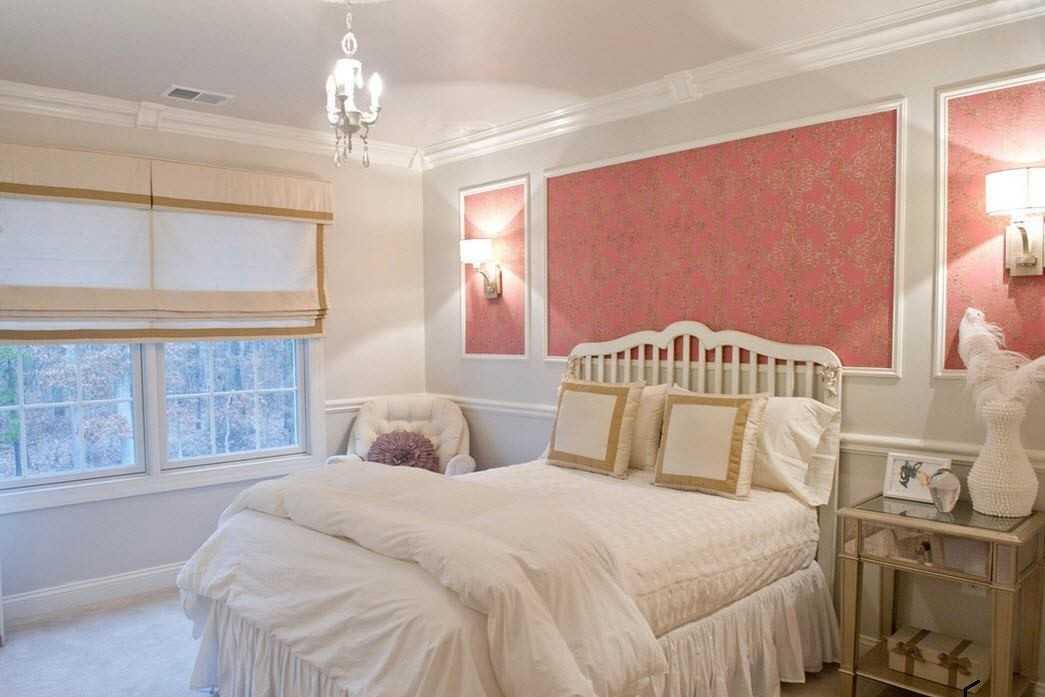
 The second option works the other way around: gluing wallpaper is associated with highlighting an object or drawing attention to it. It all depends on what kind of object is supposed to be highlighted: if this is a bedroom, then, most likely, the bed stands out, and if it is a kitchen, then it is probably worth highlighting a dining area with a table or, in other words, a dining area. This option can be compared to zoning, although, in this case, attention is diverted from the kitchen area.
Focusing attention around an object is a great way to stick two types of wallpaper. In this case, the accent can be located not necessarily vertically, but also horizontally, although the first approach is much more common. This is due to the fact that in our premises the ceilings are low, in the main, therefore, we have to resort to suitable options... With high ceilings, the accent can be positioned horizontally, in the form of wide stripes, as seen in the photo below.
Renovating the interior is quick and easy. Sometimes for this you just need to re-glue the wallpaper. Wallpapers are now sold in a variety of types of coverage and type of base.
What is non-woven wallpaper
Recently, non-woven wallpaper is very popular. They have different types coatings with varying degrees of relief. They are also washable and therefore suitable for almost all premises. A definite plus is that gluing non-woven wallpaper with your own hands is available even to a beginner in repair matters.
An important feature of these wallpapers is their non-woven backing. Since this base is very flexible, this wallpaper can be easily glued to the wall. It is just as easy to adjust their placement on the wall. Adhesive for non-woven wallpaper is applied directly to the wall, which greatly facilitates the gluing process, because it is much easier and faster to do this, especially with a roller.
For more information on what kind of glue is needed for non-woven wallpaper, read this article.

How to glue non-woven wallpaper and what is needed for this
In order to glue non-woven wallpaper easily and simply, in addition to the desire for change, you will need some tools and a few useful tips... And also a short guide in the form of step-by-step instructions.
So, the following tools and devices are needed for work:
- non-woven wallpaper in the right amount;
- glue for non-woven wallpaper;
- roller for applying glue;
- thin brush for applying glue;
- plastic wallpaper spatula for smoothing wallpaper;
- metal spatula 250-350 mm long for trimming;
- stationery knife;
- ordinary knife;
- scissors;
- glue tray;
- plumb line or level to obtain a vertical line;
- roulette;
- pencil, not too soft;
- rubber roller for smoothing wallpaper (optional, as an option);
- small rubber roller for smoothing joints and hard-to-reach places (optional);
- ladder.

Wallpaper spatula
Preparatory processes
Smooth walls and even corners
You need to start gluing wallpaper after the walls are leveled, putty and glued to the ceiling. It is very important to check the condition of the corners. It is the corners that are quite curved. A slight unevenness or slope of one wall on the wall itself is not so visible. But when two walls meet, and even with different degrees of inclination and tuberosity, it turns out not quite a beautiful "perspective". That is, subsequently, a very ugly corner may turn out, which will ruin the whole work. At the same time, it can take a lot of time and effort to glue a clumsy corner, but the result will still be unpleasant. Therefore, it is important to correctly assess the condition of the corners and, possibly, consult a specialist, because even corners are the lot of masters. Of course, if the corner is forever closed by a wardrobe or these are rear corners in a narrow room that are practically not visible, then you can not worry too much about them. But if this is an open corner in a conspicuous place, then you need to treat it carefully and correct its defects as much as possible before gluing the wallpaper.
Wall priming
Before gluing the wallpaper, the wall must be primed with a deep penetration primer and allowed to dry for the right time (indicated in the instructions for the primer, usually 1-2 days).
If you have just removed your old wallpaper and the wall is in good condition, you can probably skip this step. It is important that the wall had a uniform strong coating, not "dusty" and had the same "absorbency" (degree of moisture absorption). In this case, you can independently decide whether the wall needs to be primed now. But experts recommend priming the walls before gluing the wallpaper.
If the walls are uneven, they need to be putty. More details.
Non-woven wallpaper is glued end-to-end and it's all the same how to glue them - from the window or to the window. The main thing is to choose the correct order of gluing so that it would be convenient to glue and there was an optimal cutting of the wallpaper.
It is better to start from the corner or from the doorway in order to get a strictly vertical first strip.
For the correct gluing of the canvases, you need to make markings on the wall in the form of a vertical line. It is advisable to draw a vertical line in such a way that the edge (joint) of the wallpaper does not pass along the line, but with an indent of 2-5 mm, so that the line does not fall into the seam. You also need to try to draw a line neat, you can make it in the form of strokes. It is better to use a pencil that is harder and well sharpened.
If the wallpaper is without pattern selection or is monochromatic, then the wallpaper can be trimmed in height while gluing. If a selection of a picture is required, then it is better to cut the wallpaper into canvases in advance.
It is necessary to pay attention to the fact that trimming the top of the wallpaper for a baguette is done immediately after gluing each canvas, and not after the entire wall or even the room has been glued. You need to cut off the top while the glue has not yet frozen, then you can get an even edge that is ideal for the baguette.

Remove the formed wallpaper under the baguette
Step-by-step instructions for gluing non-woven wallpaper
Step 1. Preliminary preparation. Before starting work, you need to carefully inspect the wall so that there are no bumps, greasy spots on it, which can then appear through the wallpaper. Sometimes better wall wipe with a damp cloth to remove dust from it. Sockets, switches, cornices and everything that can interfere with work are removed from the wall. To prevent glue from getting inside the outlet, it can be carefully sealed with masking tape. So, how to glue non-woven wallpaper? We read on.

We remove sockets and switches from the wall
Step 2. Applying the first layer of glue... The glue is diluted with clean water in accordance with the instructions. Glue is applied to the wall with a roller. It must be rolled out well along the wall so that the layer of glue is uniform everywhere and of the same thickness.
The glue should dry and soak into the wall. The time is indicated in the instructions, approximately it can be 3 hours.
Step 3. Preparation of sheets for gluing... We measure the height of the wall from the floor to the baguette and set aside the required length of the canvas on the wallpaper. The height of the canvas should correspond to the measured wall height plus 1.5-3 cm of margin for correcting unevenness under the ceiling and along the floor. The margin depends on the size of the irregularities. If the level of the ceiling and floor is horizontal, then the margin can be made only 1.5 cm for trimming for a baguette.

We measure the height of the wall
If the wallpaper is with a pattern (rapport), but it is necessary to select a pattern and cut the required number of canvases. It is recommended to apply special marks on the reverse side of pre-prepared canvases, meaning the top of the web. Apply the marks carefully with a thin pencil, so that they do not come through and become visible after the sticker, because non-woven wallpaper is thin and on light wallpaper pen or bold pencils may show through.
In order to get an even cut at right angles to the ends of the wallpaper, the panel is folded and aligned along the edge line.

We align the cloth along the edge of the roll
Then it is carried out along the edge of the bend with a spatula, so that a stable, clear bend line is obtained.

Smoothing the cut line with a spatula
Along the resulting line, cut with a metal spatula or an ordinary knife.

Cut the wallpaper with a spatula
It is not advisable to use a sharp clerical knife here, because he can "wag". Of course, you can cut it with ordinary scissors, but the cut will not turn out very even and it is not so convenient. Experts recommend cutting with a knife or spatula.
Step 4. Marking on the wall... Determine the place where you need to start gluing the wallpaper. It is best to start at a corner or doorway.

We measure the width of the canvas
We measure the width of the canvas and put it on the wall, put a serif.

Transferring the width of the roll to the wall
Then, using a level or plumb line, draw a vertical line.

Draw a vertical line
Step 5. Prepare the wallpaper glue and apply the second layer to the wall. The amount of glue should correspond to the area of the wall. If the area is large, then it is better to prepare the glue in a smaller amount, because if you do not have time to do everything in one go, then there will be an extra one. A small amount of excess glue can be poured into a jar and covered plastic cover... But you can leave the glue in this way if the work continues the next day. And if in a week, then you need to make a new portion.

Apply glue with a roller to the wall
With the help of a roller, the glue is applied to the wall within the area under one sheet. The glue is carefully rolled out so that it is evenly distributed. In hard-to-reach places, the glue is applied with a brush.

Gently apply glue under the baguette with a brush
You also need to carefully brush the places under the baguette, at the bottom of the floor and along the edge of the already glued canvas. Pay special attention to the corners, they should be well coated with glue so that the wallpaper does not come off later.

Thoroughly coat the corners
Step 6. Sticking the first panel. The canvas is taken by the top edge and lightly applied to the wall without pressing. We put the canvas with a slight approach of about 1.5 cm on the baguette.
First of all, you need to look so that the edge of the canvas coincides with the vertical line and at the same time direct the top of the canvas horizontally along the baguette. The fabric should be clearly aligned along the vertical line.

We check the verticality along the entire length and at the very bottom.

After making sure that the vertical coincides, the wallpaper is pressed against the wall and begins to glue it with smoothing movements. You can smooth the wallpaper with a special wallpaper spatula or rubber roller.

Smooth the wallpaper with a rubber roller
The direction of movement with the spatula is first up, then up and to the sides. Somewhere from eye level, we begin to smooth the canvas down and from the middle of the canvas down, as it were, diagonally. Then from the middle and to the sides. The movements are reminiscent of a Christmas tree.

Smooth the wallpaper with a spatula
If the bottom of the canvas is led away from the vertical line, then the wallpaper is easily lifted and leveled along the line.

Skewed wallpaper can be lifted and its position can be corrected
Again, they are smoothed with movements first down, and then down and to the sides. Similarly, you can adjust the placement of the top of the canvas.
Step 7. Displacement of air bubbles. After the canvas is in place and smoothed out, there are still a lot of air bubbles. These bubbles are “kicked out” from under the cloth with the same smoothing movements: first up, then down and to the sides. The presence of bubbles is controlled by running your hand over the surface.

Expelling air bubbles with a wallpaper spatula
Step 8. Trimming the top edge of the panel. Now you need to trim the top of the panel under the baguette. We draw the obtuse angle of the wallpaper spatula under the baguette several times, trying to draw the line of the joint well.

The sides must be carefully "crushed" under the baguette to get a clear line. This is necessary so that there is no glue left at the joint, which creates a thickness, and after the final trimming and smoothing of the edge to the wall, because of this thickness, the edge may turn out to be uneven or even lagging behind the baguette.

Thoroughly squeeze the wallpaper under the baguette
Cut off the extra piece of wallpaper with a metal spatula and a sharp clerical knife. The spatula is applied to the cut line, once again well pressed against the baguette.
It is necessary to pay attention to the fact that the spatula should, as it were, lie on the wall, it does not need to be placed at an angle. The cut should go along the very edge of the baguette in the place of its abutment to the wall, and not along the wall or "into the corner". Then you get a beautiful junction of the wallpaper with the baguette without gaps.

You can't hold it this way when cutting. If you cut at an angle, you can get a gap between the wallpaper and the baguette.
We apply a spatula and make a cut with a knife, leading the knife along the spatula. There are some subtleties here too. The first subtlety: the knife should be kept as parallel as possible with respect to the spatula, and not at an angle to it (you need to cut it in a baguette). The second: the knife is carried out continuously, without separation, until the entire cut is made, otherwise notches will appear. To do this, the knife is not brought to the very end of the spatula, the movement is stopped (the knife is not torn off) and the spatula is smoothly moved to the next position. The spatula with light pressure is again “crushed” under the baguette and after that we continue to cut with a knife again.

Correct stacking position when cutting
The cut tape is removed and the top edge is carefully pressed against the wall. Remains of glue from the baguette and wallpaper are washed off with water using a sponge (squeeze the sponge well).

Rinse off the glue with clean water using a sponge
Step 9. Sticking the next canvas. The next sheet is glued in the same way as the first. Only here the main reference point will be the edge of the already glued panel.
Glue is applied to the wall in a strip of equal width, dense or slightly wider. If the wallpaper has a moisture-resistant vinyl covering, then you don't have to worry if the glue gets on the edge of the already glued wallpaper. it can then be easily washed off with water using a sponge. It is important to immediately coat the seam with glue well so that the wallpaper does not fall behind later.

When laying a new canvas, we focus on the vertical seam
The fabric is applied with a slight approach to the baguette and immediately set vertically along the seam. If the wallpaper is with a pattern selection, then the pattern is displayed and the rapport joining is carefully checked.

Exposing the drawing
Then the panel is smoothed out and air bubbles are expelled as described above. The joint of the seam is carefully checked.

Checking and adjusting the joint of the seams
Then the seam is carefully pressed down and smoothed with an obtuse spatula or a special small rubber roller.

Smooth the seam with a roller
Step 10. Bonding non-woven wallpaper in the corners. Consider the features of gluing wallpaper in the corner. Wallpaper in the corner can be glued only on one wall, cutting out a panel of the required width, or with a transition from one wall to another. But, in the case of gluing on two walls at once, the angle should be even and, most importantly, vertical. In this case, the wallpaper is carefully smoothed to the walls and the corner will be neat. But, if the angle is far from perfect, then with a large "camber-convergence" between the walls, it may turn out that the second edge of the canvas turns out to be not vertical, but oblique. In some cases, for example, if the corner is concave inside the wall, it can turn out to be completely ugly. Above and below there will be, as it were, superfluous wallpapers, which will form an "accordion", and in the center the wallpapers will be stretched tight, which means that they will soon lag behind the wall and "swell". Therefore, for gluing not ideal corners, it is better to cut the panel and glue it to each wall separately.

There should not be large gaps between the trowel and the wall.
The procedure for gluing the canvas itself is the same as described in Steps 5-9. You just need to carefully coat the corner with glue. If the walls are bumpy and when the trowel is applied, sufficiently large gaps are visible, then on one wall the wallpaper can be pasted with a small overlap (1.5 cm) on the other. This will be the bottom panel.
Step 11. Trim the wallpaper in the corner. After both of the wallpaper are glued to the walls of the corner, on one of the canvases you need to cut off the extra pieces of wallpaper (they are just formed on the irregularities). To do this, use the same method of trimming with a spatula and a clerical knife, which is described in Step 8. Only the spatula is now installed vertically along the corner, again "lying" on the wall.

Wallpaper must be carefully pressed into the corner
Before you start trimming, you need to press the wallpaper very well against the wall in the corner. Moreover, both the first (lower) canvas and the upper one should be carefully pressed. With a plastic spatula, we run several times along the corner, pressing the wallpaper there and pressing it against the wall.

Pressing the wallpaper into the corner
With a metal spatula, as it were, "press" the corner. Sliding the knife blade along the spatula, carefully cut the excess pieces on the upper blade. You need to cut parallel to the spatula, not "into the corner". We do not tear off the knife during cutting, moving the spatula from time to time, we lead along it with a knife. Before reaching the very bottom of the corner about 10 cm, we tear off the knife. At the very bottom, we cut the last 7-10 cm from the bottom up.

Cutting off excess wallpaper by moving the spatula along the corner
When trimming a corner panel for a baguette, you should use the following advice. The metal spatula must be installed not reaching the corner between the walls for a short distance, approximately 3-5 cm. Otherwise, burying in the corner, the spatula can make a hole in the wallpaper. The uncut tip is then easily trimmed with sharp scissors. To do this, the upper corner of the wallpaper is torn off, the corner is cut off and the wallpaper is glued back into place.

Cut off the corner of the wallpaper with scissors
We put in place sockets and switches.

In life, everyone had to deal with wallpapering. And at first glance, a rather simple procedure has its own nuances, which we will talk about in this article. Find out how to properly glue the wallpaper if this is your first time.
The modern wallpaper market is developing by leaps and bounds. Literally every day something new appears. But, despite this, wallpaper continues to fulfill its main function - decorative. The methods of their gluing also remain unchanged.
Currently, there are three main types of wallpaper:
- on a paper basis;
- vinyl;
- non-woven wallpaper.
Depending on the type, the methods of pasting them will also differ.
But first, we prepare the surface to be pasted. To do this, remove the old wallpaper. To simplify the procedure, moisten them with water, let them soak, and then remove them with a metal spatula.
The next stage is the priming of the walls; is necessary so that the glue from the wallpaper is not absorbed into the wall. For these purposes, both special primers and ordinary wallpaper glue of a lower concentration can be used. Simply coat the walls with the solution you are using and let them dry.

It should also be noted that coated walls oil paint or enamel should be treated with coarse sandpaper, removing all exfoliated areas. This will increase the adhesion of the wallpaper to the wall. In this case, no primer is needed. wash the whitewashed walls with water or scrape off the whitewash completely with a spatula. To facilitate the procedure, the whitewash should be wetted first. In this case, priming the walls is necessary. For thin paper wallpaper, the walls can be covered with newspapers beforehand. Now we proceed directly to gluing.
The tool that we will need.

Depending on the type of wallpaper, the glue will be applied directly to the wall or to the canvas. Glue is applied to the wall for non-woven wallpaper; on the canvas - for paper and vinyl. After applying glue to paper or vinyl wallpaper, they must be allowed to soak by folding the canvas in half with glue inward for 5-7 minutes. We apply the glue using a roller or a large brush. It should also be remembered that for each type of wallpaper, the appropriate type of glue is used. The process of gluing wallpaper on the ceiling is significantly different in a number of nuances, so read here and avoid mistakes.
You should start gluing wallpaper from the corner closest to the window., having previously marked a vertical on the wall using a plumb line. Non-woven wallpaper is glued from a roll; the required length is cut along the plinth.

Vinyl and paper wallpapers are cut into strips depending on the height of the wall plus ten centimeters. After gluing, the excess is cut off. It is not worth glueing the entire width of the canvas into a corner, since it will most likely turn out to be uneven, and the wallpaper may wrinkle, or the vertical will be broken.
It is necessary to glue the wallpaper to the corner of the desired width plus two centimeters.

The next strip is overlapped from the corner, then we cut off the excess with a sharp clerical knife. Smooth the canvas with a dry, clean cloth, moving from center to edge on both sides. For better adhesion, we roll the edges of the sheet with a rubber roller. Residual glue around the edges must be removed with a sponge. When gluing the strip from the door leaf to the door, measure the distance to glue the leaf parallel to the doorway.

And remember that the newly pasted wallpaper should not undergo accelerated drying, that is, do not allow drafts, direct sunlight, otherwise the wallpaper may peel off the walls.

Video: glue the wallpaper yourself
If you did everything correctly, the wallpaper will last you for a long time, otherwise you will face problems such as skew, pattern mismatch, bulging, peeling, tearing in the corners and noticeable seams. Check out the possible errors to avoid further trouble.
Frequent mistakes when gluing wallpaper incorrectly
Wallpaper gluing is one of the simplest types of repair and finishing work, which does not require any special education nor exceptional craftsmanship. Nevertheless, people who undertake to glue wallpaper on their own often make mistakes, leading to very depressing results. The glued wallpaper peels off, bulges appear on them, greasy stains, distortions, and sometimes gaps. And all this can be avoided if you adhere to simple, but very important rules.
Mismatch in the final drawing

Perhaps the most common mistake when gluing wallpaper yourself. It is very simple to avoid it, you just need to correctly match the drawing just before cutting. Naturally, you should not cut the entire roll ahead of time. Maximum two or three lanes.
Misalignment leading to mismatching of the seams of the cut strips
The second most common error is misalignment. When the strip is already glued to the wall, correcting this error by pulling up is not the most best idea as this may cause the material to burst. In such cases, it is better to remove the strip of wallpaper and stick it again, and in order to avoid such mistakes in the future, you need to use a vertical or plumb line, the role of which can be played by an ordinary weight on a thin thread.
Spots, folds and bumps
As a rule, the reason for these unpleasant phenomena is non-observance of the temperature regime, as well as the instructions for preparing the glue. Bubbles form when air enters the wallpaper. To prevent their appearance, immediately after sticking the strip on the wall, it must be gently smoothed out with a soft, clean cloth, passing it from the center to the edges.

Also, the cause of the appearance of swelling, folds and other deformations can be low temperature rooms, adhesive composition, as well as drafts. Correct gluing of wallpaper should be carried out at room temperature, the windows should be closed in the room, and the temperature of the adhesive should be approximately 30-35 degrees Celsius. If work is carried out in summer in extreme heat, the room must first be moistened by placing several containers of water on the floor. Upon completion of the work, the room must remain unventilated for at least a day.
Strictly follow the instructions for preparing the glue. Animal adhesives should not be heated too much, as this may cause them to lose their properties. Also remember to use a different type of glue for each type of wallpaper. So, if you use strong vinyl glue when gluing thin paper wallpapers, they may become bumpy, stained and smudged.
Note: small bumps can be eliminated by injecting glue under the problem area with a syringe. After that, the area is carefully smoothed out.
Peeling off the wallpaper

It happens when the temperature regime and glue preparation technologies are not observed (see above), as well as when gluing to an unprepared surface. Before starting the main work, the wall must be thoroughly cleaned of the remnants of old wallpaper, putty cracks and irregularities, and then cover the surface with an acrylic primer, which can be purchased at any hardware store.
Gaps in inner corners
 This misfortune happens when inner corner overlapped with a solid canvas. To avoid this, it is necessary to cut the wallpaper in such a way that the first strip overlaps the corner by only 3 centimeters. The next strip is glued against the corner wall, overlapping with a three-centimeter section.
Highly visible joints
Joints can be noticeable if the correct direction of the light is not taken into account. Wallpaper should be glued, starting from the window and moving deeper into the room. And only when gluing thin wallpaper with an overlap, one should adhere to the opposite direction, that is, from the corners to the window.

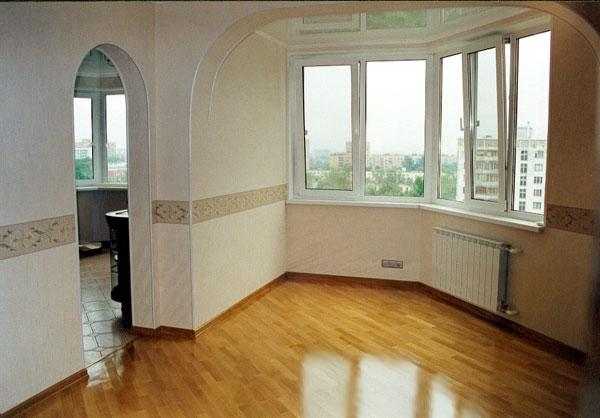
Before you start decorating your walls, you must decide where to start indoors. Each room (be it a kitchen, a corridor, etc.) has its own characteristics, manifested in the presence / absence of niches, ledges, corners, as well as in the nuances of lighting. In addition, you must also consider the type of wallpaper and the layout of the apartment.

Preparing for wallpapering

First, decide what will be the sequence of actions to be performed. And the first step should always be, which includes:
- purchase of everything you need (wallpaper, adhesive, edging,);
- preparation of the required tools (for work you will need a roller, knife, brushes, tape measure, scissors);
- covering the floor with protective material;
- preparation of communications and, of course, walls.

Purchase materials in advance. Moreover, it is necessary to think not only about how much glue and wallpaper will be required, but also about the tools with which the composition will be applied. You can use PET film to cover the floor, although old newspapers will do just fine. It is recommended to turn off the electricity supply, it will not be superfluous to remove the sockets and lighting... It is better to take out the furniture (as an option, just move it to the center of the room and cover it with foil) so that the room is as spacious as possible.

The walls that will be pasted over need special needs. The old coating must be removed, then the walls are putty and primed. Also, before gluing, the room is well ventilated, after which the doors / windows are tightly closed to avoid drafts.


Note! Also, make sure that there is a special place on the floor where you will mark, cut and glue the wallpaper. And about that in different rooms, we will explain below.
