What can be cooked from squid: quick and tasty
Collect corner sofa do it yourself without much effort at home. Ready-made drawings and diagrams will help with this. In the future, you can also repair the corner sofa yourself.
Corner sofas are very comfortable. They differ in that they occupy a small area, look good, create the necessary coziness and comfort in the room.
There are corner sofas made of fabric, velvet, leather, leatherette. Matting is widely used as a beautiful, original and rich upholstery.
Corner Sofa Fabric Velvet Genuine Leather
From eco-leather From matting
Corner sofas fit perfectly into any interior. Such furniture can be freely positioned both in the living room and in the kitchen. In addition, it will serve as a sleeping place.
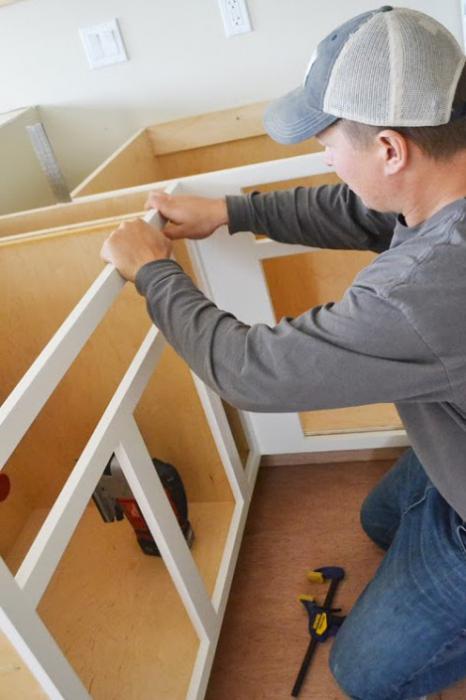
If you want, but do not know how to make a corner sofa with your own hands, first you need to read Full description, how its assembly is done. Step-by-step instruction will explain everything in detail and in an accessible manner.

Corner sofa assembly instructions
Additionally, you can watch photos and videos from detailed description work. It is safer to follow the recommendations and master classes of those who have already made similar products on their own.
DIY corner sofa
In order to make a sofa at home, you will need the following materials and tools:
- Fiberboard (chipboard, 1.6, 0.3 cm.);
- timber (preferably pine, section 3 by 5 cm.)
- plywood (1.5, 0.5 cm.);
- foam rubber;
- synthetic winterizer;
- upholstery fabric;
- legs for furniture;
- lifting mechanism;
- a set of tools (saw, jigsaw, screws, nails, bolts, joiner's glue, screwdriver).
Do not use hardwood blanks (oak, etc.) as materials for a corner sofa with your own hands, since they are quite difficult to process. Better to take birch as a basis. And the function of nails will be better performed by self-tapping screws. They are less loose and better hold structural details.
Frame fabrication
The first stage in making a sofa at home is preparing the frame. In order not to be mistaken with the dimensions, it is better to look at the ready-made diagrams and drawings of the corner sofa, photos. Having studied everything in detail, it is worth getting to work.
Cutting fiberboard (chipboard), beams, you can do it yourself, but it is easier to order where the building materials were bought.
From the very beginning of the assembly, the armrests are prepared. For this, a pair of rectangular parts is cut out, which are interconnected by bars. They are placed between the sheets, fastened. Then they start assembling the frame.
To do this, two identical sidewalls are connected to each other using horizontal beams and vertical struts. It turns out the left half of the sofa. The seat frame is inserted into the frame, and it is covered with plywood on top. The back part is covered with fiberboard (chipboard). If you wish, you can change the corner of the sofa by pointing it in the other direction.
The right side of the sofa is designed in the same way as they did with the left. Here you need to remember only that there should be a box for linen in the sofa below.
The bottom of the frame must be covered with plywood, then the back is screwed on, a lifting mechanism must be installed that will unfold and fold the sofa.
Foam padding
Having made the frame, you can start stuffing with foam rubber. It should be remembered that the foam rubber for the seat and back should be thicker than for other parts (100 mm.).
In order to correctly make the packing, you need to take accurate measurements from all parts. Then the foam rubber is cut out according to the measurements made and glued. This is where PVA glue comes in handy. And to make the sofas with your own hands original and beautiful, you can give the upholstery a certain shape by cutting off its thickness in certain areas.
Fabric upholstery
When the do-it-yourself sofa frame is ready, you can go to its upholstery. The fabric on the corner sofa should be dense, so it will retain its appearance longer and protect the furniture from damage. To protect the sofa, you can cover it with agrotextile. The material is placed on foam rubber, then it should be covered with sheathing.
First, we cut out the fabric according to pre-prepared patterns.
You can simply cover sections of the sofa with material and cut out the details to their size. Then using sewing machine a cover is made. It is pulled over the product and secured.
In order for the upholstery fabric to keep its shape better, and to make the corner sofa look more interesting with your own hands, you can make a tightening.
To do this, holes are made under the fabric in fiberboard (chipboard), and the tightening itself is done using nylon loops, originally sewn to the upholstery.
Upholstery options
A wide variety of materials are taken as a cover for the sofa. Matting is often used , natural leather, cotton, flock.
- The mat is one of the most durable types of fabric. It is actively used for making upholstered furniture... She is undemanding to self-care, makes the product unique. This is a durable material that can function for a long time without losing its appearance... Unlike other materials, the matting does not wrinkle and keeps its shape well.
- Genuine leather will give the sofa an expensive look, the material looks good, is durable, does not require special care.
- Cotton - natural material... It is harmless to health, moisture and air permeable. Furniture with such upholstery is perfect for a nursery.
- Flock is another popular option. It looks like velvet, it contains nylon and nylon pile. This upholstery is very practical, stain resistant. Flock is not affected sun rays, do not worry that the coating will fade or fade in the sun. It is also distinguished by an abundance of colors, you can choose according to your taste.
To choose the upholstery to your liking, you can see a photo of all its options.
The space problem is relevant for small and large apartments. It is very difficult to fit everything you need in a limited square footage.It is almost impossible to imagine a house, office or apartment without comfortable shelves. The element plays an aesthetic, decorative role.
Shelves help free up space and diversify the familiar interior of the room.
Shelves are used in absolutely any room and for completely different purposes. Looks great in bathrooms, kitchens and living rooms.

Consider the features and benefits of building corner shelves yourself.
Previously, the handicraft production of any furniture was considered the lot of the poor. Wealthy people preferred to buy interior items in stores. But everything there had almost the same design, so even thirty years ago the interiors in different houses were almost identical.

Today the original furniture self-made is a source of real pride.
There are dozens of different furniture models in modern stores, but even among such a variety, it is difficult to choose one option that can meet all the preferences of the owner of the house. In this case, there are only two ways out: order furniture directly from the manufacturer, or build it yourself.

Making shelves on the wall with your own hands is not at all difficult, and you can use a wide variety of materials.
The first option may seem ideal. However, not every master will be able to make furniture of high quality, inexpensively and at the same time take into account all your wishes. Finding such a specialist is not easy, and there is no point in searching if you need a simple wall shelf.

This design element is easier to build on your own.
Self-manufacturing a shelf has many advantages.

We make the shelf ourselves: how to decide on the design and materials?
Any wall shelf can have different shapes and designs. They can be complex (with additional elements) or simple. Simple shelves can be used in the kitchen.

They are used to store seasonings or kitchen utensils, so there is no point in coming up with a complex design.
It is very easy to make shelves in a semicircle. This option is ideal if you don't have the time and desire to do something more difficult. Also, simple shelves can be used in apartments and houses decorated in minimalist directions.

Styles like these do not favor complex shapes and intricate designs.
Shelves with additional elements can be used in living rooms. They can consist of several sections, or have unusual shape, for example, in the form of the letter "G".

Often, such furniture occupies not only the corner, but also some part of the wall.
You can also decorate such furniture in an original way of cutting, if you have experience in this matter. The shelves located in the corner also differ in the presence of the back wall. It can be present, or it can be replaced by a wall. If there is a desire to preserve the decoration of the walls, then it is still better to build a furniture wall.

It doesn't take much effort.
In this article, we will look at the process of building a classic-shaped corner shelf. This form is very simple and versatile. Its production does not even take two hours.

To get started, you need to decide not only on the shape of the product, but also on the material.
Consider the types of materials and their advantages.

To quickly determine the raw materials, be sure to consider comparative characteristics presented in the table.
| Specifications | Materials (edit) | |||
| Wood | Plastic | Glass | Metal | |
| Aesthetics | + | + | + | +/- |
| Durability | + | – | + | + |
| Ease of processing | + | + | – | – |
| Price | high | low | high | low |
| Moisture resistant | + | +/- | + | – |
| Resistant to high temperatures | + | – | + | + |
| Strength | + | – | +/- | + |
After analyzing all the characteristics, you will notice that it is easier and easier to create a corner shelf from wood.

In this article, we will look at detailed instructions making such furniture.
Instruments
To make a shelf out of wood, you need to properly prepare raw materials and tools. You should start by preparing the tools. To build a corner shelf made of wood, you need to find:
- Electric jigsaw;
- A regular 50 cm ruler;
- Hacksaw;
- Glue;
- Drill;
- Building level;
- Sandpaper;
- Shelf mount.

Shelf making tools.
Materials (edit)
In the role of the main raw material for creating a shelf, the most ordinary board, which was lying around on the balcony after repair, is suitable. You can also use leftovers old furniture, or purchase a board in the store. When choosing the main raw material, consider several criteria:
- Design. The board should have a suitable color and beautiful ornament;
- Quality. It is better not to use rotten and old boards;
- Integrity. The sheet for making furniture should be free of scratches and dents.

You need to cut blanks from the prepared board.
Cut the pieces of plywood diagonally, sand the edges with sandpaper, and four of the remaining timber can be cut. They must be the same size.
Manufacturing process: step by step instructions
As you can see, the process of making a shelf does not require special costs and tools that are difficult to find at home. Almost all materials and equipment are available from any owner. In this section, we will take a closer look at how to make a corner shelf.

VIDEO: Workshop on making a corner shelf.
Corner shelves in the interior - 50 photo ideas:


The sliding wardrobe saves space by itself, and if it is made in the corner, then this is the most successful option. It does not attract too much attention to itself, it leaves a lot of free space in the apartment, and how much you can put in it! It is quite possible to make a comfortable corner wardrobe with your own hands.


Design features
Unlike its usual counterparts, the corner wardrobe is always designed as a stationary one. It is created according to the dimensions of a specific corner and does not imply its movement.

First you need to decide which corner cabinet you need. Main types of construction:
- triangular;
- trapezoidal;
- L-shaped;
- "Five-wall".

In addition, cabinets can be built-in and cabinet. A built-in wardrobe is essentially a small pantry. The shelves in it are mounted directly on the walls, and the space is fenced off with a door. The cabinet cabinet has a plinth, a top cover and a back wall, at least made of thin fiberboard sheets.

The most "economical" for space is a triangular cabinet: it has no side walls. Its depth will be determined only by the width of the walls, which you are ready to "give up". The rest of the cabinets are a little more difficult to manufacture and will have additional depth.


If you decide to make a corner wardrobe with your own hands, it makes sense to use the entire space from floor to ceiling to ensure maximum capacity.
It is very important to take into account the peculiarities of the corner itself. If there are irregularities on the floor or walls, they must be leveled, because they can affect the sliding door mechanism. In addition, experts recommend making all preliminary measurements only after leveling the walls and floor! Pay attention to the skirting board near the floor or under the ceiling - will it allow you to mount a cabinet?

Today, the manufacture of a radius cabinet is popular, the facade of which is made in the form of a semicircle or a wave. Such furniture fits harmoniously into the most different interiors... Such a wardrobe is especially good for a large hallway and bedroom. For the kitchen, the corner version made of plasterboard is very popular - it is simple to perform and takes up very little space.

When you make drawings of the interior of such a cabinet, you need to take into account its purpose. If it is a closet for the hallway, it should have a bar for outerwear, shelves for shoes (possibly high for boots), shelves for hats and accessories, a place for umbrellas, gloves, etc. In the living room, a wardrobe can serve as a storage for books, documents, blankets and bedspreads, beautiful dishes. Accordingly, the main thing in it is the shelves. A small safe can also be envisaged. A wardrobe for a bedroom usually contains clothes, linen, bedding. The barbell is appropriate in it, and drawers, and shelves, and cells.

Step-by-step instruction
After the diagrams and sketches of the cabinet are created and approved by your household, you can start making the cabinet. You will need the following materials and tools (sample list):
- furniture board;
- metal profile and roller mechanism for doors;
- fiberboard sheets for the back wall (if it is supposed);
- boxes, doors, rods, hooks;
- fittings;
- bezels (if required);
- puncher;
- screwdriver;
- "Hexagon";
- "Level" (to assess the evenness of the shelves);
- glue, ruler, tape measure, pencil;
- triangle;
- screwdrivers, hammer;
- fasteners (bolts, confirmations, shelf supports, etc.)


According to the experience of many men who have already created cabinets with their own hands, it is best to entrust the sawing of boards and their external edging to professionals: give the material to a workshop where there is a special tool for precise cutting. They can also make original milling on the facades. You can independently "cut" shelves and parts for drawers - ie. internal filling of the cabinet.

If your closet is built-in, first of all you need to mark the boundaries on the floor where the doors will be. The same lines need to be applied to the ceiling. Then shelves and rods are screwed to the walls using a punch and other tools. The final touch is the installation of the guides for the doors and the doors themselves.

For enclosures with rear panels and a bottom, the base / plinth or podium of the enclosure is first assembled and installed. Then a long and responsible process begins - drilling holes. You must first carefully mark all attachment points. Then you can drill. If the hole is made on a plane, an 8mm drill is required. For end holes - 5 mm, and its depth should not exceed 60 mm.

Each do-it-yourself cabinet is unique, so make universal description that suits everyone is impossible. But there are some general principles assembly of this type of furniture.
First, the cabinet frame is assembled - that is, its vertical walls and partitions, which are fastened together by horizontals - a plinth, top cover, etc. Then shelves and rods are screwed to the side walls. Drawer carriages are attached. A metal mechanism is attached above and below sliding door... After that, the back wall is attached (usually it consists of several sheets of fiberboard, cut to fit the sections of the cabinet). Then - drawers and doors are installed.

Ideally, the cabinet should be assembled “lying down” - ie. spreading the details on the floor. This makes the assembly more likely to be accurate. But this is not always possible due to limited space. In addition, a tall cabinet that almost reaches the ceiling can be very difficult to lift. The main rule of "standing" assembly is to collect all the parts from the bottom up - the base, side walls and partitions, then the shelves, etc.

Carefully thought out sketch, good scheme, a little patience and precision - and your own corner cabinet will delight you for many years!

Corner wardrobes are extremely ergonomic: due to the beveled shape, they do not appear bulky and, at the same time, are extremely spacious. Let's look at examples of how to make a corner cabinet with your own hands - what models can be implemented, what typical dimensions, filling can be and how to calculate details using the example of ready-made drawings and diagrams.
Structures, drawings and photos of corner cabinets
Conventionally, corner cabinets can be divided into two categories: beveled trapezoidal and strictly rectangular, with diagonally and perpendicular facades. In both cases, the cabinet can be:
- Symmetrical and asymmetrical.
- With separate mezzanines and without mezzanines.
- Combined filling and dedicated exclusively to shelves or hangers.
- With internal or external drawers.
- With a different number of facades (one-door, two-door, three-door).
- With execution in the form of showcases, open racks and designed for storage of clothes.
We will consider only diagrams of wardrobe (wardrobe) corner cabinets with our own hands. 
Corner cabinets with perpendicular sashes, most often, represent an added composition of two conventional cabinets with a slightly modified design. V rare cases can be cast construction, especially if the front part is sliding, "accordion".
The advantage of trapezoidal corner cabinets is their large capacity and functionality... For example, the width of the outer sidewalls can be reduced to a minimum and this does not interfere with placing hangers with bulky clothes - after all, towards the center interior expanding.
Do-it-yourself corner cabinet: we determine the size
Before wondering how to make a corner cabinet with your own hands, you need to decide on the overall dimensions. Ergonomic shapes attract many, but it is not always possible to achieve the desired if the allotted space for placement is too small.
The smallest dimensions of a corner cabinet with your own hands can be compared to the typical dimensions of a kitchen hinged module. It takes 600x600mm from the corner. In order for the facade to be of sufficient width (minimum 400 mm), the depth of the uprights (sidewalls) is set to no more than 300 mm. Naturally, with such dimensions, there can be no question of placing the bar under the hanger. Only shelves or hooks for clothes.
For a corner wardrobe with a compartment for hanging clothes, the distance from the corner, at least on one side, must be at least 800mm. Then the depth of the rack can be set as 450mm, which is quite enough for hangers with light clothes (for "men's" and outerwear it is required from 500mm). Diy diagrams of corner cabinets with their own hands are approximately the same, in the ratio of the depth of the rack and the remaining space for the facade. 
With asymmetrical options, it is quite possible to realize what was conceived with dimensions from an angle of 850x650mm, 800x700mm, etc.
How to make a corner cabinet with your own hands using the example of a drawing
Consider a typical symmetrical model with dimensions of 2100x900x900mm. A do-it-yourself corner cabinet drawing will look like this. 
Along one of the sides, the width of the body allows the placement of shelves, they must be made taking into account the required space for the rod hinge - from 500 mm minimum. Drawers can be built into the section with shelves. The only nuance that should be taken into account in the future is the placement of loops on the facade. The hinge must not "hit" either the drawer or the shelf!
The height of the cabinet allows two rods to be placed under clothes. Distances of 900-1100 mm are sufficient for short jackets, shirts, and the hem long dresses you can simply "throw" over the lower bar. Or you can make a shelf above or below, for hats or shoes.
How to calculate the details of a corner cabinet with your own hands
After you have decided on the dimensions of the corner cabinet with your own hands, the internal filling, you can begin to calculate the details. The easiest option is in the form of a table in an office program Excel. 
- We write down all the details in strict accordance with the texture of the drawing, first the length, then the width. If you drive the formula into a tabular form by calculating the quadrature of each part, then you can sum up and roughly estimate how much the cabinet will "pour out".
- At the same time, we mark the visible sides that will need to be rolled up with the edge in units. Also, the formulas will help to pre-calculate the footage of the end tape.
- I recommend highlighting irregularly shaped parts so as not to lose sight of them (for example, as in the above table - in yellow). And also clearly show along which side they will roll up the edge.
- You can see how to calculate the size of the facades for a corner cabinet. Strictly speaking, the front part can be made of another material - for example, MDF or solid wood.
- Fiberboard detailing is considered a similar method.
DIY corner cabinet cut cards
The calculated dimensions of the parts from Excel are transferred to a special nesting program. Parts for which the direction of the pattern is not critical (for example, stiffeners, plinth, internal shelves) can be rotated to minimize waste. In our case, there is a reason to make the front part of a different material - the body of the corner cabinet with our own hands economically "lays down" on two sheets. 
Sawing can be ordered from a third party along with PVC seaming. Typically, such services are provided by all firms selling laminated chipboard. At home, it is rather laborious and accurate to roll up PVC. We'll have to be content with melamine tape, the only plus of which is its low cost. The table shows that 28.83 running meters will be needed. But it is better to take with a margin, + 10-15%.
How to mark the details of the cabinet for drilling
If you correctly mark and drill all the details on the corner cabinet with your own hands, then in the end it will be assembled very simply, like a designer. The most convenient way to do this is in special furniture programs, for example, Basis Mebel.
The principles are simple:
- Furniture is assembled on euro screws (confirmations).
- Details are drilled into the end and from the front side.
- The distance from the edge of the front part must be the same. For example, 50 mm. Or in the center.
After the fasteners are placed, we number the parts. If there are parts of the same size, but with a different fastening principle, we use additional markings (a, b, etc.). 
In Basis Mebel, you can get the specifications for drilling in this form. 
But here you need to be careful, clearly imagine where the corner cabinet part has a "face" with your own hands, and where is the "wrong side", along the sides rolled up with the edge. The program does not see this nuance, arranges the fasteners from left to right. And in the process of drilling, details may come across that will need to be mirrored. Basically, it's not difficult. Anyway, with the pre-drilling specifications, the whole process will go much faster.
How much will it cost to make a corner cabinet with your own hands?
With the correct drawing up of the drawings of the corner cabinet with your own hands, all the calculation stages, the risks of errors that lead to inevitable additional expenses are reduced to zero. If you make any furniture with your own hands, then it is always cheaper. Actually, nothing prevents you from predicting costs before the start of all work. Find out all the prices for materials, fittings and hardware in your city that will be required when making a cabinet with your own hands, and drive into a simple Excel plate. 
The most significant costs will be for the purchase of laminated chipboard and cut. We took a standard model - from changes up or down by 100-200 mm, the material consumption will not change significantly. It will also take about 2-3 sheets, depending on the number of shelves and facades (they will be ordered separately or not).
Sometimes creating some kind of furniture with your own hands is much easier and cheaper than buying ready-made headsets in salons. For example, in order to create a corner cabinet with your own hands, it is not at all necessary to be seven spans in the forehead and have a whole set of skills. In fact, the project of such a piece of furniture is simple, and there should be no problems in its implementation.
Making a corner cabinet
We will create a wardrobe that will have a sliding system of two fronts. At the base of the box there will be a square, one corner of which we will cut off. Before making a corner cabinet with our own hands, we need to measure two quantities: the depth of the sides and the distance between them (it is into it that the sliding system will be built). The height of the cabinet also matters. Let's say our structure will have the following parameters: 600 mm by 1500 mm by 2300 mm.
We draw up a project, first we draw a diagram of the upper part, two sides and an angular support. The latter will represent two parts that are connected to each other at right angles. The same parts will partially be the back wall of our cabinet - the shelves will be attached to it. On the right side, we will have shelves, on the left - a pipe on which outerwear is hung. Thus, this will be the foundation for the cabinet.
Preparing the box
Our corner cabinet will consist of two boxes. The first one will be represented by a module with shelves (you may have a different number of them). The second module will consist of two elements - straight and angular, which will allow access to the tube for outerwear. The first module is assembled simply: a chest of drawers and shelves are built into it. At this stage, it is very important to correctly calculate the depth, since otherwise the sliding system will not close completely and will rest against the facades. With the second module, there is even less work, since only the installation of the strip is required here.
How to choose a configuration?
Before making a corner cabinet with your own hands, it's a good idea to understand its dimensions. So, the standard height is considered to be 2200 mm and above, which means that the opening for the facades must be at least 900 mm. If the doors are hinged, then the sashes should be as small as possible in width. In addition, the load on the hinges will be moderate, and therefore the cabinet will last longer.

Second important point- taking into account the parameters of the room and the expected load of the cabinet. For each specific room, you can choose a specific design. For example, cabinets in the form of a trapezoid and a triangle are too complex in terms of calculations, in addition, they will have to take into account both special fittings and certain details. In this case, it is almost impossible to fit the facade correctly without a professional measurer.
Or maybe the classics?
The classic version of the corner cabinet has five walls: it is inserted between the sections in the furniture set. The system seems complex, but in reality it is the most common and easiest to manufacture. But if you put such a structure as an independent element, it is too difficult, and a lot of materials will be required to create it. The cabinet will turn out to be oversized, it will take up a lot of space, but it will simply not be possible to put a lot of things into it. So, if possible, it is best to create a built-in corner cabinet with your own hands: working space it will have more, and much less materials will be required.

Kitchen options
Of course, creating a huge one with your own hands is not easy. Therefore, most often this piece of furniture is bought in a bedroom or dressing room. But what to do when required constructive solution for the kitchen and at the same time it is impossible to buy a free-standing cabinet? The answer is simple: "Make it yourself!" For example, an L-shaped structure, consisting of two modules that are installed in a corner, can become an ideal configuration for a kitchen.

Similar angular Kitchen Cabinet it is very simple to create with your own hands. Its design will be compact and ergonomic, and therefore it will look harmonious even in the smallest kitchenette. As for the number of shelves and the opening-closing system, the preferences of the owners play the main role in this matter. In this case, it is worth remembering the mandatory nuances.
- You should not try to cut the chipboard at home on your own, since the peculiarity of the corner structures is that they need to be accurately adjusted to each other and carefully observe the geometry.
- When creating a corner kitchen cabinet with your own hands, you should not save on fittings. For example, using a sliding door mechanism, buy complete fittings for openings, and savings can lead to the fact that in a year your locker will order a long time.
- It is worth paying attention to the leveling of the floor and ceiling so that your structure fits perfectly into the opening allotted to it.
How to assemble?
Assembling a corner cabinet is not an easy process, and therefore you can spend a lot of time on it. To do this, you will need to stock up on a screwdriver, hammer, nail driver, hex wrenches, puncher or drill, hacksaw. It is worth remembering that all modules of this design are attached with the help of which they are inserted and fixed immediately. Be sure to make sure that the holes fit together. Before mounting the doors, it is worthwhile to start installing mounting plates and plastic pads for the corner hinge - it is attached with self-tapping screws.
If you need to attach the corner module to the cabinet, then you need to perform fasteners in several places. This will make the structure stronger and more reliable, and it will last much longer. As you can see, it is not very easy to create the simplest corner wardrobe with your own hands, but it is quite possible. This is a versatile piece of furniture, as it allows more rational and intelligent use of free space. If you create it yourself, you can give the system any constructive and stylistic features, thanks to which it fits perfectly into the room or kitchen. Well, do not forget about the timely drawing up of drawings - they will definitely be useful if you want a corner cabinet, created with your own hands, to be solid and of high quality.