What can be cooked from squid: quick and tasty
Archways make standard apartment interiors stylish and elegant. The arched shape of the doorway visually expands the space, changes the interior beyond recognition. In urban apartments, arched openings are not always left open, since it is necessary to ensure the possibility of a full separation of individual rooms. But the curved top lintel creates difficulties when choosing and installing a door in an arched opening. There are several options for how to close such an opening with a door, they differ both in the complexity of execution and in the principles of approach to solving such a problem.
Options for closing the arched opening
There are two types of situations when the owner installs a door in an arched opening. The first is when the question of installing the door is decided after the manufacture of the arch. In this case, the matter is complicated by the fact that the opening is already ready, and you have to build on the ready-made conditions.
The second is when the owner thought in advance about the options for installing the door in the arch, and in the manufacture of the opening prepared the necessary elements for this (niches for a cassette sliding door). From the options below, you can choose the optimal one, depending on the specific situation.
When creating arches, the opening did not increase, but fillets were made
An important factor when choosing the type of door and the method of installation in the arch is the way of making an opening with an arch. If the radius is inside a rectangular opening, then its actual height will remain the same, but visually it appears lower.
Closing the opening on one side with a full-height sliding door
Sliding doors are installed from the outside, while the sashes slide along the wall. The size of the canvas is made according to the height of the opening at the top point of the arch. Thus, the sash will overlap the arch on one side of the opening. On the back side, the passage will remain open.

Important! In such a combination of a rectangular leaf and an arched passage on the sash, there should be a symmetrical pattern either in the form of radius panels, or be made using arched glazing. In this case, all segments in the design of the canvas should have a vertical orientation, preferably without horizontal bridges. So it will be possible to visually raise the opening.
Installation of a cassette door
it the best option, which is planned at the stage of creating the arch. An arch with a cassette-type sliding compartment door is also a budget option compared to the cost of manufacturing a door leaf with arched shapes. A rectangular canvas with the same pattern is used. This approach will allow you to close a non-standard opening with any shape.

Making a wooden door
If the door is installed in a ready-made opening, and sliding structures for some reason, the owner is not suitable, it remains to go to the carpentry workshop and order an arched door.

A double-leaf door can be installed in wide openings, each leaf of which is a folding door.
The opening increased in height
Making an arched portal by cutting out the upper part above the opening in the partition - correct option in terms of aesthetics. Such an arch will look proportional in the room. A high arch will give more room for imagination, and there are many more options for installing a door into it. The main principle of closing the high arched passage with doors is the use of transom structures. With this approach, you can install in the opening standard doors any type.

An expensive and at the same time luxurious option is to order a solid wooden canvas with a box made of solid wood from the workshop. This method is used to close narrow arches designed for a single-leaf door. A cheap option would be a regular door with a transom.
The most affordable way to close the arch with a door is to make a rectangular box without a threshold with the installation of a folding accordion-type door in it. These systems are sold in kits, have a variety of designs, and are easy to install. After installing the folding door, you can evaluate how it looks in the interior, and, in accordance with the impressions received, make the upper arched transom and complete the design of the opening.
In addition, folding systems are not designed for heavy use. It is this mode that is usually assumed when installed in an arch, because only in the open state it looks spectacular.
What are folding doors made of?
Most of the folding systems in stores are made of MDF or plastic. Plastic is lightweight and practical, but it lacks soundproofing properties, and the structure itself is noisy and gives the impression of laxity.
Important! Plastic panels have stiffening ribs, therefore, with external flimsy, they are tough and durable.

The assembled plastic structure is lightweight, so the technician does not need outside help for installation. The plastic itself is easy to cut, and modern movable lock connections panels allow you to cope with the assembly and installation of the structure in a few hours yourself. In addition, guide profiles in plastic structures are attached through clips that simplify the installation process.
Systems with MDF lamellas look solid, but they are more difficult to install. They look organically in an arched opening. Due to the weight of the structure, the guides are attached to the opening with self-tapping screws.
The standard folding kit includes the following items:
- Narrow panels. In addition to several identical panels from which the canvas is assembled, there are two half-panels that are installed along the edges, a starting and a locking strip.
- Guides. All kits have a top and two side rails. In systems for wide openings or with flexible lamellas, there is also a bottom guide.
- Rollers, stoppers. In some designs, conventional hinges can be used to connect the sections.
Completions and trims for the box, locking mechanisms are not included in the package and must be purchased separately.
How to install a folding structure
First, the box is made and installed. It is assembled from addons in which there is no usual quarter for the door leaf. The box is made along the height of the straight part of the sides of the arched opening.
After installing the box, it is necessary to measure the height and width of the resulting opening and only then go to buy a folding system. So you can accurately calculate the number of sections and select them in width.
Important! When purchasing a folding door, you must carefully read the installation manual. Each manufacturer supplies products with detailed instructions.
- In budget models made of PVC, the lamellas are interconnected through special grooves or using gaskets. The joining process looks like this: the panels move, one lamella is inserted into the groove of the other lamella and pulled to the end.
- The MDF sections have special lugs that fit together and a long pin (axis) is threaded through them.

- It is better to install the lock and the handle into the lock panel before assembling the door leaf.
- The lamellas are cut to the required height. When suspended, they should be raised above the floor by 1.5-2 cm.
- After connecting the lamellas and semi-lamellas, a lock panel is attached on one side, and a deaf (fixing) panel on the other.
- The rollers are attached to the upper end of the sections through one, starting from the locking lamella. Before installation, it is advisable to treat them with technical petroleum jelly.
- The upper profile is trimmed exactly to the width of the opening, and the side ones are placed close to it from below.
- The procedure for installing the profile depends on the intended method of attachment to the opening. If the profile is attached to clips, you need to mark and fix the clips around the perimeter of the box. To do this, a line is drawn in the center of the upper jumper, and with the help of a level it is continued already on the racks. The clips for the vertical locking profile are smaller than the others. On the upper jumper, the clips are fixed with a step of 5-7 cm, and on the sides it is enough to install 4 pcs. After trimming the guides, it remains only to insert them into the fixed clips. If they come in tight, you can use a rubber mallet.
- If the profile is mounted on self-tapping screws, then first they are engaged in installing the upper guide. It is screwed onto one self-tapping screw in the middle. After that, the guide is unrolled so that the sash rollers can be inserted into it. Having inserted the sash, it is assembled in the center, the profile is turned back, finally aligned and the rest of the screws are tightened. Only after that, the side parts are screwed in level.
- At the end, the blind panel is snapped into the side profile, the mechanism is checked for smooth running. A striker plate for a lock or latch is installed in the lock profile.
The decoration of the opening with platbands is performed after the installation of the arched transom.
Installation video of a folding accordion-type system:
In small apartments, doors to an archway should be planned before starting work on its creation. And you can close an existing opening without harming the surrounding space using a folding structure.
In contact with
Comments (1)
Unfortunately, there are no comments or reviews yet, but you can leave your ...
New articles
New comments
S.A.Grade
SvetlanaGrade
SergeyGrade
SergeyGrade
AlexeyThere is an opinion that the arch as an architectural device is more suitable for palaces and museums than for an ordinary house and apartment. But this opinion is wrong. A doorway made in an arched style can look organically in the very an ordinary apartment, in almost any interior, and serve as its decoration. Manufacturers offer various types of ready-made arches that can be installed in doorway, the arch can be made with your own hands.
The advantages of arched openings
Even a person who is ignorant of the intricacies of interior design and architecture is struck by the fact that an arched structure, unlike a door, does not separate rooms, but unites them.
The doors separate the rooms from each other, and the arch creates a common space.
Experts note the following advantages that distinguish interior arched openings:
- They are able to create an effect visual expansion space.
- This architectural solution is versatile: it is suitable for a variety of interior design styles.
- The versatility of interior arches is also manifested in the fact that they organically fit into both spacious and small rooms.
- An arched doorway is able to give the interior originality and individuality.
In practice, it has been verified that arches look good both in classical-style houses and in Art Nouveau or Techno-style apartments, especially since arched openings allow numerous design options that enliven their appearance (for example, lighting, a combination of wood with metal inserts , use of stained-glass windows).

Types of arches
When designing an interior arched structure, qualified specialists take into account the features of both rooms, which are connected by an opening. The height of the ceilings, the width of the opening and other factors are taken into account. This is necessary in order to choose the right type of arch that is suitable for these conditions. Three main types of arched structures can be specified:
- The classic version is characterized by a certain ratio of bending radius and opening width: the radius is equal to half the width. This option is suitable if the premises have high ceilings (not less than 3 m). The reason for this is purely geometric: with the specified ratio of width and radius with a door width, for example, 90 cm, the height of the arch will be 45 cm.
And if the doors are wider, then the height of the arch will be higher, and with a low ceiling, it will either not fit, or it will not look aesthetically pleasing enough.
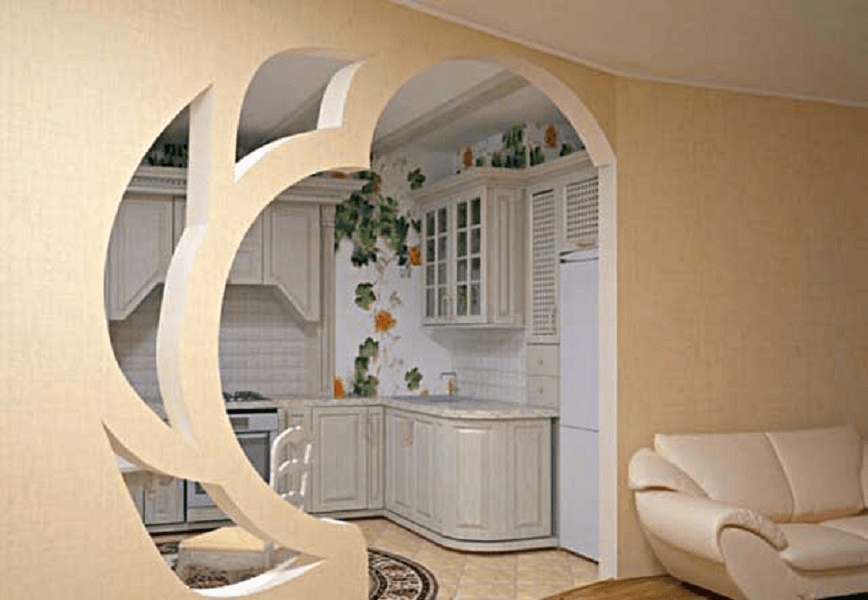
- The Art Nouveau arch looks like an oval and may well be performed in typical, including small-sized, apartments.
- Romance type: the design has rounded edges and a straight insert, horizontal or oblique.
Of course, all the variety possible designs arched openings are not limited to these three options, but they are the most common and are used in the vast majority of cases.

Materials used
To make an arched interior opening, in principle, can be used various materials... But the real possibilities of their use are far from equal.
In the first place in terms of convenience, accessibility and practicality are sheet materials - fiberboard, plywood, drywall. The technology for making arches from these materials is well developed, and different options finishes are able to give the arch an aesthetic look and arrange it in the desired color scheme and style. Natural wood is also an excellent material for this purpose, and its only drawback compared to sheet materials is the higher price.
Often, interior arched structures are made of concrete, brick or natural stone.
These materials allow you to make an arch of any size and configuration, but it must be borne in mind that these materials are heavy, and the increase in weight interior partitions not always desirable (for example, in old houses).
Metal structures are very original, but not suitable for every style of interior. Besides, stainless steel very expensive, and galvanized iron structures do not look so impressive. In some cases suitable material is plastic - it is relatively inexpensive, practical, durable and does not require finishing.
Making a door arch on your own
The easiest way is to purchase a ready-made interior arch of the desired type and size and mount it in the doorway. But if you have some skills and the necessary tools, you can make an interior arch with your own hands.
An example of the process of installing an arch in doorway can be seen in the following video:
The beginning of this work should be the drawing up of a "project": it is necessary to draw the contours of the future structure directly on the wall (on both sides) or to make (for example, from plywood) a template in full size.
You should also think over all the details before starting work, in particular, the location of lamps and other elements, if they are supposed to be built into an arched opening.
The main operations for making arches from sheet materials are:
- Manufacturing and fastening of aluminum profile guides. You can bend the aluminum profile by making cuts on it every 5-6 cm.
- Manufacturing of frame parts. These details must match the template. In order to bend a drywall sheet and give it the desired shape, it must be moistened. To bend plywood or fiberboard at home, the sheets are moistened and heated with an iron.
- Installation of the frame with self-tapping screws.
- Finishing work. They should be started only after all mounted fragments of the arched structure are completely dry.

All these operations are quite capable of a fairly experienced home craftsman. To complete them, you need the most common tools - a hammer, drill, hacksaws for metal and wood. But if there is no experience and skills in locksmith and carpentry work, then it is better to turn to specialists in order to get an interior element that is made with high quality and fully meets the requirements of both strength and aesthetics.
Most interior designers consider interior arches to be an established classics of the genre; arched vaults of doorways have long and seriously pushed the slightly angular rectangle of a classic door. Passages and openings between rooms remain a kind of bridges, uniting islands of living quarters of different meaning and content with no less important kitchen, bathroom and toilet. If there is a possibility, why not make the interior openings no less beautiful and comfortable.
How practical are interior arches
Often, everyone who wants to build interior arches has doubts about how practical and convenient such structures are in everyday use. The idea of building arched arched openings has existed for several hundred years, back in the 50s of the last century, many interior and corridor openings with arches of various configurations were built, until the fashion for economy and a utilitarian approach to the design of premises finally buried the wonderful idea.
The manufacture of interior arches will require certain financial and time costs in connection with the alteration of part of the doorway. But most often, the owners decide to rework, since the end result fully justifies the costs:
The appearance is significantly improved, even the simplest interior arch looks an order of magnitude more attractive and interesting than the official version of a rectangular door frame;
The space of an apartment or house visually becomes more spacious, even in small apartments with miniature kitchens and tiny corridors, the room becomes brighter;
Heat exchange and air movement between rooms are improved by an order of magnitude. Fresh air does not leak through the ventilation ducts, it moves without interference and restrictions along the shortest path.

In most cases, the owners decide to change the shape and size of the interior opening, equip the arch above the doorway for the sake of improving appearance inner space of living rooms. It was only after a few years that it was discovered that the installation of the arch and modification of the interior opening made it possible to improve the conditions for the distribution of heat around the house in winter and coolness in summer heat. And most importantly - without laying an additional complex pipe system.
Types of arches
One of the most valuable qualities of an interior arch is the good adaptability of the renovated doorway to any interior of rooms and corridors. Door arches are made in the form of frames from steel profiles and wooden battens, bricks and gypsum blocks. For exterior decoration the surfaces of the walls and ceiling adjacent to the arch and the box of the interior opening use plasterboard sheets, panels, polyurethane foam, plywood and fiberboard sheets.
For doorways and interior aisles of standard width, up to 90 cm inclusive, an arch with a support frame can be purchased in a specialized salon. Such standard arched vaults are most often cast from polypropylene or assembled by hand from wooden blanks.
Round arches
Most often, the arched vault above the interior doorway is associated with the classic round arch, which is most common in the architecture of stone buildings and structures. It is the round arch that is most often chosen for the doorway.
Designers and interior designers of residential premises use about a dozen basic configurations of round interior arches with supports on the door frame.

To get the perfect arc of the interior arch, the galvanized profile is divided into sectors, the side shelf is notched and the metal bar is bent according to a pre-planned template.
For your information! The round arch is very popular, primarily due to its simple installation technology.

In the classical version, a round interior arch is made in the form of a sector in ¾ circle or ½ circle, often the shape and curvature of its arc can be supplemented by side elements of arbitrary shape and configuration, but always symmetrical.
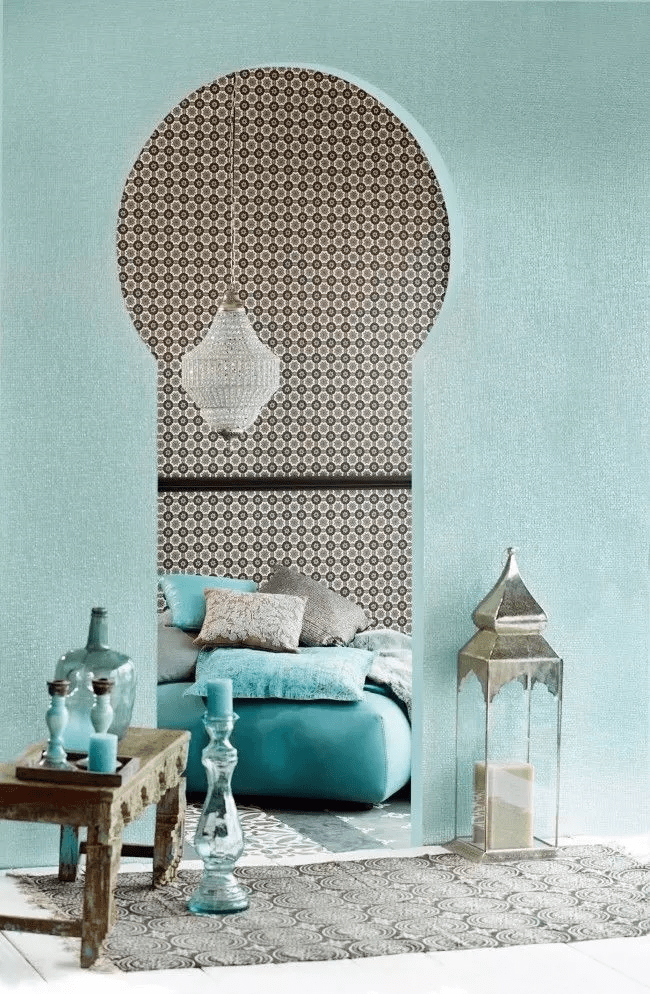
If it is necessary to add oriental motifs to the design of the interior arch, then the profile of the arch overlap of the span is made in the form of two intersecting arcs. In this design, the interior arch acquires an almond-shaped profile.
Interior arch can be combined with supporting columns, most often with stucco elements or imitation of the style of the Victorian era.
If necessary, for example, if the size of the doorway is relatively small, the arch can be decorated without any columns and unnecessary decor. It is enough to emphasize the line of the arched arc and close the plane of transition into the walls with decorative overlays.
In the event that the dimensions of the corridor allow, the design of the interior doorway can be made in the form of one round arch. Instead of a standard rectangular door frame, only a small rounded outline remains, marking the border between the kitchen, living rooms and the corridor.
Round arches are used when an apartment or living space of a private house is built in the form of several small rooms. Full-size rounded arches visually combine the rooms into one studio apartment very well. To keep the bedroom, kitchen or personal office private, the interior opening with an arch is closed with double doors or a light roll-back canvas.
Enough interesting solution shown in the photo below.

In one design of the interior opening, a round or annular arch and a rectangular box are used. A stylish doorway makes it possible to add several very necessary details to the interior of the room and open an adjacent room or corridor for light and air.
If the ceiling height is more than 2.5 m, and the dimensions of the interior passage are more than two meters, you can use the widespread technique of dividing the space into several sectors.

In this case, the design of the interior opening in the form of two small-sized arches of a classical form with an intermediate column ensures the best quality of ventilation and light filling.
For low ceilings, the round arch is split into several elements or replaced with a rectangular doorway.
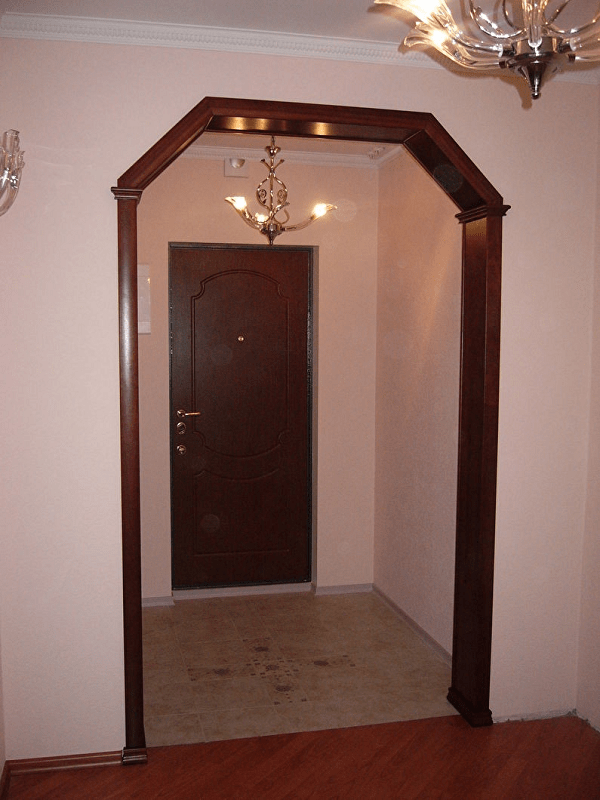
Rectangular arches
Arched structures of a rectangular or square shape in their characteristics and functions are no different from the classic round arch. The rectangular shape is resorted to if there is a significant number of objects and details with straight lines in the interior of the apartment.
In the overwhelming majority of cases, a rectangular shape for an interior arch is chosen in a situation when valuable wood species, plastic and a monotonous rectilinear design are actively used in interior decoration.

For example, an interior doorway between the corridor and the living room can be designed in the form of wooden panels assembled into one arched structure. On the one hand, there is enough air and light, on the other, the border between two rooms that are completely different in meaning and function is clearly marked.

Rectangular arches are easier and more technologically advanced to manufacture; installation does not require the use of special marking devices, as in the case of constructing semicircular and round arched structures.
Elliptical arches
It is not always possible to build a doorway with an arch in the form of a perfect semicircle or a segment of a circle. There are certain restrictions on the distance from the ceiling to the upper point of the arched arc; for apartment premises, this distance should be at least 40 cm.
In such cases, the arch of the arch is made in the form of a horizontal semi-ellipse. The excess of the arched arc turns out to be less, and the entire structure of the fashionable interior opening fits freely in the dimensions of the premises and the height of the ceilings of the apartment of a standard layout.
According to the scheme with a horizontal ellipse, you can build a fairly wide passage between adjacent rooms according to the scheme shown in the photo.

The ellipse is ideal as a profile for building an interior passageway. For example, you can create a vertical ellipse opening with truncated edges.

The passage itself turns out to be wide enough to use it, but due to the narrowing of the sidewalls to the top and to the bottom, the cross section is smaller than that of a standard rectangular profile or a classic arch. Therefore, in order to increase the amount of air and light through the interior opening, the outline of the passage is complemented with side windows.
Trapezoidal arches
The trapezoidal arch arrangement can be considered a natural continuation of the rectangular pattern. Trapezoidal top door and interior openings are traditionally used in attic rooms, especially if the room's ceiling is made with side bevels.
The shape of the trapezoid provides increased stability of the upper transverse beam of the opening, therefore, such structures are widely used in houses from a bar and rounded logs.

The decorative qualities of a trapezoid are lower than those of interior openings with an elliptical or rectangular arch. Nevertheless, there is a demand for a trapezoidal arch passage, especially in projects of panel boarding and country houses... In any case, an interior doorway with a trapezoidal arch looks much more interesting than a boring rectangular design.
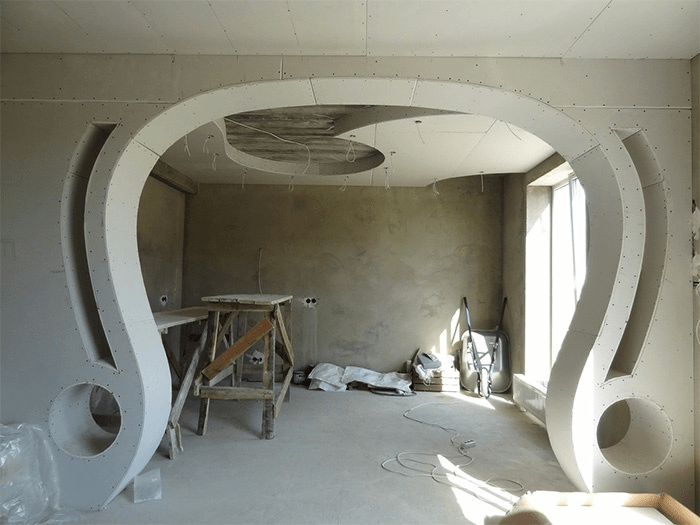
Curly arches
Making an arched vault of a complex shape is a good way to show the talents of an interior designer, imagination and invention. The most in a simple way to build an original arch of a non-standard shape, it remains to join several curved lines and surfaces to the classic arched arc.
For example, if you add a couple of side arches to a simple symmetrical arch, you can get a fairly expressive line of the arched vault for an interior wall.

A small addition to the standard arch or semi-ellipse of several asymmetrical elements turns the arch into a stylish interior opening.
Figured arches, as a rule, are made according to complex curvilinear patterns, for example:


The process of designing and manufacturing a curly interior arch is quite complicated for the amateur level, therefore even the simplest multi-level openings, as a rule, require the knowledge and skills of a professional artist-designer.

Plasterboard interior arches
In the process of planning a curly arch, you always have to look for a suitable assembly method and material from which it is easiest to assemble a rather complex arched structure.
Most of the home arched interior openings are built from wood and drywall. Pressed gypsum sheets are perfectly processed, cut, drilled, painted and putty.
The base of the plasterboard arch is assembled in the form of a frame from a galvanized profile. A strong corner and a U-shaped thin sheet metal profile can be used as a supporting element of a strong frame or bend in an arc of any curvature.
The process of making an interior arch is as follows:
- The frame is assembled with rivets and attached to the walls and ceiling of the interior opening;
- The base is sewn up with sheets of drywall;
- Seams and crevices are rubbed with plaster putty;
- Curved surfaces are sanded, painted and finished.
An arched interior opening turns out to be light, durable and of any complex structure and design.

Interior arches made of wood
Arched interior openings made of wood and its imitation firmly occupy the second place in terms of popularity of the design. It is very difficult to technologically bend a beam and a lath made of precious woods with the required radius, therefore, almost all interior arched openings made of wood are built in a rectangular shape.
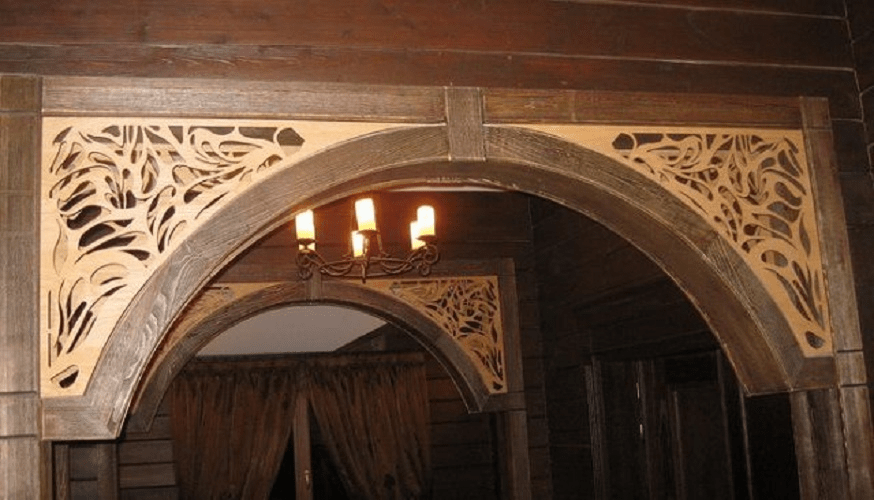
The exception is wooden arches. self made, very beautiful, with carvings and elements of furniture decor. Often, the arc is cut from solid wood and veneered with valuable wood species.

For your information! A handmade arch can be easily distinguished by surface micro defects and characteristic veneer texture, while cheap interior arches made of polypropylene look perfectly smooth and monochrome.
Arches decoration
Depending on the materials used to build the frame of the interior opening, the most suitable type of finish is chosen. Plasterboard structures must be primed and putty, after which the surface of the arch can be pasted over with PVC film with a texture like wood, red brick or natural stone.

An easier way to finish was to use decorative plaster or wall graphics. Corner joints of interior arches can be pasted over with polyurethane tiles under an artificial stone.
Wooden arches are finished using furniture technology:
- The surface of the wood is primed, tinted and varnished;
- The topcoat is applied to match the colors of the walls and ceilings of the rooms adjacent to the interior opening;
- The veneered surfaces of doorways with arches are always varnished with subsequent polishing of the decorative wood layer.
If finishing operations are performed in accordance with polishing standards, the decorative layer of wood can last at least 20 years, while plasterboard finishing will last for a maximum of 10-15 years.
Backlit arch
Installing lanterns and lights remains one of the most popular ways to enhance the decorative effect of an arch.

Lanterns can be installed along the contour of the arch, or placed in the upper part of the arch and covered with translucent polycarbonate.
Instead of spotlights, you can use led strip, monochrome or color.
Interior of interior arches
The most difficult stage in planning an interior arch is considered to be the development of a general style, because the doorway must correspond to at least two rooms at the same time. For example, the passage from the living room to the kitchen is best decorated in light colors. White, cream and beige shades are considered universal, capable of being combined with almost any style of the interior of the hall and kitchen.
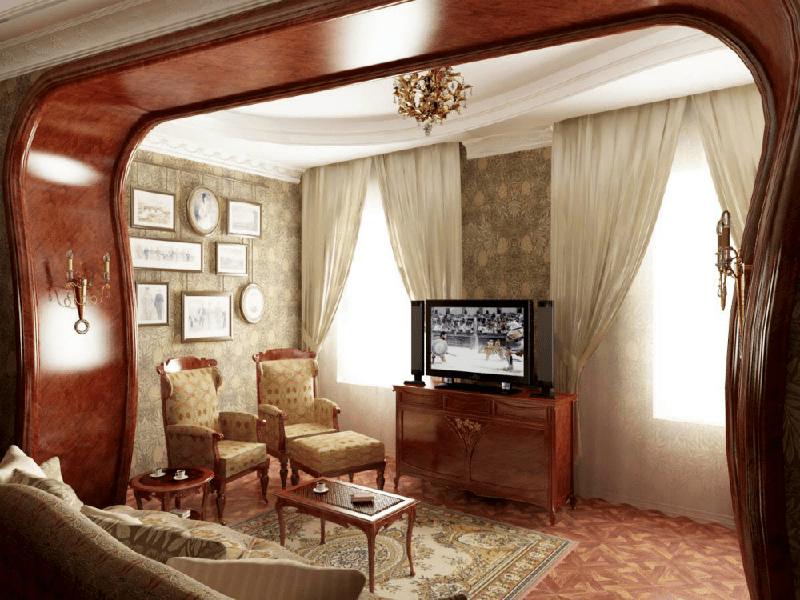
Arch in the living room
All other interior arches leading from the living room to other rooms are decorated in the style of the interior of the main space of the apartment.

Before planning the shape and size of the arched structure, you will need to take into account the color and texture of the furniture in the living room, the pattern of the floor covering.

The concept of decorating the arch in the living room is extremely simple - interior openings should visually expand the dimensions of the room, even if for this it is necessary to remove half of the inner adjacent wall.
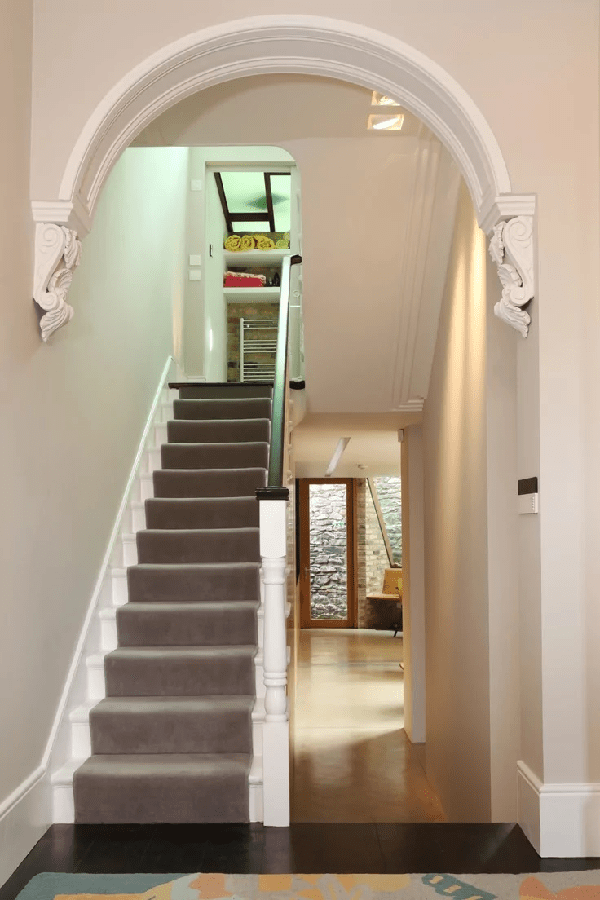
Arch in the hallway and corridor
A similar technique is used when planning arched openings in the hallway. The corridor room experiences the greatest load from dust and dirt brought into the apartment from the street or entrance.
Therefore, the entrance of the apartment is planned in more muted colors, respectively, arched structures are made with minimal absorption of space.

An exception may be interiors with extensive use of wood panels, parquet and fine wood finishes. In this case, a massive interior arch, decorated in a mahogany look, can serve as a kind of bridge from a more utilitarian and stuffed hallway to the central part of an apartment or house.
Arch to the kitchen instead of a door
Today, interior openings between the kitchen and the living room firmly occupy the first place in the list of the most popular solutions for redeveloping old apartments. It so happened that in the vast majority of old-built apartments, the hall is connected to the kitchen by a long and narrow corridor.

It is very inconvenient, so the hall is connected to the kitchen by a wide and spacious opening with a round arch. In a budget option, the interior arch can be made from drywall sheets finished with decorative plaster.
More complex and at the same time non-standard option arrangement of the interior opening is shown in the photo below.
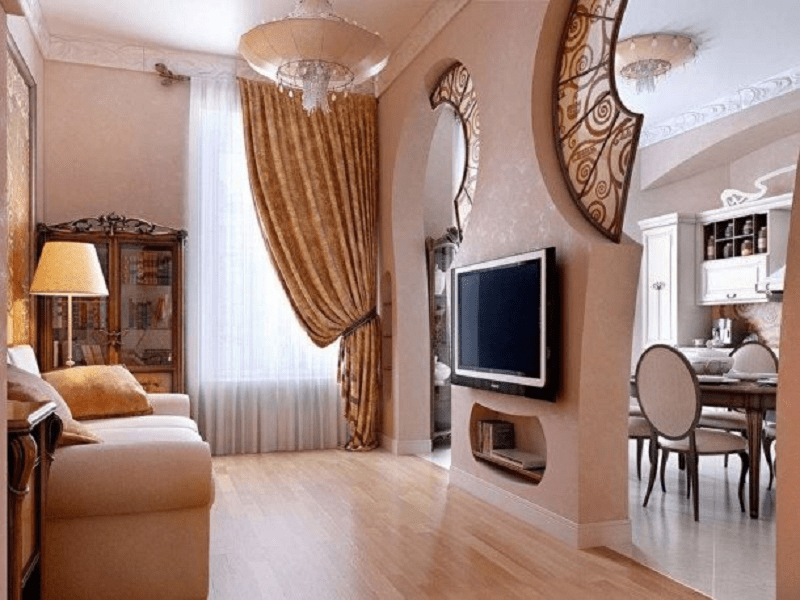
Instead of one passage in the adjacent wall, two symmetrical shaped aisles with round arches and an asymmetric shape of the opening were built. High ceilings allow you to create an arched part with a certain degree of broadening. As a result, the central part of the wall remains used for the installation of TV sets and furniture, and the side sectors are "donated" for arranging the arch.
Arch in the children's room
In apartments with a small living space, using an interior arch, the problem of dividing and delimiting space into the territory of adults and children is solved.
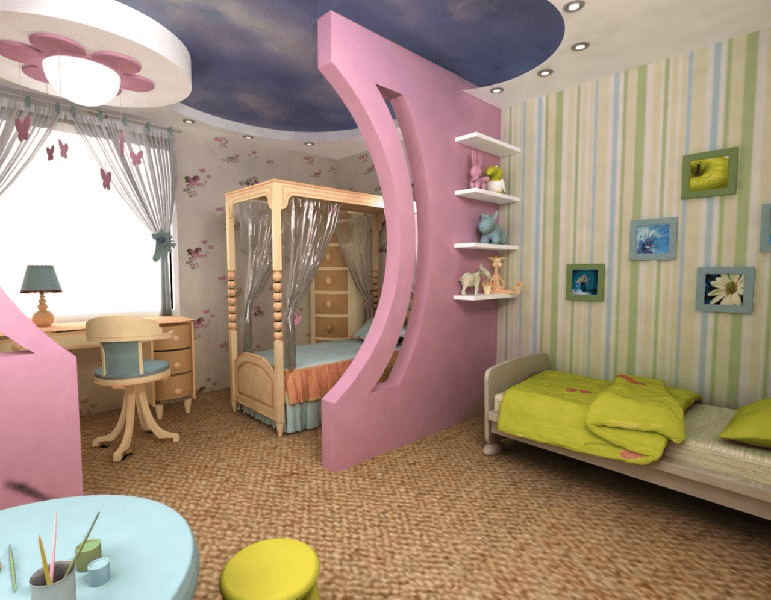
If the room is allocated for several children, then with the help of the arch it is possible to solve most of the disputes related to the division of the territory. For the arrangement of a doorway, arched structures are used quite rarely.
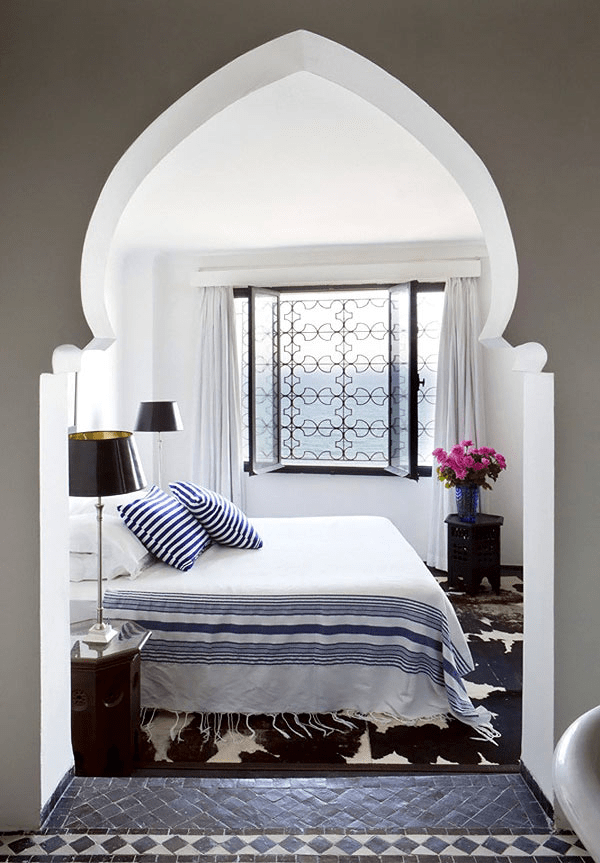
Arch in the bedroom
For the rest room and bedroom, the color of the walls, the shape and style of the arch are chosen in strict adherence interior decoration and the interior of the room.
As a rule, double doors with an arched vault or small-sized interior arches with a monotonous decoration of the walls and ceiling space are used for the bedroom.
Conclusion
Arched structures have long won the hearts of apartment and house owners striving to improve and improve the layout and interior of their home. The interior arch remains one of the most affordable, simple and at the same time very effective ways make the interior of the rooms brighter and more fresh. Moreover, the manufacturing process is not so complicated and intricate, and most of the work can be done with minimal cost... You only need a little skill of an artist-designer, the rest should be entrusted to the professionals of the design business.
You decided to make a renovation, maximizing the living space, but you cannot demolish the load-bearing partitions. Arches are one of the solutions to this problem. Using a material such as drywall, you will successfully complete the work yourself in a short time.
Types and features of door arches
Before you start making an arch, you need to choose which configuration best suits the decoration, furniture and purpose of your room.
Arches configurations
There are seven main types of arches, differing in the upper outlines and the shape of the angles of abutment to the side vertical wall:
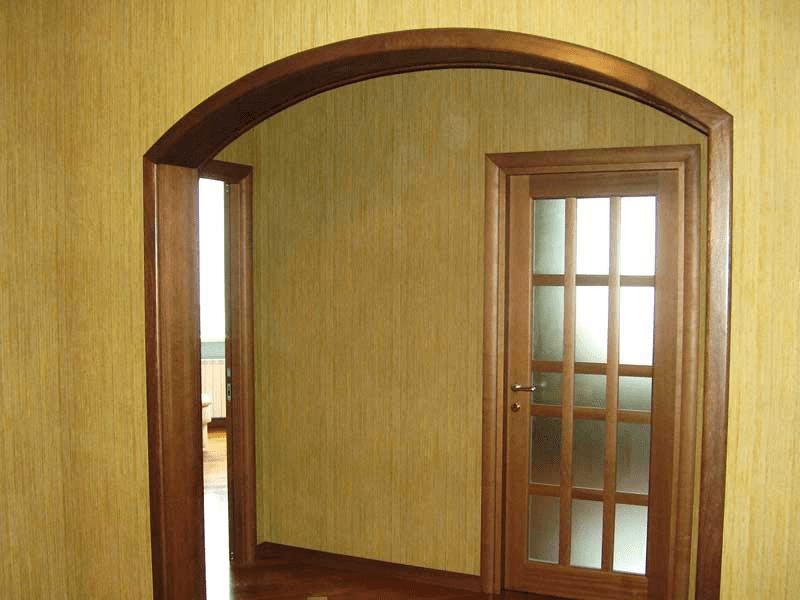
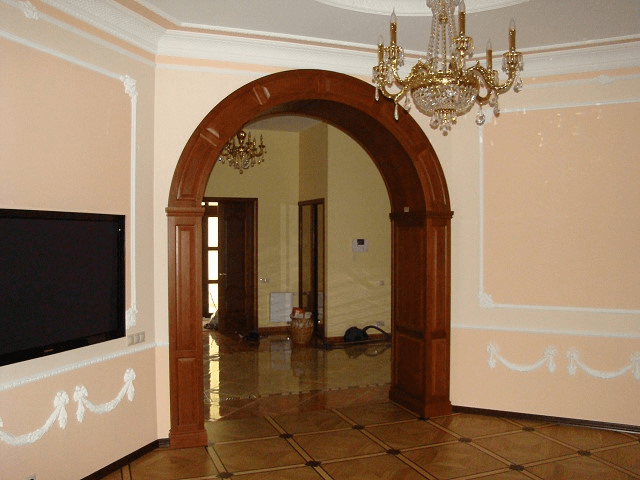
- "Classic" - is used for high openings in any interiors and is an arc with a radius of half the width of the opening.
Classic arches are most often installed in long corridors or at the entrance to the kitchen
- "Modern" - is used for wide open openings and is characterized by a gentle curvature of the arc, the line of transition to the vertical is sharp and broken.
Arches of the "Modern" type are used in rooms with a classic finish, they are installed after disassembling a window and a balcony block or as an entrance to an office
- "Romance" - the top is horizontal, the corners are rounded, the opening is wide and low.
Arches of the "Romance" type are made in wide and low openings
- "Elliptical" - differs in a slight gentle curve of the top.
An elliptical arch unites rooms where there are no height restrictions, and looks softer than "Romance"
- "Trapezium" - along the trapezoidal shape of the corners of the top to the side slopes.
Trapezium configuration fits well with classic finishes
- "Portal" - outlines in the form of an elongated rectangle.
The "Portal" configuration looks like a long rectangle that connects rooms of low height, usually with wooden sheathing
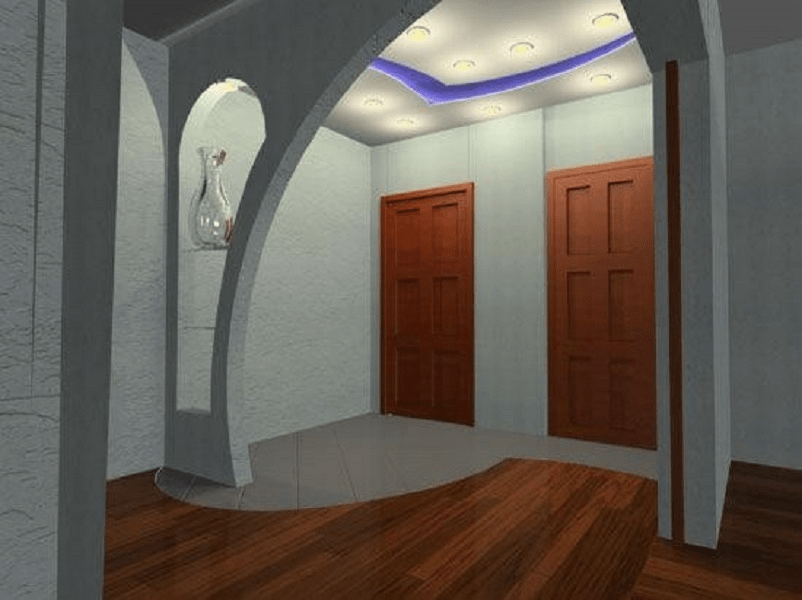
- "Semi-arch" - one side is completely vertical, the other is made in the form of a semicircle. Often used by designers in modern interiors: minimalism, hi-tech, art deco.
The "Semi-arch" configuration is a variant of the classic arch for low rooms
We select and evaluate a suitable configuration visually by cutting and securing the paper outline of the arch in the opening. After that, remove it and save it for cutting.
Choosing from a variety beautiful pictures, try to assess whether you can make such an arch yourself and whether your choice is in line with the available finances.
Preparation for making an arch
Before carrying out work, it is necessary to choose the right materials and tools depending on the size of the opening, the type of wall or partition and its thickness.
Choice of materials
To make an arch you may need:
- Plasterboard sheathing. Along the mounted frame, the arch is sheathed with plasterboard with a thickness of 9.5 mm, which provides strength, the ability to easily bend and cut out the desired outlines. For work, use sheets of 1200x2500 or 1200x3000 mm in size with the following markings:

- Frame. It is most often made of galvanized ceiling, bearing (PN 60x27 mm) and corner (PU 27 mm) profile 2400 or 2800 mm long. There is a special arched profile that easily accepts any bend. Profiles are used for installation in all walls, excluding wood or partitions with a small thickness, where it is preferable to use timber bars or laths. For narrow openings, plywood can be used.
For the manufacture of the frame, a profile for various purposes is used
- Fasteners:

- Materials for preparation for finishing after plasterboard patching. Reinforcement of the joints, which prevents cracking and gives strength, is performed with special gluing paper, fiberglass mesh or perforated corner. The final finishing, the elimination of seams and cracks is done with acrylic or plaster putty, cleaning is done with fine, medium and coarse sandpaper.
To reinforce corners and large grooves at the joints, use a fiberglass mesh and a perforated corner
Tools required for work
According to the work carried out, tools are prepared:

Opening preparation
We carry out the following preparatory work:

Video: preparation of the opening
Do-it-yourself arch installation
We will consider the installation technology using the example of a classic-type arch. Initially, we will cut drywall:

Along the drawn line with a knife or jigsaw, carefully cut out the front part of the trim. Then mark and cut out the second part along it.
A high-quality and even cut is obtained using a jigsaw... Other tools can damage the edges. To prevent damage to the edges, stick a wide paper tape on the cutting line before starting cutting.
Installation of a frame from a profile
The opening most often has a geometrically irregular shape. We draw a level line on the walls of the opening, from it we mark the bottom of the frame elements and front seams to ensure the alignment of the upper arch cladding.
The method of production of work is determined by the prepared profile:
- We mount the ceiling profile, framing the top of the opening on both sides, retreating from the plane of the walls inward by the thickness of the drywall. We measure the length of the side profiles according to the cut out front plasterboard lining.
We mount the profile on the top of the opening
- To the size of the length of the arc of the front sewing, cut off two pieces of the profile corner.
- We take one of them, use metal scissors to make parallel cuts to the corner of the shelf every 3-5 cm.
We put cuts on one shelf of the corner, which will make it easy to bend the profile
- Carefully bending, with the notched side, we fasten a piece of the corner with a pitch of 120 mm with self-tapping screws to the arcuate edge of the plasterboard front part.
We gently bend the profile and fasten it to the cut out drywall arc
- We only bend the second piece of the corner along it.
- We sew the front part with a screwed-on corner, fastening it with self-tapping screws to the perimeter frame with a pitch of 120 mm.
The front part is attached to the frame with self-tapping screws
- We cut the lintels from the ceiling profile with a length equal to the thickness of the opening minus 15 millimeters, and install them every 200–250 mm.
- At the ends of the jumpers with metal scissors, cut off 20 mm from the upright part of the profile, leaving the lower flat part. We attach the jumpers to the screwed corner, retreating 5 mm from the edge attached to the drywall.
Jumpers from the profile are prepared for installation by cutting off the side rack part
- At the second end of the lintel, we fasten the remaining curved corner with a whole shelf and mount the second front patch.
We mount the jumpers, fix the second corner to them and fasten the second front part
Video: flexible profile for gypsum board
Arched profile frame
According to its characteristics, the arched profile is more plastic and stronger than the corner. It is used for fixing curved elements:

Installation of a frame made of wooden blocks
A wooden frame is constantly changing - unlike a metal frame, it reacts to seasonal deformations of the building, changes in humidity and temperature. If you sew drywall directly onto a wooden frame, over time, cracks will appear at the joints, caused by deformations in the attachment points. To overcome this drawback, plywood is used as an intermediate material, which gives the structure additional rigidity, and drywall is already mounted on it. The frame is attached directly to the front of the plywood arch. The work is done in the following order:
- We calculate the dimensions of the sheathing according to the formula 2 GKL thickness +2 plywood thickness.
- We subtract the resulting figure from the thickness of the opening, we get the width of the frame bar. If it turns out more than 120 mm, which corresponds to the average width of the board, we make a frame from a 40x40 double bar with an insert of bosses. To do this, we connect the cut bars in two with bosses every 150 mm.
- We make the same figures from plywood with a thickness of 3-4 mm on the cut out front surfaces of drywall.
- We fasten them with self-tapping screws to the bars - first to the framing rectangular parts, and then to the stiffening ribs parallel to the sides - vertically, every 120 mm.
We attach wooden blocks to the front lining of the plywood arch
- We mount the plywood lining with a wooden frame at the top of the opening, deeper than the plane of the wall by the thickness of the gypsum board.
A frame sewn onto plywood with bosses is mounted in the opening
- We sew the opposite side with the second plywood stitching.
- We check the ratio of the curved sides with a level, construction square, trim or clean up with sandpaper.
We fasten the second plywood front seam to the frame
Laying of communications
If the design project provides for the installation of lamps, we lay the cable according to the mounted structures to the place of installation of each light source and fix it so that the end of the cable hangs over the lower plane.
The cable is attached to the structures, the ends are brought out beyond the filing plane
After patching the strip and its fine finishing cut holes with a crown and install lamps.
In the lower strip of the arch, holes of the required diameter are cut into which the lamps will subsequently be installed
Plasterboard installation
We cover the finished frames with plasterboard:
- made of an arched profile - on both sides along the finished frame;
- from wooden blocks - on top of plywood. If there is no cut-out arc in the prepared rectangles, we do it in place, focusing on the lower edge of the plywood;
- on a metal frame, faceplates are installed during the assembly process.
Then we check the correspondence of the curved cuts to each other with a level or building corner, level them by running a trowel with fixed medium-grained sandpaper several times simultaneously along the bottom of both sides.
After sewing the front sides, we sew drywall on the bottom of the arc:
- We make accurate measurements of the length of the curved part of the front surface.
- We cut out a strip of gypsum plasterboard with a length of 100 mm more than the measured distance and a width corresponding to the distance between the front surfaces.
- We apply marks on the prepared strip at the locations of the jumpers and lamps.
- We drill holes for the lamps.
We trim the arched bottom with this strip, performing the work in one of two ways:
- "Dry" - we make parallel cuts every 50 mm by half the thickness of the sheet and fasten to the frame from the center of the arc with self-tapping screws with a step of 100 mm.
We make cuts on one side of the sewing, bend the strip and fix it
- "Wet":
- with a special roller with needles, we pass the side several times without marking. In the absence of a roller, randomly over the entire surface with a knife, we make shallow cuts 20–30 mm long every 15 mm;
We apply punctures in a drywall strip with a special roller
- if possible, we make a U-shaped box of boards according to the size of the opening;
- moisten the treated side with a sponge with water;
To obtain an accurate and even bend, the strip must be laid on a pre-assembled box
- after 40 minutes, we fasten the finally curved strip from the center of the arc to the self-tapping screws;
- cut off excess length.
- with a special roller with needles, we pass the side several times without marking. In the absence of a roller, randomly over the entire surface with a knife, we make shallow cuts 20–30 mm long every 15 mm;
In the absence of a box, you can lean the strip against the wall with the wet side down, and after the beginning of the bending, re-wet it.
Wet bending is more difficult, but it gives a smoother surface on which you only need to putty the screws.
Video: ways to bend the bottom sewing strip
Making vaults by gluing
Work is possible on a partition of medium thickness:

Pre-finishing
The perforated corner is installed at the joints of drywall for reinforcement
With a large depth of unevenness, the putty is applied in several layers
After each layer of putty has dried, the surface is sanded with medium-grained emery paper.
In the absence of a reinforcing corner and paper, after applying the first layer of putty, we unwind a roll of the required width of fiberglass mesh, cut off the required length, pressing it with a spatula, fix it at the corner, cut the wrinkles of the mesh on the arcuate surface and put its ends on top of each other.
We glue the mesh to the corner on a layer of putty
If the bend was done dry, the kinks from the notches are likely to be slightly visible.... In this case, for leveling, we additionally apply another continuous layer of acrylic putty. After drying, we grind and apply a finishing filler.
We also independently changed the door to an arch in our old-style apartment. The first difficulty was that the entrance to the hall from double doors 1600x3000 mm was located on the corner, close to the front door. A large open opening in a small room, which includes outdoor shoes and clothes, did not suit. After lengthy disputes, it was decided that we were doing a semi-arc in a semicircle to entrance doors to build up a blank wall into the corridor. Height - 2500 mm, arch radius - 1500 mm. The opening above the mark of 2500 mm and 1000 mm from the floor from the side of the arc is sewn tightly, and in the rest of the space we make a glass colored stained-glass window. The old partition was made of double shingle boards and plastered, the opening was only 90 mm thick. The entire old opening was framed with a planed rail 60x10mm on all sides, above 2540 mm, a frame was made of it for a blind wall covering. We bought an arched metal profile with a length of 3000 mm. On the old cardboard packaging from the refrigerator, a quarter circle with a radius of 1500 mm was drawn. A profile was bent along it and installed in place, fixing it to the upper frame under the wall covering. To a height of 1000 mm from the floor, the lateral frame was completed from the lath to fit the wall, fixed to the profile and the lath on the opening. According to the measurements of the frames and the drawn quarter of the circle, the upper and lower stitches were cut out of drywall and fixed to the frames with self-tapping screws. We measured the profile that remained uncovered and, according to it and the drawing of the semicircle, marked and cut out arc sewing from drywall with a height of 60 mm, aligned with the profile along the bottom of the arc. Pieces of 15 mm in length were cut from a 60 mm rail and fixed to a bent profile every 150 mm. We fixed the side plasterboard lining to the profile. Then we bought 6 corners for tiling and 3 plastic panels the same color under the beech. All openings and the bottom of the arc were covered with panels using tile corners. Before that, they made a full putty and alignment of the gypsum plasterboard with the wall, pasting the joints with fiberglass mesh. In order for the putty to lie flat, I advise you to do a complete drywall primer with an acrylic compound. The final touch is to buy a beech-colored plastic holder strip for glass, stick it on liquid nails and glazing. The only thing I regret is that after the exchange of the apartment, the hard drive on the computer burned down and there were no photographs of the resulting miracle, which I am proud of.
Fine finishing
There are many design solutions for finishing. Take your time to consider them. When making the final choice, have complete confidence that you will be able to do the work yourself and master financial issues. After that, feel free to embody your fantasies. You will succeed.
Video: do-it-yourself drywall arch
It is quite possible to make an arched opening with your own hands. It is important to work carefully and know what you want as a result.
In the field of interior design, the interior arch takes a special place. Replacing the usual doorway, she is able not only to attract attention to herself, but also to become main detail interior. The use of a beautiful arch in design is not uncommon for a long time, with its help the interior acquires elegance and nobility.
Depending on the interior design, you can choose an arch in shape and execution. Undergoing stylistic transformations in various design directions, the arch itself invariably remains the main alternative to interior doors. With the help of the arch, openings are made not only in living rooms, but also in office and many other premises.

photos
Types and forms
Consider the types of interior arches:
- Classic... The classic opening is a semicircle with a radius equal to 1/2 of its width. This shape is the embodiment of strict elegance and clean lines. The construction of this arch is possible only in a room with ceilings of 3 meters or more.
There is a version that a semicircle is a distinctive feature of the oriental and antique style, capable of giving weight and significance to the interior.


- Arch-portal. This is a rectangular opening without doors, it does not require additional labor during installation, but it does not suit every room. This form fits perfectly into a laconic, austere interior with linear decor. All the effect of the result depends on the materials chosen for the design.
One of the most striking examples is a portal made of wood with illuminated vaults.

- Modern... This form is a cross between a classic and a portal. The arch is less round, but far from straight; its upper part is represented as a segment of a circle. The radius of curvature can be any, the main requirement is that it does not exceed half the width of the portal itself.
Modern is suitable for the design of openings in rooms with low ceilings, for example, in apartments of typical high-rise buildings. The design gives the room an elegant, discreet look.


- Ellipse... This shape differs from the previous one only in a large radius of rounding of the corners. The elliptical model is the most versatile, it fits perfectly into any interior design and is appropriate for any ceiling height. The height and shape of the bend depends only on your wishes and the initial data of the room. Also, an elliptical arch is ideal in combination with columns.
- Romance... The romantic design is a rectangular arch with rounded edges. It is ideal for wide openings and rooms with low ceilings. This form will look equally impressive both in a small, modest room, and in a spacious, palace style.


- Trapezoid... Very non-standard solution the design of the doorway in the form of a trapezoidal arch is guaranteed to add exoticism to your room. Competent presentation with the help of correctly selected interior items, harmoniously combined with the shape and material of the arch, will cause genuine interest and delight. This arch is simple to design and no less effective than rounded openings.


- Half-arch... A semi-arch is an example of asymmetric openings that combine 2 shapes at the same time. For example, it can be a portal and romance, a portal and a classic, a portal and an ellipse. The design of this shape is based on a quarter circle. Asymmetry will help hide calculation errors if they occurred during installation.
In addition, the non-standard form will decorate the doorway, add sophistication to the room and allow you to bring to life any original idea.


- Copyright... Thanks to a wide range of finishing materials, the arch can be made of absolutely any shape and bend. This is a solution for those who want to make their home unique and unrepeatable.
Non-standard arches can have broken lines, combine several styles at the same time, complemented by windows, lighting and other details.


- Construction features. When building a private house, arched openings are designed and built initially, while in apartment buildings the presence of arches is more likely an exception than a rule. It should be remembered that the arch is a curved overlap between the supports and has a functional significance: it bears the load of the wall.
When redeveloping an apartment with the introduction of arches, their location is absolutely appropriate in interior walls if they are not carriers.


- Arches in load-bearing walls. There is a lintel directly above the door frame, if the wall is load-bearing, then the lintel cannot be removed, this can lead to unpredictable consequences. In a load-bearing wall, the arch can only be in the height and width of the doorway. In this case, the height of the opening cannot be increased, you can only expand it.
- Arches in a panel house. The same applies to using an arch instead of a door in a panel house. Doorways in the panels are pre-made recesses in accordance with GOST and it is not recommended to violate the integrity of the panel.
In these two cases, arches of a romantic style are made with a small radius of rounding of the corners, ellipsoidal or a portal.


- An arched opening in a solid wall. It is not difficult to remake a doorway into an arch, but punching a passage in a solid wall where it has never been is a very laborious process. It is much easier to remove the partition wall completely and build a new one with an opening.

The device of the arch and its design
The device directly depends on what tasks this design will perform:
Zoning rooms when dividing rooms
The interior arch is an elegant and stylish solution in open-plan zoning. It divides the home into functional zones and is used if there is a need to visually divide the space. Arches, made to order or ready-made, are designed to mark the boundaries of two or more zones, but at the same time not separate them, but visually combine them, thereby expanding the space.


Some rooms can perfectly do without classic doors and only benefit if they are replaced with an arched opening. Usually it is a kitchen and dining room, dining room and living room, living room and hallway, bedroom and living room. When they are combined, the space expands, the feeling of isolation disappears.

A bright accent in the overall design of the space
If you are the owner of a strict and laconic interior in a classic style, or, on the contrary, furnished your dwelling in the Empire style, but you lack an unusual detail that can attract all the attention and amaze you with luxury, the arch will help with this.
It should be rich, decorated with graceful stucco moldings with floral designs running in an arc. If the arch is high, classical, it is better to order full-fledged columns of the Corinthian order, the most luxurious and majestic. The height of the Corinthian column is decorated with carved flutes. Its graceful capital with carved grape leaves and curls will be the most significant element in the interior.


For arches of a lower profile, romance, ellipse, Art Nouveau and even semi-arches, the columns of the simplest and devoid of excesses of the Doric order will be a good choice. Its understated architecture will nevertheless create an antique accent in the room.
Wanting to give the opening a major role in the decoration of rooms, it is distinguished by the contrast of color or material, decorating with colored mosaics and enamel.

Elimination of defects during construction
If your room is ugly ceiling beams or ventilation pipes, they can be sheathed with plasterboard and completed with an arch of non-standard shape. In addition, in older houses, it is often necessary to mask the unevenness of ceilings and walls.
By hiding construction defects under the arch, you will not only eliminate the imperfection of your interior, but also with the help of a non-standard beautiful design give it a new sound.


Utilitarian purpose
If the arch is installed in a load-bearing wall, its panels are quite wide, they make recesses in them, which are used as bookshelves, as well as niches for decor. In round arches with great depth they make recesses, install poufs and organize places for rest.
Near the arch itself, a group of through windows is often built in, which increases the passage of light between rooms. Windows can be decorated with stained glass motifs or be through and serve as shelves for souvenirs and decorations.


Dimensions (edit)
The parameters of the arches directly depend on the architectural specifics of the room. The width is limited by the owner's preference, the height is determined only by the level of the ceiling. In a room with a height of 2.5-3.2 m, an arch with dimensions of up to 2.2-2.6 m, respectively, fits perfectly. However, these numbers are relative. It is not worth adjusting the arch of the arch to the very ceiling, this will ruin the whole view.
A small opening in a large, wide wall will create dissonance, therefore it is important to carefully measure the room and calculate the parameters of the future arch. It should organically fit into the interior.


Materials (edit)
The following materials are used in the manufacture of arched structures:
- Brick... To make a brick arch, it is necessary to mount a frame made of reinforcement, drill holes in the wall and, driving in metal pins, weld the frame to them. The whole process is very laborious and the design at the exit turns out to be heavy, therefore, the "brick-like" finish made from different types artificial facing stone.


- Drywall... This material is versatile and malleable for the construction of rounded arches. Erection of any interior solutions from plasterboard is quick and easy to perform. The weight of such structures is small and will not give additional load on the wall. In addition, it is a good solution for one-room apartments where there is not enough space to install doors.


- Wood... Often, when choosing a material for decorating an arched opening, they opt for wood. Structures made of this noble material will add status to your interior. Openings made of wood are very beautiful and durable.
Arches made of solid oak are a luxurious pleasure that you can do with your own hands, with minimal skill in working with this wonderful material.


- Laminated MDF. This material has rightfully won wide distribution and received the recognition of the consumer due to its low cost, a variety of textures and colors, and an attractive appearance. Also, laminated MDF is very practical and versatile.It can be used to assemble complex structures, as well as order standard models. In addition, the ability to order products of non-standard sizes and configurations makes this material especially attractive.
- Veneered MDF and eco-veneer. The MDF veneered arch looks stylish and expensive, since the material most accurately conveys the texture and shades of solid wood. It is made of MDF board and veneered with oak veneer. Possible shades: wenge, bleached oak, walnut, oak with patina, ivory. Eco-veneer arches are also beautiful in appearance and have high performance.


- Polyurethane... Polyurethane is an elastic polymer that is widely used in decoration and construction. Possessing high strength and resistance to external influences, it is durable, and most importantly, it has a very low cost. This polymer makes it possible to make products from it with the maximum complexity of details, and in decorating arches it successfully replaces plaster.


- Plastic... Plastic products are very popular and allow you to repeat non-standard forms of arches, which cannot be made of wood without high costs. Plastic panels have not only a decorative function, but also a functional one. They protect the edges of the opening from damage and are moisture resistant, durable and fire resistant. Plastic, unlike other finishing materials, melts rather than burns.
- Tile... A simple arched opening of a classic shape without any details, tiled with tiles, is very effective. Particularly effective are tiles that imitate the surface and texture of a stone. Its advantages: low cost, rich assortment of colors, moisture resistance and durability.


These are far from all possible materials for the manufacture and design of arches, but the most common and effective ones.
How to make an arch with your own hands?
To make an arch with your own hands, you need to have a basic skill of working with building materials, choose an easy-to-install material and get competent instructions. Let's look at a simple and easy-to-use way to build an arch in your home.

Drywall arch
We need:
- Plasterboard of 2 types. For walls with a thickness of 12 mm and for a vault of an arch - 6 mm.
- Profile for uprights 60x27 mm, and for the contour of the arch 28x27 mm.
- Self-tapping screws and screwdriver.
- Fiberglass mesh.
- Putty.


Stages of work:
- First you need to measure the opening into which the arch will be built. The standard door height is 2 m, to build an arch, we need to raise the height of the vault to 2.5 m by removing part of the wall above the opening.
- Many types of arches significantly reduce the opening, so in some cases it needs to be slightly widened. We select in advance the shape of the arch, which will organically fit into the parameters of the room.
- To do this, we attach paper above the door, on which we outline the height and bend of the arch. If the width is more than 120 cm, it would be better to make a slight bend by choosing the Art Nouveau shape, with its small radius of curvature. If the width of the opening is larger, then it would be more correct to choose a romantic shape, it does not require raising the height and rounding of its corners will be enough to design an arched opening.


- After measuring the parameters of the opening and calculating the length of the radius, using a compass, draw a semicircle on drywall and cut it out with a jigsaw.
- Then we build a frame from a bar or a metal profile.
- We collect a rectangular opening and from a rack profile.
- We sheathe the structure with plasterboard with a cut out circle using self-tapping screws, slightly melting their caps into the surface.
- On the walls of the arched profile, we make cuts with scissors for metal every 3 cm. Then we fasten the profile along the arch with self-tapping screws, bending it in the form of a semicircle. This must be done from both ends.


- Next, we make the vault jumpers. We measure the depth of the arch and subtract 1.5-2 cm. This will be the length of the jumpers.
- We cut them from the profile and put them on self-tapping screws. Lintels are essential for the strength and stability of the structure.
- From a thin drywall, you need to cut out a part that will close the arch from below. This is a rectangle, the width of which is the length from one edge of the butt to the other, that is, the depth of the arch.
- We measure the length with a tape measure or a sewing measuring tape, from one lower point of the arch to the other.
- We also attach the resulting sheet to self-tapping screws.
