What can be cooked from squid: quick and tasty
Absolutely everyone can make accessories for the garage with their own hands. With the help of such products, the owner of the premises will free up a lot of space, and tools and equipment will always be at hand.
The workbench is a must-have item in every garage
A homemade workbench should be in every garage. It does not take up much space and makes it possible to comfortably make repairs and make useful crafts. Usually the workbench is made of sturdy wooden planks that are attached to a thick wooden beams or a profiled pipe. Often workplace made from steel billets. They are quite easy to cut and fasten into one solid structure using metal corners and universal screws.
To make a workbench, as well as others and garage machines, it is necessary to draw an accurate construction plan. In this case, take into account the space that will be allocated for the product. It is best to place the structure next to shelves or racks. In the drawing, mark the presence drawers and shelves. In them you will store small fasteners and tools. A compact vice can also be attached to the worktop. Having drawn a plan, start making a workbench. First, we assemble the countertop.
If you have a small room, then there is no point in making an overall homemade product for it. You can connect the boards to each other with good glue and metal ties. Typically, a standard workbench tabletop consists of 5-10 identical planks. Next, we make special grooves on the tabletop with dimensions of 2.5x2.5 cm. They are needed for stops. As soon as the glue on the product dries, the surface must be planed. The result should be a perfectly even coating. The legs for the structure can be made from several pieces of 80x10x10 cm in size.

In the front legs we make grooves into which the brackets will be inserted. In the future, the latter will be connected to longitudinal beam countertops. Then we assemble the base of the underframe. It consists of two frames, which are made of 5x10 cm boards. The base is attached to the support, after which the frames are cut into the legs of the workbench by 2.5 cm. Finally, we fasten the components with bolts. Then you need to attach the back and side to the workbench support walls... For their manufacture, sheets of chipboard or centimeter plywood are taken.
The last step will be to connect the table top and the top frame. For this it is worth using powerful bolts. After that, we apply drying oil to the coating of the workbench. As soon as it dries, we treat the surface with varnish. As a result of the work, you got a stable structure on which you can not only repair parts or make various crafts, but also store the tool.
We make a rack - about a complex structure in simple words
Every driver probably has a lot of large garage accessories that have nowhere to store. Where can you find such a place for them so that later you can quickly find the right tool? The correct answer is on the shelf. This design will allow you to organize free space and save a lot of time. Similar garage fittings can be made of wood or metal. The second option is more reliable, but it is rather difficult to implement it on your own.

The first one is much easier to perform, however, in order for the structure to serve for a long time, it is worth choosing strong types of wood for work. Beech or oak is perfect for this. Drawers and shelves made of them can withstand significant loads. In principle, the norm for a rack is the ability to support a weight of 150–180 kg. In practice, only a few adhere to these recommendations. However, be sure to remember that the maximum weight of all tools on the rack should not exceed 300 kg. Otherwise, this design will become dangerous for the garage owner himself.
It is very difficult to make a rack with a complex design. It requires significant effort, time and equipment. A simplified product is not much inferior to it, the manufacturing algorithm of which we will consider in more detail. So, the order of work is as follows:
- 1. First you need to take a 9 cm wide board and cut it into pieces of different sizes. In the future, these parts will play the role of supports for the structure.
- 2. For the shelves, you will need to take a thicker board. It must be cut into several identical parts.
- 3. Next, take a board for the base of the rack and mark on it the points at which we will make spacers. They should be located at a distance of 3 cm from the edges of the base.
- 4. Attach the top brace using superglue. We nail the top shelf to it with nails. The same manipulations must be repeated with other struts and shelves. The last one should be attached to the lower spreading part.
- 5. Then it is necessary to turn over the assembled product, pull off the base of the rack with spacers, using screws for this.

After the work done, your rack is almost ready. At the end, you just have to clean the surface of the rack. sandpaper and treat it with oil varnish. It is best to apply the latter in 2 layers. Fasten the structure to the wall with strong anchor bolts by screwing in the fasteners under the upper and lower shelf of the structure.
Cyclonic vacuum cleaner and press - useful homemade products for the lover of tinkering
The list of home-made machines and devices must include a press. This clamping device will become an indispensable assistant for every lover of home creativity. To make a press you will need hydraulic jack, metal bed-platform and 4 shaped pipes... Two of them should have a cross-section of 4x4 cm, and the rest - 6x6 cm. To make a press, we take two pipes with a smaller cross-section and attach them to the base of the product. At the very top, between these pipes, we weld another pipe with a large section.
Install the remaining pipe so that it can easily move along the previously installed guides. The device made in this way works in a very simple principle... To connect two products, they need to be placed on the base of the press and covered with a thick plywood sheet. The pipe with the jack installed must be lowered, and then the two short pipes must be turned. With this simple movement, you will securely connect the two previously supplied products.
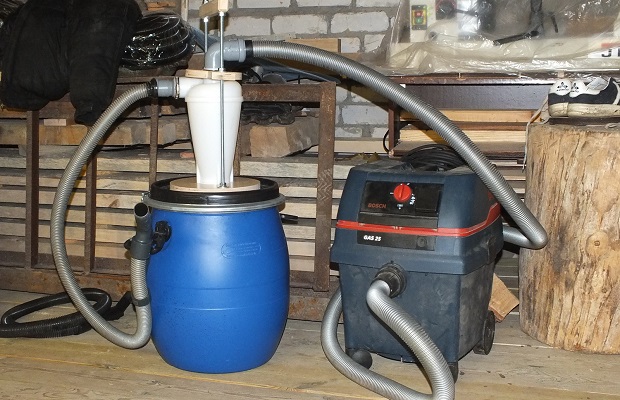
The second device is cyclone vacuum cleaner, it will help you keep your garage perfectly clean at all times. To make it, prepare a plastic or metal container. An important nuance- the lid of the vessel must be hermetically closed. Next, make 2 small holes in the lid. The first should be in the center and the second close to the edge. The bore diameters and cross-sections of the hoses you use must be the same. We connect the pipes to the holes. The first one will serve to collect garbage, and with the help of the second you will connect a regular vacuum cleaner
Install a plastic elbow in the inlet. With the help of it, the air will be sucked in by a device, like a cyclone. Thanks to the presence of this knee, the vacuum cleaner will be able to draw in not only dust, but also small stones, sawdust, lumps of dirt and other small debris. All this will remain in the container to which you connected the hoses. If you wish, you do not have to equip the vacuum cleaner with a knee. But in this case, you will not be able to remove garbage, but only dust. In such a device, it is most advisable to use a plastic container and narrow hoses. If you need a more powerful device, then you should make a vacuum cleaner from large hoses, an elbow and a steel container.
Rope making device - plastic bottle ropes
During the heating process, plastic bottles shrink quickly. Thanks to this, we get the opportunity to make quite strong ropes out of them. With their help, the garage owner will be able to combine several different products that are used on the farm. To create the device, you need to find two bolts with nuts and washers, a piece of thin board, an electric drill and a stationery knife. After that, take two washers and place them in the middle of the board. The centers of the pucks should be marked on the board with a marker. Drill holes at the points obtained.

Next, we drill the holes on the back of the board. This must be done in order to exclude cranking during the operation of the device. In the next step, we screw in the bolts. We are testing the device. We put several washers on the protruding ends of the bolts. The final thickness of the rope will depend on the number of bolts. Next, place a utility knife or a small piece of it on top of the washers. We fix the device with additional washers screwed in until it stops. Next, the device must be fixed on the desktop using clamps.
Then we take a two-liter bottle made of plastic, cut off its bottom and cut out a strip in the remaining part. We put the latter on the device so that it is located under the knife. Next, take the strip with one hand and pull it, while holding the plastic container with the other hand. As a result, from one unnecessary 2-liter bottle, you will get about 20 linear meters of rope.
How to make a viewing hole - detailed instructions for beginners
Whatever one may say, but sooner or later the car has to be repaired. And so that the owner of the car does not have to crawl under the car and "squirm", bending twice, it is necessary to dig a hole in the garage floor for inspection and repair. First of all, if you want to do this, you need to mark the area of the room where the car is parked. For this, the area of the garage is marked with chalk. There are several important factors to consider when drawing up your markup. The length of the pit should correspond to the length of the car, and add another 1 meter to this value. The width should be such that it is comfortable for you to work. However, be careful - this value should not be more than the distance between the wheels of the car.

The pit depth is calculated taking into account the height of the garage owner. Another 20 cm is added to this indicator.
"Having taken measurements", proceed to digging a hole. Having done this, think about the arrangement inside. First of all, this concerns the walls of the pit. For this purpose, brick can be laid out on the sides, building blocks or concrete. The wall thickness directly depends on the material. So, if you use ceramic bricks, then this indicator should be equal to 20 cm.If you purchased cement, then the thickness of the walls should be 12 cm.If you want to make the walls from blocks, then their thickness should not exceed 22 cm.
Do not forget that the walls of the pit will need hydrophobic impregnation. It will protect materials from moisture. It is necessary to apply the impregnation from the inside of the brick or blocks. For a more comfortable entrance and exit, we make steps in the front part of the pit. It is best to use cement for this. You need to start from the lowest step, gradually rising higher. Each of the stair elements must be the same. To achieve this, first measure the lift height and calculate the number of steps.
Indoor shelves - for storing loose fasteners and more
Sometimes the area of the garage does not allow you to make and install a large spacious rack in it. In this case, shelves of different sizes can be made. They will be attached directly to the walls at any height convenient for you. This will make it possible to save space on the floor of the room. First of all, you need to determine the place of fixing the shelves. On the selected section of the wall, we make an approximate marking, dividing the area into identical squares. Dowels will be screwed into the corners of these squares to hold the shelves.
To screw in the fasteners, drill the holes for them with a hammer drill. If possible, it is worth purchasing special dowels with hooks at the ends - they will provide a better fixation of the products. Next, we take a thin board and attach suspensions with lugs to it. When calculating the distance, be guided by the markings you made on the surface of the wall. To secure metal hangers, use reliable self-tapping screws. After that, it remains to make the shelves. We take several boards and cut them into equal parts - they will serve as bottoms for products. Then we cut out the walls of the shelves from the thicker boards. We nail or glue them to the bottoms. If desired, the products can be painted or varnished.
The final stage will be the installation of ready-made shelves in the designated places. When installing each of them, make sure that the products are level and move freely along the guides. If you like, you can glue the cut-out pieces to the front walls of the drawers. wooden handles... It will be more convenient to use the shelves with them. Highly interesting idea will be the manufacture of shelves from plastic canisters.
If you have a sufficient number of these containers, and in the future you do not plan to use them for their intended purpose, then one of them can be done according to this principle. First, we cut holes in the outer walls of the canisters. At the same time, make sure that only the right or only the left wall of each of the containers is cut off. Otherwise, the shelves will look disorganized. After cutting out the outer walls, remove the burrs from the plastic. To do this, use a file. After that, it remains to install the shelves in place in the wall or use them as drawers in the rack.
A garage is not only a parking space. It is also a workshop, a place of rest, and a club of interests. Therefore, the arrangement of the garage should be convenient and thoughtful. On a small area, you need to place a lot of things, and it should be convenient to use them. Homemade products for the garage will help with this. What people do not do with their own hands. From an elementary shelf to a complex device. All this can be made by yourself. But you need to know how. Several ideas for modernizing the garage and a plan for their implementation in the article.
Homemade garage: ideas for arrangement
Arranging a garage is a lengthy process. You won't be able to do everything right away, you have to constantly modernize something, change, make something new. In this case, they mainly use homemade products for the garage. It requires less money and is also a pleasure - making the necessary thing out of the garbage is worth a lot.
Storage of tires and wheels
Every car owner is faced with the problem of storing off-season "shoes" for the car. Where to stick the tires is a sore point. In general, the way tires are stored depends on whether they are mounted on disks or not.

So tires with disks can be suspended or stored lying down - in the form of a stack, stacking them one on top of the other. To hang the tires, you can use luggage belts, chains, a metal cable with a diameter of 4 mm or more in a polyethylene sheath. Attach belts to the ceiling, wall, to the top beam.
One more affordable way- drive pins or hooks with a small bend radius into the wall. The distance between the hooks is slightly more than the diameter of the tires. The length of the pins should be such that they do not stick out beyond the tire. You can stuff them almost under the ceiling so that the wheels fit.
Tires without discs can only be stored "standing". Special shelves are made for them. They are usually welded from a profiled pipe. 20 * 20mm, maximum, 30 * 30mm. You can also use a corner. Round pipe it is inconvenient to cook, but you can make crossbars from it - the tires fit and hold in this case better.
The shelf width is 4 times the tire width, plus a 10-15 cm margin for some freedom. The height of the rear wall is slightly higher than the outer diameter of the wheel. The design is simple = from the side it resembles a right-angled triangle. Having it, it will not be difficult to weld such a shelf.
Shelf for storing tires - a great homemade product for a garage This is a factory version with a completely inhumane price tag. But you can borrow the idea - the cross members can be rearranged depending on the size of the tires ... you never know Shelf for tires in a garage with limited space. No tires - you can fold the shelf
These shelves are usually hung on the wall. But the place must be chosen so that no light falls on the rubber - it deteriorates from this. Not the most difficult homemade garage items, but very useful.
Workplace
Probably the largest number of homemade garage items is associated with the equipment of the workplace and tool storage systems. Moreover, this is not the only way to solve this problem. First of all, you need to decide where the workplace will be located. There are three options:
- The entire width of the far wall. If the garage is long enough and it is possible to "steal" about 1.5 meters. Dignity - everything is located compactly, close at hand, does not interfere with walking along the car. The disadvantage of this solution is that you have to carry the tools far away if the work is carried out on the street.
Table top and lots of drawers. The main thing is to remember where what lies
- Along one of the long walls. This arrangement is chosen if the garage is wide, but not long enough. It makes sense to place the table and workbench to the left of the entrance - from the side of the driver's seat. But this is not critical. The disadvantage of such an arrangement of the workplace in the garage is that you have to move with some caution, but it is more convenient to bring / carry tools outside.
The main thing is to place the tools correctly.
- Taking one of the corners. This is an intermediate option. Moreover, one of the sides can be made longer, the other - shorter.
Placing a desk in the corner of the garage, and placing a sofa next to it is not a solution to the problem Taking two adjacent sides is a great idea
A table or workbench for a garage is made of boards, sheathed with plywood. Inexpensive, quite reliable. If there is welding machine and verification skills, you can weld a frame from a corner or a profiled pipe. Sheathing again is better with moisture-resistant plywood. The result is a smooth, abrasion-resistant surface. You can, of course, use and, but the lamination layer is quickly damaged.

So that the place "does not walk", you can install shelves or drawers under the tabletop. Drawers are more convenient, but making them is still a hassle. It is quite possible to make shelves and put boxes knocked down from plywood on them. Plastic crates and baskets are also suitable. But the walls must be thick.

By the way useful idea- to make a rack for storing tools from used cans. Find ones with a handle on top. Then everything is simple - one of the sidewalls is cut out and in the future this canister is used as a box.

It is not necessary to make a whole rack - after all, it is difficult to remember where, what is. But according to the same principle, you can make drawers for shelves. On the ends, by the way, you can stick inscriptions or pictures (recognition with pictures is faster). Such homemade products for the garage bring satisfaction - creating a useful thing out of garbage is a pleasant feeling.
Tool storage
The most difficult task- organize storage of the tool in the garage. It is necessary to make sure that everything is in order, but, at the same time, is at hand and in plain sight. Moreover, closed boxes are suitable only for very organized people who always put the thing taken in place. Otherwise, you will constantly rummage through the boxes, forgetting where that lies. There are several ideas for convenient storage little things and tools. This is absolutely simple homemade products for the garage.
An ordinary metal mesh will help to quickly solve the problem. A reinforcing mesh made of 2 mm wire, a 10 cm cage is suitable. Attach it to the wall, bite off some twigs, bend them, make hooks, crossbars, etc. You can buy special hooks that are attached to the net (available in stores that sell commercial equipment), ordinary double-sided hooks that can be bought or made from wire are also suitable.

Wall mesh - a way to quickly organize tool storage
It is convenient to store screwdrivers on a special shelf. Take a board, plywood, 10-15 mm thick. The board must be sanded well so that there are no splinters. Then, in the plane, drill holes of different diameters in one or two rows. If the board is wide enough, you can make larger holes for chisels or even hammer handles. Clean all the chips again. Now we need to come up with a wall mount. You can use a regular bracket. Screwdrivers, chisels, and other similar material are inserted into the holes. Convenient, fast, everything is in sight.

There is also useful homemade products for the garage, which allow you to organize storage hand tool... Pliers, pliers, wire cutters, etc. to place conveniently is problematic. It can be hung on a net; it is convenient to take off, but not to hang up. But there is a simple solution - to attach a narrow board and put the tool on it. To make it "sit down" comfortably, grind off the board from one side. In cut, it should look like an isosceles triangle.

Another simple idea for storing a cordless tool, chargers and spare batteries for them. Make a shelf as in the photo above. In the lower part, cuts of different formats are made, and the upper ones are used as ordinary shelves. The idea is that everything is in one place, quick to get / set in place. These garage homemade products will make your workplace comfortable. Keeping order will be easy.
DIY garage carriers
Even with very good lighting in the garage itself or on the street during the day, visibility is very low under the bottom of the car. To illuminate the front of the work, they use portable lamps - carriers. These are the simplest homemade garage items. With them, you can start the epic of the arrangement and equipment of the garage space.

In the very simple version This is a cartridge attached to a wire, a small screen with a hook can be attached to it. Such a completely uncomplicated thing. Light bulbs are used ordinary - incandescent or housekeeping under a standard cartridge. Everything is not bad, except that these bulbs are beating very often, you need to look for how to hang them so that they shine in specific place... In general, the design needs to be improved. There are several rework options.
Unbreakable lamp holder
This lampshade is from plastic bottle perfectly protects the fragile bulb of an energy-saving lamp. You can also use an LED lamp, but incandescent will not work - it gets too hot. The design is usual - a cord with a plug and a cartridge at the end.
The main task is to find a plastic vessel with walls made of translucent milk plastic of medium thickness. Transparent will not work - it will not scatter light, too thin walls will not save the lamp from blows. After finding a suitable vessel, a trifle remains:

Everything is simple, but such a shade allows you to brightly illuminate exactly the desired area, the rest of the space is flooded with even light that does not cut your eyes.
Carrying LED recessed light
The simplest and most common homemade garage items are portable lamps. Without them, it is inconvenient to work not only in, but even just on a workbench. Need a flat recessed LED lamp which can be plugged into 220 V. These models are called "tablets" because of their shape. I also need a cord with a plug, a piece plastic window sill- to build in a lamp. A piece of the window sill should be larger in size than the lamp. You select the specific dimensions yourself. Further actions are as follows:

That's it, the homemade carrier is ready. This option is for floor installation. The movable leg allows you to change the angle of inclination. To make it turn over less, a couple of weights can be fixed inside the case (in its lower part).
Attach the carry cord to the ceiling
Conveniences are made up of little things, and very simple homemade products for the garage help in this. For example, you can remove the cable from a portable lamp that always gets tangled under your feet. Carrying is usually done with a cheap cable. It is not the most flexible, does not fold well, its turns on the floor fall under your feet. In general, it is inconvenient to use. You can protect yourself and carry - hang the cable from the ceiling. The solution is simple but very effective.

Such a "suspension" to the ceiling for carrying you can do it yourself in an hour
- Two anchors with a ring at the end.
- Cable tie.
- Clamping clamp.
- Metal rope. The length depends on the size of the garage - it is necessary from one wall to another.
- Steel / plastic rings or steel wire and a piece of pipe to make these rings.
- Carry with long cable - roughly double the length of the garage.
The cable runs along the long side of the garage. It is more convenient - not far from the "working" wall, where the workbench or other equipment is located. Little work:

Well, that's all. You can use it. With such a device, the carrier can be pulled to either end of the garage, while the cable does not get tangled or clinging. Convenient, requires little time.
DIY garage compressor
A compressor is needed in any garage. And by the way, this is not the most difficult homemade product for a garage. A low-power compressor for a garage for inflating tires and other small work can be done with your own hands from auxiliary materials. For example, from a compressor from a refrigerator. For this you will need:
- compressor from the refrigerator;
- a sealed cylinder with thick walls (you can use a flask from a fire extinguisher, a small gas cylinder);
- safety valve for 8 atm;
- pressure gauge;
- fitting;
- oxygen hoses with couplings (select the length based on the size of your spare parts);
- base for the compressor - a thick board, a piece of plywood will do.
In order not to pump any muck into the tires, it is advisable to also put a filter - to separate oils, dust and other contaminants. A diagram of a homemade compressor is shown in the photo.

The compressor must be equipped with a starting device. We connect it to the network, look into which tube the air is sucked in, mark it. You can put a car filter on it - clean air will be pumped in.
We assemble the receiver-oil separator from the cylinder and the safety valve. To do this, we cut two fittings into the cylinder - for the inlet and outlet of air. We put a safety valve on the inlet to it with the help of an oxygen hose and connect the compressor outlet.

We put another car oil filter on the outlet of the oil separator receiver - to remove the oils completely. We connect the filter to the pressure gauge, and from it there is already a hose, which is connected to the bus through the corresponding adapter.
The assembly is complete. But in order to carry this device conveniently, everything must be fixed in some way. You can weld the frame to size, attach wheels and a handle - for easy transportation. One of the compressor options for pumping the wheels is described in the video. There is no receiver, but an oil filter performs its function. You can do that, but with a receiver, the design is more reliable.
Since the compressor in the refrigerator is small, it can take a long time to inflate the wheels. It can be made more powerful by installing two compressors that will start at the same time. Accordingly, the pressure will build up twice as fast. But in such an installation, a more solid security group is required. Such homemade products require a little more equipment, since the circuit is still more complicated.
Rarely does a garage serve solely for storing a car, but even this over time becomes overgrown with a bunch of homemade products needed for its maintenance. Often it is the garage that serves as a home workshop for its owner. What to fill it with to make life easier for the car owner and, of course, save on repair and maintenance of the car.
We are talking about homemade products for the garage and home craftsman, which you can make with your own hands.
The very first thing, in my opinion, that needs to be made in the garage is a place to store all kinds of little things and tools. These can be racks or shelves that will successfully fit into the garage interior and help to put things in order in it. They can be built from wooden planks or metal corners that you have left during the repair or construction of the house.

And with the help of magnets, you can easily clean up small parts.

A garage for storing garden accessories is very useful, if, of course, space allows, because not always in a suburban area a special room is allocated for such things. The photo below shows how easy it is to do this using planks and hooks.

It is also convenient to store tourist and sports equipment in the garage (after all, not everyone in a city apartment has an extra space for storing bicycles for the winter).

Such devices on the ceiling save very space in the room:

And most importantly, tires have a special place in the garage. Real home craftsmen can easily make tire holders with their own hands.

And if there is a welding machine, then such holders can be built from metal corners.

And it saves space, and the garage is not cluttered. And you can safely carry out masterpieces of homemade products for the repair and maintenance of your car.
Stands and mini-stages in the garage
The jack is a standard tool in the vehicle, but it is strictly forbidden to carry out even minor work under the bottom of the car when it is hung on a jack. And sometimes it is necessary to raise its entire front or back.

In this case, you cannot do without goat stands.

Sometimes the stands are made in the form of mini-overpasses, which the car runs into.

except general requirements listed below, an important element of these supports is the travel stop at the front of the structure.
It is not so important what they will be made of, but the requirements are the same:
- stable wide support;
- safety margin for the estimated weight of the car;
- minimum clearances between moving elements for height adjustable stands.
The video shows the simplest coasters with a check-in:
Very often, just such a homemade product is not at hand in the garage during repairs that do not require the involvement of service specialists.


After all, they are removed from the shafts not only the bearings, but also the gears, they will also help to press out and press in the silent blocks and so on.

A factory-made bearing puller is quite expensive, and making this device yourself is not so difficult:
Even if you do not have welding, and the puller is needed urgently, then between the strips of the puller body from the video, you can clamp an elongated nut with stops. Or use a heavy plate design with drilled holes, as in the photo, where the nuts can work simply on the stop and without welding. But it is also useful to have a small weld that can fix such elements in the garage.
Homemade welding from a microwave transformer for a garage
This is one of the most suitable transformers for converting into a welding machine. The primary winding is used in it as standard, only the secondary is altered. Moreover, the wire can be used and thinner than in the video offered to you, but preferably with a cross section of 8 - 10 mm:
The number of turns just increases. From transformers from low-power microwaves, welding with a power of 0.5 kW, a current of about 250A and an output voltage of about 2V is obtained. They are capable of welding 2 sheets of steel with a thickness of 1-1.5 mm.

Such devices can be doubled, increasing the power indicators.
But it is not necessary to saw the case - you can cut off the protruding turns of the secondary winding and remove it, and simply drag the new wire into the formed windows.
Also, it is not at all necessary to place the electrodes opposite each other. You can place them side by side, with a gap of 2 - 3 mm. With such an apparatus, you can weld the wing to the body and do much more.

It is only necessary to modify the holder a little and make it removable.
And for little things, this option of mini-welding using a standard battery from a car is quite suitable:
Compressor from an old refrigerator in a garage
Despite the seeming weakness, this is a completely efficient unit. With its help, you can also pump up the wheels, and, with a little modification, tint the car. It is in no way weaker than most cigarette lighter-powered ones. car compressors, but unlike them, it can work much longer.
The main problem of direct use of this compressor is the presence in the circuit of its connection as part of refrigeration unit thermostat. It should be disabled:
But installing a fine filter on the outlet hose of an automobile fine filter that catches oil droplets is ineffective; it is better to use more powerful filters with sedimentation tanks for this purpose. The start relay should be used as standard. The compressor is powered by 220V, which makes it tied to the mains, but in a garage it is a very useful device.
To pump the wheels on the outlet hose, it is worth putting a pistol with a pressure valve and a pressure gauge, because this baby can create pressure up to 16 atm.

And if you plan to use such a compressor to perform small painting works, then you cannot do without a receiver.

Its role can be played by any sealed container capable of withstanding a pressure of 4 - 7 atm, into which 2 threaded or comb fittings can be embedded. Installing a pressure gauge in such a system is required.
You can also use a car wheel or even a camera as a receiver. More stationary option such a receiver is shown in the video:
But you can not spoil the disk, but make the system simpler.

The pumping hose is connected to the system through a spool, and a mechanism for shutting off the air in the spray gun works on the outlet branch.
You can of course use and.
But in this case, a stopcock should be cut in front of it. But the wheel can be pumped up with a mechanical pump, with a small air flow, this pressure will be enough.
The simplest devices for recharging the battery
Having a full-fledged car charger is good, but sometimes quite expensive, especially since cheaper devices can also perform its function. So with a full charge of a car battery with a capacity of up to 75 ampere-hours, a charger from a laptop can easily cope.

Moreover, you do not need to make any alterations, but it is enough to include a 55-watt 12-volt automobile lamp in the circuit and periodically monitor the state of charge of the battery with a multimeter.

When the indicator reaches 13-13.5V, you should stop charging - the battery is fully charged. In addition, it is extremely important not to mix up the polarity. This use of the adapter does not harm him in the least.

In general, without any alterations, chargers for a 12-volt cordless power tool do quite well with the recharging function, and most of them have LEDs that signal a full battery charge.
An old computer power supply is also capable of recharging a dead battery to a level sufficient to start the car. It has an output voltage of 12V, and for a full charge it needs to be up to 14V, but minor alterations can provide this voltage.
Tire fitting and balancing - homemade products for the do-it-yourselfer
Creating in your garage devices for self-tire fitting and balancing is real, and will allow you to constantly save a lot of money. And not so many devices are required for this:
- universal tire fitting machine;
- balancing device.
Some craftsmen carry the functional parts of the tire changer, but in a garage it is better to combine them on the contrary.

You will need a paw with a lever to break the tire off the disc and a fixed stand with holes for mounting the disc and a central thrust pin. The disc can be fastened in various ways, but since you usually have 1 - 2 cars in your personal use, it is reasonable to make fastenings for specific wheels. The easiest way is to drill the bolt holes locally. The number of levers for removing and setting the tire on the disc can be large, or you can do with one - double-sided.


This is exactly what the home master did in the video:
Of course, it would be more convenient to fix such a machine to the base, but on the other hand: when assembled, it will not take up much space in the garage, but it will perform its main function anyway.
Yet we don't skip the wheels as often as they require balancing. According to the rules, it should be done at least every 10 thousand km of run, but this procedure at the service station is quite expensive and therefore few people withstand the established frequency. And its quality does not always correspond to our expectations, because complex computerized machines are even more expensive to set up and maintain, and the running gear of our cars suffer from this.
There are 2 types of balancing:
- static;
- dynamic.
The attachments for both are not complicated, but you will need a good turner and a high-quality bearing for one of them. Static balancing is often sufficient if you are mainly driving at speeds of 120 km / h or less. It is necessary to grind the hub for fixing the wheel of your car, it is advisable to do this from one fixing of the part, or later it must be carefully balanced by drilling blind holes in the right place.


And the process of static balancing is clear from the video:
The listed accessories for the garage, which are not difficult to make with your own hands, are not the only ones of their kind, there are many other homemade products that simplify the "garage" life of a home craftsman. If you share your options for such devices with us, we will be sincerely glad.
Dear readers, if you have any questions, ask them using the form below. We will be glad to communicate with you;)
The garage is not only a place for a car, but also a source of priceless extra space, which can be used truly rationally if you design useful devices with your own hands.
DIY garage accessories
Since the garage for its intended purpose is a home for a car, you should be careful to ensure that the place for the tools is well organized. Also in the room there are probably several square meters in order to take out some of the objects from the apartment, so as not to clutter up the living space.
When installing various devices in a room, it is important to consider that all available equipment is at hand. To do this, you can use the following recommendations:

The rational organization of space in the garage creates many tangible benefits:
- it becomes possible to independently carry out small-term repairs of auto parts and other mechanisms, due to which you can significantly save money;
- convenient placement of tools significantly speeds up the work progress and saves time;
- the creation of additional places for storing tools, old things, clothes makes it possible to unload the apartment from things that are rarely used in the household;
- finally, the well-thought-out internal logistics of the premises allows it to maintain its attractive appearance and avoid clutter.
NOTE. At the stage of project development, it is important to proceed from the area of \ u200b \ u200bthe room, as well as take into account several mandatory utility compartments - for storing summer and winter tires, canisters, jacks, etc.

Video TOP of the best ideas for arranging a garage with your own hands
Garage rack: step-by-step manufacturing instructions
Since the garage always contains a lot of items, ordering their arrangement is a fundamental requirement for proper storage. The simplest and at the same time convenient option is to create a rack with shelves.


Preparatory stage
Before proceeding with the installation of the structure, several important requirements should be taken into account:
- The total weight of the rack should not be more than 4-5 centners - otherwise the structure will be very difficult to move if necessary. It will also press on the floor noticeably, which can impair the quality of the coating.
- When choosing materials, it is important to proceed from considerations of strength and durability of the structure. Metal is optimal, as well as wooden crafts beech or oak. Plastic shelves are not suitable - they are not durable and, moreover, may not withstand temperature changes.
- When choosing between a metal and a wooden structure, you should proceed from your specific needs. Metal is more durable and stronger, but wood is more affordable. If you need to place a few tools, a small wooden rack is enough.
- Since all tools are very heavy, the strength of the structure should be calculated immediately so that it can withstand at least 100-150 kg on one shelf.
Installation of a wooden structure
To make such a device for a garage with your own hands, you will need ordinary working tools:
- hacksaw for wood and metal;
- hammer, nails;
- screwdriver, self-tapping screws;
- construction tape;
- construction level;
- electric drill.


All wooden parts must be primed and varnished prior to assembly. In the garage, there may be high humidity or temperature differences - therefore, without treatment, the tree will not last long.
Video - DIY wooden shelving technology
Installation of a metal structure
Metal structures are distinguished by their exceptional durability and strength. In addition, they do not need to be treated with special materials to prevent rotting.

It is possible to make both a rack and separate structures from metal, for example, for storing rubber.

In this case, you should take into account the rules for storing tires, which are schematically shown in the figure.

At the design stage of a metal rack, it should be taken into account that all the necessary items can be freely accommodated in it. You can take such a drawing as a basis.

Or this option.

The easiest option is to purchase a modular design and assemble it yourself. But you can make this device for the garage with your own hands. The sequence of actions is as follows:


The heaviest equipment is best placed on the lower shelves for optimal load distribution throughout the rack. Moreover, the most the best way- when the lower floors are made of corrugated metal, and for the upper ones it is quite acceptable to use a strong chipboard.
Hanging shelves: quick and practical
Not in all cases there is a need to create a rack, since it will take up a lot of space. On the other hand, in a garage of any size, there is always an unused overhead space that can easily be occupied by hanging shelves.

Structurally, it is quite realistic to do with your own hands any version of such a device for a garage:


Of the tools, you will need the standard set described above. The sequence of actions is as follows:

If the shelf is mounted to the ceiling, you can strengthen its connection to the wall using metal corners - then the product will not sway and will last much longer.
The whole technology is shown schematically in the figure.

Manufacturing of a shelf-shield
The do-it-yourself manufacturing technology of such a garage device has its own differences compared to the installation of conventional shelves:
- The shield itself is made of durable plywood, the parameters of which are selected according to the situation. Visually, the shield should completely cover the surface of the desktop.
- Space is allocated on the board for all shelves and appropriate notes are made.
- Further, in the surface of the structure, all holes are made into which the dowels enter. It is on them that the hooks will be attached, on which all the tools will be placed.
- The panel is fastened to the wall using brackets. The corresponding holes are made with a hammer drill.
All steps are shown schematically in the figure.

Toolbox above the workbench in the garage in-house
Garage workbench: step by step instructions
Another design that is likely to be needed for repair, plumbing and other types of work is a workbench. It can be purchased in the store, but if you have a certain skill, then it is quite possible to make such a device with your own hands and put it in the garage.

Before carrying out the actual installation works it is important to clarify several important details:
- Where the table will be located.
- What kind of work will be mainly carried out on it.
- Which work surface material is suitable - metal or wood.
All these questions are closely related to the purpose of the product. If the work is supposed to be done often, then it is better to choose a durable metal. And for standard household tasks, a durable tree will do.
It is important to understand, however, that a workbench is not just a work surface. Often, it combines the function of a wardrobe, a small chest of drawers and even a metal safe - such a set of parameters depends on the specific configuration of the product.

Varieties of workbenches
The key classification of workbenches is based on the types of work that are supposed to be carried out on it:


At the same time, you can combine these functions, so this classification is largely arbitrary. The best option such a garage fixture is a structure on a metal frame with wooden surface tables and drawers. It is more reliable than a wooden counterpart, and allows you to save on manufacturing due to the fact that some parts will be made of wood. Table surface can be strengthened sheet metal- then the workbench will serve for a very long time.

Manufacturing technology of a workbench from a metal frame
To mount the structure, you will need a standard set of tools and materials:
- welding machine;
- grinder for metal;
- building level;
- jigsaw for wood;
- screwdriver, drill;
- self-tapping screws, anchor bolts;
- hammer and nails;
- metal corners with parameters 5 * 5 cm;
- square pipes 6 * 4 cm, total length about 24-25 m;
- steel strip 4 cm thick, up to 8-9 m long;
- paint for wood and metal processing.
Such parameters are intended for the manufacture of a finished product with table parameters 220 * 75 cm, as shown in the figure.

The sequence of actions is as follows:


Even at the stage of designing a workbench, it is important to decide whether the device will be collapsible or whether it will stand permanently in the garage. In the case of a collapsible version, all parts are fastened with self-tapping screws, and the principles of technology will be different.
Manufacturing technology of a wooden workbench
A wooden workbench is less durable than a metal one. It is well suited for those cases when the work is supposed to be done not so often - several times a year.
To make this device for a garage with your own hands, you can use the same drawing that was given above, or take the diagram shown in the figure as a sample.

The algorithm will be something like this:

DIY garage tipper: step-by-step video instructions
Along with the creation of the considered devices for the garage, you can also take care of making your own hands the working tools that you will need directly for Maintenance auto.
One of the most useful settings is a tipper for inspecting the bottom of the machine. The need for such a product is most relevant for Russian realities, since not in every case there is a real possibility of building an inspection pit.

Detailed video instruction with step by step scheme making
Before making such an installation, it is extremely important to consider the issue of safety. Even a light car, if dropped, can cause an accident and at least be seriously injured. Therefore, it is possible to take on the creation of such a structure only if there is sufficient skill.
Self-production of garage fixtures allows you to rationally organize the internal space and, in fact, get your own workshop, in which you can perform any current repair work.
Original ideas for organizing space in the garage
And finally - a photo selection of visual ideas for creating spacious structures from a variety of objects, which will surely be found in any garage.

A garage is not only a parking space. It is also a workshop, a place of rest, and a club of interests. Therefore, the arrangement of the garage should be convenient and thoughtful. On a small area, you need to place a lot of things, and it should be convenient to use them. Homemade products for the garage will help with this. What people do not do with their own hands. From an elementary shelf to a complex device. All this can be made by yourself. But you need to know how. Several ideas for modernizing the garage and a plan for their implementation in the article.
Homemade garage: ideas for arrangement
Arranging a garage is a lengthy process. You won't be able to do everything right away, you have to constantly modernize something, change, make something new. In this case, they mainly use homemade products for the garage. It requires less money and is also a pleasure - making the necessary thing out of the garbage is worth a lot.
Even in a small area, you can fit everything
Storage of tires and wheels
Every car owner is faced with the problem of storing off-season "shoes" for the car. Where to stick the tires is a sore point. In general, the way tires are stored depends on whether they are mounted on disks or not.

Tire storage methods
So tires with disks can be suspended or stored lying down - in the form of a stack, stacking them one on top of the other. To hang the tires, you can use luggage belts, chains, a metal cable with a diameter of 4 mm or more in a polyethylene sheath. Attach belts to the ceiling, wall, to the top beam.

PE-sheathed cable, ring anchors and clamps for tightening

Luggage straps are best secured to rings in the ceiling or hooks on the walls

Drive pins of sufficient length into the wall, but such that the pin does not stick out of the tire

Not only a pin will work, but also a hook with a small bend radius
Another affordable way is to drive pins or hooks with a small bend radius into the wall. The distance between the hooks is slightly more than the diameter of the tires. The length of the pins should be such that they do not stick out beyond the tire. You can stuff them almost under the ceiling so that the wheels fit.
Tires without discs can only be stored "standing". Special shelves are made for them. They are usually welded from a profiled pipe. 20 * 20mm, maximum, 30 * 30mm. You can also use a corner. It is inconvenient to cook a round pipe, but you can make crossbars from it - the tires fit and hold in this case better.
The shelf width is 4 times the tire width, plus a 10-15 cm margin for some freedom. The height of the rear wall is slightly higher than the outer diameter of the wheel. The design is simple = from the side it resembles a right-angled triangle. Having an inverter welding machine, it will not be difficult to weld such a shelf.

Tire Storage Shelf - Great DIY Garage DIY

This is a factory version with a completely inhuman price tag. But you can borrow the idea - the cross members can be rearranged depending on the size of the tires ... you never know

Just cooked and painted
These shelves are usually hung on the wall. But the place must be chosen so that no light falls on the rubber - it deteriorates from this. Not the most difficult homemade garage items, but very useful.
Workplace
Probably the largest number of homemade garage items is associated with the equipment of the workplace and tool storage systems. Moreover, shelves and shelves in the garage are not the only way to solve this problem. First of all, you need to decide where the workplace will be located. There are three options:

A table or workbench for a garage is made of boards, sheathed with plywood. Inexpensive, quite reliable. If you have a welding machine and verification skills, you can weld a frame from a corner or profiled pipe. Sheathing again is better with moisture-resistant plywood. The result is a smooth, abrasion-resistant surface. You can, of course, use laminated chipboard, but the laminate is quickly damaged.

U-shaped workbench for the garage
So that the place "does not walk", you can install shelves or drawers under the tabletop. Drawers are more convenient, but making them is still a hassle. It is quite possible to make shelves and put boxes knocked down from plywood on them. Plastic crates and baskets are also suitable. But the walls must be thick.

Drawers can be placed on the shelves
By the way, there is a useful idea - to make a rack for storing tools from used cans. Find ones with a handle on top. Then everything is simple - one of the sidewalls is cut out and in the future this canister is used as a box.

Useful and simple homemade garage items
It is not necessary to make a whole rack - after all, it is difficult to remember where, what is. But according to the same principle, you can make drawers for shelves. On the ends, by the way, you can stick inscriptions or pictures (recognition with pictures is faster). Such homemade products for the garage bring satisfaction - creating a useful thing out of garbage is a pleasant feeling.
Tool storage
The most difficult task is organizing storage of the tool in the garage. It is necessary to make sure that everything is in order, but, at the same time, is at hand and in plain sight. Moreover, closed boxes are suitable only for very organized people who always put the thing taken in place. Otherwise, you will constantly rummage through the boxes, forgetting where that lies. There are several ideas for conveniently storing small items and tools. These are very simple homemade products for the garage.
An ordinary metal mesh will help to quickly solve the problem. A reinforcing mesh made of 2 mm wire, a 10 cm cage is suitable. Attach it to the wall, bite off some twigs, bend them, make hooks, crossbars, etc. You can buy special hooks that are attached to the net (available in stores that sell commercial equipment), ordinary double-sided hooks that can be bought or made from wire are also suitable.

Wall mesh - a way to quickly organize tool storage
It is convenient to store screwdrivers on a special shelf. Take a board, plywood, 10-15 mm thick. The board must be sanded well so that there are no splinters. Then, in the plane, drill holes of different diameters in one or two rows. If the board is wide enough, you can make larger holes for chisels or even hammer handles. Clean all the chips again. Now we need to come up with a wall mount. You can use a regular bracket. Screwdrivers, chisels, and other similar material are inserted into the holes. Convenient, fast, everything is in sight.

Idea for storing screwdrivers in a garage
There are also useful homemade garage items that allow you to organize the storage of hand tools. Pliers, pliers, wire cutters, etc. to place conveniently is problematic. It can be hung on a net; it is convenient to take off, but not to hang up. But there is a simple solution - to attach a narrow board and put the tool on it. To make it "sit down" comfortably, grind off the board from one side. In cut, it should look like an isosceles triangle.

Storing hand tools in the garage
Another simple idea for storing a cordless tool, chargers and spare batteries for them. Make a shelf as in the photo above. In the lower part, cuts of different formats are made, and the upper ones are used as ordinary shelves. The idea is that everything is in one place, quick to get / set in place. These garage homemade products will make your workplace comfortable. Keeping order will be easy.
DIY garage carriers
Even with very good lighting in the garage itself or on the street during the day, visibility is very low under the bottom of the car. To illuminate the front of the work, they use portable lamps - carriers. These are the simplest homemade garage items. With them, you can start the epic of the arrangement and equipment of the garage space.

The most widely used type of garage carrier. Self-made ones usually make very similar
In the simplest version, this is a cartridge attached to a wire, a small screen with a hook can be attached to it. Such a completely uncomplicated thing. Light bulbs are used ordinary - incandescent or housekeeping under a standard cartridge. Everything is not bad, except that these bulbs are beating very often, you need to look for how to hang them so that they shine in a specific place. In general, the design needs to be improved. There are several rework options.
Unbreakable lamp holder
This plastic bottle lampshade protects the fragile bulb of an energy saving lamp perfectly. You can also use an LED lamp, but incandescent will not work - it gets too hot. The design is usual - a cord with a plug and a cartridge at the end.
The main task is to find a plastic vessel with walls made of translucent milk plastic of medium thickness. Transparent will not work - it will not scatter light, too thin walls will not save the lamp from blows. After finding a suitable vessel, a trifle remains:

Everything is simple, but such a shade allows you to brightly illuminate exactly the desired area, the rest of the space is flooded with even light that does not cut your eyes.
Carrying LED recessed light
The simplest and most common homemade garage items are portable lamps. Without them, it is inconvenient to work not only in a garage pit, but even just on a workbench. You need a flat recessed LED luminaire that can be turned on at 220 V. These models are called "pills" because of their shape. You also need a cord with a plug, a piece of plastic window sill - to build in the lamp. A piece of the window sill should be larger in size than the lamp. You select the specific dimensions yourself. Further actions are as follows:

That's it, the homemade carrier is ready. This option is for floor installation. The movable leg allows you to change the angle of inclination. To make it turn over less, a couple of weights can be fixed inside the case (in its lower part).
Attach the carry cord to the ceiling
Conveniences are made up of little things, and very simple homemade products for the garage help in this. For example, you can remove the cable from a portable lamp that always gets tangled under your feet. Carrying is usually done with a cheap cable. It is not the most flexible, does not fold well, its turns on the floor fall under your feet. In general, it is inconvenient to use. You can protect yourself and carry - hang the cable from the ceiling. The solution is simple but very effective.

Such a "suspension" to the ceiling for carrying you can do it yourself in an hour
- Two anchors with a ring at the end.
- Cable tie.
- Clamping clamp.
- Metal rope. The length depends on the size of the garage - it is necessary from one wall to another.
- Steel / plastic rings or steel wire and a piece of pipe to make these rings.
- Carry with long cable - roughly double the length of the garage.
The cable runs along the long side of the garage. It is more convenient - not far from the "working" wall, where the workbench or other equipment is located. Little work:

Well, that's all. You can use it. With such a device, the carrier can be pulled to either end of the garage, while the cable does not get tangled or clinging. Convenient, requires little time.
DIY garage compressor
A compressor is needed in any garage. And by the way, this is not the most difficult homemade product for a garage. A low-power compressor for a garage for inflating tires and other small work can be done with your own hands from auxiliary materials. For example, from a compressor from a refrigerator. For this you will need:
- compressor from the refrigerator;
- a sealed cylinder with thick walls (you can use a flask from a fire extinguisher, a small gas cylinder);
- safety valve for 8 atm;
- pressure gauge;
- fitting;
- oxygen hoses with couplings (select the length based on the size of your spare parts);
- base for the compressor - a thick board, a piece of plywood will do.
In order not to pump any muck into the tires, it is advisable to also put a filter - to separate oils, dust and other contaminants. A diagram of a homemade compressor is shown in the photo.

Homemade compressor circuit
The compressor must be equipped with a starting device. We connect it to the network, look into which tube the air is sucked in, mark it. You can put a car filter on it - clean air will be pumped in.
We assemble the receiver-oil separator from the cylinder and the safety valve. To do this, we cut two fittings into the cylinder - for the inlet and outlet of air. We put a safety valve on the inlet to it with the help of an oxygen hose and connect the compressor outlet.

Homemade compressor for the garage based on the compressor from the refrigerator
We put another car oil filter on the outlet of the oil separator receiver - to remove the oils completely. We connect the filter to the pressure gauge, and from it there is already a hose, which is connected to the bus through the corresponding adapter.
The assembly is complete. But in order to carry this device conveniently, everything must be fixed in some way. You can weld the frame to size, attach wheels and a handle - for easy transportation. One of the compressor options for pumping the wheels is described in the video. There is no receiver, but an oil filter performs its function. You can do that, but with a receiver, the design is more reliable.
Since the compressor in the refrigerator is small, it can take a long time to inflate the wheels. It can be made more powerful by installing two compressors that will start at the same time. Accordingly, the pressure will build up twice as fast. But in such an installation, a more solid security group is required. Such homemade products require a little more equipment, since the circuit is still more complicated.