What can be cooked from squid: quick and tasty
Why do children need a sandbox, there is no need to explain. There is hardly anyone who, as a child, would not play in the sand. You can make a good sandbox on your own in literally half a day. This will not only save a certain amount, but, perhaps more importantly, will make my father's authority much more significant. A do-it-yourself sandbox is built for family use when the first-born is already cheerfully stomping, and the collective one is at the beginning of the arrangement of the children's town in the local area.
A sandbox for children's games is, as you know, low, 25-40 cm high above the ground, a fence or box, with or without a bottom, 1.2-3 m in diameter, into which sand is poured. He is the main thing in the sandbox, because most susceptible to pollution, and the children's sandbox must meet the sanitary and hygienic requirements for children's household items. For a relatively small, 2x2 m, sandbox it requires approx. 1 cubic meter. To prepare at home for a children's sandbox so many ordinary sand, you will need to establish a whole production. Purchased mixes are not cheap, and no one can give a reliable guarantee that they will retain their properties on the street. If they still correspond to the declared ones. However, building sand of a certain type (not the most expensive at all) can be suitable for a sandbox, provided that it is replaced annually or prepared for re-filling. Therefore, further A special section will be devoted to the choice of sand for the sandbox.
Seat selection

To make a sandbox correctly, you first need to choose the right place for it. Place a sandbox on the site, as shown in fig; in general, in the sector from north to southeast. It's about ultraviolet (UV) light. In the morning, when the air is fresher and more transparent, its share in the sunlight is greater, but the UV radiation itself is softer. Remember, doctors recommend sunbathing in the morning. In the afternoon, due to physical phenomena with dusty air and more saturated with water vapor, the proportion of UV decreases slightly, but its spectrum becomes harder. Therefore, in the afternoon, a shadow should fall on the sandbox.
However, building a sandbox under a tree is not recommended. Leaves can not be expected to fall: in the summer garbage will fall into the sandbox, bird droppings and insects will fall. Spiders are absolutely not needed in the sandbox: a cross-piece that is safe for an adult can bite through children's skin, and spider venom does not cause immunity, but on the contrary, sensitization, increased sensitivity to it. Most spiders cannot stand bright light and dryness, therefore the sandbox should be located at least 3-4 m from frequently watered beds, bushes, a reservoir, a fountain, etc. sources of moisture.
The next factor no longer concerns the sandbox itself, but the house and the equipped area near it. Sand is an excellent abrasive. Grains of sand carried on shoes can quickly spoil not only parquet or laminate, but also paved garden path... Therefore, it is highly desirable that around the sandbox there is at least 1.5-2 m of lawn or blind area that removes sand from shoes. If the sandbox is not on the lawn, you can put cleaning mats for the hallway around it, but options from scrap materials are also possible, see below.
Site preparation
Sandboxes are made permanent, overwintering in the open air, and seasonal, which are removed under the roof for the winter. The latter are not necessarily with a bottom, requiring more material consumption and adding weight. Permanent sandboxes are usually built for several generations by children, and the seasonal one is a typical sandbox for a summer cottage. With more or less careful use, it will serve not only children, but also grandchildren. The construction of a sandbox of both types differs, in essence, only in the way the box is installed, see below.Anyway preparation of a place for a sandbox and its fixation on it is carried out in stages as follows:
- In the selected area, sod or the upper loose / littered layer of soil is removed by 15-20 cm, i.e. on a half bayonet of a shovel, and with the same exit to the sides;
- The site is leveled, covered with any sand with a layer of 5-6 cm, and passed with a rake;
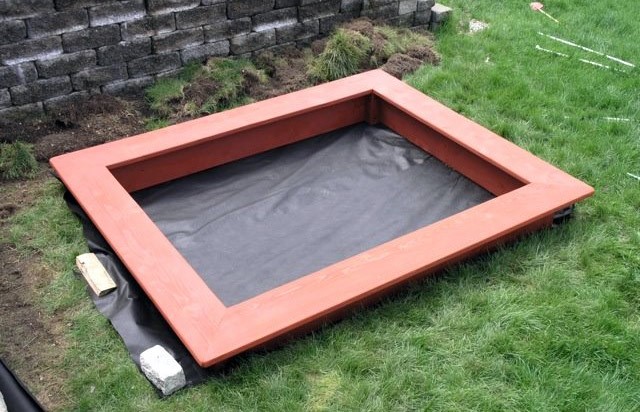
- The sand backfill is covered with geotextile, agrofibre or, quite in budget option, propylene matting from old bags loose on the cloths, with a removal along the contour of 30-40 cm. Such insulation will not let roots and soil living creatures into the sandbox, but will release excess moisture from it into the ground;
- After installing the box (see Fig.), The lapels of the insulation are folded up and temporarily attached with tape to the sides of the box;

- The trench bordering the box is covered with excavated soil, tamping it;
- The excess insulation is cut off or tucked in, tucking in with a chip, a ruler, etc.
Note: if the sandbox is seasonal, then it is better to tuck the insulation. In the fall, her lapels are pulled out and straightened. The box is removed, and then it will be possible to take out the sand for winter storage. Or to a construction site, if the need for a sandbox is over.
Does the sandbox need a cover?
Why sand is attractive to cats and dogs and why their completely natural needs are incompatible with human hygiene is understandable. It is also highly undesirable for children to play on completely damp sand. He sculpts better, but not for long before a cold. You can, of course, when the sandbox is not in use, put pipes, boards, poles on it, cover it with foil and press it down with bricks. But in the adult summer, when there are a lot of worries on the site, it is troublesome and does not diminish the trash on the territory. Therefore, a sandbox cover is still needed.

Note: in the purchased expensive mixtures for sandboxes, fragrances are introduced that scare away animals. But, first of all, they "fizzle out" pretty soon. Secondly, there is no independent medical statistics on the effects of these substances on human health. Insofar as it comes not just about health, but about children, then, as they say, it is better to stay away from sin.

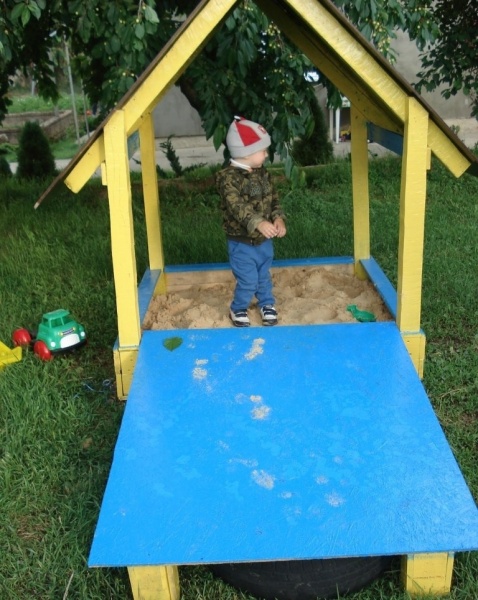
A sandbox with a lid, if we exclude completely exotic options for a fan lid, self-lifting with a mechanism, etc., is done in three ways, see fig. above. The simplest option is a regular board made of boards or plywood, as in Fig. left. But then the small ones will not get into the sandbox without the help of adults (perhaps they are very busy right now). Secondly, due to such sandbox covers, injuries are possible. A neat, quick-witted and independent child, trying to put in order in an adult way workplace, pulls a shield that is too heavy for him, and he falls on the little owner. There were no serious cases, there was no roar or resentment.
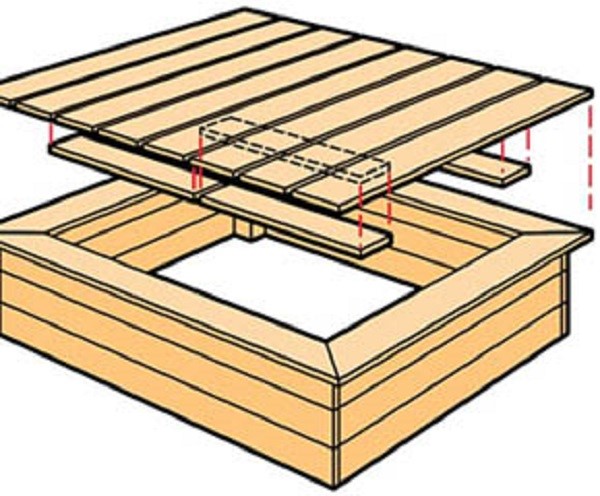
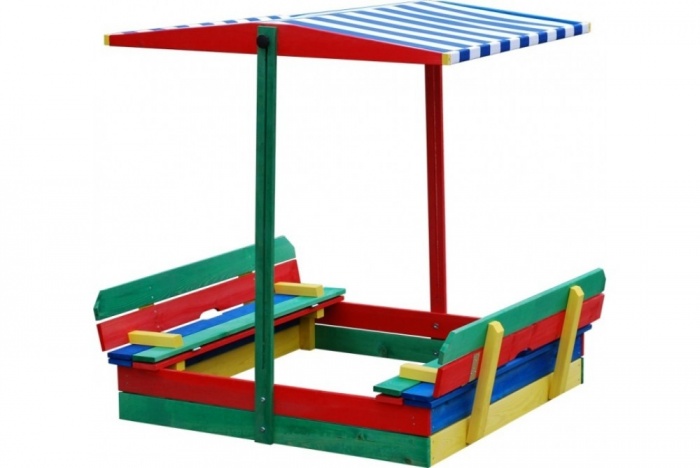
The second option is a fold-over cover, or a book that transforms into a convenient bench, on the left in Fig. To do this is not at all difficult; a diagram of the device of the transformer cover for the sandbox is shown in Fig. on right. Materials - boards (100-150) x (20-30) and beams 50x50. The bar (a) in a closed sandbox is under the lid, and the bar (b) is on it, so there is no need to calculate the exact indents / clearances / offsets with this mechanism. By removing the bar (b), the backrest tilt is adjusted.

Loops 1 card with wings as wide as the thickness of the board; hinges 2 are better for barn ones. In the middle of the upper boards of the back, cut-outs are made (shown by the arrow on the left in the figure above). If a deaf cover is needed, then door handles are attached in the same places.
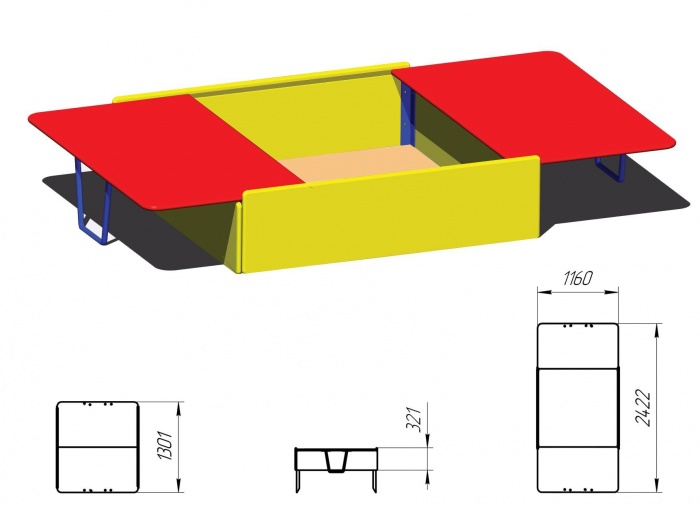
The second option is a sandbox with a hinged lid, on the right in Fig. above, it is more suitable for children of different ages, when the elder (elder) may have outgrown the sandbox, but takes care of the little brother (sister). Then the elder, who is already able to lift a rather large sheet of plywood or painted chipboard, will have a play / work table at his disposal, well, and the little one will have his own.
Superstructure
Materials (edit)
It is preferable to make sandboxes made of wood; wood in this case is the most environmentally friendly and least traumatic material. A simple and completely harmless treatment can achieve its durability in the open air for over 10 years, which is more than enough for a sandbox. Other options for constructing a sandbox will be considered later, but for now we will deal with wooden ones.
Preparation of parts
The preparation of the material for the manufacture of a sandbox made of wood is reduced to a double impregnation of ready-to-assemble parts with a water-polymer emulsion (WPE). In this case, it makes no sense to use expensive certified oil and silicone water repellents (water-repellent compounds) and antiseptics: there are few cracks and nooks that retain moisture (this is the so-called capillary locking) in the sandbox, they are all well ventilated and / or are in contact with greedy moisture-absorbing sand. Free practice, which in many other cases helps the home foreman, is inapplicable in this case, since motor oils contain additives, the presence of which is unacceptable in children's items.
Note: the underground parts of the permanent sandboxes are also treated with bitumen mastic before installation, see below, or poured over with boiling bitumen.
For the same reasons, almost any tree will go to the sandbox, even alder and aspen unsuitable for buildings. Their low resistance to rot and mold is compensated by "roasting" in the sun and contact with sand, and low mechanical strength for a sandbox that is practically unloaded does not matter. For permanent sandpits, it is better, of course, to take pine or other conifers. Birch is not suitable for any structures exposed to atmospheric influences, it molds very easily.

As for the choice of the type of lumber, it is best to use quarter or grooved boards, they will exclude the penetration of atmospheric moisture into the sand through the walls. Grooved ones, in addition, will make it possible to arrange strong wide benches, see fig., And the folding sandbox cover will make it reliable and durable. A quite solid sandbox is obtained from a grooved board with a thickness of 16-20 mm. Of course, when assembling the box, the tongue of the top board tongue will have to be removed.
Note: the tongue of the tongue of the sides of the box should always be facing upwards, and the ridge of the lower quarter, if quarter boards are used, outward. Otherwise, moisture will stagnate in the compound.
Sandbox construction
The sandbox box is made 2-3 boards high, depending on their width. They are assembled by attaching at the corners with self-tapping screws to pieces of timber 50x50 in length in the height of a box for a seasonal sandbox or with "legs" of 30-40 cm for a permanent one. For a 100-mm board, 2 attachment points are required, and for a 150-mm one, 3. If the walls are made of a simple edged or quarter board, and their length exceeds about 1.8 m, then in the middle of each wall they attach another piece of the same bar.

The corners of the seasonal sandbox need to be additionally reinforced so that its box can be turned over by 1 person without risking breaking. In this case, the corner posts are placed outside, and the intersecting boards cut into each other in half a tree. Drawings of a summer cottage sandbox for seasonal use are shown in Fig. Of course, a constant made in this way will not be worse.
Side-seat

The sandbox board is a frame made of boards. It gives her drawer extra rigidity, serves as a seat and shelf for toys. To make the board even, the ends of its boards are sawn at 45 degrees. Here, firstly, it is necessary to pay attention to the coincidence of the edges. The protrusion of the corner, see fig., Is traumatic, children are scratched on such hooks, as if they are being pulled there by a magnet. Such flaws must be filed off and the outer corners of the bead must be sanded to roundness.
How the board is superimposed on the box can be seen in pos. 1 fig. It is unambiguously attached to the corner and intermediate posts. But if you leave it that way, the board will soon break off.

Fastening to the edge of the box board, pos. 2, not entirely reliable, the kids are angry people. Lining block B is also not an ideal solution, it prevents children from poking into the hiding places under the side of the toy, but what kind of game is this? The best way reinforcement of the sandbox side - pieces of fillet plinth from 40x40 mm, pos. 3. A piece of 30 cm long, set in the middle, is enough for 1 m of the side length. There are 3 attachment points, i.e. with a step of 10 cm. In addition, if the same supports are installed under the outer extension of the side, then its fastening can be made hidden.
Roof
Based on the conditions for placing the sandbox, it is clear that it needs a roof. The classic option is fungus. But adults who remember playing in the sandbox also remember that he doesn't really hide from anything, only on the forehead every now and then. In the center of the sandbox is the game itself, and there the pillar sticks out. The fungus on the playground, of course, is needed for quiet and quiet games, but aside. And it makes sense to make a sandbox with a fungus only if there is waste of building materials and there is no money for new money. In such a case, see the video on how to make a sandbox with a fungus from scrap materials.
Video: do-it-yourself sandbox with a fungus
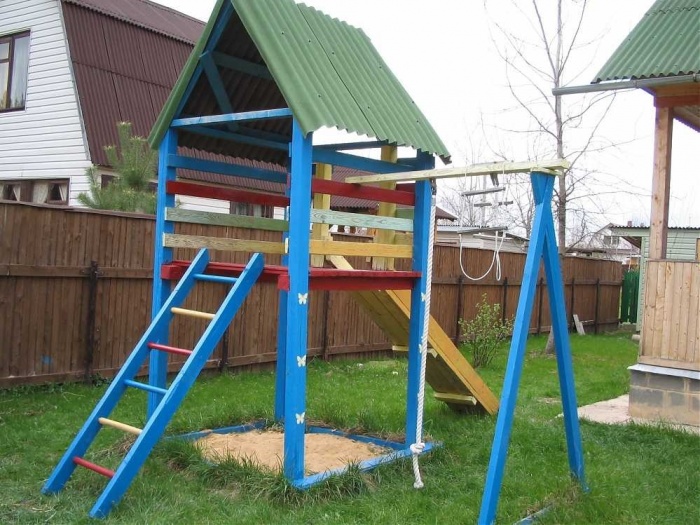
The most durable and reliable version of the sandbox roof is on 4 pillars, pos. 1 in fig. One problem is that fidgets have the same problem with a nose-and-bull, like a reckless driver with a radiator: always in front of him there is either a tree or a pillar.

It is much safer than a roof on 2 pillars, pos. 2 and 3. They are attached to the sides of the box at the location. Therefore, if the roof is heavy and / or with steep slopes, which gives better shelter, then the pillars must be reinforced with struts, pos. 2.
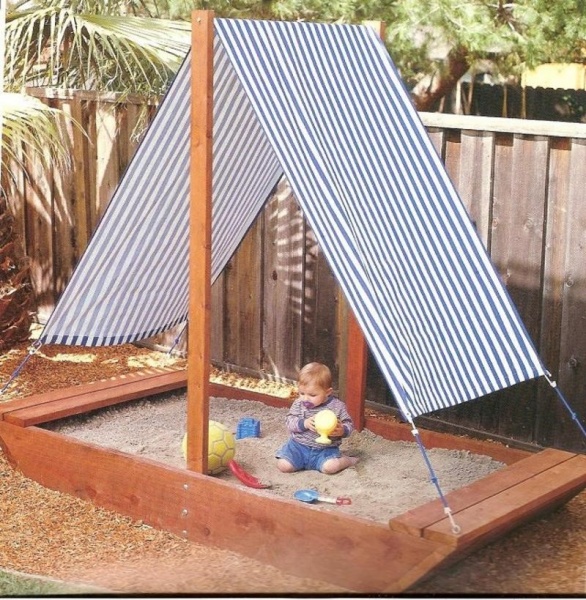
It is advisable to make the roof of the seasonal sandbox soft, captive, pos. 3, or tension, pos. 4. The latter allows you to minimize the consumption of wood and gives a very good cover. Roofing material for all roofs - any suitable. If polycarbonate remains from the greenhouse, porch, shed or, say, a gazebo, this is the best option.
A special case is the sandbox-wigwam, pos. 5, or a sandbox-hut. Although there are more pillars in it, their physiognomy falls on them much less often. The point here is in some of the features of children's psychophysiology of vision and motor skills. In general, the highlight is that the pillars are tilted inward.
Installation procedure
This question only applies to persistent sandboxes. And the very question is how to assemble a product from parts: on site, similar to "adult" buildings, or, for example, a dog booth, entirely where it is more convenient, see fig., And put in place assembled. For a sandbox, the second option is definitely preferable, because allows you to significantly reduce the volume earthworks... This is also important because the sandbox is placed on a well-equipped territory, and you don't want to bruise the lawn or area, in which a lot of work has also been invested, beyond what is necessary.

Another reason in favor of installing a ready-made box is that when assembling it on site, leveling, adjusting to size and straightening the contour will be required. Country toilet oblique will not stand for a long time; the sandbox in the plan is larger. And the finished box with the sides is quite tough, lightly loaded and will hold, even if the zero cycle is far from perfect.
The step-by-step instructions for installing the assembled sandbox in place are as follows:
- Prepare a pit, as described above, but so far without sand filling and not laying insulation;
- In places where the racks (pillars) will go into the ground, a hand drill with a diameter of 80-100 mm runs wells to the depth of the racks plus 10-15 cm, i.e. 40-55 cm, because it is enough to deepen the racks by 30-40 cm. With a 10-cm drill, this work is done effortlessly, for 5-10 minutes per well;
- During the sand filling process, the wells are filled with sand approximately half or slightly higher under the insulation;
- Before processing with bitumen, the "legs" of the box are sharpened by hanging with an ax or sawing on a wedge or into an elongated pyramid;
- When the insulation is laid, petals are cut over the wellheads;
- The box is placed "with their feet" in the wells and upset in level to the place, first with their hands, and then tapping the ends of the racks with a badger - a wooden sledgehammer. It is not necessary to beat with all your strength, you need to gradually hammer, passing along the contour;
- The roof, if provided, is assembled on site.
Note: a leopard can be made with your own hands from a log or trimming a bar from 130x130 cm, mounted on a handle.
More materials
For fast self assembly sandboxes are produced plastic modules, see fig., in trade practice for some reason called linear polyethylene. Nothing bad is known about them, but if you are equipping a garden or breaking a flower bed, then they can be replaced with elements of a border for flower beds from a garden designer; especially - elements for flower beds on the lawn. They are suitable in height, sand does not spill through the joints, they do not require excavation, but they hold firmly in the ground. And the cost of a sandbox from a garden curb will go away.


A common version of the "sandbox hastily and for nothing" - from tires, see fig. on right. Free, but, firstly, it is not very hygienic: moisture stagnates in the pockets of the tires, the sand can rot. Secondly, there is a steel cord. As the rubber on the sections dries out, its ends slowly but surely stick out, children prick and scratch about them. Of course, you can make a lot of useful crafts from tires, but they are not suitable for a sandbox.

Sandbox boat with a box - compartment for toys
Useful enhancements
This is primarily a sandbox-boat. It is not much more difficult to make it than the usual one, but in the bow compartment, which in real ships is called the forepeak, it is very convenient to store toys and even small gardening accessories. Romance in the game, it goes without saying. In this case, the forepeak is equipped with a hatch cover and is fenced off from the sandbox itself with a blank wall - a bulkhead, see Fig. Since the boat, we will also call its parts in the sea. If the forepeak is part of the sandbox, then it's not worth making a deck over it, the sand can rot without sunlight.

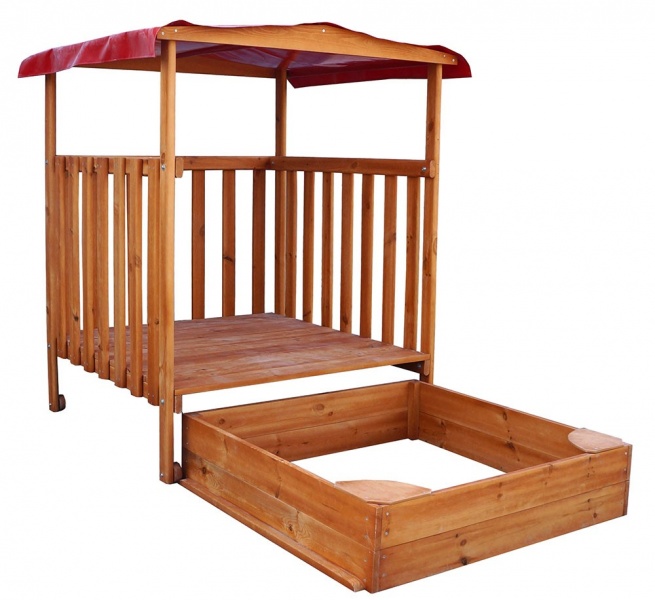
The next option will require more work; even more than a sandbox with a roof. This is a sandbox-house for growth. Its design is strong and durable enough that when the child outgrows playing in the sand, it could be used to lay the floor, sheathe the walls and thus get a playhouse. A diagram of the construction of a sandbox house is shown in Fig. left.
About corners
If the dimensions of the sandbox in the plan do not exceed about 2x2 m, then it is possible to reduce the consumption of wood without losing the strength of the box by arranging corner seats, on the left in Fig. in the center above. Psychologically, this option is preferable for individualistic children.

A very beautiful and durable sandbox with corner seats is made from stumps and logs, not necessarily the same size. And if, with cuts from the same logs, lay out a blind area around the box (in this case, already a log house), then the removal of even very fine sand outside the playing area will be minimal, on the right in the same fig.
What sand to take?
Now back to the question of which building sand is suitable for the sandbox. Small, almost white, pos. 1 per next. rice. - definitely not. He, from the point of view of a child, does not mold well. And in an adult way - it gets very dusty, gets into the eyes and everywhere, microscopically injuring the skin, which can contribute to the occurrence of allergies. Adult construction workers, healthy hardy uncles, when working with such sand, wear protective clothing, respirators and goggles.

Also, white or slightly grayish quartz sand, pos. 2. It does not get dusty, but almost does not mold at all, and it injures the skin to visible scratches. Quartz is a very hard mineral and its grains are rarely rounded to full roundness.
Red sand, traded as a ravine, pos. 3, it is molded perfectly, but also not suitable for a sandbox. There is a lot of clay in it, it gets very dirty. Even worse, this clay is full of microscopic pores filled with nutrients. Serve only that harmful micro-living.
For a sandbox, moderately yellowish sand of medium size, pos. 4. There is enough clay in it for very thin modeling, but it covers the grains with a thin dense layer, making them not traumatic and unsuitable for the settlement of microorganisms. Repeatedly, up to 3-4 times, such sand (it goes on sale most often as river sand) is used as follows:
- Store dry in winter unheated room; better - in bags, or in the yard under a film.
- In the spring, the sandbox is filled up when the weather is warm.
- If the sand has wintered in it, then after complete drying it is selected and winnowed, see below.
- The sandbox is re-filled in layers, in layers of 7-10 cm.
- Sand is poured into a box with winding, i.e. a bucket stream from a height of a man's height in a moderate wind.
- The filled layer is dried in air for at least a day before filling the next one.
Unusual
There is also such a kind of sandbox as the desktop one. Generally speaking, children, playing in it, are much more likely to clog their eyes, nose, mouth, tk. at the same time, the head is kept straight, and not tilted face down. In addition, the construction of a sandbox tabletop is difficult, since even in a small amount of sand, no less than half a ton is required. And if the desktop sandbox is home, then you will need a separate room that does not communicate directly with others.

Perhaps all young parents of little fidgets dream of a children's playground on their personal plot. Everyone knows about the benefits of staying in the fresh air for children, but when parents take the child out of town, the question arises before them: what to do with the baby. It is the sandbox that will keep the child busy and allow his parents to relax, develop his creative skills and spatial thinking. In this article we will talk about how to make a children's sandbox with our own hands, consider various photos and ideas of such structures.
It would seem that there is nothing difficult in the construction of a sandbox: dig a hole, fill up the sand, enclose it with bumpers, and you're done. But there are nuances that cannot be ignored.

A children's sandbox can be easily made by hand
When choosing a place where the future sandbox will be located, preference should be given open areas, where you can easily observe the child during the game. The sandbox should not be located in direct sunlight, but it is also undesirable to do it in the shade. Penumbra is the best option. Build a sandbox close to a spreading tree, or place it under an umbrella so you don't have to worry about your baby overheating in the sun. But do not place it too close to the tree, as the leaves and fruits will constantly fall and pollute the sand.

There are many interesting sandbox options available to purchase

It is better to place a children's sandbox near the house, in full view of the parents

Second stage: preparation of drawings and tools
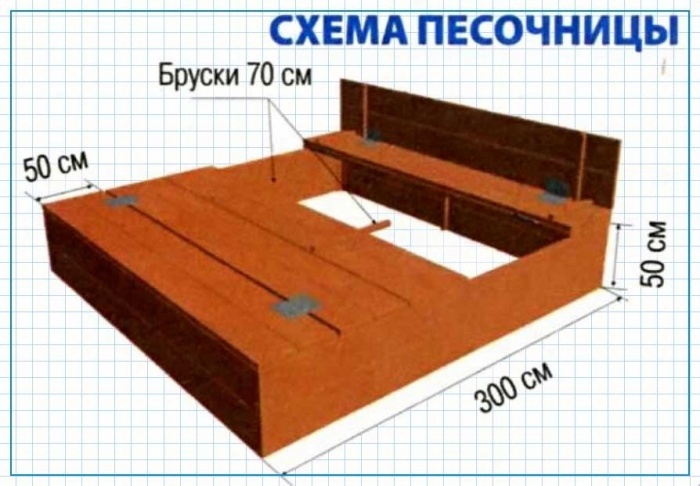
A standard sandbox for toddlers up to 5 years old has a square shape and a size of 2x2 m. However, the choice of size and shape is limited only by your imagination. If desired, draw up a drawing or diagram of the proposed playing space and enter the dimensions of the length, width, height there. Sketch the shape and additional details (umbrella, roof, partitions, seats). After that, it will become much easier for you to calculate the amount of building material required.

Tip: The sandbox shape does not have to be geometric shapes. Various sailboats and ships, flowers and even sand labyrinths will decorate the site no worse than designer items. Match them with a variety of sandbox decorations to complete the look.

To prevent the child from overheating, it is better to make a sandbox with a canopy.

An interesting option would be to make a whole sand maze.
Choose natural Construction Materials for the construction of a children's corner: birch or pine boards will be an excellent choice. You will also need bars, wood protective impregnation, varnishes or paint, geotextiles or agrofiber.

Stock the following tools:
- Sander;
- Screwdriver or hammer;
- Self-tapping screws or nails;
- Saw:
- Shovel.
Stage three: preparing the foundation
Drive the pegs in the corners of the selected area and pull the rope. Inside the fenced area, remove the top fertile soil layer about 30 cm deep.

For a sandbox, you need to choose high-quality sand
Sand can be poured already on the earthen base, but this will create difficulties in the future: the sand will settle and become polluted. To avoid this, a breathable material is placed between the ground and the sand. For this, it is recommended to use agrofibre or geotextiles, which are good at allowing moisture to pass through and protect the sandbox from plants and soil animals. For these purposes, plastic wrap or plywood will also work, but using them, make holes in them for ventilation in advance.

So that plants do not germinate and moisture does not accumulate, it is better to lay sand on geotextiles
Then prepare the wood: carefully sand each board, bars (to reduce the risk of splinters or scratches in the future), cover their surface with a protective impregnation.
In the corners of the pit, drive in the bars to a depth of 20-25 cm and attach pre-processed boards to them along the perimeter. They can be wide or narrow. If desired, for strength, the corners of the frame are reinforced with the remnants of the timber.

Do-it-yourself children's sandbox, which can be closed, will protect from precipitation
It will be convenient for both toddlers and parents if bumpers are nailed to the sandbox along the edges, as shown in the figure. In the future, children will be able to sculpt their masterpieces on them and put them on display or sit and relax.
Coloring the sandbox, if desired, easily turns into a real creative process. Color it with the children in all the colors of the rainbow or use a strict monochromatic style. Paint color is a matter of taste, and all parents decide this issue based on their preferences.

DIY sandbox is a great addition for any playground
These owners decided to maintain a monochromatic design.
You can emphasize the color of natural wood that has not gone out of fashion for a long time. Such a sandbox is universally suitable for any site design and is pleasing to the eye.

It is interesting to paint the sandbox with bright drawings, your kids will really like them
But the most interesting and original option would, of course, be painting the sandbox with all the colors of the rainbow. The kid will be delighted with the diversity of bright colors, and they will charge you with a good mood for the whole day.
Bumpers and seats can be decorated with drawings of figures of animals, plants, favorite cartoon characters, geometric figures or even original ornaments. Your kid will like this unusual design, and you will develop his cognitive skills. He himself can decorate the play area, developing creativity and imagination.


The sandbox from the tire can be covered with a film from rain and debris
Sandbox cover
An extremely necessary part for the playground is the cover. It will protect the sand from bad weather (rain, snow, strong wind), will prevent its contamination with various debris: branches, leaves, plastic bottles and others. It is important that if the sandbox is securely covered, it will exclude the possibility of stray or domestic animal feces getting into the sand, and you can safely let your baby go for a walk without fearing for his health.
Interesting fact. The cover performs not only a protective function, but also a decorative one. Various design solutions for its decoration will add originality to the design.

The simplest cover for a playground is an awning that is pulled up when the child has finished playing before the next walk. For this purpose, you can also use a plastic film. But such a shelter has a drawback: unreliability. Both the awning and the film are easily damaged, not resistant to weather conditions.

A reliable and common sandbox cover is a wooden cover. There are three options here:
- Cover-shield: starting boards are nailed onto the bars, carefully measuring the size. This is a very simple construction, but the child himself will not be able to open and close the sandbox on his own.
- Cover-door: two flaps of a suitable size are made in exactly the same way, which are attached to the sides of the sandbox with hinges, and handles are nailed on top. This design looks original, and the child can easily open and close the lid himself.
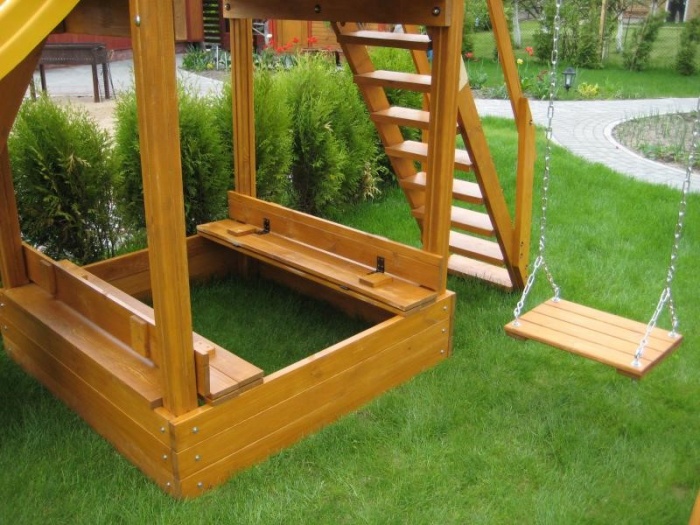
- Convertible cover. Unusual and practical solution when the lid forms a bench when opened. To do this, the initial boards are rigidly fixed to the sides of the sandbox, and the subsequent ones are attached with hinges so that when folded, a seat with a back is formed. Such a design does not require a lot of effort and energy, and the result obtained will pleasantly surprise and delight you.

The sandbox can be in the form of a table
Sandbox canopy
To make the child feel comfortable while playing, when it is hot and scorching sun outside, it is recommended to install a sun canopy in the sandbox. As already mentioned, it is better to place the playground in partial shade, but if this cannot be done, then the canopy will become a great solution Problems.

Simple and effective shelter from the straights sun rays- umbrella. This is not a stationary canopy, so you will need to remove it daily after a walk and fix and move it as the sun advances during the game.

Another version of the awning is a tarpaulin awning, reinforced on wooden racks. But more reliable is a stationary wooden canopy-roof, fixed on wooden racks. In this photo, we seem to be a combined version: wooden roof covered with a tarpaulin awning. This design is light and airy, but at the same time reliable.

Canopy - sandbox fungus
A decorative solution will be a canopy in the form of a "fungus", familiar to us from childhood. This will require one wooden stand, to which several triangular sheets of plywood are fixed so that a kind of umbrella resembling a mushroom cap is formed. By coloring such a fungus, you can give free rein to imagination, and it will turn out decorative decoration for a suburban area.

Choosing sand for a children's sandbox
The choice of sand is approached carefully. There are three options here:
- River sand, which until today is considered the most suitable. It is natural, does not contain harmful impurities and foreign smell, clean. Everyone sculpted sea castles in childhood, resting on the banks of the river. The child will be delighted with the opportunity to build the same structures without waiting for a trip to the lake.
- Quartz sand. It is purchased in hardware stores. Not a bad option, but it is not natural and may contain harmful building impurities in its composition.
- Sands with a high clay content. These are special children's sands that are suitable for sculpting, due to their special composition. Special substances are added to it that can drive stray animals away from the sandboxes.

It is better to choose sand without stones and impurities.
Interesting fact. Psychologists have proven that sand suppresses negative emotions, negative energy, acting soothingly on a person and his nervous system.

Make sure to sift the sand before pouring it onto the playground. This will ensure that there are no foreign objects in the sandbox. You will need about 1 ton of sand. Specify the amount of the order in advance, do not be discouraged if you order more than necessary. Remember that sand is also a versatile building material.

Show your imagination and make an unforgettable children's corner on your site! He will delight the kid, decorate the design of the suburban area, and you will always find something to keep your child busy.
DIY sandbox
40 photo ideas:

It's time happy childhood consists of many faces. Loving parents strive not only to provide their child with healthy food and beautiful clothes, but also worry about his development. This direction includes a physical and psychological component. Equipped playgrounds contribute to a pleasant pastime for the child, while at the same time forming in him many vital inclinations. The banal children's sandbox is no exception: patience, spatial thinking and the ability to communicate with peers are not the whole list of character traits developed during the game. Often children's rest in summer, it takes place outside the city limits, far from prepared sites. Therefore, you will have to make a comfortable sandbox yourself. We will tell you in detail which version of the children's design scheme to stop and how to properly organize the whole process.
Determine the place
In addition to studying possible schemes and preparing your own drawing, you should correctly choose a place to install a children's sandbox. Many factors are taken into account when considering this issue. The priority direction for placing a children's sandbox is the sector between the northern and southeastern parts of the site. The logical explanation lies in the influence of ultraviolet rays. The first half of the day is characterized by transparent air and soft UV radiation, after lunch the picture changes, ultraviolet light becomes harder, so the formation of a shadow over the children's sandbox is mandatory. The diagram below clearly demonstrates the stated idea.
In addition to the reference point in the sun, there are several other factors that determine the location of the children's sandbox installation:
- Good visibility from the window of the house and the most visited points of the site. Children's unpredictability is a common occurrence, so the sandbox must constantly be in the field of vision of the older generation.
- It is not recommended to equip a children's sandbox in the shade of trees. At best, it will be contaminated with bird droppings and other debris, at worst, a caterpillar will fall on the child.
- It is also not recommended to draw up a drawing of a children's sandbox, focusing on the nearest location of moisture sources, it can be an artificial reservoir or a regularly irrigated garden bed. Spiders can take a fancy to such places, and a child will not find meeting them in a children's sandbox pleasant.
- The northern side of housing construction will also have to be excluded - the constant presence in the shade prevents high-quality heating of the sand.
Remark! In addition to installing the structure itself, the scheme should provide for the arrangement of the site around it. To avoid the massive transfer of sand to the house or garden path, there should be a lawn within a radius of one and a half meters. In its absence, it is recommended to make a blind area around the sandbox.
Having decided on the place, they proceed directly to drawing up a diagram of the children's sandbox.
Design stages
The work on drawing up the diagram includes several stages: designing the box, starting from its shape, the drawing is complemented with a project for a cover and a canopy. What the foundation of a children's sandbox will be depends on many factors:
- Whether the purchase of new material is planned or the leftovers from the previous construction will be used.
- Your professional skills when working with wooden structures.
- How much time can you spend on creating a children's sandbox.
The most common variant of the scheme is a standard square shape, with a side size from 1.2 to 3.0 m. The height of a children's sandbox varies between 25-30 cm, it can be equipped with a bottom. To fill a structure measuring 2x2 m, you will need about 1 m 3 of sand. Having finished the drawing of the base, proceed to the design of the cover.

Cap options
Doubting the need to install a protective element for a children's sandbox is silly. The reasons why the diagram should contain the cover structure are as follows:
- Attractiveness for dogs and cats to equip a latrine there. So that children's rest does not end with treatment, hygiene standards should be observed constantly, and the sandbox is no exception. The purchase of expensive mixtures containing fragrances to repel animals does not always solve the problem for a long period. Firstly, the substance quickly evaporates, and secondly, the harmlessness of its effect on children's organism questionable.
- During the period of heavy rains, the cover will protect against excessive absorption of moisture by the sand, and as soon as the weather improves, the child will be able to start his favorite games in the children's sandbox.
- You can save money and not include the installation of a cover in the scheme, but protection in the form of polyethylene pressed down by pipes or bricks is not aesthetically pleasing. In addition, the child cannot independently remove such protection from the children's sandbox.
Let's leave the options for drawings with complex structures in the form of a fan-opening lid or equipped lifting mechanism aside. The easiest option for a children's sandbox is an ordinary removable board made of boards, presented in the drawing below:
But this is not a very good solution to the problem, due to the possible child injury, if you want to remove it yourself. Recently, models of children's sandboxes equipped with a folding lid, which can easily be converted into a shop, have been very popular. The design option is shown in the following diagram:
For ease of opening, it is equipped with handles, as in the photo below:

For a children's sandbox, you can use a scheme with a sliding lid, which later plays the role of a shelf or bench without a back. Convenient bottom supports ensure easy opening and stability.
Canopy equipment
The canopy layout also has many variations. Depending on the planned lifespan of a children's sandbox, you can use thick fabric, plywood or thin boards as a material. The mount is chosen based on overall dimensions constructions:
- For small children's facilities, two pillars with a transverse crossbar and a stretched awning are sufficient.
- You can dwell on a variant familiar from childhood and create a drawing with a fungus. But it is better to leave such protection from the sun as a last resort, because the pillar in the middle of the children's sandbox often brings continuous inconvenience, and the shadow goes to the side.
- For volumetric structures, it is recommended to install four support pillars. In this case, the canopy can be flat or in the form of a gable roof.
The drawings and photos presented below will help you determine the shape of the canopy necessary for your children's sandbox scheme.
Preparing the site
It is extremely rare in the work to use structural schemes that are removed for the winter or equipped with rollers for moving around the site. In most cases, a children's sandbox is installed on an ongoing basis, so you should first take care of the preparation of the site. The process consists of the following steps:
- The site for the future children's sandbox is deepened by 20 cm.
- After leveling the soil, it is covered with sand by 5 cm and processed with a rake.
- It is optimal to use geotextiles or agrofiber as a drainage base for a children's sandbox. With a modest budget, dense polyethylene or propylene matting is suitable, which is spread with a margin of 30 cm along the border.This will prevent weed germination and pest penetration, while speeding up the process of sand drying.
- After installing the box, the recess not occupied around the children's sandbox is covered with soil and tamped, and the excess edges of the film are trimmed.
For an approximate scheme of work, see the photo below:
The nuances of the construction process
Having carefully checked the drawing of the children's design, according to the chosen scheme, they proceed to the purchase, cutting and preliminary preparation of the material.
Material
Wood is the most commonly used material for making children's facilities. With proper handling and timely preventive care wooden sandbox will last more than 10 years. Parts, cut according to prepared drawings, are coated twice with a water-polymer emulsion.
Remark! The elements of the children's sandbox, which will be in the soil, are treated with bitumen mastic.
If long-term operation of the children's sandbox is not planned, you can take aspen or alder for its manufacture. Coniferous trees will help to increase the service life. For construction, it is convenient to use quarter or tongue-and-groove boards. How to assemble a box from them is clearly shown in the following diagram:

Assembling the box
Focusing on the drawing, the children's sandbox box is put together. The boards are attached to 50x50 timber sections with self-tapping screws. If the side of the structure exceeds 1.8 m, the scheme must provide for additional fastening of the bar in the middle of the wall. According to the drawing, the height of the timber for a permanent children's structure should be 30-40 cm. The corners of the children's sandbox need additional reinforcement. How to do this correctly, see the diagram below:
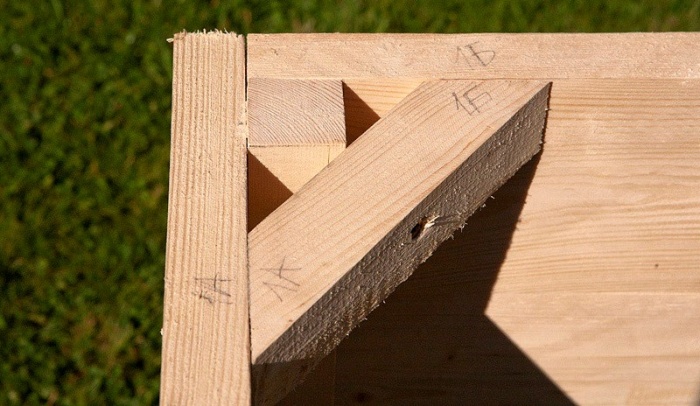
Advice ! All wooden parts should be carefully sanded to avoid injury to the child. Pay special attention to the corners, which it is desirable to round off a little.
We have considered the simplest version of the sandbox box. Experience and free time allows you to improve the design. After the base, they move on to the equipment of the cover and canopy according to the prepared drawing. The diagram below will allow you to equip a miniature sandbox house that your child will like:


A children's facility looks also interesting, where a sandbox is connected together with a slide:
And finally, a few more interesting ideas, which will be useful when creating your own drawing:


Good luck in your work and creative inspiration!
Almost every city dweller has a dacha today. Arriving at the dacha, it is very convenient to provide children with some fenced-in space for games and fun. The best option such a place is a children's sandbox. Several kids can be in it at once, which will play with sand from morning to evening. Well, if your small sandbox also has a roof, then children will be able to continue their games there even during heavy rain. We invite you to build a sandbox for your kids with your own hands.


Preparatory work
The first step is to purchase boards. If your car is not very roomy, then all the boards can be cut right at the place of purchase, about 120 centimeters, and then take them to the dacha. Basically, a solid board is about six meters, plus or minus five centimeters, so it can easily be divided into five pieces, and a couple of centimeters are left for trimming. An example of a drawing is shown in the photo.
Chances are, the boards you bought will be raw. To process them, you will need an electric plane. It is necessary to process the boards so that your kid, playing in the sandbox, does not accidentally drive a splinter and does not get hurt.
Frame construction
In our case, the height of all the planks is about 32 mm, which allows us to attach them to each other without additional materials, and directly to the end part, using long self-tapping screws... In order for our children's sandbox to have the shape of a square with each side of 120 centimeters in size, we need to get four boards of 120 centimeters when trimming, and the rest should be 113 centimeters in size. Only in this case the children's sandbox will delight the eye with its even forms. This can be seen in the drawing. As a result, we should have two boxes of boards that you made with your own hands. A little later we will need a roof.


Therefore, our task is to create everything the necessary conditions so that the man-made children's sandbox will serve us as long as possible. For processing, you need to buy a high-quality antiseptic with a capacity of about five liters, and, guided by the instructions, thoroughly process all the wooden parts with your own hands.
In the sun wooden structure dries up instantly, and now you can start building the bottom.
Bottom assembly
The underbody is a significant element in our design. It is necessary in order to:
- prevent insects from entering the sandbox through the ground;
- prevent grass and other plants from sprouting.
A pretty good material for the production of the bottom is agrofibre. It has all the properties that suit us:
Agrofibre is elementary fastened with a stapler, and the edges of the material are neatly tucked inward.
Installation of a children's sandbox.
First of all, we install the bottom with the box. Then you should attach the second box made to it (as in the drawing). Next, a special seal is laid, designed for the door, which prevents the formation of cracks and the pouring of sand from the sandbox.
Now we do the joining of two boxes of our sandbox using special beams that are attached in the corners. In general, the basic structure is ready, we only need a roof and sand for our structure. By the way, the roof is not a prerequisite.
Roof manufacturing.
If we need a roof, then we need a board no thicker than 18 mm and several hinges. It is very important to accurately calculate the width of the boards, and, as a result, we get an excellent sandbox with two benches where children can sit. The result is shown in the photo.
We will need 12 boards, which are 120 centimeters long and the desired width is about 9 centimeters. You can buy a board 12 centimeters wide, and make benches on the left and a table on the right. Approximately as in the photo.


We need about four boards, which we fasten in 2 each using special bars. It is possible to use scraps of thick boards. You can see in the drawing how it looks. It remains to fasten the hinges, and our children's bench is ready.
The next part of making a sandbox is the construction of the roof and the backs of the benches, which should stop against the roof posts.
Fastening blocks are used not only for fastening, but so that children do not accidentally assemble a bench. That is, the blocks are a kind of blocking.
So that is all. It remains to fill up the river sand, and your children's sandbox is ready for use.
We examined in detail only one option for making a sandbox with a roof for a summer cottage. In the photo you can see other options, for example, a sandbox-boat, a sandbox-truck for boys, a sandbox-sailboat.


The video presents detailed instructions on the implementation of another version of the sandbox.
Now your whole family, especially your children, will be proud of you. And there is a reason, because you have created a small game world for your children with your own hands.