What can be cooked from squid: quick and tasty
In small settlements common system there is no sewage system. At the same time, the need for safe collection of sewage in a suburban area plays an important role. Do you agree? A well-equipped drainage pit in a private house will perfectly cope with the duties of receiving and partial disposal of wastewater.
But is she capable of providing comfort and epidemiological safety to household members? How to make sure that the pit is not a hassle? These issues should be carefully dealt with before deciding on the device of such a system.
We will also discuss solutions to the problem Wastewater on a suburban area and talk about how to build a cesspool yourself and what you need for this. The article contains expert advice, photo and video materials to help you better understand the arrangement of a sewer point on the site.
The operation of a suburban household is associated with the production of wastewater. Every homeowner is faced with the task not so much of the accumulation of domestic waste water, but of their cleaning. Moreover, a solution widespread in rural areas is digging under a sewer cesspool old barrel or tank - ineffective.
If the daily volume of wastewater exceeds one cubic meter (1000 l), then the shortcomings will soon manifest themselves as unpleasant odors. Or worse - intestinal infections among household members. Finally, a self-organized drain pit from a worn-out keg is illegal in a number of situations.
Image gallery

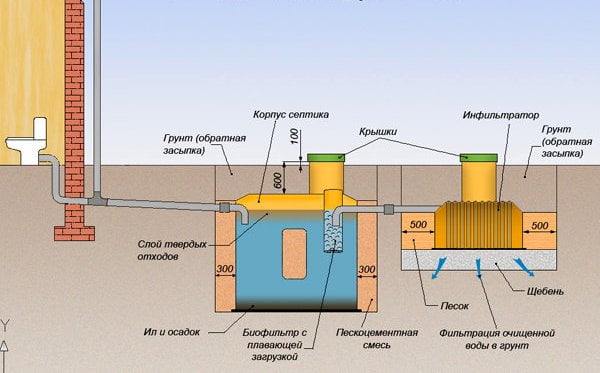
A drain pit with a filter bottom (picture on the left) can only be used for gray waste water or for the disposal of water discharged from a multi-chamber septic tank. To collect brown sewer masses, sealed accumulators are built (figure on the right)
Porous or silicate bricks are not suitable, you need a material made of fired clay. Only walls made of fired bricks are capable of keeping mechanical loads from ground movements for years, not collapsing under the constant influence of moisture and generally do not let it into their own thickness.
The best option for a brick single-chamber accumulator is a completely waterproof structure, which is periodically emptied by sewers.
If a drain pit is arranged for the disposal of gray effluents coming from a kitchen sink, bath, shower, etc., then a brick structure is arranged with a permeable bottom in type.
The bottom of the filtering or otherwise absorbing well is filled with a soil filter composed of sand, fine, then coarse gravel or crushed stone.
The thickness of the cleaning backfill should be at least 1 m, between its conditional base and the highest groundwater level, noted in the rainy season, there should be at least one meter.
In the case of installing a brick sewage system on sandy loam soil, the filtration properties of which are insufficient for the free passage of treated wastewater, its throughput is increased. This is done by forming holes in the lower part of the walls during masonry.
We will disassemble the structure itself simple option- a collection pit for waste discharge, which does not perform absorption functions. Its bottom and walls will not let the waste mass, clarified and disinfected by a soil filter, into the environment.

The optimal pit depth for drain pit 2-2.5 m. There is no need to dig deeper - the hose of the sewage suction machine will not reach
The question of arranging a full-fledged bathroom in a private house arises before each owner. Technologies make it possible to equip a domestic sewage system without special investments, both material and temporary. And fewer and fewer residential private buildings remain with amenities in the yard. In this article we will consider such popular questions: what types and types of sewerage exist, the sewerage device in the house with our own hands, what is a septic tank and how to make it, how to make a septic tank from concrete rings, what is a cesspool and how to make it, as well as related questions.
Sewerage types for private households are divided into two parts.
For cottage communities or urban areas where the private sector is close to apartment buildings, the sewerage system for a private house is supplied to the centralized drain collectors. This solution is convenient, since all the difficulties are only in the high-quality laying of sewer pipes to the place of the tie-in. However, there is also negative side connecting a private house to the city sewerage network - payment for sewerage services. For apartment buildings a tariff is set and the total volume of wastewater disposal corresponds to the total amount of consumed water. Accounting is carried out according to the number of registered, according to the norms or according to water metering devices.
For a private house, where the lion's share of the water used is not discharged into the sewer, charging payment according to the readings of a water meter can significantly complicate life. To many, this issue will seem unimportant, but some of the owners strive for autonomy, therefore it remains relevant.
The traditional method of drainage in private houses is a cesspool, it is also a septic tank, it is also a sewer pit.
Before proceeding with a detailed guide to its creation and arrangement, it is necessary to complete all plumbing work in the House.
Diy sewerage device in the house
Most of the buildings in the private sector have one floor. Where there are two of them, the bathroom is located on the first floor. Contemporary projects private buildings provide for the placement of plumbing on each floor, but all objects are adjacent to a common riser. As an example, consider a standard one-story building, where it is necessary to carry out the sewage system with your own hands.
So, you need to place a sink in the kitchen, a washbasin and a bath / shower in the bathroom, and a toilet in the toilet.
Bathroom and toilet can be combined or separate. In any case, the drain will be common for them, therefore, the distribution of drain points in the room must be done in such a way that the distance to the "riser" (the main pipe with a diameter of 110 mm, which will bring the waste to the street) is minimal.
The kitchen where the sink is located, according to design documents, often has an adjacent wall with a bath or toilet. In this case, no difficulties arise. If the kitchen is remote from the main riser, it is necessary to lay a separate drain before connecting it to the riser. Depending on the situation, this can be done both in the perimeter of the house (the drain connection is included in the riser, which includes the drains from the washbasin and bath / shower), and outside the perimeter (if the location of the kitchen and the bathroom does not allow the pipes to be brought down in the perimeter, they are displayed outside outside the house, where they can connect or enter the drain pit separately).
The above difficulties are caused by the fact that for high-quality water flow, it is necessary to observe the slope of the sewage system, which is not always possible to do in situations where the distance from point to point is large. The slope of the sewer should be a certain percentage, depending on the diameter of the pipe. See the slope values of the sewer depending on the pipe diameter in the figure below.

Sewerage pipes are laid under the floor. Most of the buildings have wooden floors raised above ground level. The cavities under the floor are empty, which gives a lot of options for solving the problem. The slope is measured by the building level or marks on the masonry, along which the pipe should pass. The assembled pipe spans are tested at intermediate stages by pouring water into the system and controlling its drain. It is important that even a small part does not stagnate anywhere, since a blockage forms there, which will be difficult to remove after flooring. Sewer slopes of more than 5% are permissible if it is dictated by the convenience of placing the system or by the margin of distances under the floor.
Final assembly
When the drains are removed from the places of each discharge to the final place, the final assembly will take place. PVC pipes for sewage have all the necessary elbows and adapters, as well as tees with various transitions, allowing you to join together drains from a sink, shower and washing machine... Next, the riser and drain from the toilet are combined. After completion of the work, final testing with a high load is required to eliminate leaks, if any, and to avoid blockages and water accumulation.
Sewerage is released outside the perimeter of the house at a depth of at least 300 mm. It depends on the climatic features of the region, as well as on the slope of the site, the proximity of groundwater, which affect the depth of the drainage pit.
At each of the drain points, except for the toilet bowl, an elbow is made from a flexible hose, in which a small amount of water constantly stands, the so-called water seal, which excludes the penetration of an unpleasant odor from the drain. If necessary, it takes 10 minutes to clear the blockage in such a knee.

Drain system
It is she who becomes for many homeowners a stumbling block in matters of arranging a domestic sewage system in a private house. Technology has greatly simplified the work with the contents of such pits, allowing them to do without maintenance for many years.
Domestic sewerage is divided into two types - a septic tank and a traditional drain pit.
Septic tank
A technological solution promoted in the construction of cottage townships and small country houses... They are a plastic or metal container that collects all waste and organic waste. It uses only its usable volume, which is partially increased by the use of microorganisms (septic) that convert organic matter into gas (removed through the ventilation duct, does not harm the environment) and clean water (suitable for irrigating the site with a small pump). For a full-fledged residential building for a large family, large capacity models are offered.
Bottleneck of this type sewerage is its price. The cost of containers is quite high, moreover, transportation and installation are imposed on it, which must be performed in compliance with the technology so that the container remains intact.
The advantage that is worth noting is that the septic tank can be mounted in areas with high groundwater levels. The containers are sunk in dug holes, then loaded with a load so that the water does not push them out of the ground during the flood.
The average maintenance period with proper use and adequate space saving is 2-5 years.
Concrete ring septic tank
One of the subspecies of a septic tank is a device from factory concrete rings. This type of septic tank is quite popular, because it is relatively cheap, fast and easy to install. It is quite simple to make a septic tank from concrete rings with your own hands. To do this, we dig a hole of sufficient depth. To cut off water, a layer of rubble is placed on the bottom.
Usually they put 3 one and a half meter rings on top of each other, then cover them with a lid with a hole. Another small ring is placed on this hole to access the septic tank. Such a ring is closed by a sewer hatch. Rings fasten together cement mortar... If you are making a septic tank with an overflow, then you need to make 2 or 3 such pyramids from rings. The more overflow chambers, the cleaner the outlet water will be. The bottom in the first chamber is waterproofed and concreted. A hole is punched in the upper part of the upper large ring and a 110 mm pipe is inserted onto which tees are put on on both sides.
If you want to make 3 chambers, then we repeat the procedure with the hole and pipe, but place them just below the overflow level from the first chamber to the second. From the last chamber, a pipe is diverted to the drainage field, or the bottom is left open in it and large crushed stone is laid on it. On the sides outside, the rings are covered with sand to cut off the water. Do not forget to bring the ventilation pipe out of the chambers for air access.
Video about a septic tank made of concrete rings
Cesspool
It has been used for many decades without complaints and special problems. Even in areas with a high level of groundwater filling such pits during the flood period, a solution was found in the form of placing a pit at a shallow depth, but with a large area.
The place to place the pit and drain the sewer from the house must be determined before the start of all work, since reorienting the system already divorced under the floor will require recalculation of slopes and additional time.
The pipe leading from the house to the pit is deepened by 500 - 800 mm, if the water level allows. Otherwise, it is necessary to insulate it as much as possible and leave the revision windows (a special butt block with an opening cover) for easy cleaning every 3 meters of the pipe length.
The average volume of a pit for this type of sewerage is 5 cubic meters per adult. At the same time, one should not neglect organic septic tanks, which will allow you to do without pumping out the contents for decades at all.
We build a drain pit
Having chosen a place, you need to determine the linear dimensions and depth, dig a hole and carefully align the walls. The perimeter near the walls at the bottom is dug under the edge by 300 mm and deepens by about 500 mm in depth. A small layer of rubble is placed on the bottom, then 2-3 rows of a half-block without holes are placed on the mortar. This will be the base for the walls of the cesspool.
Walls (only he is able to withstand the microenvironment for a long time), making gaps between bricks at 20 - 25% of their length, starting from 5-6 rows. Through these intervals, water will flow, which will make it possible to service the pit less often.
The masonry is not removed to the edge of the pit, but with a 400 mm shortfall. The main thing is that the sewer outlet pipe is completely lined.
At the bottom of the pit, medium crushed stone is laid out in a layer up to 200 mm thick, from above it can be strengthened with stones collected from slag heaps, similar to pumice for the legs. This trick allows you to pump out the pit even less often, since microorganisms that absorb organic matter develop well in the pores of such a drain.
The overlap can be anything from a curly finished reinforced concrete slab to a self-poured product. Such a product is created from flat slate or galvanized sheet, laid out on top of the masonry cut. The future overlap should protrude at least 250 - 300 mm beyond the edges of the masonry. Reinforcement from bars is laid on top. A mesh made of reinforcement with a diameter of 8-10 mm with a cell of 20 by 20 cm will suffice. The lower edge of the mesh must be raised from the base by at least 20 mm (it is better to lay it on stones or protective layer clamps). On the sides of the reinforcement we build the formwork and fill everything with a layer of concrete of 100-200 mm.
If the linear dimensions are large, a brick support is placed in the center of the pit or cast iron pipe on which the overlap rests.
It is imperative to leave the hatch for access to the pit, as well as for pumping it out if necessary.
An excellent solution would be to make the upper edge of the slab below ground level and lay the space around the hatch with sod.
It is imperative to leave the outlet for ventilation (standard sewer PVC pipe). Many people make gazebos or parking spaces for cars on top. But in this case, the reinforcement and the slab above the pit must be seriously strengthened.
We hope you have figured out the basics of sewerage in your home. If you still have questions, ask them in the comments to the article, we will definitely answer them.
This topic is completely uninteresting to a city dweller sitting in his apartment in multi-storey building... She is also not interesting to the inhabitant of the luxurious mansion.
It is for lovers of country life or for people living in their own homes without amenities. They themselves need to think about arranging acceptable conditions for their lives. Let's try to consider the issue of building drain pits. The simplest drain pits, providing acceptable sanitary standards life.
Arrangement of a drain pit
Before starting construction, it is necessary to determine the height of the groundwater level. This is very important point... If it is high, that is, the waters lie quite close to the surface of the earth, it will not be possible to make a deep hole. Generally high level minus for the construction of such a pit.
An area with such a water occurrence can be flooded in the spring, when the snow melts, or even during heavy rains, the pit will overflow, and its contents will spill over the area, which is very unpleasant and smelly.
Useful information ! You can make a hole 2.5 meters deep if groundwater are below 8 meters.
The stages of construction of a drainage pit are as follows:
- First, a place is chosen where it will be located. Everything is considered - the distance from the house, from the water intake, neighbors, the height of the area.
- Further, its volume is thought over. In this case, the size of the cistern of the sewer truck must be taken into account, if there is an intention to call it in the future.
- Materials for construction are selected, their varieties.
- The construction itself, the direct construction of the structure.
- Giving a civilian look to the territory around the pit, its arrangement.
If you have financial and other possibilities, you need to hire an excavator, he will dig a hole in a couple of hours. And if there is strength, free time and I want to save money, you can do this work yourself. How long it will take is unknown.
Useful information! The distance from the pit to the house should not be small, the smallest is 5 meters, but more is better if possible.
When choosing the size of the pit before its construction, the following factors must be taken into account:
- How often do they live in the house - all year round or only during the summer season.
- The number of people living in the house is important.
- The required amount of water per day per person. 200 liters per day is the norm, but it is very approximate.
Having calculated the volume, you can lay the pipeline. The pipes should go with a noticeable slope, 7 centimeters per meter of pipe, that is, the dependence here is such that the longer the pipe, the greater the slope.
There are two types of pits - sealed and without a bottom. Of course, each of them has its own characteristics that should be considered.
Drain pit without a bottom
This is the simplest type of drain pit. The liquid from such a pit gradually goes into the ground, solid waste pressed. When the pit is full, it is buried and built elsewhere. Or they call services to clean the pit.

With such a pit, the daily discharge into it should not exceed cubic meter... Such a pit cannot be placed above the water intake or on the same line with it, its water can get into the drinking water.
It should be at least 50 meters from all water intakes. Of course, this is a very problematic pit. All restrictions must be met, since it is necessary to protect the environment, and pollution of groundwater, soil is a crime that is punishable by a large fine.
In no case should there be a well next to such a pit, as it will certainly be contaminated. These pits are simple, do not require special costs, but, for obvious reasons, are rarely used, they leave our lives.
Sealed drain pit
Such a pit can be made of concrete, brick, wood, concrete rings, all of which are perfect. After construction, it is carefully waterproofed.
Despite the fact that this is also a very simple and affordable device, it is already much better, as it excludes infection environment... There is no need to worry about the water in the water intake, and besides, it does not matter at what height the groundwater lies. Provided there is good waterproofing, and this is easily achievable, the pit can be built to any depth.

Varieties of pits with a sealed bottom:
- Brick pits. Naturally, the foundation pit is being dug. Its bottom is well compacted, and then it is filled with a mixture of cement, sand, gravel and water. After the bottom has solidified well, the walls of the pit are covered with bricks. Old brick that was in use is also quite suitable. You can also use ceramic bricks, it is more reliable, and it is possible and successful - natural stone. Then a roofing material is placed between the ground and the masonry. It serves as additional waterproofing. And the remaining space between the ground and the roofing material is poured with a concrete solution.
- Drain pit made of reinforced concrete rings. You can't do without a crane. You can dig a hole in advance and use a crane that will unload the rings brought after the purchase, that is, lay them immediately on the future duty station. The joints between the rings must be sealed with cement. The number of rings is calculated based on the depth of the pit and the height of the ring. The usual height is 1 meter. Such pits are very reliable and last a long time. This is their main advantage.
- A pit from a plastic tank. This is a very convenient but the most expensive option. The containers are completely ready and sealed. They are very durable and have a long service life. Great option!
Some craftsmen build pits from barrels, cutting off the bottom, use the bodies of washing machines that have served their time, stack old wheels of cars on top of each other, full of imagination.
There are pits with double discharge. For example, to drain from a bath or bathroom - without a bottom, and from the kitchen and toilet - the pit is sealed. It is convenient and more economical.
The pit must be cleaned from time to time. To do this, it is possible different ways.
- Call for sewage equipment... The pleasure is quite expensive and it is often difficult to use this service. And so, please call, they will arrive at a convenient time. It is imperative to provide for a good entrance so that the driver is comfortable and the flower beds are not damaged. If the hole is very deep, it cannot be completely cleaned, the length of the machine hose will not be enough.
- The use of biological products. Under the influence of these drugs, waste and waste products decompose into odorless water and solid... The liquid can be pumped out with a special fecal pump and even used as fertilizer. Cleansing bacteria come in powder, tablet, and liquid form. They are accompanied by a mandatory instruction, according to it, and you need to act. They do not fall asleep in an empty pit, they will simply die there without food. The drugs are septic and antiseptics, it cannot be said that they are cheap. They will not completely clean the pit, all the same occasionally, however, they will have to call the sewer workers, ask for their help.
Everyone can choose for themselves the most suitable method for cleaning the drainage pit in their area.
The owner's business is whether to build a drain pit on the site. One has only to say that there is no simpler way of arranging an autonomous sewage system on a site. Opponents of this method talk about the smell, the risk of flooding, very fast filling and the cost of cleaning. In general, we repeat, everyone decides for himself.
Unfortunately, there is not a centralized sewage system everywhere, and people are forced to equip street toilets on their plots.
It will not be difficult to go outside in the warm season, but in the cold season you do not want to go out into the cold once again.
And therefore, many people think about equipment at the site of the drain pit. Consider the topic of a drain pit in a private house in this article.
To ensure the arrangement of the drainage pit, it is better to hire professional workers, but you can equip it yourself.
Volume calculation
Drainage equipment is considered cheap and in a simple way in order to provide private homes.
To calculate the required volume of the drainage pit, it is necessary to multiply the number of people who will live in the house by 1.2 m3. Let's give an example: if your family has five people, then the volume of the drain hole will be at least two and a half meters in a cube.
Types and purpose
Drain pits are of different types:
- Fecal... A pit, the name of which speaks for itself, that is, this pit is designed to drain water from a toilet bowl or toilet, which is located on the site.
- Waste... It is intended for, that is, draining from baths, showers, washbasins.
- Combined. The pit is designed to drain both fecal matter and household water.
In rural areas, it is better to equip two pits: fecal and waste.
How to equip a drain pit in a private house
Determine the dimensions
Depth
First, find out the level of groundwater in your area. You can check the level yourself, but you can check it using a well, if it is located nearby.
If the groundwater is at a depth of 6-8 meters, then a waste disposal pit must be made at a level of 2-2.5 meters.
Length Width
In the event that the groundwater is close to the surface, the plastic container should not be placed underground. In this case, a sealed concrete well is made and a plastic container is placed in it, but this way will cost more.
In order for the plastic pit to work well for a long time, the pit under it must be dug so that there is a distance of 30 cm from the walls to the container.
The container is installed strictly horizontally. It is important that the tank has a ventilation pipe, otherwise there will be a danger of an explosion in the tank, since the decomposition of organic waste releases methane gas.
The drain pit has its positive and negative qualities, but its presence brings suburban life and life in a private house to another level. For this reason, people more and more often make cesspools of different designs on their plots.
We wish you good luck in your endeavors!
Citizens, using the water supply, as a rule, do not think about where the waste water then flows. But the owners of country houses often have to solve the problem of waste disposal on their own. Consider how to properly make a drain pit. After all, it is this popular option local sewerage is the simplest, cheapest and most affordable for self-construction.
When improving a house and a plot, the first thing to do is to build water supply and sewerage systems. Since imagine comfortable life it is rather difficult to carry water from a well if necessary.
There are a lot of options for organizing wastewater disposal, but the simplest and therefore very popular is the construction of a drain pit. Consider how to make a drain pit with your own hands, without resorting to the help of professional builders.
Types of drain pits
For all its simplicity, a drain pit can have different design... The most common options are:
- Sealed pit.
- Filter pit.
- Two-chamber pit.
Sealed pit
This version of the local sewage system is the safest for the environment, since all the drains from the house disappear into a sealed sump and remain there until they are pumped out by sewers.
Thus, there is no risk of contaminated water getting into the ground and soil water, that is, the presence of this type of sewage on the site does not affect the ecological systems. The disadvantage of this waste disposal option is the need to regularly pump out the accumulated liquid.
Filter drain pit
Sanitary rules are allowed to build drainage pits of a filter type only if the volume of wastewater per day is less than a cubic meter. If there is little wastewater, they have time to be processed by natural decomposition. Pits of this type can be built for a bathhouse, as well as for a house in which there is a separation of drains.

In the latter case, two sewer branches and two drainage pits are built. In the first (filter type), wastewater is transported from the shower room, from the washbasin, from the washing machine, that is, relatively clean. In the second (sealed type), sewage from toilets and kitchens should be transported.
Two-chamber drain pit
One more practical solution tasks of how to build a drain pit - the construction of a two-chamber installation. Let's consider the principle of operation of such sewage treatment plant:
- The pit consists of two chambers connected at the top by an overflow.
- The first chamber is sealed, the second is filtering.
- The drains (undivided) come from the house into the first sealed chamber, where they are mechanically separated, that is, they are simply defended. Solid inclusions sink to the bottom, and relatively clean water pours into the second chamber.
- From the second chamber, water is filtered into the ground.
- Waste accumulated in the first chamber should be pumped out periodically.
Advice! So that the drain pit can be cleaned less often, it is recommended to use special biological products. Bacteria recycle organics, reducing the amount of solid waste.
Construction planning
Before making a drain pit, a construction plan should be drawn up. It is necessary to decide on the type of structure, choose the place of construction and determine the required volume of tanks.

How to determine the volume of the drainage pit?
The main indicator on which the volume of the drainage pit will depend is the intensity of use of a residential building. It is clear that a more voluminous pit is needed for a house than for a summer cottage.
Advice! Of course, it is better to determine the volume of effluents individually, but there are generally accepted norms. So, for a family of three permanently residing in the house, a pit with a capacity of 6 cubic meters should be built.
When determining the volume of the tank, the following factors should be taken into account:
- Availability of sewer services.
- The volume that the sewage equipment can pump out at one time.
Where to locate the drain pit?
- Soil water should lie deep enough on the site, since the minimum depth of the pit is two meters.
- If there is a source of drinking water nearby, then a pit should be placed at a distance of at least 30 meters from it.
- The cesspool cannot be placed on a slope.
- It is necessary to provide for the availability of free passages for servicing the pit.
- You can not place a hole next to the house and the fence of the neighboring site. The minimum distance to the accommodation is five meters.

In short, it is quite difficult to choose a place for construction, especially if the site is already equipped. However, you cannot deviate from the rules listed above.
The choice of material for construction
For the construction of a sealed pit, the following materials are used:
- Concrete mortar. A formwork is being built into which the solution is poured. The thickness of the walls and the bottom should be at least 7 cm, it is advisable to perform reinforcement with a steel mesh.
- Plastic containers. This is the least time consuming option. A pit is prepared, into which a finished plastic container is installed.
Advice! To exclude the possibility of deformation of containers under the action of soil pressure, as well as its floatation during spring floods, it is recommended to concreting the walls and bottom of the pit. When concreting the bottom, special fastening loops are laid, to which a plastic tank is tied with polymer straps.
- Concrete rings.
- Ceramic brick.
When choosing the last two options, you have to take additional measures to seal the seams. For this brickwork(or the joints between the rings) are treated with mortar from the inside, the bottom of the pit is concreted.
Additionally, from the inside, the walls are covered with a bitumen solution, and the outside is covered with a thick (20 cm) layer of oily clay. And what is the best way to overlay a drain pit if a filtering version of a treatment plant is being built? There are no less options. Perfect for:

- Brick. The walls should be laid out so that between the rows there are five-centimeter gaps, located in a checkerboard pattern.
- Reinforced concrete rings. Manufacturers specially produce rings for the construction of drainage wells, they have perforations. If it was not possible to buy such rings, holes in solid products can be made independently using a puncher.
- Old car tires... From this material at hand, you can easily assemble a drainage well. The tires are stacked one above the other, having previously cut off the lower rim on each of them.
- Old plastic or metal barrels... For the construction of a pit, a barrel without a bottom is used, while a number of holes are made in its lower part for better water filtration.
Stages of construction of a drainage pit
Consider how to properly make a drain pit, provided that the work is done independently:
- Construction begins with the preparation of a pit and trenches for laying a supply pipeline.
- The pit should be deeper than the planned depth of the drainage pit, since a drainage cushion is arranged at its bottom.
- The drainage pad is made by pouring a layer of sand and gravel, each layer is tamped with high quality.
- If the pit is airtight, then the height of the layers can be 10-15 cm. On top of the drainage pad, either put a finished reinforced concrete slab or make a concrete screed.
- If a filter pit is being built, then the layer of crushed stone should be at least 20 cm so that the drains are better cleaned and the bottom does not silt up longer.
- Next, the walls of the tank are strengthened, that is, brickwork is performed, concrete rings or plastic containers are installed, depending on the chosen construction material.
- If a sealed tank is being built, then after the walls have been strengthened, they are waterproofed.
- At this stage, the connection of the supply pipeline to the receiving tank is also carried out. The connection between the pipe and the tank must be airtight, but not rigid, so that it does not collapse under the action of ground movements. It is convenient to use rubber couplings.

- At a distance of about 40 cm from the surface of the earth, an overlap for the pit is arranged. As a rule, a ready-made reinforced concrete slab with a hatch hole is used as a ceiling. If desired, such a slab can be cast on your own, having previously built the formwork.
- Alternatively, thick boards can be used for the construction of the floor, but in this case, it will turn out to be less durable.
- A hatch must be made into the ceiling to check the filling of the pit and pumping out its contents.
- It is advisable to install a ventilation pipe on the cover. Indeed, in the process of decomposition of waste, various gases are formed, including methane, which are explosive. Therefore, it is better to provide for the availability of ventilation.
- From above, the overlap can be covered with soil. The soil must be poured with a mound to prevent rainwater from flowing into the pit.
So, if it is planned to arrange a local sewage system, the construction of a drainage pit is one of the simplest, but at the same time, convenient and practical options... For beginners in the construction business, it will not hurt to clearly see how to make a drain pit - a video describing the stages of work can be found on construction sites.