What can be cooked from squid: quick and tasty
Today, the plasterboard ceiling in the kitchen no longer surprises anyone, since this kind of ceilings have become known all over the world.
Most, already from their own experience, managed to appreciate all the advantages of this finishing material, including strength, as well as ease of installation and aesthetics.

It is worth considering in more detail the plasterboard ceiling in the kitchen design, as well as all the advantages and disadvantages that may occur during the renovation.

What is gypsum plasterboard?
First of all, deciding to find out how to make a ceiling in the kitchen from plasterboard, it is worth keeping in mind that this material consists of gypsum, and is simply lined with additional cardboard.

Moreover, it is environmentally friendly. Installation of this type of ceiling takes in practice from one to three days. The time depends solely on the size of the room, as well as how complex the drawing was chosen.

In any case, this time is worth it, because as a result, the owners of an apartment or house will get a really flat, durable and truly beautiful ceiling who will be admired on a daily basis.
Advantages of a two-level plasterboard kitchen ceiling
If you want to protect the ceiling from sudden temperature changes, as well as from possible moisture, then in this case it is better to choose the most moisture-resistant plasterboard.

By choosing the installation of such ceilings, you will have a unique opportunity to hide various kinds of communications such as electrical wiring or terrible pipes.

Before installing ceilings, there is no need to level the existing ceiling, since in the end all the unevenness of the base will still be hidden.

If you want to zoning a room, then drywall can be an excellent assistant.
Easy installation process. If desired, almost any structure can be made from a material such as drywall.
Note! Kitchen curtains - 180 photos of new designs for kitchen curtains

That is, any idea of an interior designer can be brought to life. In addition, built-in lamps can be easily installed in such a ceiling.

Easy to operate. If there is a desire, then in just a few days such a ceiling can even be painted in any color.

Resistant to various mechanical damages.

A little about the disadvantages
Installation must be carried out by a real professional only. This is due to the fact that any error in the creation of the frame structure can lead to the formation of cracks, even if they are almost invisible at first glance.

Needs a neat finish when painting. This is important so that there are no visible seams in the future.
It is best not to install plasterboard ceilings in an apartment purchased in a new house, since the building always shrinks, and after a year cracks may appear, or the frame will be skewed altogether.


Thus, by looking at the photo of the plasterboard ceiling in the kitchen, you can safely conclude that it is just perfect for kitchens.

Moreover, such ceilings can, if desired, even be combined with any other tension structures.

Types of structures
Speaking about the type of attachment, it is worth keeping in mind that there are various methods.

Firstly, this is a plasterboard suspended ceiling in the kitchen, when the suspension system is first attached in the form of, for example, brackets, and then the metal frame itself with sheets.

Secondly, as you can see the two-level photo plasterboard ceilings for the kitchen can be fixed in a special hemming method, when the frame is immediately attached to the floor slabs.


This allows you to make the structure more durable and at the same time quite rigid.

Photo of a plasterboard ceiling in the kitchen


A suspended ceiling in a plasterboard kitchen will be the best solution for cladding a kitchen ceiling due to the excellent qualities of the material - environmental friendliness, moisture and fire resistance, lightness and flexibility.
Pros and cons of plasterboard ceiling in the kitchen
Plasterboard ceilings in the kitchen have great potential and many advantages:
- They can hide or disguise communications - wiring and pipes;
- Defects and irregularities in the ceiling will also not be visible;
- it great way dividing the kitchen space into zones - working and dining, ceiling zoning is especially important for studio apartments;
- You can come up with any ceiling design that can become an accent in the interior of your kitchen;
- When installing drywall sheets, you can additionally insulate and soundproof the room;
- You can rethink the kitchen lighting - create niches for lighting, install in the work area, and above dining table hang a chandelier, as is fashionable now;

- The gypsum plasterboard is strong enough that the ceiling structure will not crack due to the movement of the ceiling or walls.
Disadvantages of plasterboard ceiling:
- Unfortunately, at least 7 cm of height will inevitably be lost, which means that this type of finish will not work;
- In addition, do-it-yourself installation of a suspended plasterboard ceiling (especially a two-level and with a complex design) requires some skills, as well as time, the availability of tools, the help of a partner and strength;
- Over time, the ceiling can deform, crack at the joints.
We think over the design
In order to choose the right design on the basis of which two-level plasterboard ceilings will be created, it is imperative to evaluate the following criteria:
- Room configuration and dimensions;
- Finishing methods acceptable in the general interior solution;
- Color and texture;
- Used lighting;
- Applied decorative additions.
- In the kitchen space, an extractor hood with hob... The air duct required for this device is best hidden under the ceiling that descends in this part.
- You can lower the entire perimeter of the ceiling, leaving the central part at the same level. This option is suitable for those who value symmetry - elements with a decrease in height can be used for spotlights. It is easy to zoning the kitchen space with such lighting fixtures.
- To create a positive effect, lighting in the kitchen can be supplemented.
- As for color, it is better to choose pastel, muted shades for suspended structures. And the use of glossy textures will help make the room visually more spacious.

A plasterboard suspended ceiling in a kitchen can be done in a variety of ways. It can be sibling flat design, no different from a conventional ceiling. This traditional design will blend in with any interior.


A surface with protrusions and niches can delimit space and hide communications.


Suspended ceilings in the kitchen, if the height of the room allows, often have a structure of several tiers. Most often, the ceiling is made of two levels - a ceiling-base and a convex geometric figure around the perimeter of the room or in the center.


Abstract corner elements, as well as ovals, semicircles and other shapes are very relevant. This sophisticated design is more suitable for spacious kitchens with high ceilings.


However, in a small or medium kitchen, you can also highlight the dining area with plasterboard ceiling figures.


However, do not forget that any suspended structure will "take away" a few precious centimeters in the height of the room, therefore, for miniature and low kitchens, a complex ceiling design is not recommended - it is better to choose a single-level ceiling.

If desired, you can create a combination of stretch and plasterboard ceilings.

How to choose materials: plasterboard sheets, putty and paint
- Plasterboard ceiling sheets are lighter than wall sheets, and most often have a thickness of 8.5 - 9.5 mm.
- In order for plasterboard ceilings in the kitchen to delight you as long as possible, you need to choose a moisture-resistant material. If you use a regular GK-sheet, the structure will very quickly become unusable, because in the kitchen high level humidity. And moisture-resistant drywall does not deform either when water gets in, or when there are sharp temperature changes.
- In order for the suspended ceilings in the kitchen to maintain their perfection for a long time, it is recommended to carefully choose the filler and Decoration Materials... They must also be moisture resistant and have a long service life. Poor quality putty can crack like a "cobweb". As for the paint, it should be suitable for areas with high humidity, easy to apply on horizontal surfaces and be UV resistant.
Draw a plan of your ceiling by hand (observing the scale) or in the program and place on it the GK sheets, guides along the perimeter of the kitchen, and the supporting profiles - across, then mark where the crabs and hangers will be located.

We make a single-level ceiling on our own
To sheathe the ceiling drywall sheets do it yourself first you need to prepare everything necessary tools and materials.

The actual process of installing ceilings includes 4 main stages:
- Creation of a frame from special profiles;
- Fixing plasterboard sheets;
- Plastering and painting (decoration) of the surface;
- Installation of a lamp and lighting.
If you plan to install the kitchen ceiling yourself, then invite at least one assistant. After all, drywall sheets are heavy enough to lift them alone.
To make a false ceiling in the kitchen with your own hands, perform the following sequence of actions:
- Find the lowest point of the surface and mark along the walls. This will require a thread marker and a water level.
- A UD profile is attached to the marked strips, after which the structure is sewn over the entire plane with a CD profile. The elements are fixed with special mounting strips and dowel nails.
The distance between the fasteners should be 500-600 mm.
- Plasterboard sheets are attached to the created frame. For this, screws are screwed in with a pitch of 200 mm, no more. If drywall needs to be cut during installation, a special cutter or knife is used for this.
- The ceiling, completely sheathed with GK, is putty - first, all the seams are sealed to ensure the tightness of the structure.

- The seams are pasted over with a serpentine and putty again, after which they pass the entire surface.
- After the putty dries, the surface is decorated - painted or pasted over with wallpaper.
The design of the plasterboard ceiling can be any, have different shapes - straight, bent, round, oval. In any interior style, plasterboard ceilings will be appropriate, and will allow you to solve a number of both technical and aesthetic problems.

Design of plasterboard ceilings in the kitchen
Before proceeding with the design of a plasterboard structure, it is necessary to take into account a number of technical conditions. For example, equipping the work area with a hood requires an air duct above it, and this must be provided. If you plan to build in luminaires, the distance between the ceilings and the drywall should be chosen taking into account the size of these luminaires.
The work begins with an assessment of the size of the room and the shape of the ceiling. Then determine the number of levels and their location depending on the chosen style and functionality. Next, the color and the way in which the ceiling surface will be finished is selected. The final stage of work on the design of plasterboard ceilings in the kitchen is the choice of lighting fixtures and decorative elements.


When choosing a color, you should be guided by general rules design:
- In small rooms, it is better to use light colors;
- In spacious kitchens, rich dark shades are acceptable;
- Pastel colors will suit almost any interior style and add coziness;
- Bright, harsh colors can be detrimental to your well-being and mood.
Tip: If you want to emphasize visual zoning, make a plasterboard suspended ceiling in the kitchen in different levels- above each of the zones at its own height. Spotlights mounted in the ceiling along the border dividing the different heights will enhance the effect.


This is the most simple construction suitable for any space. Its surface can be plastered and painted - in this case, the ceiling will not differ in appearance from the traditional one, while retaining all its advantages.
Under the ceiling, you can remove communications, wiring or mount lamps. At the same time, the visual zoning of the kitchen can be emphasized by applying a different color or a different texture over different zones. For example, the ceiling above the dining table may be light, and above the work area, it may be in a more saturated tone. This will draw attention to the dining area and ensure that it dominates the interior.


A plasterboard ceiling in the kitchen will also help to emphasize the allocation of zones, if you install lamps in it along the boundaries of these zones. Directed downward, the light will create a kind of "curtain of light", effectively highlighting this or that part of the room.
You can turn a simple ceiling into a masterpiece if you decorate it with three-dimensional drawings. You can create them yourself - and it's easy. Having applied the selected pattern to the surface, using liquid paper we draw it and dry it. After that, the drywall sheets are fixed in the selected places and painted in the usual way.

A structure made in two levels often provides more opportunities for obtaining a spectacular interior or solving technical problems that arise when renovating such a complex room as a kitchen. The protruding parts will hide large elements of communications, for example, air ducts, or large recessed luminaires.
The combination of parts of different heights will add volume and allow you to solve interior problems. The higher parts of the structure are often located in the kitchen work area or in the center. They can have a wide variety of shapes, depending on the chosen design. Often, oval and rectangular elements are combined in plasterboard ceilings in the kitchen. There are also combinations of drywall elements with stretch ceilings... This diversifies the interior and brings a zest to it.


If elements of plasterboard construction are used, located in three or more levels, such a ceiling is called multi-level. Most often it is used in spacious kitchens with high ceilings - from three meters or more.
This is especially true in cases where the ceiling height exceeds four meters, which is usually for old-built apartments, especially "Stalinist" ones. Not too large in area, but having a significant height, such rooms look disproportionate, and the multi-level ceiling allows you to correct the proportions and make the room more comfortable.


Such ceilings can hide large differences in the height of the ceiling, significant defects in it, and also remove from the eyes ceiling beams or ventilation box. With their help, you can place accents, for example, emphasize the exclusivity of kitchen furniture.


Plasterboard ceiling in the kitchen: pros and cons
There are many advantages of plasterboard structures, we will list the main ones:
- Hide wiring and communications;
- Remove irregularities and defects in ceiling ceilings;
- Help to carry out visual zoning;
- Give individuality to the interior;
- Provide the ability to install point ceiling lamps flush with the ceiling;
- Provide additional sound insulation;
- Do not change when the building settles, do not crack;
- Provide unlimited design possibilities.
In addition to the obvious advantages, there are also disadvantages, and they must be taken into account when deciding on the decoration of the ceiling.
- When installing a plasterboard structure, it is lost from 7 cm in height;
- Installation requires skills and is carried out by specialists;
- Over time, the joints between drywall boards can crack.


Well-chosen lighting schemes can completely change the room, make it more spacious, highlight individual parts, and focus on the main areas. Spotlights that can be installed in the ceiling can serve as the main lighting, or be aimed at specific places in the room.


An interesting option is the eaves lighting of the ceiling. In this version, the cornice is glued to the wall at a distance of several centimeters from the ceiling, and an LED strip is laid behind it. The power and color of this backlight may vary. The illuminated ceiling seems to be higher, and the room itself acquires additional volume. Directional light from built-in sources can create interesting game lights and shadows that transform the interior.


The small size of the kitchen area cannot interfere with the use of plasterboard ceiling structures. You just need to choose the right look and design.
- If the height of the kitchen is low, choose a single-level ceiling - it will "eat" less than centimeters, which already count.
- A well-thought-out lighting scheme, as well as the use of cornice lighting, will help to complicate the single-level ceiling and make it more effective.
- Light colors for painting the ceiling will help to visually enlarge the room.
- The use of glossy textures on the ceiling will visually increase the volume of the room.
Tip: If the height of the kitchen is low, but you want to have a ceiling in two levels, add a wide decorative cornice to the usual single-level ceiling, placing it slightly below the main level. The lighting behind the cornice will help create the necessary impression.


Plasterboard constructions can be found in almost every modern interior because it is practical, cheap and aesthetically pleasing. You can create them yourself by fitting into any style. Be it classic or high-tech, the variability of forms allows you to design a unique design of a plasterboard ceiling in the kitchen, which will become the highlight of the room. About the features of this material - in our article!
Types of ceilings for the kitchen
Plasterboard ceilings are a type of suspended structure that is installed to serve decorative or practical purposes. But due to the low resistance of the gypsum board to moisture, it is not recommended to mount it in the bathroom, where this indicator is quite high. But for the kitchen, this is an excellent solution that will help hide surface imperfections or hide communications.
Obviously, not only because of this, products from gypsum plasterboard are so popular. The fact is that it is a very plastic, malleable material, with the help of which it is possible to form both figured decor and smooth, perfectly even partitions with a complex lighting system. Based on the form, installation method and purpose, there are three types plasterboard ceilings, on each of which it is worth dwelling in more detail.
Plasterboard single-level ceilings
This type is the simplest option, which can serve as an independent element of the interior or the basis for more complex structures.
Single-level ceilings made of plasterboard in the kitchen are composed of a metal frame that is firmly fixed, cladding and recessed lighting fixtures. Even a beginner in repair work, the main thing is to securely fix the base.
GKL sheets are adjusted to each other, and all joints are carefully puttyed - this helps to create the effect of a perfectly even coating. An empty space is formed between the drywall and the main partition along the height of the suspensions, in which built-in lighting is usually hidden.
In general, despite their simplicity, single-level ceilings look quite stylish and are able to blend harmoniously with minimalistic or modern style. To expand the design possibilities, you can play with colors, patterns, make the coating matte, glossy, or simply paste over with wallpaper.
Single-level plasterboard ceilings have a number of advantages over other types. Firstly, they do not lose their appearance even because of the subsiding foundation. Secondly, they allow you to visually align the original finish without reducing the height of the room so much, which is especially important for small kitchens. Thirdly, it will protect against too noisy neighbors, providing better sound insulation. Simple solution for simple design.


Multilevel plasterboard ceilings
Having learned how to create a single-level structure, you can stop at this, or you can "attach" to it a second or third level (smaller in area) for a more complex view. The second option refers to multilevel plasterboard ceilings and requires a certain skill from the creator.
The following drywall tiers can be not only straight, but also curved, for which it is necessary to use a special curly frame and sheets. At the same time, it is necessary to carefully consider each level so that it does not put pressure on the visitors of the kitchen, does not deform the space. Depending on the desired effect, a certain type of multi-level ceilings is chosen, of which there are only three:
1. Frame products. This is a kind of box with steps, which is located around the entire perimeter of the room. The center of the room becomes the highest point, making it seem more spacious. Levels can be symmetrical or asymmetrical, completely changing the geometry of the space. The impression is enhanced with spot lighting.
2. Diagonal structures. They help to divide the kitchen into two parts, visually highlighting one of them. This is done as follows: from corner to corner there is a dividing line, on one side of which there is a protruding part, and on the other not. Accordingly, they are at different levels. For more effect, you can experiment with colors or types of coatings.
3. Zonal view. Suitable for rooms that combine several zones at once. This is true for kitchens combined with a dining room, as well as a living room. You can select any part of the room by building a second level of the desired shape above it. Such a ceiling above the bar counter or dining table will look stylish, additionally illuminating this part.
Thus, together with the complexity installation works the functions of multi-level plasterboard ceilings are also becoming more complicated. With their help, you can visually change the size of the kitchen, make it more voluminous, highlight certain functional parts. But the main thing is that your interior will become more diverse and unique.


Shaped plasterboard ceilings
Such ceilings are also called combined models, since they can combine several types at once to implement complex design ideas. These are not just smooth curves or clear stripes, but complex shapes that, as a result, will become the central object of the kitchen. There are practically no clear classifications here, since "the ball is ruled" unique ideas... But we will try to highlight the main motives of the combined structures in order to demonstrate their capabilities.
- Like a drawing on a canvas, plasterboard figures "grow" on a single-level ceiling, acting as an independent design element. Depending on the interior concept, these can be flowers or even silhouettes of living creatures. To make the "image" stand out more, it is highlighted at the edges.
- Popular for modern style motif - abstract patterns that give the kitchen a mystery and uniqueness. For example, you can create a spiral deformed structure and apply multiple shades when painting.
- The effect of a UFO hovering over the kitchen can be achieved by using fitting sleeves and metal pins, which are attached to the base in a special way. It feels like a plasterboard structure is floating in the air without touching the ceiling surface.


Determining the shape of the plasterboard ceiling is one thing. But in order to fully reveal the full decorative potential, it is also necessary to think over the lighting system.
There are two options for lighting ceilings:
1. Open type, when the luminaires are mounted in a hole or suspended, forming a separate part of the upper ensemble.
2. Concealed type, when the lamps are hidden in special niches between the plasterboard sheets and the original surface. This is a more popular option, which creates soft, unobtrusive light, as well as the effect of a floating structure.
The most interesting thing begins when choosing lamps, since their range and possibilities are quite wide.
- Spot. The most common type of luminaire for suspended ceilings. There are models with the function of controlling the direction of light, although they are more expensive.
— LED strips... They are easy enough to be mounted in the resulting niches. You can control the strength and intensity of the lighting using a special controller. The advantage of this type is also the relative safety of the devices, since they do not generate heat. To enhance the atmosphere in the interior, you can purchase multi-colored lights.
- Neon. It is a tube of neon, which, due to its flexibility, can take a curved shape, smoothly outlining the figures from the gypsum board with unusual light.
- Chandelier. A familiar type of lighting, the installation of which, probably, any owner has encountered. For plasterboard ceilings, the same principle is used. At the same time, chandeliers are often combined with other lighting options, placing it in the center of the ensemble.
When choosing the best option for lighting a plasterboard ceiling for a kitchen, keep in mind that solving practical problems is more important than decorative ones. Unlike the living room, where we spend most of the time relaxing, in this space it is important that the working area is as illuminated as possible, without creating inconvenience during cooking. The ability to adjust the light output is a very handy feature.


Owners of small kitchens probably know that this space should be filled with a minimum number of items, decorated with minimal decor and "painted" in light colors. But the design of the ceiling can also take meters away, or vice versa - save.
Of course, for rooms with low ceilings, it is not recommended to install additional elements on its surface. But what if she's not perfect? Plasterboard single-level ceilings - perfect solution all problems.
For finishing, it is recommended to choose light shades that are several tones lighter than walls... Avoid drawings, patterns, or lines that create a borderline for the ceiling, making it smaller and smaller in size. Acting on the principle "the less the better", you can take advantage of all the advantages of gypsum plasterboard structures and transform the interior.


Plasterboard ceilings are an excellent solution for the kitchen, which will allow you to hide surface imperfections or become a design advantage of the room. Some may be surprised by the variety design options, but in fact there are even more of them. Proof of this, as well as an additional source of inspiration, is our selection of photographs. Happy viewing!


Did you know that the ceiling in the kitchen can be not only a decorative element, but also perform certain functions? This part of the room can be made useful and functional if you create it from drywall. How to do this, and how can the space under the ceiling structure do a good job in the kitchen?
Why is it worth installing a plasterboard ceiling in the kitchen?
Drywall is construction material, which was invented in the USA in the 19th century. It was invented by Augustine Sacket, the owner of a paper mill. Then this canvas was called a building board and resembled a kind of cake made of plaster and paper. The material was improved by engineer Clarence Utsman, who created such drywall as we see it and use it now.

On a note! In the composition of one sheet of drywall, approximately 91% of the mass is occupied by dihydrate gypsum, the remaining 9% are cardboard, starch and an organic surfactant.


Drywall came to the Soviet Union around the 50s of the twentieth century and has since been used in construction and design. The material is simple and easy to use, relatively cheap and not only allows you to trim (level) the walls, but is also suitable for manufacturing window slopes... It is not surprising that drywall began to be used to create ceiling structures, including multi-level and complex ones.


The material has a large number of advantages and that is why it is ideal for making a ceiling in the kitchen.

But the plasterboard ceiling has its drawbacks.
Drywall prices
drywall
- The structure “eats up” at least 7 cm of the total ceiling height, which is very inconvenient for small kitchens.
- Installation of a plasterboard ceiling is not a matter of five minutes. It may take more than one day to collect it completely.
- After the installation is completed, the ceiling will require finishing, and this is additional time and financial costs. Depending on the type exterior decoration, the structure can become difficult to maintain.
- Such a ceiling does not like moisture and will not save the room in case of flooding by neighbors from above.
- With improper installation, as well as with prolonged use, the surface finish may crack at the joints between the drywall sheets.
Nevertheless, despite all the shortcomings, plasterboard ceilings are one of the most popular types of ceiling surface finishes. It has a lot more advantages.

Types of plasterboard ceilings
Drywall is such a "plastic" material that it allows you to create completely different shapes, including in the kitchen. In order to purchase the required amount of materials, the right tools and start installation work, you should decide how your ceiling will look. There are several types of plasterboard ceiling structures.
Table. Types of plasterboard ceilings.
| Ceiling type | Description |
|---|---|
| The simplest version of the plasterboard ceiling. It is a flat surface without additional elements. Easy to install: the metal frame is simply sheathed with drywall sheets. Such a ceiling "eats up" at least the total height of the room, but at the same time allows you to hide the draft ceiling completely. |
| Medium in complexity type of plasterboard ceiling decoration. The main "subtlety" is to correctly calculate the location of additional levels and create a more complex frame than in the case of a ceiling of one level. This makes the installation more difficult and takes longer. But on the other hand, the levels can be interestingly beaten with the help of curved lines, as well as highlighted with the help of lamps or a glowing tape. It is worth remembering that a ceiling of several levels "steals" more more height premises, therefore only suitable for spacious kitchens. |
| As a rule, such a ceiling will have a very complex structure and some kind of volumetric decorative element of its surface. For example, a flower may bloom in the center of the kitchen, a butterfly may appear, or some kind of abstract drawing. Such a ceiling is difficult to mount for those who have no experience with drywall. |


Let's take a closer look at ceiling structures consisting of several levels. The ceiling in the kitchen can be made frame, diagonal or zonal.
Frame ceiling- this is the easiest way to implement a multi-level ceiling. It is a surface with one or two steps along the perimeter of the kitchen walls.
On a note! By the way, a step along the perimeter of the kitchen is a great place for organizing additional lighting of the room. As a rule, lamps look very organic there.

Diagonal ceiling- a structure where the level steps are located only on one side of the room and stretch from corner to corner. They are performed both perfectly smooth and wavy.

Zonal ceiling will clearly highlight the work or dining area. The main step will emphasize it. The rest of the ceiling space will be flat. As a rule, such a step is not large and massive.

Design tips for kitchens small and large
In order for the ceiling in the kitchen to please you for many years and does not seem cumbersome, ugly, heavy, you should carefully consider its appearance.
When choosing a type ceiling structure from drywall and its finish, it is important to consider several important factors:
- the size and height of the kitchen;
- general style of the interior;
- the need for additional lighting equipment;
- the need to use decor.
Why is it worth paying attention to these factors? The fact is that a plasterboard ceiling with improper installation and finishing will not just "crush" - it will look very bad, and you will definitely not have satisfaction from the repair done.

Here are some tips, following which, you can very successfully work out the design of the ceiling and make it perfect.
- Use spotlights for zoning the room.
- Hide corrugation and other kitchen communications under drywall.
- For finishing the structure, use materials of light shades - beige, cream.
- In small rooms, it is better not to make protrusions on the ceiling in the center of the kitchen.
- Playing with color will also help to zone the room. Use different shades for this.
- V large kitchens you can create a soaring ceiling - in this case, it seems that part of the structure is simply hanging in the air (the mounts are not visible).
Attention! Remember that in a small kitchen, bulky multi-level structures will look very bad. It is best to make the ceiling in one level or work out a frame version of the plasterboard ceiling.
Ceiling installation
After you have decided on the design of the plasterboard ceiling in the kitchen, you can proceed with the installation.
This will require the following tools, which should be taken care of in advance:
- puncher;
- screwofert;
- roulette;
- construction laser level;
- ladder;
- a pencil for marking;
- putty knife.

Video - Drywall Plaster Tool (Basic Set)
Materials that will be needed to create a plasterboard ceiling:
- drywall sheets;
- anchor wedges for the ceiling;
- metal profiles CD and UD;
- suspensions, rods;
- putty and primer, finishing material;
- sealing tape, separating tape, serpyanka;
- screws for metal and drywall;
- dowels;
- profile extensions, "crabs" for suspended structures, "fleas".

Also, purchase lighting devices in the required quantity and wires to connect them to the mains in advance.
The procedure for performing work on the installation of a two-level ceiling.
Draw up a detailed plan for the fastening of all structural elements. It will facilitate the work and will allow you to calculate the required number of fasteners and materials.
Prices for screwdrivers
screwdriver

Start work with the markup. Using a tape measure, determine the lowest corner in the kitchen, from the base ceiling down, make a mark along the lower border of the first tier (this is about 10 cm). Make the same marks on the other corners. Determine the level on them using a laser level.


Connect the points indicated in the corners with one line along the perimeter of the kitchen. For this, it is convenient to use the so-called chopping line.

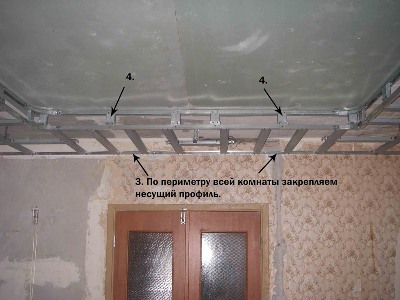
Attach the UD guide profiles along the drawn line with dowels. Make holes for the profiles with a punch. Remember to reinforce each profile at the edges at least 10 cm from each end.

Attention! Before fixing the profiles, glue them with a sealing tape.

Transfer to the ceiling that part of your diagram where the main profiles fixed to the ceiling are marked. The step between the parallel lines of the marking is approximately 40 cm. Make marks perpendicular to them in those places where the suspensions will be installed (the step is about 50 cm). In this case, install the extreme hangers at a distance of 25 cm from the wall.
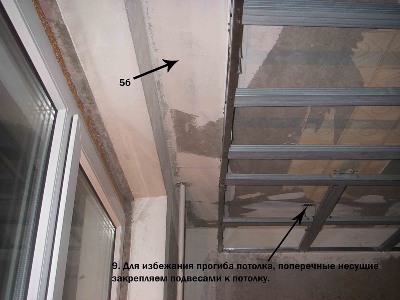
Start installing suspensions. Screw the anchors into the ceiling, fix the suspension structure and bend its ends so that it has no free play.

Fastening of suspensions (here - vibration suspensions for noise insulation)
Install the profiles on the prepared structure, screwing them to the suspensions with self-tapping screws - first the edges, then the middle. In this case, fasten the profiles on one side of the ceiling, then on the other, step by step.

On a note! The length of the entire profile should be about 2 cm less than the length of the kitchen. Short profiles can be connected using special connectors. Remember that the joints of several profiles in this case should not be at the same level.
Place jumpers between the profiles using the "crabs". Install jumpers in those places where there will be joints of drywall sheets.

Do all the wiring, because after plasterboarding you will not be able to complete this stage of the work. Run the wires for the luminaires and check the entire network for operability.


Advice! In order not to subsequently look for the place of installation of the lamps, they can be marked in advance on sheets of drywall.
Start installing drywall. Before that, it must be processed - cut each sheet at a slight angle along the edge. This is necessary to improve the results of puttying in the future. The glued ends of the sheets do not need trimming.


Fasten the sheets, starting from the corners of the room, with self-tapping screws with a pitch of 20 cm. Make sure that the sheets are installed "at a distance".
Ceiling profile prices
ceiling profile


Attention! The caps of the self-tapping screws should not protrude, they should be drowned in a sheet of drywall a few millimeters.
After you have sheathed the entire ceiling, proceed with the installation of the second level. Pull two strands from corner to corner of the kitchen so that they intersect. This will find the center of the ceiling. It is from him that you begin to postpone equal distances to determine the boundaries of the junction of the ceiling levels. That is, now you draw the markup, along which you will attach the profiles for another tier.

Screw the guide rail along the marked perimeter. Repeat steps 2, 3, 4, focusing now on the second level.

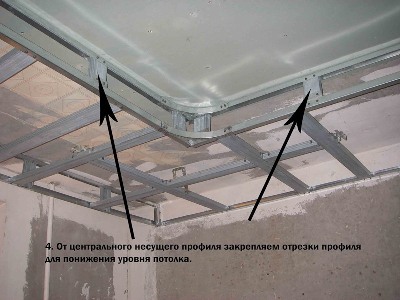


Now cut the CD profile into segments of the length you plan to set the second level to. This is the same length as the distance from the first level to the guide profiles of the second, fixed to the wall. Cut out special “tongues” on one side of the segments by cutting off the side parts of the profile.
Insert the pieces into the UD profile fixed on the first tier at a distance of about 5-6 cm. Fasten them with self-tapping “fleas” screws.

Slip another guide profile over the hanging pieces.


Prepare sections of CD profiles equal in length to the distance from the resulting mini-frame to the wall, and install them, securing them with fleas.
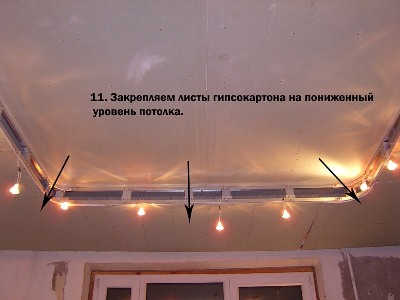
Sheathe the frame with drywall.

Advice! To save material, do not plasterboard the part of the first tier that will hide under the second.

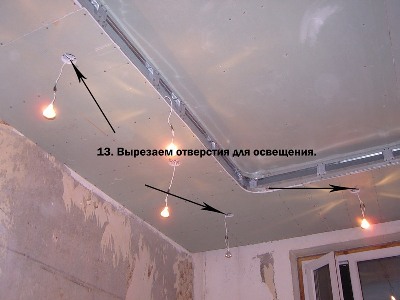
Make holes for the lamps using a cutter of the desired diameter or a reinforced clerical knife. Install the fixtures after finishing the drywall.
Putty prices
putty

Video - Two-level ceiling with rounded sides
Ceiling decoration
Now you can start finishing the ceiling surface. To do this, carefully treat with a primer and putty all the joints, also use a serpyanka tape and then again coat all the irregularities, including the places where the screws are screwed in.
It remains only to finish the surface. How to cover drywall so that the ceiling in the kitchen looks harmonious, beautiful and lasts a long time?
- You can paint drywall ceiling with acrylic, latex, water-based paint.
- You can paint, or you can combine these two types of finishes.
- Looks good and.
Attention! Glossy paints can only be used if the ceiling has been completely plastered. Otherwise, all the irregularities will be visible.

Master Class. How to make a small figure on a plasterboard ceiling
The figure is executed on the original level of the plasterboard ceiling, made according to the technology described above.


Now the most difficult and responsible part of the work is the installation of cornices. For this we need such a tool. This is a saw in a universal miter box. It can be tilted to almost any angle. The cut is smooth, precise and slightly rough, which will improve its adhesion to the glue.


The plasterboard ceiling in the kitchen is one of best options finishes for this room. However, cover drywall better paint so that you can wash it regularly. Wallpaper and plaster do not like water, and the ceiling in the kitchen is often exposed to steam, and splashes of grease often fall on it. Therefore, choose the most practical finishing materials so as not to complicate your life.