What can be cooked from squid: quick and tasty
A spark arrester for a chimney, at first glance, it is difficult to imagine what the main purpose of this device is. In the understanding of an ordinary person, it is a simple cylinder with small holes. He is able to catch sparks, not allowing them to scatter over the roof covering. But, you need to understand that for some roofs, even for fire safety purposes, the possibility of installing the device is discussed at the factory.
Why are spark arresters installed?
The spark arrester, as it is also called, is designed to catch burning sparks from the chimney. It is considered mandatory to install such devices in those rooms, buildings that are built, made of fire hazardous materials. This includes not only the tree itself, but various materials for the production of the roof, which may contain a certain amount of plastic and other things.
Most often it can be seen on the tops of the chimney; as a rule, they are connected to the “visor” itself and represent a single “exposition”. Many people combine a device for improving traction with a device that allows you to extinguish sparks, this does not require separate outputs and construction, some incredible and cumbersome devices.
Like any chimney device, the presented device has its own characteristics:
- They are mounted for stoves, boilers operating on solid fuels.
- The dimensions of the "nets" themselves, which are supposed to "catch" sparks, must comply with certain standards and not be more than 5 mm.
- Your house may not be accepted by employees of the company that registers it in the register, as well as by the fire department if your roof is made of flammable materials, and there is no spark extinguisher. Pay attention to this weighty fact.
- In addition, the arrangement of the chimney with a spark arrester is mandatory even if the channel itself has a straight section. In houses, as a rule, a rare occurrence, but baths, saunas, just fit this concept.
- In addition, this type of device protects the chimney much better from debris, dead birds and other things. Thanks to its small cells.
- Spark arresters require mandatory and regular cleaning.
- V modern houses, architects have already introduced this device into the project in advance.
Please note that when equipping your chimney with such a device, it is not recommended to use firewood as a heating means. Most of the firewood is soot, which in a short period is able to completely clog the cells of the damper, which will subsequently lead to the formation of reverse thrust, or its absence as such.
In principle, the structure itself is not so complex in configuration, it can be assembled by every homeowner who has the necessary material and tools. But remember, not every material will fit, so pay attention to the characteristics.
Necessary materials
The stove flame arrester can be made from a wide variety of metal, but remember the properties, because even on the head the temperature can reach impressive values. Moreover, the metal must meet certain characteristics:
- do not rust;
- be anti-corrosion.
As a rule, you can even use the usual fence mesh. All the requirements listed above apply to it. But, take into account another significant factor, a spark arrester on a chimney pipe can only be installed with a certain cell size. Otherwise, too large holes will not bring the desired result, and small ones will even reduce traction.

Advice. The mesh is very difficult to bend, so to relieve tension from it, use a hammer, tap it, and it will become soft and pliable. Do not use too thick rods, the structure will clog up with soot faster. Better to find thin steel wires, they are ideal for the venture.
You need to take care of the tools, without them, as you know, nothing can be done. So, the minimum set:
- Hammer.
- Roulette.
- Pliers.
- Scissors.
- Screwdriver.
- Bulgarian.
- Drill.
Whenever possible, use welding machine... But remember that not every machine is capable of welding thin metal. We need a special "machine". It will be more reliable than a regular wire bundle.
Types of spark arresters
Today you can find a spark arrester for a chimney of various configurations. They may differ in design features, form of manufacture and others. But, there are two main models of a spark arrester for a chimney:
- Metal casing.

Simple metal spark arrester
As you can imagine, the main requirement applicable to any of the subspecies is not to interfere with normal traction. Exhaust gases, combustion products, must freely leave the channel, without lingering and without encountering any obstacles. In addition, the flame arrester must extinguish absolutely all sparks, not allowing any to scatter and hit the roof.

Also take into account the features of the dimensions of the devices, the main requirement in this part is the correspondence of the proportion of the pipe itself. That is, a smaller diameter and a larger one will not perform the assigned functions.
The minimum cylinder diameter of the spark arrestor part should not be less than 80 mm, and the maximum diameter should not be more than 550 mm. Of course, for the calculation it is better to use a special table, there are now many drawings, diagrams on the Internet, where the correspondence of the channel diameter to the size of the device is given.
Please note that for a do-it-yourself bath, the diameter must be the same as that of the channel itself. These are the features of the straight pipe design.
How to make a device yourself?
There is always an opportunity to buy a ready-made device, according to its size and requirements, without delving into the calculations of the pipe and other things, since now the choice is simply colossal and for every taste, including in the price range. But, more and more requests on the topic of how to make a spark arrester for a chimney yourself, with your own hands.
The most popular as a do-it-yourself manufacturing, is considered to be a device that forms an ordinary plug on a pipe with holes drilled in it. There is a small nuance here, namely, the workpiece itself must have a larger diameter than the outlet channel. This is necessary in order to fix the device on the pipe without significant problems.
But, some difficulties may lie in wait for you, for example, what size to choose, how many holes to make, and the like. Incorrectly calculated indicators can easily lead to malfunctioning of the system. There is also one, but very significant disadvantage for the use of just such adapt. Over time, the amount of carbon deposits will increase, and often hardly anyone wants to climb onto the roof. Therefore, after a while, an unpleasant odor will be felt in the house, due to poor removal of exhaust gases.
Advice. If you decide to install a spark arrestor due to the increased number of sparks, then the problem can be solved less drastically. After all, increased cravings bring negativity as much as its lack. Therefore, by reducing the thrust, you will surely get rid of sparks.
The second method is a conventional metal mesh. In terms of work, there is nothing complicated, the main thing is to choose the right required material... And you can fix the spark arrester to the chimney for your bath, at home using a regular clamp or a special bracket.
The disadvantages of this type of design include:
- Fast filling of "pores" with soot.
- It is not highly efficient.
Manufacturing process:
- First, take measurements of the main parameters.
- After that, mark up on a sheet of cardboard and cut out the blanks, along which you will then work with metal.
- We cut out and prepare the necessary metal elements.
- We connect by welding, bolts or wire. The first option is safer.
- We fix it on the head. Use clamps or rivets, depending on the configuration used.
Reading 5 min.
Fireplaces, stoves and stoves installed in houses and baths run on solid fuel. These devices are simple in design, but they are dangerous. They have an open location of fire, and there is a possibility of its spread. To avoid this, a spark arrester is installed on the chimney. It is the main element in the flue system.
The purpose of the spark arrester
A spark arrester for a bath or other structure is designed to cool the incandescent particles in the chimney. Moving along a flat pipe, they do not cool down. And if they are not cooled, the particles will fall on trees or a house and ignite. Therefore, a spark arrester is mounted on the rim of the chimney. The chimney is designed in such a way that the cooling of sparks occurs in stages:
- Special obstacles in the form of horizontal bends and turbulent flows help the particles contact the pipe surface, transferring their heat to it.
- As a result, the pipe heats up quickly and the particles stop cooling.
- The draft inside the chimney becomes weaker due to the turbulent flow.
- The installed spark arrestor contains particles and cools them. At the same time, high-quality draft is maintained in the chimney.
Need to know what fuel High Quality emits fewer non-combustible particles and poorer quality fuels more.
Varieties
There are many varieties of spark arresters for the sauna chimney. Of these, 2 types are very popular: deflectors and casings.
- Casing. The device has a simple design and you can make it yourself, using improvised means. To install the device, a hole is made in the pipe or a nozzle is mounted in the form of a mesh. Since the combustion products quickly clog the perforations and mesh, the draft level is impaired. Therefore, such a model needs constant inspection, which is its only drawback. You can purchase a ready-made model in the store. It is assembled; it is enough to connect it to the chimney.
- Deflector. it modern model a spark arrester, which not only extinguishes hot sparks, but also changes the direction of the wind in the pipe, thereby increasing the thrust. This effect is due to a bottleneck that is located anywhere in the device. The spark arrester has a beautiful appearance, but resembles a casing in construction. Models are equipped with meshes and perforations.
Principle of operation
The principle of operation of a spark arrester is simple. It is based on the fundamentals of physics. The diameter of the device must be larger than the chimney. The device and principle of operation of a spark arrester on a chimney pipe:
- The spark arrester is put on the pipe with its lower part, like a cap, and it becomes its continuation.
- The middle part of the device is made in the form of a tubular mesh. This design keeps hot particles inside and allows smoke to escape easily. The upper part of the pipe is equipped with a ring or umbrella plug that protects the pipe from rainfall.
- The part of the incandescent particles that has not cooled against the pipe wall will reach the end of the chimney and go directly into the spark arrester.
- Once in the device, sparks will begin to contact the inner surface of the device, the plug and cool, and the smoke will seep through the mesh.
Since the spark arrester is installed outside the structure, it will always be kept cool.
Making a spark arrester with your own hands
It is not difficult to make a spark arrester on a bath pipe with your own hands. This will take several hours and the following tools and materials:
- steel that has anti-corrosion properties;
- thin metal rods (for mesh);
- welding machine;
- drill, grinder;
- hammer, pliers, clamps, screwdriver;
- scissors (for metal) and a ruler.
Before making a spark arrestor for a pipe in a bath, you need to select a model, take all measurements and prepare a circuit.
- The device is manufactured according to sketches. To do this, measure inner size the chimney and the details of the spark arrester are drawn on the cardboard. For an allowance, add 2 cm to each side of the part.
- Then the models are cut out with scissors and the cardboard prototype is assembled. If necessary, the design is corrected.
- Then the finished models are applied to metal sheets and parts are cut out of them using metal scissors.
- The pipe is made from a sheet of stainless steel or bought in a store.
- The mesh is made by hand from steel rods with a diameter of up to 6 mm or purchased in a store ready-made, with suitable cells. It must be heat-resistant and wear-resistant. Since it is difficult to bend the steel material, you need to knock on the mesh with a hammer. The stress on the metal material will disappear and it will begin to bend easily. You need to know that a mesh with too large holes will allow sparks to pass through, and if they are small, then the release of gas and smoke will be of poor quality.
- To assemble the structure, all parts are joined and fixed with a rivet or welding. If welding is used, then allowances in the details are made up to 1 cm. All joints are carefully processed with a grinder.
- The rest of the elements are connected using metal rivets.
For the manufacture of the deflector, metal is used. It is cut to the required size and bent at an angle. Places of bends are fixed with rivets. The visor is installed on the device and secured. The device for extinguishing sparks is ready, you can start installing it.
Installation procedure
To install a spark arrestor on a chimney, you need to climb onto the roof. Better to do this work together. During installation, be sure to use personal protective equipment, otherwise you can breathe in smoke. What you need to know when installing:
- The mesh of the device quickly becomes dirty with soot and needs to be cleaned regularly. Therefore, the features of installation and operation are closely related.
- For safety reasons, the structure must be removable and cannot be welded to the pipe. The device is inserted into the chimney and secured with a clamp of a suitable size. It can be easily removed if cleaning is required. This is the easiest installation method, but not reliable.
- If the device is fixed with stainless rivets, then holes are pre-drilled on it and on the pipe. The distance between the rivets is made uniform.
- In order to install the spark arrester for the chimney correctly, the cross-section of the device and the pipes must match each other.
If the fuel used contains a large amount of tar, the metal mesh will need to be cleaned frequently. In addition, the mesh quickly deteriorates if it is made of low-quality material. In order not to have to climb onto the roof every time to replace it, the product must be made of high quality wear-resistant material
In any house where a heating system is installed that processes fuel and releases its combustion products into the atmosphere, there is an increased risk of fire. This is especially true if the house is made of flammable and flammable materials.
One of the sources of danger is the chimney, which heats up to high temperatures during operation and scatters sparks. To neutralize the latter, a spark arrester is installed on the chimney - a device that allows you to catch sparks flying out of the system and protect the house from fire. How to make a spark arrester for a pipe will be discussed in this article.
Purpose and device of the spark arrester
When building a new home, you should always take into account the fire safety requirements. Of course, they apply to the entire building and should be taken into account in all aspects, but everything related to the heating system is subject to increased fire hazard... This is especially important if a solid fuel boiler or stove is installed in the house - sparks flying out of the chimney may well set fire to the roof, so you will have to install a spark arrester.
Structurally, the spark arrester is very similar to its "colleague" - a deflector installed to protect from the wind (more: ""). But the functions of the spark arrester are different, and it is much cheaper - if only because it can be made with your own hands from scrap materials. This device is installed directly on the upper edge of the chimney.

The design of a spark arrester includes several basic elements:
- The body is necessary for connecting all parts and fastening to the pipe;
- A grid for catching and extinguishing sparks;
- Detail that extinguishes the resulting flame;
- Visor.
Spark Arrester Features
The spark arrester installed on the boiler pipe has a series of characteristic features, inherent only to these devices:
- All spark arresters are designed for installation on chimneys connected to heating systems working on solid fuels;
- The size of the spark arrestor cells may not exceed 5 mm;
- It is imperative to install a spark arrestor on the pipe if the roof is made of flammable or flammable materials;
- Installation of spark arrestors is mandatory even if the chimney design does not have turns and bends (such systems are found in saunas, baths, etc.);
- In addition to protecting against fire, spark arresters also protect the structure from external factors- for example, from birds mistaking a chimney for a nest.
- It is best to make the spark arresting mesh removable - it actively clogs up, so it must be regularly cleaned from dirt;
- A spark arrester (if necessary) is always included in the project, according to which the chimney system is equipped. Read also: "".

It is easy to assemble and install a spark arrester on a pipe with your own hands - it is much more difficult to choose the materials that are optimal for this device and will allow you to achieve maximum efficiency. A bad example is ferritic steel or zinc-coated metal - these materials wear out very quickly, so very soon you will have to think about repairing the structure.
The best material for creating a spark arrester is 5 mm stainless steel. Stainless steel has high mechanical strength and good resistance to corrosion. A significant plus in relation to protection against sparks is that this material perfectly withstands serious temperature extremes.
Classification and principle of operation of spark arresters
There are many different schemes spark arresters, between which there are significant design differences, but there are only two main types:
- A spark arrester made in the form of a deflector (read: "");
- A spark arrester in the form of a casing made of a metal mesh.
The main requirement for all types of these devices is the maintenance of normal traction required for the operation of heating equipment. The combustion products must move freely through the chimney without colliding with obstacles. And, of course, the flame arrester installed on the chimney pipe must fulfill its main function - to extinguish sparks moving through the system.

The dimensions of the spark arresters are selected depending on the dimensions of the pipe on which they will be installed. Typically, the diameter of these devices ranges from 80 to 550 mm. The size of the visor directly depends on the dimensions of the chimney. To find out the exact value, it is worth referring to the table, which describes the relationship between these indicators.
The principle of operation of all spark arresters is simple and does not depend on the size and scheme according to which a particular device is assembled:
- In the heater, the fuel burns, sending the combustion products out through the pipe;
- Approaching the exit, the substances bump into the spark arrester and change the direction of movement;
- Directly at the outlet of the pipe, sparks enter the spark arrester and are extinguished in it.
Simple spark arrestor circuits
Of course, if you wish, you can always just go to the market and buy a ready-made device, having previously measured the dimensions of the chimney, and then install it - but such a spark arrester on the bath pipe will cost a little more. In addition, the design of the spark arrester is quite simple, so it will be almost easier to assemble it at home.

It is very simple to make such a structure, but it was not without problems. The biggest of these is calculating the number and size of holes that will be drilled in the plug. If the calculation is performed incorrectly, the chimney draft will decrease. In addition, such an external plug becomes covered with carbon deposits over time, and an unpleasant odor enters the room.

Another option, which is also often used because of its simplicity, is a spark arrester made of a metal mesh, mounted on a pipe with a clamp. This design is also not without drawbacks: firstly, a critical mass of soot will very soon be deposited on the mesh, and the thrust will significantly decrease, and secondly, the effectiveness of such a spark arrester itself is not very high.
If you wish, you can use the third scheme of a simple spark arrestor - all the same mesh, but assembled in the shape of a dome. Such a device is a little more difficult to implement, but the efficiency is much higher than that of the homemade alternatives described above to high-quality spark arresters.
Making a spark arrester with your own hands
For self assembly A full-fledged spark arrester will require the following set of tools:
- Hammer, pliers, clamps, screwdriver;
- Measuring instruments;
- Grinder, scissors for cutting metal and drill with drills;
- Welding machine or rivet set.
The choice of material is individual, but it is best to take stainless steel, which has all the necessary qualities. The thickness of the mesh rods should be kept to a minimum so that the structure is clogged with soot as slowly as possible. It is important not to overdo it here - too thin rods can burn out after a while.

The spark arrester on the pipe is assembled according to the following algorithm:
- Before making a spark arrester on chimney, you need to measure the dimensions of the chimney, in accordance with which the sketches of the future device are depicted. It is best to make cardboard dummies that can be used as stencils for cutting steel pieces.
- The net for the structure can be bought or assembled by hand. With the first case, everything is clear, and in the second, you need to correctly select the rods - their thickness should be in the range from 1 to 6 mm.
- The connection of individual elements is carried out by welding. The resulting joints should be carefully cleaned. The final fixation of all structural details is carried out using rivets.
- The finished device is mounted on the chimney.
If desired, you can assemble a deflector, which will require the following steps:
- From sheet metal the visor of the corresponding size is cut out.
- The resulting workpiece is bent at the required angle. The bending points are fixed with metal rivets.
- The assembled visor is attached to the base of the spark arrester using the same rivets.
Features of installation and operation of spark arresters
The correct installation of the device directly depends on the choice of the dimensions of the parts used - the slightest discrepancy in the diameters will lead to the fact that it will simply not be possible to install a spark arrestor on the chimney. If absolutely necessary, you can install a spark catching device without any fasteners - but this method is very unreliable.
The operation of the spark arrester is reduced to regular cleaning of the mesh from soot deposits. This imposes certain restrictions on the installation - the structure must be located in such a way that, if necessary, it can be removed. It is forbidden to weld the device tightly to the chimney - it must be removable.

Conclusion
It is simply necessary to install a spark arrester on the pipe - this will protect the roof of the house from fire. Even if the roof is made of non-combustible materials, it is still worth taking care of installing a spark arrester - the radius of spark spread can be wide enough to pose a danger to nearby outbuildings or other objects prone to fire.
A conscientious owner who is building a bathhouse on his site will have to think over not only the comfort and arrangement of the future building. Of great importance are the problems of ensuring the all-round safety of the operation of such a building. And one of the key issues in this area is a well-thought-out fire safety system.
One of the main elements of a real bath is a stove, which, as a rule, runs on solid fuel. Required to provide correct installation and the furnace itself, and the chimney system, so as to prevent the likelihood of poisoning by combustion products, exclude the possibility of ignition of walls and floors and roofs. And one more thing - the chimney itself should not become a potential source of danger outside the bath. This can be achieved by making and installing a spark arrester on the bath pipe with your own hands.
Do not indulge yourself with the false confidence that you can live without this element - fire does not forgive negligence. Making a spark arrester is not so difficult, but you can then be sure that there is no danger from this side.
What is a spark arrester for? How it works.
Solid fuel used in sauna stoves is not always of the same quality. Often, its combustion is accompanied by abundant formation of sparks - incandescent unburned particles, which rush up the chimney with a stream of hot gases.
Probably, many had to observe the picture when no-no, red sparks jump out of the smoking chimney - this is especially noticeable at dusk or in the dark. It happens even stronger - when whole "sheaves" are pulled out of the vent. The spectacle is certainly beautiful, but it is fraught with great danger.
Unburned incandescent particles can get onto the roof or wooden elements of the roof structure. The wind easily blows them for tens of meters, and the largest of them can ignite dry leaves and needles, grass or hay, surrounding buildings or trees. In short, if such a phenomenon is noticed, measures must be taken urgently.
Sparks can be extinguished by providing contacts with surfaces or parts with high thermal conductivity on the way of their movement. The incandescent particles lose their thermal potential, "go out", and no longer pose a great danger.
The very design of many sauna stoves provides a preliminary spark extinguishing function.


Air (wide blue arrow) enters the stove through the blower door (pos. 1), penetrates through the grate (pos. 2) into the combustion chamber (pos. 3), providing fuel combustion and warming up the stove (pos. 4). Further, hot combustion products (wide red arrows) do not immediately enter the chimney (pos. 6), but pass through a kind of "labyrinth" created by special jumpers (pos. 5). There is an active release of heat, and in addition, due to a sharp change in the direction of movement, unburned particles (thin red arrows), under the action of centrifugal forces, break out of the general flow of gases, beat against the walls of the chambers, and a significant part of them is extinguished already here.
However, speech itself is red-hot, and often simply cannot completely extinguish all the sparks. Since emissions of unburned particles are most likely on straight chimneys, this phenomenon is also combated by adding horizontal sections. The principle is exactly the same - changing the direction of flow and contact of sparks with the pipe walls.

True, it is better not to experiment with this on your own. The chimney requires a certain calculation, and it is impossible to "oversaturate" it with broken sections - this will negatively affect the draft level, which will already pose a different kind of danger.
To achieve the desired "compromise", a special simple device called a spark arrester is installed on the pipe head. Here, two principles of reducing the thermal potential of incandescent particles to a safe level can already be applied:
- So, as described above - abrupt changes in the direction of the flow of combustion products.
- Creation of artificial barriers (mesh, lattice, etc.) that will not prevent smoke from escaping, but will provide a high probability of contact of unburned particles with metal structural parts with high thermal conductivity.
In many spark arrestor designs, these two principles are used in conjunction with one another.
One more important point can be made. Regardless of the presence of a spark arrestor on the pipe head, it must be correctly positioned on the roof slope. In this regard, there are certain standards, which are schematically shown in the figure:


Distance from the roof ridge to the chimney, L, mm
The simplest models of spark arresters
A spark arrester for a chimney of any diameter can be purchased in a specialized store or ordered by a tinsmith. However, if the owner of the bath has the skills of locksmithing, then he will be quite capable of making such an accessory on his own.
The simplest spark arrester is a plugged pipe section, on the side walls of which round or slot-like holes are drilled or cut. Schematically it looks like this:


Chimney pipe - pos. 1. A piece of pipe (pos. 2) of a slightly larger diameter is selected to it, so that it can be put on from above, but at the same time it does not give a large gap. A plug (pos. 3) is welded in the upper part. Holes (pos. 5) are placed on the walls of this improvised spark arrester - in rows or staggered. Instead of holes, you can cut horizontal slots with a grinder. Inside this cylinder, stops (item 4) are provided to fix the spark arrester on the head.
Although the scheme is simple, it does not receive much distribution due to a number of disadvantages. Thus, it is very difficult to calculate the number and diameter of the holes required to ensure normal thrust. Such a spark arrester will have to be removed often enough for cleaning, as the holes will gradually become overgrown with soot. And the accumulation of carbon deposits on the inside of the cylinder can lead to the appearance of a rather unpleasant burning smell in the bathhouse.
In short, this is a construction "for the lazy".
Another simplest option- just pick up the chimney outlet with a mesh (grate). This can be done using a ready-made metal mesh, fixing it along the pipe bypass with a clamp, or by making a rim for it with brackets for fastening. By the way, even such primitive options are found on sale, but, probably, there is no problem to make such a simple design on your own.


There are also a lot of disadvantages to such a scheme. You cannot put a net too often - it will overgrow very quickly. And the rarer one has a very insignificant total "working" area, which practically coincides with the cross-sectional area of the pipe. In the upper straight section of the chimney, hot gases are gaining a decent speed, and there is no guarantee that incandescent solid fragments during straight motion will not slip through the bars. That is, the efficiency of spark extinguishing is still not up to par.
The grid cells can be reduced, but this will require increasing it. total area so that the smoke comes out without reducing the draft. This is achieved by installing a higher mesh "dome" above the pipe head - another simple version of the spark arrester. Sometimes a welded lattice structure, cylindrical or spherical, is also used, which is attached to the chimney.

These are already quite functional spark arresters, but with one common drawback. They do not provide protection against precipitation into the chimney, in other words, there is no "roof". But if you add an "umbrella" to this design, you get a pretty decent and practical accessory.


By the way, this is one of the most common models produced by both industrial enterprises and private craftsmen. It is quite capable of making such a spark arrester on your own.
Making a simple spark arrester on your own
To begin with, consider the general basic drawing of a simple spark arrester:

1 - cylindrical pipe - a glass, which is either put on the chimney pipe and fixed with a conventional clamp, or inserted into it. Depending on the version, it can be slightly flared or have a vertical cut, or vice versa - the lower part is slightly tapering.
2 - metal mesh, with cells of at least 1 and no more than 5 mm. Sometimes, instead of it, a welded lattice structure from a steel bar with a diameter of up to 5 mm is used.
3 - rainproof cone-shaped "fungus" cap.
4 - racks that connect all parts into a single structure.
5 - riveted joints.
The dimensions of such a spark arrester have a certain pattern, depending on the diameter of the chimney (the lower branch pipe of the device). For ease of operation, the averaged values are shown in the table:
Parameters Values, mm
| D | 80 | 100 | 110 | 120 | 130 | 140 | 150 | 160 | 180 | 200 | 230 | 250 |
| D1 | 160 | 200 | 220 | 250 | 280 | 300 | 360 | 400 | 450 | |||
| H1, min | 50 | 50 | 50 | 50 | 50 | 50 | ||||||
| H2 | 150 | 150 | 150 | 150 | 200 | 200 | ||||||
| H3 | 50 | 50 | 50 | 70 | 70 | 70 |
It will be most convenient to make such a spark arrester from a sheet of galvanized steel with a thickness of 0.6 ÷ 1.0 mm. With a thin sheet, it is more convenient to work, but with a thick one, the design is more reliable.


In addition, it is best to purchase a ready-made mesh - galvanized or stainless, with a cell of the order of 3 ÷ 5 mm. It is convenient to use a rivet for connections, but only steel rivets should be used - aluminum in these conditions will not be entirely reliable.
For cutting metal, you will need special scissors; on straight sections, you can also use a "grinder". Also, you can not do without an electric drill - for drilling holes for rivets.
For the manufacture of blanks (bending of metal along the lines), you need a workbench with a metal corner or just a piece of a profile (channel, corner, etc.) with smooth edges. The manufacture of some round parts will be facilitated if there are peculiar patterns from pipes of different diameters.
If there is no experience in tin work, then it is best to first make a model from thick cardboard, of course, in full size. After a successful check, cardboard parts will become excellent templates for transferring dimensions already on a sheet of metal.
To begin with, sweeps of parts are made.
A. With the bottom glass, everything is quite simple. To collapse a cylinder, you need to cut a rectangle whose length is equal to the circumference of the base.


Cylinder sweep - "glass"
It is known from the geometry course that the circumference (L) is equal to:
L = π × D, where π ≈ 3,14, a D- the required cylinder diameter.
In this case, on one of the sides, a mounting valve with a width of M, equal to 15 ÷ 20 mm - in this place riveted connection will be made
Such a strip is carefully bent, for example, using a pipe, the edges are aligned, holes are drilled and fixed with rivets. For a height of 50 ÷ 100 mm, two pieces will be enough.
B. In the same way, a blank is made for a mesh cylinder. The only difference is that when assembling the cylinder itself at the junction, it is advisable to lay strips of metal about 10 mm wide on both sides, and then rivet.
V. Probably the most difficult thing in this design is to make a cone-shaped cap. However, if you carry out the correct calculation, then this detail should easily turn out. The main thing is to correctly perform the sweep (pattern of the cone). For this it is necessary to "plunge" into geometry a little again.
Obviously, a cone, when folded, can give us a circle in which a sector of a certain angular value is cut out. This means that it is necessary to determine the dependence of the diameter and height of the cone on the diameter of the workpiece and the size of the sector.


It is clear that the length of the lateral component of the cone ( WITH) will be equal to the radius of the workpiece. Of the known values, we have the desired height of the part being manufactured ( h) and its diameter ( D). Based on this, it is possible to determine and WITH- according to the well-known Pythagorean theorem. WITH is the hypotenuse of a right-angled triangle with legs h and D / 2
C = √ (h² + (D / 2) ²)
Thus, the required workpiece radius is obtained.
Now we are determined with the angle of the cut sector.
It is clear that the circumference of the base of the cone will be equal to the length of the workpiece circular arc, which will remain after cutting the sector.
The length of the circumference of the base of the cone is determined by the formula:
Lк = π × D
Now let's determine the circumference of the whole workpiece, before the cut:
Lз = π × 2С
It's not hard to calculate the difference:
Δ L = Lz - Lk
Now it remains to solve a simple ratio:
360 ° → Lз
α → ΔL
According to the rule of proportion:
α = ΔL × 360 / Lз
This is how the angle of the cut-out sector is obtained.
For example, we calculate the sweep of a cone with a diameter of 240 mm and a height of 70 mm
The side (and the radius of the workpiece) is equal to:
WITH = √ (70² + 120²) = 139 mm
Cone circumference:
Lк = 3.14 × 240 = 754 mm
Circumference of the whole circle of the workpiece:
Lz = 3.14 × 2 × 139 = 872 mm
We get the difference:
Δ L = 872 - 754 = 118 mm
Now you can immediately determine the angle of the section to be cut.
α = 118 × 360/872 = 48.7 ≈ 49 °
It remains with the help of a protractor to transfer this angle to the layout of the workpiece with the previously calculated radii and cut it out. In this case, again, do not forget about the mounting valve for rivets - it is shown in the diagram.
The finished cut-out reamer is neatly rolled up with a cone (for this, you can slightly "roll" it on a horizontally fixed metal pin or a small-diameter pipe). Then the cone can be clamped with a clamp, the mounting holes can be drilled and the rivets installed, finally fixing the part.
G. Another component of the overall design is the racks that connect all the parts into a single assembly.


Racks are made from the same sheet metal, but for strength it is better to make them three-layer. To do this, when laying out the workpiece, bend lines are provided (shown in dotted lines, so that the outer "shelves" are about 2 mm narrower than the central one. Usually, a total rack width of 15 mm is sufficient.
The length may vary - depending on the size of the structure. In this case, the need for a margin from below must be taken into account - at least 20 mm to accommodate one or two rivets for fastening to the glass. From above, the edge of the stand is bent at the desired angle, so that a platform with a length of about 15 mm is obtained - in these places the cone of the "umbrella" will be fastened with rivets.


Often the racks are placed at an angle to the vertical - from the pipe to the edges of the "mushroom". This trapezoidal arrangement makes the overall structure somewhat stronger. However, this is not decisive.
There can be three racks - then they are placed at an equal angular distance of 120 °, or four - with placement at 90 ° intervals.

Position numbering is the same as on the diagram in direct projection.
So, as already mentioned, for a start it is better to outline and execute the entire structure from thick cardboard. This will help you finally understand the mating of parts, with the required length of the racks. After a successful experiment, the cardboard reamers will become ready-made template for marking sheet metal.
When all the parts are ready, you can proceed to the final assembly.
- First of all, to the branch pipe - "glass" are strictly vertically attached to one or two rivets of the rack.
- The mesh cylinder is inserted into the space between the posts, so that it slightly enters the lower "glass" and rests on the rivet heads. The height of the net should be such that it rests against the cone of the umbrella from above during final assembly.
- If the racks are located vertically, then for greater strength, you can rivet the mesh to them - one rivet per rack.
- Further, the "fungus" is exposed. The post mounting pads are precisely folded so that they fit snugly against the inner surface of the cone. Through holes are drilled through the umbrella and racks, and the whole structure is finally fixed with rivets.
In fact, the assembly of the spark arrester is complete - you can safely install it on the bath pipe and no longer be afraid of the possibility of sparks flying out.
Video: the work of a tinsmith to make some parts of the spark arrester
Manufacturing of a spark arrester deflector
Devices that combine the functions of a spark arrester and a deflector show excellent performance. Especially this one structural element important for saunas located in open, windy areas. Not only is the wind capable of carrying sparks over a long distance. When the speed increases, the effect of "reverse thrust" is not excluded, when, instead of going outside, the smoke begins to penetrate back into the room, poisoning the sauna atmosphere and becoming a threat to the health of people there. Using a spark arrestor deflector solves both problems at once.


The wind does not directly affect the cut of the chimney - the special design of the deflector forces the air flow (shown by blue arrows) to bend around the head from the top, bottom and sides. In this case, the movement of air is accompanied by the phenomenon of injection - some vacuum inside the deflector, which only increases the thrust, and will never allow the opposite effect.
At the same time, the flow of hot gases with unburned particles contained in it (shown by yellow arrows) makes two sharp turns almost 180 degrees. In this case, all sparks are guaranteed to contact the metal surfaces of the structure, which leads to their extinction.


There are many different models of deflectors - spark arrestors. For self-made you can take a very common and proven by many years of practice TsAGI deflector. The name comes from the abbreviation of the Central Aerohydrodynamic Institute. Zhukovsky, whose specialists once developed this device.
In general terms, you can schematically depict a deflector-spark arrester of a similar design with the following diagram:

1 - branch pipe - "glass" with which the deflector is put on the chimney. All other dimensions of the device parts depend on the diameter of this part - D.
2 - Pipe-diffuser, which is a truncated cone expanding upward. Its diameter D1 in the wide part should be equal 1.25 × D. Height, H2 + H1 = D
5 - cone-shaped umbrella, approximately the same as that of the previously considered spark arrester model. Cone base diameter - D2 = 1.7 × D. Cone height, H4 = 0.3 × D
6 - cylindrical outer casing. Its diameter D3 = 2 × D. Overall height - H2 + H3 + H3 = 1.2 × D
3 - Under the casing, there can be an apron - a pallet, which prevents sparks from entering the roof, and additionally serves as a partition to change the direction of the gas flow. This apron has a diameter equal to the diameter of the casing, or 5 ÷ 7 mm larger. The shape is slightly curved upward, like a saucer. For strength, radial stiffeners are often rolled onto the apron. To prevent moisture from collecting in it, you can drill a drain hole.
The whole structure (with the exception of the mating of the "glass" and the diffuser, is assembled on common brackets-stands (pos. 4) by riveting (pos. 7). The number of stands is the same as in the above-described model - three, sometimes four. True, the brackets have a more complex curved shape - but even this is not difficult to calculate during the initial assembly of the layout.
What else is important? The outer cylindrical casing must be at a height H1, with the lower edge exactly in the middle of the diffuser. The upper edge of the cone-"fungus coincides in level with the upper edge of the casing.
In principle, the assembly should be fairly well understood from the schematic and from the previously discussed example of a spark arrester with a grid. The main differences are more details, more complicated configuration of brackets, no mesh. And the main difficulties are the manufacture of a truncated cone - a diffuser and its connection with a cylindrical glass.
To make a sweep of a truncated cone, you will again have to return to geometric calculations. The task is somewhat complicated by the fact that the height of the full cone is unknown in advance, before it is truncated. And the initial values are two diameters of the circles lying at the base and at the top of the truncated cone (the radii are shown in the diagram), and its specified height.
The sweep is a ring bounded by two circles: outer, with a radius Rzn, and internal - R star... These are essentially the sides of the triangle shown at the top of the diagram (green arrows).


So the height H generally unknown, but it is necessary to determine R zn. But then we have a given cone height H to and both diameters. The rule of similarity of triangles is turned on:
Base radius Do / 2 (Ro) refers to the total height H just like the difference in radii Δ R– to the given height of the truncated cone Nk. And in this equation, we know all the quantities, except for the total height:
Ro : H = ΔR : Nk
Δ R = (Dо - Dв) / 2 = Ro - Rv
Total we get:
H = Rо × Нк: (RO - Rv)
Having the heights of right-angled triangles, it is easy to determine their hypotenuses by the Pythagorean theorem. This will give the outer radius of the ring (Rzn) sweep and ring width (Sk), which will make it possible to determine the inner radius.
Rzn = √ (H² + Do² / 4)
Rstar = Rzn - Sk = Rzn - √ (Нк² + Dв² / 4)
We figured out the ring, and now we need to find out the angle of the sector cut from it. Here, in fact, a complete analogy with the calculation of an ordinary cone. You can take the outer radius of the workpiece as a basis for calculations.
The length of the whole circle is:
Ls = 2 × π ×R zn
When rolling up the cone, the circumference of the base will be:
Lk = π ×DO
The difference between these values (arc length of the cut sector) will be:
ΔL = Ls - LTo
Considering that there is 360 ° in the circle, it is easy to calculate the angle of the sector to be removed using the ratio:
α = ΔL × 360 / Ls
You can consider an example in relation to our deflector. It is required to perform a flattened cone unfolding with a height Нк = 150 mm, large diameter Dо = 190 mm, smaller - Dв = 150 mm
Determine the height of the non-truncated cone:
H = 95 × 150 / (95–75) = 712 mm
Outer radius of the sweep ring:
Rzn = √ (712² + 190² / 4) = 718 mm
The width of the sweep ring is:
Sk = √ (150² + 150² / 4) = 167
Thus, the inner diameter is:
Rzv = 718 - 167 = 551 mm
Whole circumference of the workpiece:
Lh = 2 × 3.14 × 718 = 4509 mm
Circumference of the base of the cone:
Lk = 3.14 × 190 = 557 mm
Thus, the cut-out sector should be:
α = (4509 - 557) × 360/4507 = 315 °
In total, our workpiece itself is obtained in a rather narrow sector, with an angular width of everything:
360 - 315 = 45 °


After the reamer is calculated and cut out, a truncated cone-diffuser is rolled out of it, and attached to rivets, for which a mounting valve is left.
Now - about the connection of the "glass - diffuser" assembly. Experienced tinsmiths have their own technological secrets, but a beginner can do the simplest way:
When drawing the sweep of the "glass" along its upper rim, a row of triangular or trapezoidal valves is left, each about 10 mm wide and of the same height.


Reamer "glass" with valves for attaching the diffuser
Such valves should not interfere with the rolling of the cylinder. When assembling the unit, the cone-shaped diffuser, which has the same diameter to the narrow part as that of the glass, is tightly put on the cylinder like this. so that all valves are inside. Then all these petals are spread apart as much as possible, and rivets are placed in 3 ≈ 4 places around the circumference. For maximum bond strength, assembly is best done with a heat resistant sealant.
For the rest, the general installation of the design of the deflector-spark arrester should not be difficult if all the details are calculated and drawn correctly, if training has been carried out on a cardboard model.
Video: the basic device of the deflector-spark arrester
There are other types of spark arrestor deflectors, both simpler and quite complex in execution. But, probably, for the first time the given examples will be enough for beginners.
We make a spark arrester for a bath with our own hands
In wooden baths, it is especially important to comply with the rules fire safety... Even a small spark from a stove can cause a fire.
Often sparks fly out of the chimney from the firebox, especially with good draft. Therefore, without fail, a spark arrestor must be installed on it.


Types of spark arresters
There are several main types of spark arresters:
- In the form of a deflector;
- In the form of a metal casing made of mesh.
Hot gas with sparks flows through the chimney and collides with an obstacle in the form of a metal cover or mesh. On contact with them, the sparks cool quickly and do not pose a danger to the tree.
Many stove-makers prefer to use Tsagi-type spark arresters, as they are more practical than mesh ones. If you use a coarse mesh, sparks can break through it, and if you use a very fine mesh, it will quickly become clogged with soot.
There are also other types of deflectors, for example, the Grigorovich deflector shown in the photo is well suited for chimneys.


Why are spark arresters installed?
Spark arresters are not necessary to install in most cases, and it is impractical to buy expensive off-the-shelf options, but they can give you some advantages.
- According to the fire safety requirements PPB-01-93, the use of spark arresters is mandatory near combustible materials.
- They are also installed in the case of a lightly combustible roof (Ondulin, Tegola, scaly), when foliage accumulates on the roof, or if the house is close to trees, in the forest.
- In addition to the main purpose, its use will not allow moisture, foliage, birds to get inside.
- By reducing the resistance, you will eliminate reverse draft and increase the draft of the chimney.
We make a spark arrester ourselves
You can make a spark arrester for a bath with your own hands from stainless steel or aluminum zinc. To do this, you need to measure the diameter of the chimney for the bath and make a template according to the drawing you have chosen.
Note! AISI 304 stainless steel with a thickness of 0.5 mm is best suited for this. Products made from it will last twice as long as from AISI-409 (430) ferritic steel: 10-12 years. For solid fuel boilers, chimneys of galvanized steel cannot be made.
This instruction shows an example of making a Tsagi deflector according to a drawing, only with the addition of a spark apron.
The structure will consist of a main chimney nozzle, a protective casing (shell), an apron and a hood cover.
- Central inner part can be made from a finished stainless pipe, it will dress like a chimney nozzle.
- The upper part of the pipe is rolled out in the form of a cone with an increased diameter. It should end approximately in the middle of the top casing.
- The casing, which will be put on the pipe, is cut by hand and fastened with metal plates to rivets.
- It is recommended to make an apron under the casing with an indentation of about 6 cm from the bottom of the casing, into which sparks will fall.

- The apron should be wider than the casing in width, and fixed in the form of a funnel at an angle on spot welding... Before attaching it, a small recess is made on the pipe - a side for tight docking. Later, this connection is treated with a sealant.
Note! Additionally, drain holes must be provided in the apron to drain moisture and stiffening ribs must be rolled.
- The top of the casing is closed with a round nozzle, which is several cm smaller in diameter than the pipe. All fasteners are made with stainless steel rivets.
- To calculate the dimensions of the top cover and the height of the deflector, you can use the data from the table.


- To securely rivet 2 parts, drill through them in place of the overlap with a metal drill. Then insert a rivet into the hole, grab its head with a rivet and smoothly squeeze its handles.
- For additional structural strength, rolled stiffeners are made.
A diagram of the deflector is clearly shown in the photo:


Required tools
To assemble the chimney cap yourself, you will need:
- Metal scissors;
- Hammer;
- Drill and drill for metal;
- Welding machine;
- Stainless steel riveter and rivets;
- Bending machine.
Alternative ways of protecting against sparks
In addition to installing the hood, there are other ways to protect against sparks:
- The first way is the easiest. The end of the chimney is welded tightly, and then many holes are drilled from the ends from above. This can be done even by installing a prepared pipe on an existing one.
- The next way is a metal mesh is welded to the end of the chimney. This option has a significant drawback: the net quickly clogs up, and it will need to be changed soon in order to maintain good traction.
- If there are strong winds in your area, then a good deflector is installed on the pipe head, it will not allow the formation of reverse thrust.
- Another way is to reduce cravings. This is not the most a good option, but this way you can increase the temperature of the pipe and the number of emitted sparks. For this, additional elbows are created on the chimney.
You can see another home-made solution in this video tutorial:
To prevent sparks from flying straight up due to the high thrust, a jumper is made on the chimney pipe, which displaces part of the pipe to the side. That is, an artificial bend of the pipe is created with a well for sparks in the middle (see photo below). A small cleaning hatch is made in the well.

Conclusion
If you do not want to spend money on buying ready-made sauna deflectors, then you can make it yourself in one evening. The price of ready-made options starts from 1 thousand rubles, depending on the diameter (see also the article "Smoke bath: features, characteristics, installation of the stove").
For more information on this topic, we recommend watching the video in this article:
Spark arrester on the pipe of the bath
Spark arresters are installed on pipes to prevent sparks from escaping and spreading fire on the roof and around the building. If you wish, you can make such a structure yourself. To do this, you just need to correctly cut the fragments of the spark arrestor. Having considered different options of such designs, one can understand how exactly a spark arrester should be created.


Methods for extinguishing sparks from a chimney
To eliminate the possibility of sparks hitting flammable materials, several methods can be used:
 Advice! If a large number of sparks fly out of the chimney, you should first try to reduce the draft, and then install a spark arrester.

It is worth noting that the installation of the named structure allows you to protect the chimney from birds that begin to arrange nests there. Before making a spark arrester for a bath pipe with your own hands, it is worth considering in detail the process of its creation.
Features of installing spark arresters
The most common are spark arresters, which are made in the form of a deflector and have a mesh. They apply in the following cases:

The spark arrester not only prevents the roof from catching fire due to flying sparks, it also helps protect the pipe from birds. Even if the risk of sparks hitting flammable materials is minimal, a spark arrester should be installed in order to protect yourself from fire.
When creating the described product with your own hands, it is worth remembering that not every material is suitable for such a design. If you use ferritic steel, the structure will quickly become unusable due to the wear of its elements. Also, do not use galvanized sheet metal. It is best to choose stainless steel, the thickness of which is 0.5 mm, as the main material for creating a spark arrester. This material is resistant to corrosion. Moreover, it is easy to weld.


You can also use aluminozinc. But it is worth noting that such material cannot be joined by simple welding. Rivets must be used to connect all structural elements. Having installed the spark arrestor on the chimney, it is worth making sure that the structure will not be broken by gusts of wind.
When choosing a material, it is necessary to correctly select the size of the cells of the purchased mesh. If you choose a product with too small cells, they will become clogged with soot, which will require you to constantly clean the spark arrester. If you choose a grid that is too coarse, it will not stop the sparks. It is best to purchase products with a mesh size of 3 to 5 mm.
Stages of manufacturing a spark arrester
To make a spark arrester for a brick pipe, the following tools and materials are required:
- sheet of stainless steel, the thickness of which should be in the range from 0.5 to 1 cm;
- metal mesh with great rigidity;
- steel rivets required to connect some structural elements;
- scissors for metal;
- Bulgarian;
- welding machine.
It is worth remembering that if sparks periodically fly out of the pipe, then you should not install a simple visor on it. Such devices are not able to stop the emitted sparks. To save money, you can not buy finished products, but make them yourself, because this does not require experience in performing such work.


Most simple construction manufactured as follows:
- First you need to purchase a metal mesh. In this case, it is important to choose a rigid material, since it does not deform when exposed to high temperatures.
- After that, you need to prepare a piece of metal pipe.
- Then a rectangle is cut from the mesh, the length of which is equal to the diameter of the pipe.
- After that, it is necessary to wrap the pipe with a net and secure it by welding. At this stage, it is important to secure the mesh securely so that it can withstand strong winds.
- At the next stage, the cone is fixed over the mesh. Fastening takes place on metal brackets in such a way that there is a small distance between the mesh and the cone.
- At the final stage, the finished spark arrester is fixed to the pipe using metal brackets.
Creating a spark arrester as a deflector
It is worth noting that designs created by the type of deflector are more efficient than products with a mesh. Often, spark arresters are created on a brick pipe like a Tsaga deflector, to which an apron is added to catch sparks. Creation is as follows:


By creating even a simple spark arrester, you can make your bath safer.


Any stove, boiler or fireplace is always a danger to buildings - especially to wooden baths(it's not for nothing that they burn more often, isn't it?). Therefore, compliance with fire safety rules in steam rooms is sacred. And when combustion products are thrown into the chimney, they are often accompanied by sheaves of sparks, from which it is as easy as shelling pears to ignite the roof or adjacent structures. That is why a spark arrester must be installed on the chimney - a special design, which is a nozzle with a metal mesh and an umbrella on top. A spark arrester is similar in function to a deflector, only it costs much less. And it's much easier to make it yourself, but we will now tell you how.
Modern types of spark arresters
There are many designs of modern spark arresters. But the most common are two of them:
- In the form of a roof on which the mesh runs.
- With metal mesh walls and baffle plate.
The main components of the spark arrester are: mesh, roof cover and spark arrestor cover.
But how does a spark arrester work? Quite simple: the flue gases pass through the pipe channel, collide with an obstacle in the form of a lid, change direction and exit through the metal mesh. It is about her that possible sparks are extinguished. In any case, a spark arrester is simply necessary for direct chimneys with high temperature and a sufficiently strong draft - and these are always the chimneys of baths and saunas.

How else can you extinguish the sparks from the chimney?
In principle, there are several ways to fight off sparks today:
- Method 1. Side holes are cut out on the pipe head, and the end is welded. You can do it this way if you already have a chimney: take a piece of pipe of the required diameter, drill holes in it, weld the end and insert it into the pipe of the existing chimney from above.
- Method 2. A metal mesh is welded into the pipe head. But, unfortunately, over time, it clogs up and has to be changed.
- Method 3. A good deflector is placed on the head. But it is really only necessary when the winds in your area are strong enough, and there is a risk of back draft in the bath. If you have predominantly calm and the area is calm, there are no large branchy trees nearby, then you can limit yourself to one spark arrester.
- Method 4. Create a smoke flow on the chimney. The easiest way is to make a knee on the chimney, this will significantly reduce the draft, and the sparks will fly out of the chimney much less. And the smoke itself will pass through the pipe a little slower, and this is additional heat for the bath. Just do not overdo it - the craving should be sufficient so that the person in the bath does not get crazy. Therefore, if your roof is made of combustible material, or the chimney is straight, or you heat with wood, or all this together - be sure to install a spark arrester!
Advice: if sparks are flying out of your chimney very generously, pay attention - maybe there is too much draft in it?
There is one more weighty reason to install a spark arrestor - it prevents birds from getting into the smoke channel and making their nests there. After a long break, try to heat such an oven where the chicks have already hatched - the smell in the bath will be terrible, and sticky resin will settle on the walls of the pipes for a long time.
How to make a good spark arrester yourself?
The main thing here is to be patient and make all the measurements exactly. The main requirement for a spark arrester is that the dimensions of its cells are no more than 5 mm. But they should not be too small, so that the gas can penetrate freely between the cells. The only drawback is that the spark arrestor mesh can become heavily clogged with soot. This happens when you heat with wood with a high resin content, and the flue gases do not burn out (i.e. you do not have a special device for this). This mesh should be cleaned and cleaned regularly to avoid the unpleasant backdraft effect.
So, the order of work:
- Step 1. We measure the size of the chimney hole. Making a sketch of the future parts of the spark arrester.
- Step 2. Cut out the necessary parts from the metal, applying cardboard layouts. We observe the accuracy of millimeter in millimeter.
- Step 3. We use 1-6 mm metal rods or a piece of finished mesh as a mesh.
- Step 4. We weld all the joints. We clean them with a grinder.
- Step 5. We fix all the details with steel rivets.
- Step 6. We put the finished spark arrester on the chimney with our own hands, and then fix it well.
Take steel for its manufacture 1 mm thick, and if you use rods, then the thinner they are, the better.
Advice: if it is difficult to bend the metal mesh, knock on it with a hammer - this will release stress from the metal and it will be more malleable to deformation.
If you wish, you can also attach a deflector to the spark arrester. So, we cut out a visor from a sheet of metal and bend it, securing all the folds with rivets. It turns out a cone with a diameter slightly larger than that of the main pipe. This is the visor we need, which we will attach to the base of the spark arrester using steel rivets.
According to SNiP, the spark arrestor mesh is mandatory if the roof of the house is made of flammable material or the stove is fired with coal. But even if your roofing material from non-combustible material, this does not mean that the emitted sparks from the pipe are safe. They can easily ignite dry foliage or poplar fluff, as well as a wooden gazebo nearby. But putting a spark arrester on is a matter of some five minutes, but the peace and safety will definitely be worth it.
How to make a spark arrester on a bath pipe - possible design options
A spark arrester is a device installed on the chimney of a bath to prevent the escape of sparks that appear during combustion solid fuel... The design of the spark arrester is quite simple, so you can make it yourself. How to make a spark arrester for a bath with your own hands, and will be discussed in this article.


Classification of spark arresters and their application
Before making a spark arrester for a bath, you need to study the theory, and only after that move on to the practical part of the question.
There are several main types of spark arresters:
- Metal mesh casing;
- Deflector;
- Other designs.
Such devices are installed in the following cases:
- If the roof of the bath is made of materials belonging to the category of flammable, a spark arrester must be installed on the chimney;
- The spark arrester is installed on the pipe coming out of the boiler, because due to the absence of elbows, sparks can go out directly through the chimney (read: "Which pipes for the chimney to choose in the bath - examples are examples");
- A spark arrester must be installed on the bath pipe if the stove runs on solid fuel.


In addition to increasing fire safety, spark arresters also protect the chimney from various external factors - for example, birds flying into it. To avoid possible problems, it is worth installing spark arresters even if there is no need for this.
When assembling a spark arrester for a bath with your own hands, you need to choose the right metal - not any material will do. For example, ferritic steel will wear out very quickly because its service life is extremely low. Galvanized material cannot be used at all for such purposes.
The best option for the manufacture of a spark arrester is considered to be 0.5 mm thick stainless steel. It can last long enough, it resists corrosion well and is easy to cook. Alumozinc, which also has good characteristics... True, in this case, the material will have to be fastened with rivets.
Having picked up the material, you should think about the size of the cells. If they are large, then sparks from the bath tube will easily pass through them, and small cells will clog up very quickly, and they will have to be cleaned. As practice shows, the average size cells can vary from 1 to 5 mm.
Deflector manufacturing
Deflectors are structurally a little more complicated than their mesh counterparts, but this complexity is justified - the effectiveness of such devices is much higher. There are a few classic schemes manufacture of deflectors, and the choice is always individual.

The simplest and most convenient construction is created according to the following algorithm:
- First, all the elements of the spark arrester must be cut out on cardboard, having previously measured the diameter of the chimney.
- The inner part of the spark arrester can be made from a piece of pipe - by choosing the correct diameter, you can simply put the structure on the chimney. If there is no suitable pipe, the desired design you will have to do it yourself from a sheet of stainless steel.
- The top of the sleeve should have a slightly larger diameter. When making a sleeve from a pipe, one part of it will have to be rolled out. The length of the sleeve must reach the middle of the outer casing.
- A pipe or stainless steel sheet is used to create the main casing. The casing is put on over the sleeve and fastened with rivets.
- Under the casing, at a distance of 6 cm, an apron is attached - a part of a spark arrester, visually similar to a curved saucer. Sparks will fall on the apron, so its dimensions must be larger than the dimensions of the casing. For the manufacture of the apron, the same stainless steel is used. A hole of appropriate dimensions is cut out in it, after which the apron is put on the sleeve and fixed by welding.
- A cover is mounted on top of the casing, which is slightly inferior in diameter to the main pipe.
- To connect individual parts, rivets are used (of course, the necessary holes are drilled in the parts of the spark arrester before fixing).
The assembled spark arrester on the sauna chimney is installed in its place and fixed. The construction is ready, and now the bath can be used without any problems.
Making a grid spark arrester
If the design of the deflector seems too complicated, then a spark arrester can be made from a metal mesh. It is not as effective, but it is often chosen for its simplicity of design, which makes it possible to assemble such protection with your own hands.


The assembly algorithm is as follows:
- The first step is to cut out the necessary elements from thick cardboard.
- When arranging the mesh, the sleeve is not equipped with an external casing - the structure is put on over bath pipe... The sleeve is made in the same way as in the previous case - from a sheet of stainless steel or a piece of pipe of appropriate dimensions.
- Two rods with a cross section of about 5 mm 2 are welded to the mesh. A ring is bent from the mesh, which can reliably settle in the inner cavity of the sleeve. When bending, the mesh must be tapped with a hammer to reduce the stress on the metal.
- The ring at the joint is welded, installed in the sleeve and fixed in any way.
- A visor is attached to the protruding parts of the rods.
The spark arrester created in this way will provide proper protection of the bath from fire.
Other spark arrestor circuits
Sometimes, instead of the traditional deflector and mesh, the owners of the baths use other devices to prevent the spread of sparks from the chimney.


The most commonly used methods of spark protection are:
- A piece of pipe is put on the upper edge of the chimney, the end of which is tightly welded. Several holes are cut in the side of the pipe through which the smoke will pass.
- There is a fairly simple design, for the arrangement of which the mesh is welded into the inside of the chimney. The problem with this scheme is that the contaminated mesh will have to be cut out completely.
- With constant winds in the area, the chimney can be closed with a good deflector, but if there is no wind, then it will not work to use the bath - there will be no draft.
- For protection, you can also equip a chimney with several elbows. Sparks will be extinguished by bends. In addition, such a design will slightly increase the amount of heat given off to the bath.
Conclusion
This article has examined the most common spark arresters for the bath. You can even collect these devices with your own hands - there is no particular difficulty in this, and all existing schemes are quite simple.
Making a spark arrester for a bath with your own hands


Sauna stove device
Stoves, fireplaces and boilers are a potential hazard to the buildings in which they are installed and those that are located nearby. What if it comes O wooden building, the fire hazard of the furnace structure increases. This is largely due to the fact that combustion products are released into the chimney. The process is accompanied by a multitude of sparks, the ingress of which on the roofs of buildings causes a fire. In order to avoid this, a spark arrestor should be installed on the chimney. The design is a nozzle equipped with a steel mesh and an umbrella. The product resembles a deflector, but has a much more affordable cost. In addition, it is very easy to make a spark arrester yourself.
The design, which will be responsible for capturing sparks, has several options, but the most common are 2 types. The first is made in the form of a roof, and the second has steel mesh walls and a deflector.
Advice from the master!
When making a spark arrester, one should take into account the presence of the main elements: mesh; cover responsible for spark extinguishing; covering the roof. It must be remembered that the mesh of the product must effectively extinguish sparks falling into the pipe.
Alternative spark arresters
You can create other types of spark arresters for baths or saunas. For example, side holes should be made on the pipe head by welding the butt end. You can act differently if the chimney is already installed. This will require cutting a pipe of a certain diameter. You need to drill holes in it, weld the end, and then insert the workpiece from above into the chimney pipe.


How does a spark extinguisher work?
A spark arrester can be constructed using a different method. For this, a steel mesh must be welded into the pipe head. However, this option is not so durable, the mesh will become clogged over time, which will lead to the need to replace it.
Another option for a spark arrester for a chimney involves mounting a high-quality deflector on the head. But its presence is required when strong winds, if calm prevails on the ground, such a solution can cause back draft in the building where the stove is installed.
It is possible to equip a chimney with a chimney. This option is the simplest. To do this, install a knee on the chimney, which will reduce draft and make the outflow of sparks insignificant. The smoke will flow through the chimney more slowly, which will provide additional heat in the room. However, when implementing this method you need to be careful, cravings should not be reduced to zero, otherwise a person may get fired up in the bath.
Advice from the master!
A spark arrester should be installed not only to secure the roof, but also to prevent birds from nesting in the chimney. Otherwise, when the furnace is fired, there will be an unpleasant smell, and a sticky resin will form on the walls of the pipes, which will remain there for a long time.
Tools and materials:
- welding machine;
- Bulgarian;
- net;
- cardboard;
- pencil;
- ruler;
- steel sheets.
Part manufacturing technology
You can make a spark arrestor for a chimney for a bath with your own hands, only with patience, since accurate measurements and calculations have to be carried out. The main requirement for such a design is that the mesh size of the mesh should not exceed 5 mm. However, they should not be too small, this will not allow the gas to pass freely between the cells. The spark arrestor mesh for the chimney has its drawback - it is prone to clogging with soot. This happens when the stove is heated with wood with a significant resin content. In this case, the flue gases are not fully combusted. The mesh must be cleaned by hand regularly, otherwise backdraft effects will occur.
Complete structure
You can make a spark catcher for a bath with your own hands in several stages. The first involves measuring the chimney hole. Next, you should prepare a drawing of future structural elements. Then the necessary parts are cut out of steel using layouts made of cardboard. In doing so, it is important to be accurate.
The mesh can be metal rods, the diameter of which is 1-6 mm, and the finished mesh will do an excellent job.
Next comes the turn of welding, which will fix the joints. The resulting seams can be processed with a grinder. The elements must also be reinforced with metal rivets. The finished spark arrester should be mounted on the chimney, securely reinforced. The main material will be steel, the thickness of which is 1 mm. When using rods, it is best to choose the thinnest.
When forming the mesh, bend it. If this is difficult enough, you can knock on it with a hammer, which will relieve stress from the metal and make it more malleable. If desired, a deflector can also be attached to the flue spark arrester. To do this, use a sheet of metal, forming a visor from it. Bending the visor, you need to strengthen the folds with rivets. This will allow you to get a cone, the diameter of which will be slightly larger than the diameter of the chimney. This design will act as a visor attached to the base of the spark arrester using metal rivets.
If you want to install a rod spark arrestor, they must be placed parallel to each other. On top of them, it is necessary to lay a grid, leaving part of the bar uncovered, which will be necessary for fixing to the chimney. Next, you can proceed to fastening the mesh and the joint of the rod by welding. A mesh plate will be used to wrap around the pipe. The edge of the mesh must be pressed against the pipe with clamps. In order for the mesh to acquire a roundness, you should knock on it with a hammer. After the mesh has been bent, you can weld its edges.
Advice from the master!
A sheet of metal will be used to make the visor. It needs to be welded to the ends of the bars.
A spark arrester on the chimney, according to SNiP rules, must be installed if the roof is made of flammable material. This pipe element is also needed when firing a furnace with coal. But even if the roofing material is not flammable, sparks flying out of the pipe are still dangerous. This is because they can interact with dry foliage or poplar fluff. The spark can also hit wooden structural elements that are located nearby. In addition, installing a spark arrester is a matter of 5 minutes, but this way you guarantee yourself safety and peace of mind.
Spark arresters are installed on pipes to prevent sparks from escaping and spreading fire on the roof and around the building. If you wish, you can make such a structure yourself. To do this, you just need to correctly cut the fragments of the spark arrestor. Having considered the various options for such designs, you can understand how exactly a spark arrester should be created.
Methods for extinguishing sparks from a chimney
To eliminate the possibility of sparks hitting flammable materials, several methods can be used:

Advice! If a large number of sparks fly out of the chimney, you should first try to reduce the draft, and then install a spark arrester.

It is worth noting that the installation of the named structure allows you to protect the chimney from birds that begin to arrange nests there. Before making a spark arrester for a bath pipe with your own hands, it is worth considering in detail the process of its creation.
Features of installing spark arresters
The most common are spark arresters, which are made in the form of a deflector and have a mesh. They apply in the following cases:
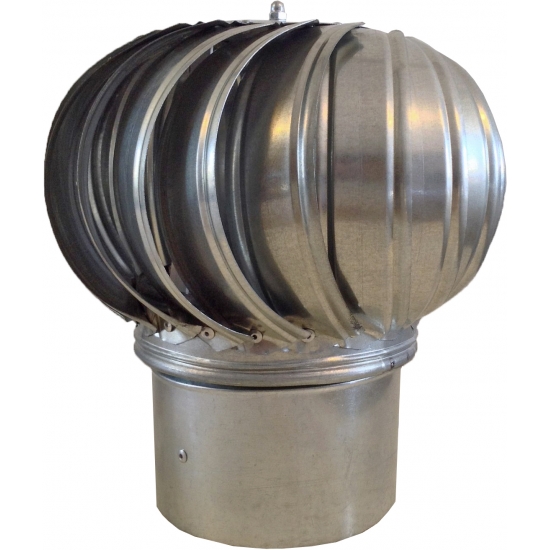
The spark arrester not only prevents the roof from catching fire due to flying sparks, it also helps protect the pipe from birds. Even if the risk of sparks hitting flammable materials is minimal, a spark arrester should be installed in order to protect yourself from fire.

When creating the described product with your own hands, it is worth remembering that not every material is suitable for such a design. If you use ferritic steel, the structure will quickly become unusable due to the wear of its elements. Also, do not use galvanized sheet metal. It is best to choose stainless steel, the thickness of which is 0.5 mm, as the main material for creating a spark arrester. This material is resistant to corrosion. Moreover, it is easy to weld.

You can also use aluminozinc. But it is worth noting that such material cannot be joined by simple welding. Rivets must be used to connect all structural elements. Having installed the spark arrestor on the chimney, it is worth making sure that the structure will not be broken by gusts of wind.
When choosing a material, it is necessary to correctly select the size of the cells of the purchased mesh. If you choose a product with too small cells, they will become clogged with soot, which will require you to constantly clean the spark arrester. If you choose a grid that is too coarse, it will not stop the sparks. It is best to purchase products with a mesh size of 3 to 5 mm.
Stages of manufacturing a spark arrester
To make a spark arrester for a brick pipe, the following tools and materials are required:
- stainless steel sheet, the thickness of which should be in the range from 0.5 to 1 cm;
- metal mesh with great rigidity;
- steel rivets required to connect some structural elements;
- scissors for metal;
- Bulgarian;
- welding machine.
It is worth remembering that if sparks periodically fly out of the pipe, then you should not install a simple visor on it. Such devices are not able to stop the emitted sparks. To save money, you can not buy finished products, but make them yourself, because this does not require experience in performing such work.

The simplest design is made as follows:
- First you need to purchase a metal mesh. In this case, it is important to choose a rigid material, since it does not deform when exposed to high temperatures.
- After that, you need to prepare a piece of metal pipe.
- Then a rectangle is cut from the mesh, the length of which is equal to the diameter of the pipe.
- After that, it is necessary to wrap the pipe with a net and secure it by welding. At this stage, it is important to secure the mesh securely so that it can withstand strong winds.
- At the next stage, the cone is fixed over the mesh. Fastening takes place on metal brackets in such a way that there is a small distance between the mesh and the cone.
- At the final stage, the finished spark arrester is fixed to the pipe using metal brackets.
Creating a spark arrester as a deflector
It is worth noting that designs created by the type of deflector are more efficient than products with a mesh. Often, spark arresters are created on a brick pipe like a Tsaga deflector, to which an apron is added to catch sparks. The creation takes place as follows.