What can you cook from squid: quick and tasty
Plastic panels are an inexpensive material used for decoration of both residential and business premises. This type of wall and ceiling cladding is inexpensive, while the decorative qualities are very good. Among other things, the advantages of this material include ease of installation. It will not be difficult for anyone to install PVC panels with their own hands.
What material to choose
Before proceeding with such an operation as installing wall walls with your own hands, you should decide on the actual type of material itself. For the interior decoration of premises for various purposes, plastic elements of several types can be used:
PVC lining. This material is similar in appearance to its wooden counterpart - it has a small width and often has a corresponding color.
Sheet panels. This variety is similar to decorative plywood sheets.
Conventional panels in the form of a plastic "board" with a tenon / groove fastening.
When choosing a specific type of material, you should focus primarily on the specifics and design features of a particular room. Plastic lining has the advantage that it does not "burden" the room and gives it a natural look to some extent. Sheet panels are usually used to decorate walls and ceilings of large rooms. A very good solution, for example, can be the sheathing of the attic or basement with them. country house... Versatility - one of the main advantages of a material such as PVC is just perfect, just like for a bathroom, living rooms, hallway, etc.
The cost of PVC panels
Plastic elements of this variety are considered to be budget option finishes. Very low cost is one of the main advantages of such material as PVC panels. The price for them ranges from 200-300 rubles for a lamella in the form of a "board". The width of the plastic decorative element is usually 25-30 cm. Thus, for finishing, for example, a wall five meters long, you will have to spend only about 4-6 thousand rubles. If desired, you can find PVC panels and cheaper - for 100-150 rubles. However, they are unlikely to differ in too beautiful and original design.

What tools will you need
Do-it-yourself installation of PVC wall panels on a special frame is carried out. To install it, you will need a drill, a building level, and a tape measure. The panels themselves usually have to be cut during installation. Therefore, you will also need to prepare a hacksaw or jigsaw. In the event that it is supposed to do additional insulation premises, you will have to purchase a trowel for applying glue and a construction stapler.
Beam for the frame
In addition to the panels themselves, before starting the sheathing, you will need to buy Weight decorative trim PVC is negligible. Therefore, it is not necessary to purchase a bar of too large a section. The option 3x3 cm or 4x2.5 cm will suffice. The exception is those cases when the walls are additionally insulated. Insulator plates are installed between the frame elements. Therefore, a beam for this type of cladding should be chosen with a section corresponding to the thickness of the insulation. Also, in this case, you will need to purchase glue for plates, dowels, fungi, primer and vapor barrier film.
Other types of frame
PVC wall panels are usually mounted not on a cobbled one, but on a metal frame. Wooden in the bathroom, sauna or bath can simply "lead". Recently, a plastic thin frame is often used under PVC panels. Its use allows you to save a few centimeters of the area of the room. However, it is still recommended to use this option only in rooms with very flat walls.

Assembling the frame
The base elements under the panels can be installed horizontally or vertically. It all depends on the direction in which the PVC wall panels will be finished. A bar or profile is attached to the level. Holes for dowels are pre-drilled in the wall. Since the joint between the panels and the ceiling is usually closed with a decorative beam or a profile in this place must be installed without fail. The same goes for the corners of the room. This is where the corner strips are mounted.
When installing the frame, it is important to adhere exactly not only to the verticality or horizontalness of the elements. It is also necessary to ensure that all the bars are in the same plane. PVC panels are elastic material. However, the distortions will give the wall not too neat appearance... You can adjust the position of the beams in the right places using small wooden wedges.
Before installing the frame, you should think about where heavy wall cabinets, shelves, paintings, and so on will hang in the future. In these places, you need to fill in additional horizontal bars.

DIY installation of PVC wall panels
If insulation is necessary between the elements of the installed frame, expanded polystyrene plates are preliminarily fixed to the glue. Additionally, they are fixed with special "fungi". Next, a vapor barrier film is stretched onto the frame.
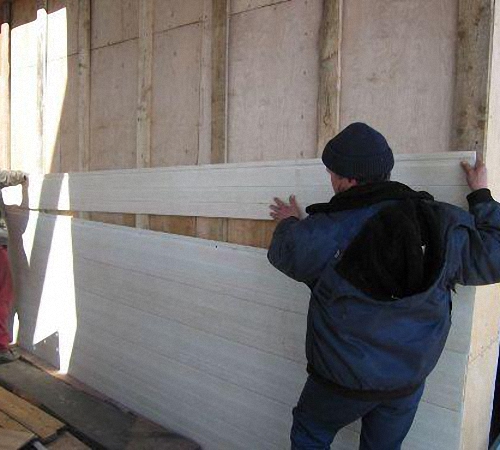
Actually the walls itself with panels starts from the corner. This is where the starting bar is set. The ridge of the first panel is inserted into its groove. The lamella is attached to the frame with special brackets using a stapler. Next, the second panel is inserted into the first and also fixed. The last lamella on the wall is inserted into the pre-fixed finishing strip. If the width of the PVC element turns out to be too large, it is allowed to cut it, but not more than 1/3.
After all the walls are paneled, they begin to decorate the space above the doors and windows. At the final stage, the upper decorative plinth is installed.

Do-it-yourself installation of PVC wall panels should be carried out in compliance with the following recommendations:
The frame can be mounted on uneven or even unplastered walls. This will save on finishing costs.
The bars should be attached to the wall only using galvanized screws or dowels.
The first sheathing element should be leveled as carefully as possible. Otherwise, all panels will be crooked.
If the interior decoration of the walls of the room is carried out during the summer period, the panels are kept at room temperature for at least 12 hours before installation. When performing installation in winter, this period is increased to 2 days (if the panels were stored in the cold).
The lamellas should be unpacked as carefully as possible. This material is not very resistant to all kinds of mechanical damage. Pull out the plastic elements carefully by the edge and only one by one.
A hacksaw for cutting plastic should be used with fine teeth.

As you can see, the installation of such material as PVC panels, the price of which is low, is an extremely simple procedure. The main thing when doing this work is to set the frame evenly. The lamellas themselves should fit to each other as tightly as possible. In this case, the cladding will turn out to be neat and durable, and the design of the room will be cozy and attractive.
The article will focus on how to fix PVC panels to the wall and to the ceiling base: they will be studied in detail possible options fixing the material on the surface, the main step by step technologies, the nuances of the correct use of the material and the creation of indoor design using it. Also, illustrative examples of the design of the bathroom, kitchen, balcony and other premises will be provided.
Fastening of PVC panels to the wall can be carried out using an adhesive, self-tapping screws or clamps.
Panels made of polyvinyl chloride are practical and durable. For this reason, they are widely used to decorate the surfaces of walls and ceilings in the house. Thanks to a wide variety of shapes, shades and textures, an interior based on this material can be stylish and beautiful.
Useful advice! Use for bathroom renovation PVC rooms panels. This material is hygienic and absolutely not afraid of water, so it can be used in those rooms where other finishes are not suitable. On the Internet, there are not only photos of finishing a bathroom with PVC panels, but also design options using this material in the kitchen, in the toilet, on the balcony or loggia, in the sauna.

Material advantages:
- resistance to moisture;
- convenient installation system that even a beginner can handle;
- long terms of operational service;
- fire safety;
- resistance to mold, fungi and other microorganisms;
- hygiene;
- ease of care and cleaning;
- affordable cost.
On the Internet, you can stumble upon a photo of PVC panels in the kitchen; instead of tiles, this material looks no less beautiful, while its cost is much lower than that of tiles.
The disadvantages of PVC panels include a low level of impact strength. Therefore, you should carefully control the process of transporting material from the point of purchase to the work area. When installing PVC wall panels with your own hands, you should also be careful not to damage them.

Before proceeding with the installation of PVC panels in the bathroom or in any other room, you should prepare the tools and materials necessary for performing finishing works... They should always be at hand.
To renovate the premises PVC panels you will need:
- tape measure and pencil (for marking);
- hacksaws with fine teeth (for cutting material);
- building level;
- square;
- PVC panels;
- plastic profile for PVC panels or slats;
- a set of fixing elements (self-tapping screws, dowel-nails, clamps);
- puncher and screwdriver;
- antiseptic solution and sealant;
- ceiling plinths.

At the same stage, the selection and purchase of material is carried out. There are panels on the market with different types of coatings, which can be glossy or matte. In addition, manufacturers use various technologies for applying patterns and designs.
Strength characteristics depend on the thickness of the panel walls, as well as on the number of stiffeners that are located inside.
Useful advice! To test the material for strength, gently press down on the surface of the plastic with your finger. If the panel is bent, it means that it has a low strength and short service life.
Features of the choice of material for wall cladding with PVC panels
PVC panels from different manufacturers have different characteristics. Be sure to pay attention to the quality of the material.
To purchase a quality panel, avoid purchasing material if:
- stiffeners are damaged or deformed;

- the lines of the drawing on the front side of the panel are not clear, there are blurring, or the edge line is blurred;
- lamellas differ from each other in shade;
- the surface is covered with scratches;
- the dimensional parameters of the lamellas do not coincide (in this case, the technology of attaching PVC panels to the ceiling or wall may not only be complicated, but also impossible, since the elements will not be tightly fixed).
Characteristics of the average European and Chinese panels (comparison table):
| Criterion | European lamella | Chinese lamella |
| Front side thickness, mm | 2 | 1,5 |
| Number of stiffeners, pcs. | 29 | 20 |
| External characteristics of stiffeners | smooth, do not have deformations | smooth, there are small deformation changes |
| Lamella weight, kg / m² | 2 | 1,7 |
| External characteristics of the lamella | Smooth coating, stiffening ribs do not protrude | Smooth coating, voids between stiffeners are visible, small deformation changes are present |
| The quality of the raw material base | From light pressing, the lamella bends a little and again returns to its original state, the presence of chalk in the composition is minimal | From a slight pressure on the surface with a finger, the lamella undergoes deformation changes, which indicates a high content of chalk in the composition |
How to fix a PVC panel to the ceiling and wall: preliminary calculations
Before fixing the PVC panel, it is necessary to make preliminary calculations of the material for wall decoration.
Useful advice! Be sure to calculate the amount of material. This will allow you to avoid overpayments or additional purchases of panels if they are not enough. By performing preliminary calculations, you save both time and money.
When installing PVC wall panels, the lamellas can be positioned horizontally and vertically. It depends on your desire. The calculation of the material for vertical installation is carried out as follows:
- The room is measured (the length of the room around the perimeter).
- The width of the window and doorways.
- The remainder is divided by the width of one lamella.

As a result, you get the required number of panels for interior decoration. Be sure to add a few more additional slats in case you accidentally damage one of the elements during installation.
For horizontal finishing, a slightly different calculation scheme is used:
- The total area of the room is measured.
- The area of window and door openings is subtracted.
- The resulting value is divided by the area of one lamella.
In this case, at least 10% of the panels in reserve must be added to the received quantity. This moment is due to the fact that when finishing the ceiling horizontally with PVC panels, as well as when working with walls, the master is faced with the need to cut the material. The result is more construction waste.
Calculation of consumables for lathing under PVC panels
If it is planned to install PVC wall panels with your own hands on top of the crate base, additional calculations of the amount of consumables for this structure should be performed. As a building material for the lathing, metal profile elements or timber slats can be used.

First you need to measure the height of the walls in the room. Then divide this indicator by the step of placing the battens in the crate. The result of these calculations must be multiplied by the perimeter of the room. You will receive the length of the profiles or strips in linear meters.
Note! Typically, wood or metal elements are spaced 50 cm apart.
To calculate, measure the height of the corners in the room and multiply this indicator by their number. As a result, you will get the total footage of the corner-type profile elements. The perimeter of the door and window openings in the room is added to this value.
Using PVC panels: how to fix plastic slats to the bathroom wall
Numerous photos of PVC panels in the bathroom, which can be found while browsing websites and magazines for home renovation, indicate that this type of material is quite popular among consumers.

Decorating a bathroom with PVC panels with your own hands can be done in three different ways:
- using an adhesive composition;
- using self-tapping screws;
- using clamps.
The use of an adhesive will be effective if you have to deal with perfectly flat and smooth surfaces.
Types of adhesive for PVC panels in the bathroom:
- specialized adhesive for PVC lamellas;
- universal composition "Moment-montage";
- liquid Nails.

Installing lamellas with glue greatly simplifies and reduces the cost renovation work in the bathroom, since the need for the construction of a lathing structure is completely eliminated.
The glue method of fixing also has disadvantages. In case of damage to the finish, the damaged lamella cannot be replaced with another one. Moreover, subsequent repairs will be complicated by the procedure for dismantling the old coating, which is difficult to remove from the wall.
Fixing with self-tapping screws is more convenient and reliable. For work, you will definitely need an auxiliary tool in the form of a screwdriver. Otherwise, the repair will be significantly delayed.
Note! Before fixing the PVC panel in the bathroom with self-tapping screws, there is no need to level the surface.

The disadvantages of this method include the need for the construction of a frame base in the form of a crate made of wood. This entails additional time and Money.
Cleamers provide fast and reliable fixing of the lamellas to the wall surface. In this case, the lathing structure must be metal.
Finishing a bathroom with PVC panels: interesting ideas, photos
Plastic finishing opens up ample opportunities for the design of the bathroom - photos of PVC panels in the design of this room look stylish and effective. A variety of colors and external characteristics of the material allows you to equip the room in different styles.

Eco-friendly interiors are very popular today. Of course, plastic does not belong to the category of environmentally friendly and natural materials, but in the photo of the bathroom, PVC panels with a wood texture create an excellent imitation of the ethno style. The installation of pvc panels in the bathroom on the walls is ideally combined with the ceiling finish made with slats.
In the photo of bathrooms, PVC panels imitating a tiled covering look so natural that they are practically indistinguishable from real tiles. In this case, you achieve significant savings in terms of purchasing costs, since plastic lamellas are much cheaper than ceramic tile... When repairing a bathroom with pvc panels for tiles, you have the opportunity to decorate a room in a neoclassical style by adding friezes, columns, curbs to it, or to make a classic finish.
Useful advice! It is not recommended in the design of the bathroom, as well as in the decoration of the toilet, to combine with finishing materials from the expensive segment. The neighborhood of polyvinyl chloride with marble looks not only tasteless, but at the same time the presentability of natural stone is completely lost.

In the photo of finishing toilets with PVC panels, a light color scheme looks very advantageous. Thanks to this, additional volume can be added to a small bathroom. Modern design options for bathrooms include the use of products with photo printing or the installation of mosaics.
For the finishing of bathrooms, it is recommended to use plastic slats with a mild textured surface. The fact is that voluminous textures can be an excellent basis for the formation of mold and fungal spores. If you buy material with large embossed depressions on the surface, it will be difficult to maintain the finish afterwards.
There are also advantages in how PVC panels are attached to the walls in the bathroom:
- saving money - average prices on a panel with standard dimensional parameters are in the range of 200-300 rubles / piece. Range market value material covers prices from 100 to 500 rubles / piece. This indicator depends on the quality of products and design;

- hygiene and safety - the surface of the lamellas does not absorb unpleasant odors, it is easy to clean with a sponge and soap solution;
- high level of resistance to moisture. For this reason, the material is suitable for rooms with high level humidity. This property allows you to finish the loggia with PVC panels, as well as the balcony, corridor and even the kitchen;
- simplicity of the installation system - for this it is enough to have the skills of using a construction stapler and a screwdriver;
- practicality - communication systems are not visible in the photo of the bathroom decoration with PVC panels. The material is used for lining communication boxes, where all pipes, valves and other elements are placed.
Note! Plastic panels have excellent performance characteristics: low flammability, thermal and sound insulation.
How to glue PVC panels on walls without the use of lathing
Before gluing the decorative PVC panel to the wall surface, it is necessary to prepare the base. This technology requires thorough cleaning of the walls, followed by their leveling. Mistakes in the choice of glue are also unacceptable.
Surface preparation involves:
- complete removal of the old coating;
- elimination of cracks;
- leveling the surface.
The size of the differences is allowed within 5 mm. If the pits and bumps are deeper, the plastic will come loose or deformed over time. Grease, dust, dirt may be present on the surface of the walls. These particles interfere with the proper adhesion of the adhesive. Therefore, it is advisable to wash off the whitewash from the surface of the walls, cleanse the fat with an effective detergent and apply a primer.
List of universal adhesives:
- Emficol 34012A;
- Clayberite 636;
- Moment Crystal.
 When installing PVC panels, you can use non-expanding polyurethane foam or liquid nails.
These compounds can be used for DIY installation of PVC panels, but experts recommend using specialized glue for plastic.
Signs of a high-quality composition:
- transparency after drying and the formation of a film layer;
- resistance to sharp temperature changes, moisture and frost (for this reason, photos of balconies with PVC panels are so often found on the Internet);
- fast setting;
- reliable and long-lasting fixation.
Note! It is strictly forbidden to use hot melt glue to fix the plastic.
A non-expanding polyurethane foam sealant or liquid nails can be used. These materials are flexible and firmly fix the panels to the wall.

Decorative PVC mosaic panels: how to glue, video instruction
To learn how to glue sheet panel PVC mosaic, use step by step instructions which is also applicable for conventional lamellas.
Step-by-step implementation of the procedure:
- Cleaning the back of the panel with a damp cloth.
- Drying of the panel (before gluing the PVC mosaic panels, the surface of the material must be completely dried - only after that can the glue be applied).
- Application of the adhesive composition to the back side using the dotting method in increments of 25-35 cm.
- Installing the panel to the wall.
If you use liquid nails in your work, the panel will need to be tapped lightly and then torn off the surface again. For better adhesion, the glue requires 5-7 minutes of airing. Then you need to re-fix the lamella in place.

The frameless method does not require the formation of external and inner corners for PVC panels. Such a procedure in this case would be inappropriate. The usual cladding with the help of plastic corners that do not have grooves for mounting lamellas is enough. Transparent silicone can be used to secure the corners. The size of such elements varies from 2 cm to 5 cm.
Useful advice! To carry out the installation of trim around the sockets, you must first cut the holes for them in the appropriate place on the panel. Be sure to turn off the electricity during the work.
Use the video material below for a more detailed study of the procedure for installing PVC wall panels with your own hands.
Last but not least, the floor and ceiling skirting boards for PVC panels are fixed. Use self-tapping screws for this. The joint areas between the lamellas must be filled with silicone or.
Photo of kitchen aprons made of PVC panels and installation technology in the spacer
Most often, expanded clay or tile... However, the installation of these materials requires special knowledge and skills, so more and more often you can find in the photo finishing the kitchen with PVC panels. Thanks to the special design of the lamellas, the wall assembly in the apron area is carried out with minimal gaps.
The technology of fixing the lamellas to the spacer does not imply the use of fasteners, adhesives or lathing structures. This method is used exclusively in small kitchens where the work area can be covered with a single sheet panel.
- Place the panel with its lower edge on the worktop and cut the material taking into account the dimensions of the apron.
- Install the lamella in the apron area in such a way that the upper edge of the material goes under the wall cabinet and is firmly pressed against it. To improve retention, you can use hidden brackets.
- The lower end is secured with a plinth. This part is fixed to the table top and it is better if it is massive and durable.
Note! The advantage of this technology is that the lamella can be easily removed if necessary to repair the premises. The material is not damaged and can be reused.

Instructions for the installation of PVC panels on the walls over the lathing frame
Before sheathing the wall with PVC panels, the surface should be cleaned. There is no need for serious leveling, but if it is planned to finish a bathroom, kitchen or other damp room, it is recommended to waterproof and cover the walls with an antiseptic.
To form the lathing structure, 2x2 cm blocks of wood can be used.They are much cheaper than metal elements. However, it is not recommended to use wooden lathing for rooms with high levels of humidity. Before using wood, it must be thoroughly dried so that the moisture content of the material reaches the permissible norm - 12-15%. Remember to follow through preprocessing antiseptic bars.
To equip the metal frame, you will need a UD profile element (contour part) and CD (guides).

Regardless of whether you are making ceilings from PVC panels with your own hands or sheathing walls, the construction of a batten structure should start with marking. If you are working with walls, you first need to determine the lower level, taking into account the further installation of the skirting board. As a guide, you need to take the most protruding point of the wall. It is she who will determine the indent of the crate.
Useful advice! For wooden lathing, another 2-3 mm should be added to the resulting indentation, since the wood is subject to deformational changes under the influence of temperature and moisture.
After that, the line of the top level (with a reference to the ceiling) and side levels is determined. To control the upper and lower zones, it is recommended to use a building level, for side elements - a plumb line.
How to fix a PVC wall panel: working with the frame and cladding
The fixing of the lathing elements is carried out using straight hangers. The screws are positioned in increments of 20-25 cm (wooden frame) or 15-25 cm (metal frame). Installation of bars or metal profiles is carried out first along the edge, then inside the structure. This will ensure a secure hold of the trim around the edges.

When installing internal profiles, it is worth considering the type of panel mounting you have chosen - horizontal or vertical. The lamellas will subsequently have to be fastened perpendicular to the guides, fixed with screws.
Panel mounting scheme on crate:
- Installation of external and internal moldings.
- Installation of the first panel and fixing with a cleaimer (the lamella spike must enter the profile).
- Mounting the second panel into the groove of the previously installed lamella and fixing in the same way.
- Installation of material to the end of the wall.
- Open the last panel, taking into account that finishing material should be installed all the way to the corner area. In this case, a gap of 2-3 mm should form between the spike of the last element and the groove of the previous lamella. The cut side should be placed in the profile and the finishing piece inserted into place.
Use a video review of this procedure for a more detailed consideration of the installation of PVC wall panels with your own hands.
Note! If you want to hide, the fixing of the first panel must be carried out strictly in the corner zone, and the installation of all subsequent elements must be carried out back to back. On one of the corner elements, you need to remove the spike so that a groove appears at the end. Hook brackets will be pushed here, which are installed on the second profile element. The next lamella in the corner area will fit into the starting profile.
Formation of suspended ceilings from PVC panels: photos of structures and technology
The moisture-resistant properties of PVC panels are also useful for arranging suspended ceilings.
This material is used for arranging the ceiling in various rooms:
- kitchen;
- toilet;
- shower, sauna or bath;

- hallway;
- balcony or loggia.
In most cases, in the photo of ceilings made of PVC panels in the kitchen, you can see a material that imitates a lining 10 cm wide.This finish without any problems allows you to install point-type lamps in the structure of a suspended ceiling.
Other design options for lamellas can be used for decoration:
- imitating wood or natural marble stone;
- matte or glossy;
- plain or covered with ornaments;
- decorated with a seal or thermal film.
Before making suspended ceilings from PVC panels, the calculation of materials must be carried out. The calculation scheme in this case is very simple, since there are no window and door openings on the ceilings. Material stock - 15% of the required amount.

Making a ceiling from PVC panels with your own hands: videos and recommendations
Creation false ceilings carried out in stages. First, you need to calculate the parameters of the crate, take into account the features of the lighting system, since the recessed spot-type luminaires need accurate calculations and have a special installation system.
Note! For work, you will definitely need the help of one more person.
Construction of a batten structure:
- Using the building level, mark the points along the perimeter of the room, along which the installation of the profile elements of the frame base will be carried out. The profiles must be fixed strictly horizontally. It is necessary to achieve the most dense placement against the wall.
- Using self-tapping screws, you need to fix the profile elements with transverse placement. They will hold the entire structure.
- A profile forming the letter L should be located along the perimeter. Next, all work is performed to install and mask the lighting system.

Use a video review for installing PVC panels with your own hands, reflecting all the features of the technology for creating suspended ceiling structures.
It should be remembered that the video of installing PVC panels with your own hands in combination with the system lighting fixtures does not always reflect all the nuances of this technology. It is recommended to read additional materials on this topic, since working with electricity requires serious knowledge and can be unsafe. If you do not have the required amount of knowledge and experience, entrust the installation to professionals in order to avoid accidents, calculation errors and unnecessary costs.
Plastic wall panels are a low-budget way of ennobling and improving residential, office and public premises. Caring for the coating is not difficult: the coating is washed with water and powders, is chemically resistant, belongs to the group of materials of average fire hazard, does not create an environment for the development of mold fungi, bedbugs, cockroaches and bark beetles. High moisture resistance allows the panels to be used in showers, bathrooms, kitchens and public places. The main advantage of plastic wall panels is that they are attached even to curved walls. The cover of this material transforms the room, adds aesthetics and matches the modern fashion influence.
Types of plastic, decorative, wall panels

- There are two types of panels: for internal and external needs. The external difference between the species is barely noticeable. The main difference is the composition and quality of the material.
- Exterior panels have a more durable structure and are resistant to UV rays and temperature extremes.
- Panels for interior work - have a high level of environmental friendliness, thermal conductivity.
Both materials are used to protect against noise and cold. Color solution has the entire gamut of the spectrum, the selection of a color scheme for the interior is not difficult.
The price of plastic wall panels is from $ 3 per m2. The cost of finishing plastic panels is from $ 1 per meter.
Installation options for plastic wall panels
It does not take many working hours to install wall panels. They are quickly placed on the prepared crate. A room with a total wall area of 40 m2 is finished in 3-4 hours. The main time is spent on the manufacture of the lathing up to 10-20 hours.
Lathing making:
Lathing is a special foundation, the strength and quality of its foundation affects the service life of the coating. The method is used for walls with a curvature of the surface, poor plaster, and an ugly base. In cases where it is necessary to lay the wiring between the wall and the finish. Communications or finishing with soundproofing material.

The lathing is made of wooden bars 40x40 mm:
- The fastening of the battens for vertical wall panels is carried out on a horizontal level. The basic rule for the installation of the lathing is observance of perpendicularity to the installed finish.
- In order to avoid deformation of the panels for any objective reasons, the distance between the bars is maintained up to 500 mm.
- The beams are fastened to the base with screws.
- To extend the durability, the attached crate is covered with a moisture-proof and fire-retardant mixture.
Fastening of wall plastic panels to the crate:
- The panels are installed from the corner of the room.
- The first panel is installed with a "comb" in the corner.
- Holes for self-tapping screws are drilled in the grooves.
- Fasten the panel to the crate with self-tapping screws.
- Install the second panel. The ridge of the panel covers the groove first, masking the self-tapping screws for fastening to the crate.
- The final interior design is completed with baseboards, fillets, corner strips.
- They are attached to wall panels with screws or liquid nails.
Professional method of fixing plastic wall panels
This method is used by installers for installation in public or office spaces. The essence of the method:
- Installation of finishing elements of decor to the crate is in progress. They are fastened with self-tapping screws.
- The panels are bent with an arc and inserted into the grooves of the elements.
- The panels are held at the top and bottom, and the rest of the area remains unattached.
The quick installation method allows you to finish the work in 1-2 hours in a room with a total wall area of 45 m2. This method is used only for wall plastic panels with a high characteristic of elasticity and bending strength.
Installation of plastic wall panels with construction brackets
Method for flat, smooth surfaces. The construction bracket easily fits into the wall material and does not require much effort.
- The level marks the exact position of the panel along the coordinate axis. The corner from which the installation will go is marked.
- Staples are driven in along the line, at least 4 units. For high walls, the recommended number is 6-9 pieces.
- The staples are fastened with nails. Nail marking is selected according to the size and protruding part of the staple.
- The ridge of the first panel should fit into the brackets.
- The second panel is inserted into the groove of the first.
- A line is outlined for installing brackets for the third panel.
- Further, the installation proceeds according to the scheme described above.

How to install plastic wall panels using adhesives
The method is used for flat walls, in the absence of special tools. The adhesive is used to apply to the wall surface.
- The wall is pre-plastered, the surface is degreased and the surface is allowed to dry.
- For walls that absorb solution and moisture, they are treated with a primer for the appropriate purpose.
- Dilute the adhesive according to the instructions on the package.
- Apply to the wall surface with a roller, brush or spray gun.
- Make vertical and horizontal markings on a clean surface.
- Cover the area with liquid glue.
- A panel is attached to the layer of glue, pressed for the time indicated on the package for adhesion to the base.
- The next section is smeared under the second panel.
- Connect the panels with a groove into a ridge.

The method allows you to do without fixing the panels with self-tapping screws.
For wall mounting with plastic panels decorative and functional shelves, hangers make nests in advance for fixtures in the rough wall, and not on the finish. The holes are made as deep as possible. Then the dowel or screw is hammered in. On the plastic surface, a place is marked with a small core for the withdrawal of fasteners.
How to fix plastic wall panels to a metal profile
The advantage of installation on a metal profile:
- Profile lathing is not subject to deformation, unlike wooden beams.
- The cost of a metal profile is lower than the price of a quality wood material.
- A structure with high rigidity parameters is made from the profile.
- Metal lathing can withstand heavy loads vertically and horizontally.
The metal profile is available in different sizes for vertical and horizontal use.

Calculation of profiles for lathing
One specific type of profile is selected from the assortment, and after that its quantity is calculated.
An example of calculation for a wall 2.75x6.0 m:
- The distance between the posts is assumed to be 50 cm.
- For installation, the following quantity is required: 600/50 + 1 pc. = 13 units.
- The length of the standard profile is three meters. For workpieces from a standard length, 25 cm are cut off, and slats are obtained with a length of 275 cm.
- Professional trimming of the profile is carried out after setting the zero level and determining the height difference for each surface.

To save money, you should not make a distance between the guides of 1 meter. The larger the gap between the gratings, the lower the stiffness parameter of the structure as a whole. For walls in residential and frequently visited official premises, the ideal, time-tested distance is 500 mm. A greater distance is maintained for ancillary and outbuildings.
- The horizontal components are calculated in the same way, only the height of 275 cm is replaced by the standard profile length of 300 cm: 2 x (300/50 + 1) = 14 units.
- A distance of 50 cm is maintained from the floor for horizontal rails. A distance of 25 - 30 cm is maintained from the middle of the wall to the ceiling.
Do not immediately cut the estimated number of guides. It is worth chopping as the work progresses. It will not be possible to correct the workpieces by 2.75 m in case of height differences in the room.
Stuffing the lathing from the profile
- A guide ceiling profile is installed.
- The profile is attached to the concrete surface with dowels at least in four places. The second profile is installed end-to-end with the first. Reminder: the length of the wall is 6 m, the length of the standard profile is 3 meters. The ceiling will require 2 units.
- Profiles are aligned with high precision. The aesthetic design of the future wall depends on their installation.
- A plumb line is suspended from the attached ceiling rails. The vertical beating is performed at least at three marks.
- Guides are installed according to the marks on the floor surface.
- The profile is nailed onto the wooden floor with self-tapping screws or dowels. TO concrete floor regardless of the top coating: linoleum, laminate, PVC tiles, the profile is fixed in the same way as ceiling mounting.
- As a result of the work, two gutters are obtained: one at the top, the second at the bottom. Calculated 13 units of racks are inserted into these gutters.
Installation of racks:
- Marking is done with chalk.
- A plumb line is hung at the installation point. The length of the rack is measured.
- With scissors for metal from a standard profile, a segment of the measured length is cut.
- Slightly tilting the profile, put the segment in the guides, aligning the vertical visually. More accurate adjustments are made with the level.
- Self-tapping screws are used for fasteners. The screwdriver is used for fastening. For each guide, 2-3 units of fasteners are consumed.
Manufacturing and installation of stiffeners
Additional stiffening ribs, on which the wall panels are installed, are cut off as the work is performed and at the place of its execution. Installation starts from the wall. In the first vertical post there is a groove, and in the second it is not due to the orientation of all the posts in the same direction. According to the classical technology, it is required to install two vertical posts so that the cut looks like two letters "P" connected and turned in opposite directions. Two profile units significantly increase the cost of the crate and do not have a significant effect on increasing the rigidity of the structure. With one profile, a stable and optimal stiffness crate is formed.
An alternative to the second guide will be a corner or a section of a 70-100 mm profile.
- Screw the angle or piece to the back of the upright. Bring the counterpart under the stiffener.
- Carry out similar actions for all elements of the crate.
The technique has been tested and proved to be effective in creating low-cost, durable battens.
Horizontal guide lines are set visually, without a level. The main thing is to correctly set the guides vertically. The position of the stiffeners does not play a special role.

Installation of wall panels on a profile
The calculation of wall plastic panels is made. The size of a standard sheet is 122x244 cm. The sizes of typesetting panels are more suitable for the described example. Choose a sheet with a width of 300 mm and a length of 3000 mm. The excess length is cut with a hacksaw with a small blade. Measurement of length is performed for each section in order to be able to correct irregularities and differences in the height of the room.
- The panel is installed from the wall.
- The first panel is level with meticulous precision. With a careless installation of the initial plate to the end of the wall, a huge run-up is formed, forcing the entire section to be dismantled and redone.
- The exposed panel is fastened with self-tapping screws to a stiffener or a vertical post.
- Insert the second panel into the groove of the start sheet. Attach.
- Further actions are repeated according to the scheme described above.
- A narrow gap is usually formed near the end of the wall for a whole sheet. Measure the width of the strip near the ceiling, floor and mid-height. A pattern is cut out of thick cardboard. Applied to the gap, check the correctness of the size. Cut the panel in half and insert it into the slot.
- After finishing the installation of one wall, the panels are mounted on the following surfaces.
Ugly narrow crevices at the joints of the panels with the ceiling, corners and floor are masked by plastic decorative strips, baseboards and corners. Installation and fastening are performed using special latches. This method allows you to quickly and easily dismantle the elements.
Plastic wall panels, photos of rooms with interesting decision interior finishes will be a guide when choosing your own project.
This finishing material is made of polyvinyl chloride, which is why they are often called PVC panels. This material, in a semi-liquid state, is squeezed out through a special mold, after which a different pattern is applied to the panel. Often the drawing is already ready and placed on a film that is simply glued to the front side of the panels. The surface can be either smooth or textured. Patterned panels retain their attractive appearance for a long time, but they are significantly more expensive than conventional panels.
 PVC wall panels with a picture
There is another technology, when the pattern is applied directly to the panels and covered with two layers of varnish. This type of panel does not have a long service life, since the quality of the pattern is lower.
Ceiling and wall panels
There are panels for both wall decoration and ceiling decoration, and they differ in the thickness of the panels themselves and partitions in the panels. Those for ceilings are 2 times thinner. If you look at a section of the panel, you can easily determine its purpose. Besides, ceiling panels they have a glossy surface, and the quality of the joints is such that they are practically invisible.
 Ceiling PVC panel
There is another type of plastic panels - this is a plastic lining. The thickness of the panel is 10 mm, and its width is 10 cm, while it has shaped edges, therefore, when refining the walls, a surface is obtained that is similar to that obtained when installing a wooden lining, that is, embossed.
 Plastic panel lining
Wall panels differ in different widths, but most often the manufacturer produces PVC panels with a width of 25 and 37 centimeters, with a length of 2.7 and 3 meters. As for the cost, it depends on various factors, since different manufacturers use different technologies.
PVC wall panels - thin
There are various PVC panels, but those that consist of two layers of plastic connected by thin bridges have a number of disadvantages. The main drawback is their poor resistance to physical exertion. If you press on the panel even slightly, then a dent will appear, and if you press harder, then you can press it. This drawback always becomes the stumbling block, because of which people refuse to use these types of panels.
 PVC panel sectional view
Recently, a completely different type of PVC panels has appeared on the market, which do not have this drawback. Their thickness is only 3 mm and they have no cells, and there is a pattern on the front side. The panels differ in dimensions of 950x480 mm, although the dimensions may be different. These panels differ in the same installation technology, since they are glued on a flat surface. Due to their small thickness, the panels are easily cut with scissors, which simplifies the processing process. This type of panels practically does not take away useful space, but you can only glue them on flat walls.
 Flexible PVC panels
Care features
It is believed that plastic panels require special care. However, this has absolutely no reason - from all types of finishing materials, perhaps, it is difficult to find a simpler and "unpretentious" one. Regardless of whether they are in the hallway or on the loggia, it is enough to wash them a couple of times a year with any traditional dishwashing detergent or soap solution.

However, sometimes during service, more serious dirt appears on the surface - drawings made with felt-tip pens and markers, engine oil stains, scotch tape residues and others. Cleaning abrasive wipes will help to clean them, and if the marks are significant, then liquid cleaners such as Synto-Forte, Graffiti Flussig, etc.
- chlorine;
- degreasing compounds;
- alkaline soap;
- nail polish remover;
- acetone;
- all types of polishes.

Calculation of material requirements
No special calculations are required. You can determine the required amount of finishing material in one of two options:
- on total area walls;
- by the size of the panels.
The first way is to determine the total area of the walls. For this, their height and width are multiplied.
The most convenient option is to calculate the need based on the dimensions of the panels. The cladding material has the following standard dimensions: length - 3 m, width - 0.25 m. For example, if the bathroom is 2 m wide, then 8 panels (2 m. 0.25 m) will be needed for repair.
When calculating the number of panels, the area of the door and window openings and the space behind the bathroom, installed right next to the wall, are subtracted. In the process of work, you can spoil the cladding. For this reason, 3-4 more pieces must be added to the estimated number of panels.
Plastic panels are a good alternative to tiles.
How to make a crate for panels correctly
Plastic wall cladding begins with the fabrication of the frame for the panels or wall sheathing. This will allow in the future to quickly replace, if necessary, plastic panels and securely fix them.
For lathing are used:
- Wood blocks.
- The metal profile is less common.
In this case, small cells located behind the structure can be used for laying insulating materials. The crate is attached to the wall surface with clamps or self-tapping screws in dowels.

Sheathing device for plastic panels
The fastening elements of the lathing are installed in increments of up to 0.5 meters. The distance between the bars is chosen such that the laying insulating material was as simple as possible.
Fastening lamellas
To fix the plastic panels when decorating the walls, you can use glue, self-tapping screws or clamps. As glue, you can use both special PVC and liquid nails, but this method is suitable only for a smooth and even wall. Using glue, you can save a lot, because there is no need to fasten the lathing. The disadvantage is that if the panel is damaged, it cannot be replaced.
A reliable and convenient method is to fasten plastic panels to self-tapping screws, especially since there is no need for perfect wall evenness. To reduce the installation time, it is recommended to screw in the self-tapping screws with a screwdriver. The disadvantage of this option is the need to install a wooden frame under the screws. You will need to set aside some time to prepare the wood base.
The easiest way is to use cleats, which are quickly and easily attached to the crate. They allow you to conveniently and efficiently fix the panels on the wall. The lathing can be made from a metal profile. If the lamella is damaged, it is possible to replace it with a new one at any time.

What elements are needed for panel mounting
Before sheathing the walls with plastic panels, it is necessary to purchase additional moldings - fixing and at the same time decorative elements that give the cladding a final look. There are several types of profiles, shown in the photo.
- Starting.
- Finishing.
- Guides: top and bottom. These are installation moldings that create a border around the entire surface to be trimmed.
- Corner outside. With its help, protruding corners of the room are formed.
- Corner inner, mounted along inner corners.
- Connecting. Designed for end connection of elements, with combined finishing of panels of different colors.
- Skirting boards or fillets. Fixed with glue.
- Simple corners. Used for finishing corners, glued to the sheathing.

Installation diagram of plastic panels
The panels are attached to the wooden frame with brackets and a construction stapler, to the metal frame - with self-tapping screws.
Advice: Polyvinyl chloride has a high coefficient of thermal expansion, it follows from this that during installation, fastening points must be performed with a small gap for elastic deformations of the plastic panel. In this case, the brackets make it possible to move the plastic, but the self-tapping “flea” screws do not. In this case, it is necessary to use thermal washers with self-tapping screws, consisting of an O-ring, a cover and a washer with a leg. There must be a gap of at least 1.5 millimeters between the wall of the hole in the plastic and the leg of the washer.
Before sheathing the walls with plastic panels, a video lesson will tell you the nuances of the work.
Tools and accessories
It is necessary to prepare for working with PVC panels. As already mentioned, the use of this finishing material involves the use of professional tools, namely:
- perforator - needed when forming the frame;
- screwdriver - used when fixing panels to bars or metal profiles (a perforator can also cope with this task, but it is quite heavy, so it will not be easy for a finisher with little experience to cope with it);
- jigsaw with medium-sized teeth or circular saw;
- jet with an angle of 90 and 45 g;
- stapler - used when installing wood lathing;
- rubber mallet - required to remove jammed plates; if such a procedure is carried out manually, then there is a high probability of breakage of the crate and the panel itself;
- spatula - it is used to fold back the profile when the very last panel needs to be inserted. It is optimal to use a tool with a length of 80 to 120 cm.


Auxiliary tool:
- tape measure for taking measurements;
- pencil or marker - for making notes on the panels;
- level - to measure deviations from the ideal geometry of the coating;
- square, moldings, clips, edging;
- elements for fasteners (dowels, screws and cleats).

We do the installation of the crate with our own hands
Work on inner lining walls begins with the assembly of the lathing under the pvc panels. It is done very simply, everyone can assemble the crate with their own hands. The material from which it is made is wooden slats or metal profiles. The wall lathing is attached with a self-tapping screw with a dowel, through to the wall panel. Then all installed rails must be leveled so that the structure is level.
 For the frame, wooden slats 10x50 mm are suitable, with their help it will also be possible to level the surface of the walls, all wooden parts must be treated with an antiseptic.
The frame should be made with a step of 30-50 centimeters, the design is quite simple and linear, there are no special wisdom in it. It is necessary to make a frame along the entire wall, it is unacceptable that the ends of the pvc panels hang in the air, they must be fully fixed. For insulation or additional insulation, the necessary material can be added to empty openings.
How to clad the walls with plastic panels
Wall cladding can be done in three ways. For even walls, these panels can be planted with PVC glue, all-purpose glue or liquid nails. The disadvantage of this method is that during repair, these materials spoil the walls and it is rather difficult to replace them.
The second method is to use self-tapping screws for fastening. For this, a wooden frame is mounted on the walls with a step of half a meter. This basis is measured by level and if there are errors, then they are immediately corrected. Also, the tree, the frame must be treated with antiseptic compounds.


The third method is to use metal rails on the wall and fasteners in the form of clips or cleats. The latter are attached to metal guides and fix the panels. This method makes it possible, if necessary, to repair a separate section of the wall.
When the panels are arranged horizontally, the lathing is carried out in the vertical direction. When the panels are arranged vertically, the guides are mounted horizontally. First, the upper part of the frame is mounted, and then the rest. Before installation, everything is measured, lines are drawn. Then the guides are placed and secured along them. When mounted vertically, the frame is made from the corner of the room. The guides are fixed with dowel nails or self-tapping screws.

Intermediate guides should fit in the same plane with the main ones. If wiring is necessary, the cable is secured so that it does not touch the top of the frame. Holes for sockets and switches are made with a clerical knife. After installing the panels, protective boxes are inserted.
Panels are mounted from the far corner or from top to bottom. To create a neat and nice looking for corners and edges, you can use plastic moldings
The last panel is installed with great care and precision to ensure that the surface is flat. The panel is cut to size if necessary

Useful article: Finishing house facades with building materials
The upper part of the wall under the ceiling is sewn up ceiling plinth... At the bottom, the plastic is also covered with a plastic skirting board. This type of wall cladding has many advantages and when renovating, many use this material to decorate kitchens, baths, living rooms and hallways.

Do-it-yourself wall cladding with plastic panels - good way carry out inexpensive wall cladding in a short time. Make repairs in the apartment yourself, then you can implement any design ideas and create a cozy and harmonious atmosphere.
Installation of the lathing
Guides on which PVC panels are attached for interior decoration, are installed perpendicular to the direction of installation of the casing. Between them are intermediate beams / profiles, the distance between which is 500-600 mm. Before installation, markup is done.
A mandatory bar is installed at the bottom (closer to the floor) - it provides additional rigidity of the structure. The profile / timber should also be fixed on top. It can be under the ceiling or below. It all depends on the level to which the sheathing is performed.
Paneling
Above and below the start and finish profiles are installed, where each panel is inserted. Installation is started from the corner, which is the first to "catch the eye" when entering the room. This is where the corner molding is installed (attached to the batten in the selected way).
Then the panel is inserted with the side where the small PVC panel fastening strip is located. The large fastening strip is used for fastening to the battens.
Each subsequent PVC panel should adhere as tightly as possible to the previous installed one. Recommend to use silicone sealant for the purpose of sealing joints. It is applied to the side edge prior to installation.
The final stage
When the balcony cladding with the main material is completed, you need to close all the edges with moldings. These can be corners or areas where material color transitions are used.
Cutouts for switches and sockets are also made after finishing the balcony cladding. Special boxes are installed in the finished openings.
You just need to correctly calculate the amount of material and add a small margin to the resulting number, and also carefully mark the lathing and the panels themselves. This will avoid wasting time and effort on dismantling the erroneously installed structure.
Finishing instructions
The installation process consists of several stages. For the correct execution of the finish, each of them must be observed. For more information, you can watch the proposed video, where you will see how the walls are finished with plastic panels by professional craftsmen.
Surface marking
To avoid distortions, the fastening of the lathing needs to be done only at the level. You can save time on measuring each batten by marking the wall. At a height of 1–2 cm from the floor, mark a point with a pencil and draw a horizontal line from it using a level along the perimeter of the entire area for finishing. This will be the bottom row of the sheathing. Repeat the process under the ceiling in the same way. Now, at a height of 40-50 cm from the bottom line, we put a beacon and repeat this to the very top. We draw parallel lines through the installed beacons and finish the marking.
Usually plastic panels are fastened perpendicularly, therefore the horizontal frame should be sheathed vertically. Otherwise, we do the opposite. To create such a markup, you need to draw the first line in the corner between the ceiling and the floor using a plumb line. The second corner is also marked, and lines are drawn taking into account a step of 50 cm.

Installation of the lathing
When the lathing is mounted from wooden beams, they should be pre-primed with an antiseptic. On the wall, along the marked lines, you need to drill holes for the dowels with a puncher at a distance of 50 cm from each other. After that, it is necessary to attach slats to the lines and fix them with self-tapping screws.
In places with irregularities, a wooden wedge can be placed under the crate. To hide the wiring under the finish, you need to take measurements and drill holes in a certain place. After that, the wires should be secured with clamps so that they are outside the plane of the sheathing.

Fastening plastic panels
Installation of the first lamella should be done in the most conspicuous place: the far corner from the entrance. After making the necessary measurements, if necessary, it is necessary to cut the length of the panel with a hacksaw. Having adjusted the size, you should insert it into the side molding on one side, and on the other, fix it on the crate. The second panel needs to fit exactly into the groove of the first. Then it is pressed tightly and fixed with the frame slats. We carry out the installation of other plastic panels in the same way.
To achieve a better seal, you can coat the side edges with a small layer of silicone. When inserting the last panel, it is most often required to crop to width. To do this, you need to attach it to the wall, draw a cutting line and remove the excess with a hacksaw. Don't forget about switches and sockets. For them, you need to cut holes with a sharp knife, and after the installation is completed, these places should be closed with plastic boxes.

Installation of moldings
Finishing the process of decorating the walls with plastic panels, it is important to ensure that the walls are smooth, monolithic and without gaps at the seams. To do this, you need to close all joints, corners and joints with plastic moldings.
They are designed to allow panel edges to be inserted from both sides. This will make the finish look significantly more attractive.
It is also necessary to install a decorative molding at the transition from the wall to the ceiling. And along the perimeter of the floor, you need to fix a plastic skirting board. After that, you can enjoy the work done with your own hands.
Where to start construction
Let's start with the tools you need to do this job:
- drill or hammer drill;
- construction stapler and staples for it;
- silicone sealant (in the color of the panels or colorless);
- screws or dowels;
- level and tape measure.
Now for the plastic panels themselves. Modern market building materials will offer you not only different manufacturers and different quality of plastic panels, but wide choose colors (monochromatic, with and without a pattern), imitation natural materials, sizes and much more. Its popularity is primarily due to its enormous number of advantages.
- Firstly, it is its accessibility, because in comparison with others facing materials plastic panels are relatively cheap, so anyone can buy them.
- Secondly, the ease of installation, which is expressed in the fact that anyone, without exception, with their own hands can carry out the correct work with this material. In addition, the panels can be positioned both vertically and horizontally, and diagonally, and they dock perfectly, without seams.
- Thirdly, plastic is highly moisture resistant, so it is often used in bathroom and balcony cladding.
- Fourthly, they are very practical to care for, that is, they can be washed and cleaned with any household detergent, without paying special attention to the composition and concentration.
- And, fifthly, it is the durability of this material and its practicality.

Install the panel fasteners first. This is the finishing element, as well as the inner or outer corner. If you are going to panel the entire wall all the way to the ceiling, then install a ceiling plinth as well.
We begin work on plastic wall cladding with our own hands with preparatory activities:
- align the ceiling and walls, and then measure them;
- we buy the plastic itself, but it is better with a margin and taking into account the place where you are going to use it (hallway, balcony or other), as well as the interior of the room;
- guides and, if necessary, heat and sound insulating material.
Now we go directly to work with the crate and panels. You need to know that the installation of plastic panels can be carried out in two ways: frameless and frame.
The latter option is used much more often, since the plastic cladding is made just for the frame. Well, the frameless version is used mainly in plastic cladding of a balcony, so as not to reduce the already insufficient space.
Material selection
Naturally, you want to quickly sheathe the walls with plastic panels, but you must first select them. And this should be approached with great care. After all, the final result depends on the correct choice. The following rules are taken into account:
- For bathrooms and shower rooms, as well as for all types of wet rooms, panels are suitable that are moisture resistant and do not have a relief.
- For corridors and balconies (loggias) - it is better to choose products that are immune to mechanical damage.
- Wall decoration with wall panels in living rooms is carried out with PVC coverings, which have a different relief and pattern. They also imitate natural materials.
 Plastic lining has good moisture resistance, so it is often used for finishing bathrooms.
When buying, you need to pay attention to the following indicators:
The appearance of the packaging. It must be intact, no damage.
It is important to choose material from the same batch.
Number of cells. The bigger, the better
You can also navigate by weight. Lightweight products are a sign of a deficiency.
Lock. To do this, check the two selected panels for connection - it must be reliable.
Price. Products that are too cheap are most likely fakes.
Wall cladding with panels requires preliminary calculations. They relate to all stages of work. This helps to avoid problems in the future, as well as significantly save money and time.
- The location of the profiles is taken into account. It can be vertical or horizontal. It depends on the installation of the plastic panels. In any case, they are always perpendicular to the lathing posts.
- The distance between them is also taken into account, which is equal to 30 - 45 cm. From all, the required number of frame parts is calculated (+ two profiles along the edges of the wall).
- The number of dowel-nails is taken into account from a step of 35-50 cm.
- Clamps - there are 20-25 pieces per square meter.
- The size of the wall and the selected panel is measured. One indicator is divided by another, and the required amount is obtained.
- Tile material is calculated based on square meters.
This group includes all other parts and moldings. For the calculation, measure the entire perimeter of the room. The number of external and internal corners is taken into account.
 Additional elements that can be useful when decorating walls with plastic panels
On a note! All calculations are made with a 10% margin. Such a reserve is due to the fact that various damage to products or other unforeseen circumstances are possible. And also door and window openings are taken into account.
General recommendations for working with PVC panels
- Before starting work, let the PVC panels lie in the room for at least 2 hours.
- Only finish the walls after the floor and ceiling are finished.
- Make removable panels in those places where communications are located.
- Draw in advance the electrical diagram for the room and prepare the sheets of PVC panels: cut out the holes according to the location of the fittings in the diagram.
The use of PVC panels greatly facilitates the time and material costs during the renovation. Plastic sheets can be installed by hand. At the same time, the appearance and quality of work will not suffer: plastic sheets are so easy to install that even a beginner in repair can handle them.
How to install the frame base
You should start with the installation of the frame (lathing).
First of all, you need to purchase the guides that are needed for the crate.
It is necessary to pay special attention to the quality of the installation, or rather, to the evenness of the installed panels. Guides are made of two main types of material - wood and metal, recently plastic guides have appeared on the market, but so far this is a rarity
Guides are made of two main types of material - wood and metal, recently, plastic guides have appeared on the market, but so far this is a rarity.
If you choose wooden slats, then it must be a material of good drying and dimensions of at least 50 mm in width and at least 20-22 mm in thickness.
We determine the length based on the height of the room, but we take a few centimeters in reserve, since the ceiling may not be perfectly flat and it is easier to cut off the excess than to instruct the short one.
Metal guides standard sizes and experts advise using them all the same.
The lathing is mounted based on how the panels will be located. Let's consider the most common way of placement - vertically.
In this case, we place the guides horizontally - the upper and the lower profile, which we fasten with dowels or self-tapping screws and align strictly according to the level. Then we fix the guides between them (intermediate) at a distance of no more than 50 cm.

In the event that the wall to be finished does not finish the cladding process, then it makes sense to install an internal or external corner molding in its corner, everything will depend on the very corner of the room.
Also, when you do the installation of plastic panels with your own hands, you will come across the concept of a profile (sometimes they are called moldings) - these are wall decoration elements that greatly facilitate the work, namely, the panels will be attached to them.
So, for example, the starting profile is used to determine the point of departure of all finishing work, it is attached first.
The finishing profile is installed in front of the very last panel. The outer corner profile is used for sheathing areas such as windows, doors and niches. Internal profile - in all corners inside the room. Docking - when the length of the panel is not enough and you need to add another one, or if you are using a design solution and you need to build a mirror or other object into the wall.
Features of PVC wall panels
PVC sheets are a modern finishing material that has a number of advantages. That is why they are often preferred over other types of decorative coatings. TO positive aspects The use of PVC includes:
- Plastic panels are an environmentally friendly material that does not emit harmful substances during operation. This property allows the panels to be used in living quarters, including children's playrooms.
- A wide range of design solutions: PVC stone or tile, floral prints and children's images.
- The surface of PVC panels is suitable for secondary use: It can be painted, painted and pasted over.
- The plastic is assembled in the form of small cells, which allows it to keep warm for a long time.
- The panels are easy to fit to each other, which allows you to finish the room yourself in a short time.
- Panels can be laid horizontally, vertically, diagonally relative to the floor and ceiling level.
- The plastic is durable and can withstand the weight of the fittings: electrical outlets, ventilation hatches, hooks and shelf holders.
- The plastic from which PVC is made is frost-resistant: it can be mounted on open balconies or verandas.
- PVC panels are water-repellent, so they are used to decorate rooms with high humidity. The decoration of the toilet with PVC panels will become a great solution and will save on expensive tiles. Finishing with panels that imitate stone is possible.
- To decorate PVC walls with your own hands, no additional wall preparation is required.
- Plastic washes well. The gaps between the panels keep out dust and dirt particles.
Despite the obvious advantages, PVC panels are not a panacea for repairs and have a number of disadvantages that do not allow their use in residential premises. These include:
- The panels are placed on the crate. In order to mount it with your own hands, you must have special knowledge and tools. Aligning such a batten takes a significant amount of time.
- The material does not allow air to pass through, it is undesirable to install it in bedrooms.
- The surface of the plastic is glossy, therefore it creates glare in strong sunlight. For this reason, it is not recommended to install plastic in rooms where sick people live.
- According to the rules fire safety PVC plastic should not be placed in corridors and on escape routes: when exposed to fire, the plastic begins to melt and releases additional amounts of carbon dioxide mixed with toxins. This can make it difficult to evacuate people from a burning room.
Disadvantages of plastic lining
- Despite many misconceptions that PVC panels can be easily used for any surface, practice shows that this is not true. For a competent finish, in any case, preliminary preparation is required. Moreover, we are talking not only about the removal of old wallpaper and worn out plaster, but also about the installation of the lathing. Otherwise, the surface of the panels will be wavy.
- To work with plastic, a special set of tools is required, which will be discussed below. Even the most experienced worker will not be able to make high-quality repairs with a hacksaw and a hammer.
- Plastic panels are not highly hygienic. Each panel is a hollow structure, inside which, if not properly cared for, various insects can settle, but this is more a rarity than a rule.
- Plastic can hardly be called a fire-resistant material. Even with persistent attempts to set fire to the PVC panel with matches or a lighter, it will be extremely difficult to carry out this. However, in the event of a fire, PVC will not only perfectly support the fire, but also release a large amount of toxic substances during the combustion process.
Decorating with plastic panels cannot be carried out by an absolutely ignorant craftsman. It is necessary that a person has at least basic skills in working with plastic panels, or at least studied in detail the peculiarities of using PVC.
When purchasing goods, everyone pays attention to the manufacturer. Image and reputation mean a lot and are a kind of quality indicator
PVC panels in this sense are no exception, there are hundreds of manufacturers on the market, but only a few have won the recognition of consumers.
Venta (Belgium). The company is a leader in the market of finishing materials in Europe and all over the world. The company regularly opens new production facilities in the most different countries and in 2003 a plant in Russia began operating. This made it possible to reduce the cost of plates for the domestic buyer - now Russians can buy models of European quality at affordable prices. The assortment list includes a large selection of panels of all colors and shades, products have the property of increased strength, and printed panels are also available.


How not to make a mistake in choosing panels, see this video.
Preparatory work
The surface of the wall is cleaned of the old coating. Flaking plaster is removed. Dust and dirt are removed. Walls do not require perfect alignment. But if possible, you need to try to make them even. This will make it more convenient to fasten the crate.
TO preparatory work applies to the application of antiseptic composition to the walls. This prevents the development of fungus, which causes an unpleasant odor in the bathroom. What will affect human health.
Mold can be avoided by creating an efficient ventilation system. If natural ventilation is not enough to ventilate the room, it is recommended to use an electric fan.
Before sheathing the wall with plastic panels, it is recommended to replace the old metal pipes... First, when plastic panels are used to cover the pipes in the bathroom, it will be more difficult to find a leak. Secondly, the pipes are located at a short distance from the surface of the walls. And this will require more extension of the crate, which will reduce the area of the room.
List of sources
- svoimi-rykami.ru
- stroy-podskazka.ru
- remontick.ru
- UnasBalkon.ru
- EconomOtdelka.ru
- remontonly.ru
- decorstars.ru
- stroyday.com
Plastic panels are an excellent material that is commonly used to provide various surface decorations. Conveniently, this product can be used in almost any room. It becomes possible to create a truly unique interior. And wall decoration with plastic panels is a fairly simple event that does not require construction experience. Although you still need to know how to do everything most correctly.
Plastic panels (lining) have another name - PVC. This is the abbreviation for the main ingredient in the material - polyvinyl chloride. The production is quite simple and consists in the fact that the molten substance is driven through special forms. This creates a strip that is cooled and cut into right size... It turns out an excellent finishing material that can withstand almost any temperature (within living quarters).

Wall panels vary in size:
- In terms of thickness, there are two types - five and ten (eight) millimeters. The second indicator is combined into one, for it there are the same additional elements.
- Width varies from twenty to thirty-seven centimeters.
- There are three main dimensions in height - 2.6 m; 2.7 m; 3m.
Of course, there are many more sizes. So, the width of the plastic lining reaches 120 cm. You can also make any desired non-standard to order.
Advantages and disadvantages
It is impossible to imagine finishing and construction material, which would not have its pros and cons.

Wall panels have the following advantages:
- The service life is practically unlimited.
- Excellent moisture resistance. With the correct connection, the seams create a complete tightness.
- The material protects the room from extraneous noise.
- Reliability and good abrasion resistance.
- The honeycomb structure provides additional thermal insulation. When cladding walls with your own hands using lathing, additional space appears for the insulating layer.
- Modern technologists allow you to create various types of decor. More recently, the choice has been quite limited, if not primitive.
- Easy to assemble. No complicated tools required.
- Low price compared to other products.
- Environmental friendliness.
Flaws:
- Failure to withstand constant temperature fluctuations. This is not a seasonal phenomenon.
- In case of fire, corrosive substances are released from plastic parts.
- Incorrect installation - reduces many positive qualities to zero.
 Like any other plastic, PVC panels are "afraid" of high temperatures, and when they catch fire, they emit harmful substances.
 On a note! Currently, there are panels that are distinguished by the ability to withstand high temperatures... But they must be specially marked.
Material selection
Naturally, you want to quickly sheathe the walls with plastic panels, but you must first select them. And this should be approached with great care. After all, the final result depends on the correct choice. The following rules are taken into account:
- For bathrooms and shower rooms, as well as for all types of wet rooms, panels are suitable that are moisture resistant and do not have a relief.
- For corridors and balconies (loggias) - it is better to choose products that are immune to mechanical damage.
- Wall decoration with wall panels in living rooms is carried out with PVC coverings, which have a different relief and pattern. They also imitate natural materials.

When buying, you need to pay attention to the following indicators:
- The appearance of the packaging. It should be intact, no damage. It is important to choose material from the same batch.
- Number of cells. The bigger, the better. You can also navigate by weight. Lightweight products are a sign of a deficiency.
- Lock. To do this, check the two selected panels for connection - it must be reliable.
- Price. Products that are too cheap are most likely fakes.
Additionally, we suggest watching a video on how to select and attach wall panels.
Calculations
Wall cladding with PVC panels requires preliminary calculations. They relate to all stages of work. This helps to avoid problems in the future, as well as significantly save money and time.
Frame:
- The location of the profiles is taken into account. It can be vertical or horizontal. It depends on the installation of the plastic panels. In any case, they are always perpendicular to the lathing posts.
- The distance between them is also taken into account, which is equal to 30 - 45 cm. From all, the required number of frame parts is calculated (+ two profiles along the edges of the wall).
Fasteners:
- The number of dowel-nails is taken into account from a step of 35-50 cm.
- Clamps - there are 20-25 pieces per square meter.
Panels:
- The size of the wall and the selected panel is measured. One indicator is divided by another, and the required amount is obtained.
- Tile material is calculated based on square meters.
This group includes all other parts and moldings. For the calculation, measure the entire perimeter of the room. The number of external and internal corners is taken into account.

On a note! All calculations are made with a 10% margin. Such a reserve is due to the fact that various damage to products or other unforeseen circumstances are possible. And also door and window openings are taken into account.
Frame methods of wall decoration
Do-it-yourself wall cladding with plastic panels can be done in various ways. But, before choosing the most suitable one, you should prepare necessary tool and purchase material.
For work you will need:
- Perforator and a set of drills.
- Drill and drills.
- Screwdriver or screwdriver set.
- Sealant gun.
- Level and construction knife.
- Hardware and other consumables.
- Stapler.
- Hammer.
- Required material and additional elements.
Training
After calculations, it is necessary to prepare the surface for cladding with plastic panels. This is done based on the chosen method.

- Regardless of the options, the necessary calculations are made and all dimensions are taken.
- Racks for the frame are marked and cut off - they are numbered in order.
- All unnecessary things are removed from the walls. If there is damage in the form of cracks, then they are putty.
- The surface is covered with an antiseptic. It is better to use two in one - a primer with the addition of substances against fungus and mildew.
- If it is assumed that the surface will be glued with PVC, then it is pre-leveled.
- The use of wooden elements should start with impregnation. This is done with antifungal compounds.

On a note! The primer is applied in two layers. The first strengthens the surface, the second fixes the result. Wait until they dry completely; this takes at least 6-12 hours.
Lathing and its installation
The frame is made when there are large surface imperfections, and too much effort will have to be made to correct them. Finishing with PVC panels on the crate - helps to hide all the unevenness of the walls. This method has two more noticeable advantages: it is possible to lay additional elements of insulation and hide communications. To achieve the desired result are used different materials, which do not differ much in the way they are mounted.
Creating a timber frame

- For this, wooden blocks are used, which have a cross section of 40 * 40 (40 * 30) mm. Fastening is done on dowels to concrete bases and on self-tapping screws to wooden ones.
- When the room is covered with panels vertically, the installation starts from the edges. Namely, two initial guides are screwed on. Next, calculate the same distance and put the rest of the racks.
- Crossbars are attached between them.
- If it is required to achieve greater rigidity, then additional vertical slats are installed.
- It should be borne in mind that every detail is checked by level. If alignment is required, then use lining from the remnants of a bar. They are pre-attached to the wall.
- For a greater effect, the joints of the racks and crossbars are coated with silicone sealant.
Advice! Wood cladding is best used for dry rooms with a mild indoor climate.
Lathing made of metal profiles

This option literally repeats the installation of gypsum boards. After such work, a lot of scraps remain, which, if desired, can be used for wall cladding with PVC panels.
This method is not used as often as others. The fact is that the cost of such a frame is very high.
- First, fix the top and bottom guides. This is done accordingly to the floor and ceiling. They are pre-aligned with each other.
- Now comes the turn of the vertical guides. They are aligned with each other and fixed on the wall. This is due to the U-shaped brackets.
- The horizontal cross members are fastened at equal intervals. In general, this is not necessary, the metal profile already creates sufficient rigidity.
When you have to bypass doorways, the vertical posts are pre-strengthened with a wooden bar.
Use of plastic profiles
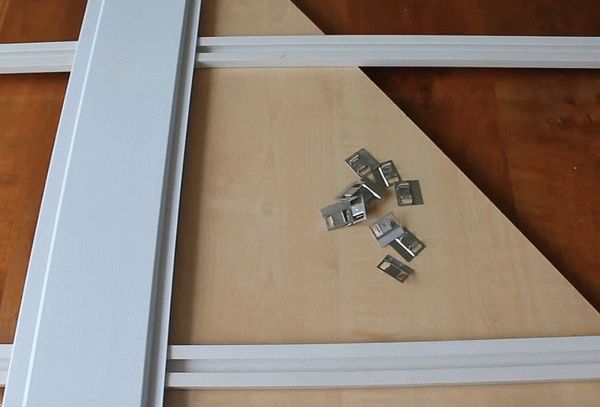 Plastic profiles for PVC installations lining
 Decorating with plastic panels using this method is one of the most modern. It surpasses in many ways all the types described above, but its popularity is not yet so high. This is due to both cost and increased surface requirements. But the plastic crate is not afraid of moisture and mold.
- Installation of such a structure on the wall takes place in a very short time. This is done with dowels. Often, such guides already have a reaming, which greatly facilitates the process.
- They are attached with a small step of thirty centimeters. This is done in order to give the greatest rigidity.
- In principle, working with such elements, nothing else is required. But it is very important to observe perfect perpendicularity. This is the only way to ensure the correct cladding with PVC panels.
 1 - fastening plastic profiles to the wall; 2 - installation of the corner element; 3 - installation of plastic panels, fastening to profiles with clamps; 4 - installation of the upper plinth.
 On a note! Plastic profiles are great for interior walls bath complexes.
Installation of plastic panels
When the frame is finally ready and level-checked, the main process begins. He gives a complete understanding of how to sheathe walls with plastic panels.
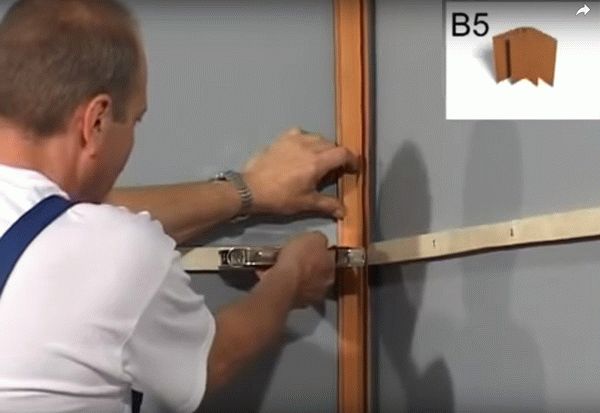
Wall cladding with panels when using a plastic profile is much faster. It already has grooves in which the clamps are fixed. They securely fix each element. And also make it possible to disassemble the entire structure without damage.
Glue mounting
If the walls are flat enough, then work can be carried out without using the frame. Liquid nails are used as fasteners.
When choosing an adhesive, you need to pay attention to its composition. It must be free of solvent. Otherwise, the lining will simply collapse.
Training
When decorating walls with PVC panels with your own hands occurs according to the glue option, then the preparation of the walls is most carefully approached. It will not be enough just to remove the excess - it is necessary to completely clean the surface. And in some cases, create a new layer of putty. And be sure to apply an antibacterial primer.

On a note! Currently, there are types of putty that include antifungal agents.
Pasting
The whole process should be fast enough, and all movements should be verified. The fact is that it will be almost impossible to fix the shortcomings. That is why this method requires some skills.

So:
- The primer coat should dry well. After all, plastic finishing cannot be carried out on a wet wall. Nothing will hold.
- The glue is prepared according to the instructions. When canned compositions are used, they are thoroughly mixed beforehand.
- For work, use a special gun, roller or brush. The area of application of the adhesive composition should not exceed two structural elements.
- The corner piece is installed first. A lining is inserted behind it and pressed against the wall. You need to do this without extra effort, and even more so - point clicks. It is very easy to damage the cellular structure of the material.
- So, sequentially, they paste over the entire area with plastic with their own hands. At the end, the finishing moldings are fixed.
- Now comes the turn of decorative elements.
Wall paneling can also be done on adhesive tape. This method not yet so sealed, so you should not trust him. And the point lies precisely in the tape used. Its quality does not always correspond to the required parameters.
Of course, each master can offer his own variations, which certainly deserve respect. But, when real experience is insignificant or completely absent, then it is better to follow the proven path, even if it takes a little longer. After the first success, it will become very clear: how to sheathe the walls with plastic.