What can be cooked from squid: quick and tasty
How to make a wooden deck: step by step photos construction of an open terrace in the country.
The article presents a photo and description of the process of attaching a wooden platform to a wooden country house.
The terrace is a raised horizontal platform, an extension to the house, designed to accommodate furniture and interior items, for comfortable outdoor activities and recreation.
Usually terraces are installed right next to the house, summer cottage or summer kitchen, in addition, over such a platform, you can erect a pergola, a canopy, a gazebo, or glaze and make a veranda.
In this case, we will consider the construction of the simplest wooden terrace, this will be an extension to a wooden country house.
Construction of a wooden terrace: step by step photos.
Initial stage: preparing the site for construction, clearing the site of debris and vegetation, marking the dimensions of the future building.
The next stage is the installation of the foundation, in this case, a columnar foundation is made, concrete blocks... Small holes were dug under the blocks, and a crushed stone pillow was made in each hole.

Concrete blocks are level in one horizontal plane. During the casting, reinforcement inserts were installed in the blocks, which will be used to fasten the strapping from the bar.
We will make a strapping from a bar with a section of 100 x 100 mm. We fasten the beam to the mortgage with long bolts.

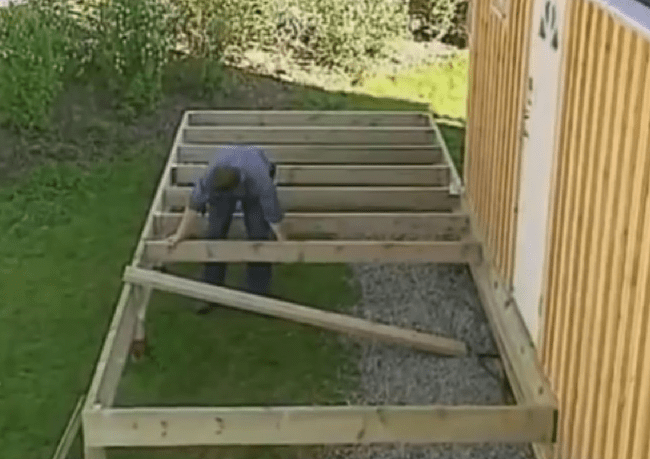
We lay logs for the floor, as a log, you can use a bar or a board laid on the edge, the option with a board is preferable, since the board will cost less than a bar, if you have a sawmill, you can dissolve the bar into boards and less materials will be needed.

We attach the logs to the harness made of timber, check with a building level and level them so that all the logs are at the same level. From the side of the house, we fasten the logs with their ends to the metal corners to support board fixed on the wall of the house. We attach sidewalls from the same board to the back ends of the lag.

The logs must be treated with an antifungal impregnation, as an option, you can use the old proven method, cover the logs with used engine oil.
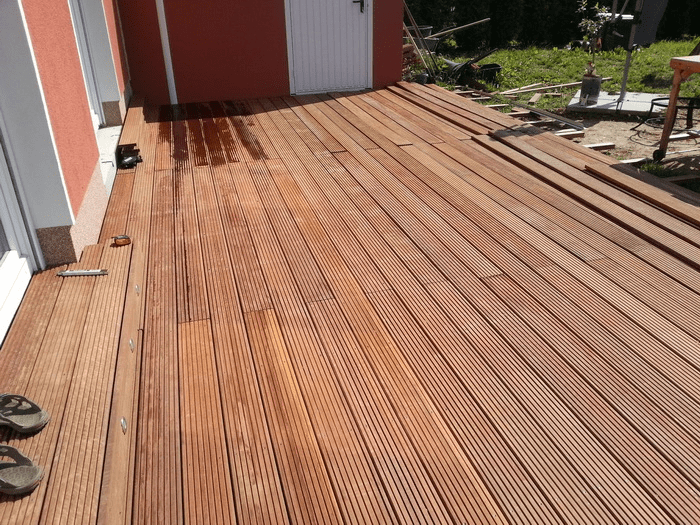
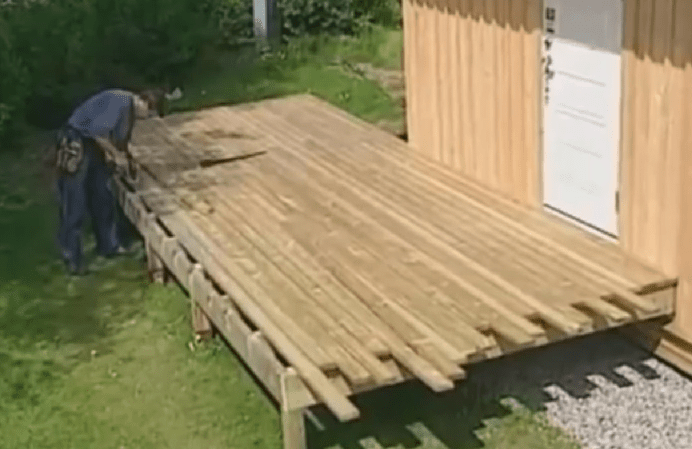
Plank flooring as it is open terrace, then the wood will be affected by atmospheric precipitation, if the wood becomes damp, it begins to swell, therefore, floorboards should not be laid end-to-end, but with a small uniform gap of 3 - 5 mm, which compensates for the expansion of the wood. We fasten the boards to the logs with nails or screws.

We process the entire surface of the floor with a grinder we use sandpaper medium grain size.
The wooden terrace must be treated with an antifungal impregnation, which will protect the wood from rotting, then covered with paint or varnish for outdoor use.

For the terrace, use paint or varnish intended for outdoor use only!
It is very important not to save on high-quality varnish or paint, otherwise in a couple of years the coating will swell and you will have to sand and repaint everything, the cost of materials will be even higher, so it is better to immediately process the wood with high-quality materials.
A terrace is a platform attached to the house or free-standing. Usually it resembles a large porch adjacent to the wall at the entrance to the house. In the southern regions, the terraces are usually open. V middle lane- covered with awnings or awnings. The design of the terrace can be initially included in the construction plan of the house and built on the same foundation. But, if the house already exists, it will not be difficult for anyone to attach a terrace to it. home master... Let's talk about what basic terrace structures exist and how to build them yourself.
Before proceeding with the construction of the terrace, you should carry out the design and decide which design option to give preference to.
The simplest terrace designs are made at ground level. These are platforms paved paving slabs, paving stones or clinker. Paving is performed on a gravel-sand cushion, laid in a pre-arranged excavation in the ground, 20-30 cm high.
On the gravel bed, you can also build a wooden deck with planks or composite decking. On top of the dump, wooden bars or steel profiles are laid, playing the role of a lag. Wooden support beams are mounted on them. Flooring boards are fixed on top.
Terraces that are more complex in execution, raised above the ground level. Moreover, they can be raised both by 15-20 cm and by 2-3 m (the level of the second floor). In this case, you cannot do without a foundation. Such a terrace rests on reinforced concrete slabs, blocks or piles that play the role of a monolithic, columnar or pile foundation. An example of a raised terrace: A reinforced concrete slab deck lined with ceramics or porcelain stoneware. During the construction of a wooden raised terrace, on the selected foundation (concrete posts, slabs, piles), wooden logs are fixed, which are sheathed from above with an edged or terrace board (decking).
We will provide you with several options for building a terrace, decorated in the form of informational master classes.
Option 1. Clinker-paved terrace
This version of the terrace is built on a sandy tamped cushion, at ground level. Clinker tiles, from which the flooring is laid out, allows you to form curved, curved lines of the site. To clearly define the boundaries of the terrace, fences are installed along its perimeter. For example, small wooden posts soaked in antiseptics.
The work is performed as follows:
1. Clear the soil at the site of the paved terrace. They remove stones, driftwood, remove the top layer of soil, 20 cm thick.
2. Sand is poured into the resulting recess, with a layer of 15 cm.
3. A trench with dimensions of 70x70 cm (depth, width) is dug along the intended border of the area. A layer of gravel or sand, 15-20 cm high, is poured at the bottom of the trench. It is necessary for better drainage of water at the installation site of the fence posts.
4. In the trench, on the drainage layer, install two rows of wooden posts (on the inside and outside). Their verticality is controlled by the building level. The posts installed at the ends of the fence are fastened with self-tapping screws. This solution provides stronger adhesion of structural elements, does not allow them to shift and fall out of the row.
The fence looks like a closed "pocket", which will later be used as a flower bed framing the terrace. If the arrangement of a flower bed is not included in your plans, then the curb can be made in one row, installing bricks, ready-made plastic fences, etc. in the trench.
5. In order to prevent the soil from washing out from the future flower bed, a layer of roofing material is laid inside the enclosing "pocket", putting it on the walls of the posts. Roofing material is laid at the height of the planned level of backfill with soil. At several points, the waterproofing layer is fixed on the walls of the posts with screws or nails.
6. Pegs are driven into the ground, from the wall of the house to the fence, with a pitch of 3 m and cords are pulled over them with a slope of 2-3 cm per 1 running meter. Thus, the level of sand filling is outlined, which must necessarily form a slope for the drainage of rainwater from the terrace area.
7. The sand backfill is tamped and leveled according to the level of the stretched cords, adding, if necessary, the missing amount of sand.
8. Begin the installation of clinker tiles. Each tile is laid on a sand layer, pressed firmly and tapped on the surface with a rubber mallet.
9. The remaining free areas, between the paving and the fence, are covered with large decorative gravel.
10. Seams between tiles are filled with fine sand using a stiff brush.
11. Excess sand on the surface is washed off with a stream of water from under the hose. The pressure should be low so that the sand does not wash out of the seams.
12. To allow rain moisture to drain freely from the paved area, drainage is performed. To do this, along the posts of the fence, lay a drainage pipe with slots wrapped in jute cloth with a slope (so that debris and soil do not get into the slots). For camouflage, the surface of the pipe is covered with gravel.
End of stacked drain pipe connected to the storm sewer pipe. Through a tee, a drainage outlet is also connected here. A gutter with a grate is installed in the right place.

Option # 2. Wooden terrace on gravel
A durable and easy-to-use gravel deck can be easily made from steel profiles (logs), wooden blocks and planks. Since in this case they will practically lie at the level of the ground, for this version of the terrace it is allowed to use only wood from hard, not subject to decay, species: larch, oak, garapa, teak, merbau, etc. Before use, the boards are treated with antiseptics that protect them from moisture, decay, insects, UV rays.
Progress:
1. At the site of the future site, remove the top layer of soil, 20-30 cm thick.
2. Fill the pit with gravel.
3. Steel profiles are laid on gravel, forming a slope of 2-3 cm per 1 running meter. The distance between the profiles is about 500-600 mm.
4. Support beams are attached to the profiles. The distance between the beams is about 600 mm if the thickness of the decking is 27 mm. With a board thickness of 20 mm, the spacing of the beams will have to be reduced to 400 mm. For additional protection of the beams from moisture, in the places of their contact with the profiles, rubber gaskets are laid, cut along the width of the boards.
5. The load-bearing beams are covered with a dark protective fabric (geotextile, for example) to prevent weed growth.
6. Perpendicular to the supporting beams, the flooring is assembled from boards with gaps of 2-3 m. Spacers are installed between the boards and the protective fabric to prevent the accumulation of moisture in the floor space. An expansion gap of 1-2 cm is left between the walls and the flooring.
7. At the end of the assembly, the boardwalk is covered with antiseptics, staining impregnations or varnish.

Option # 3. Columnar terrace
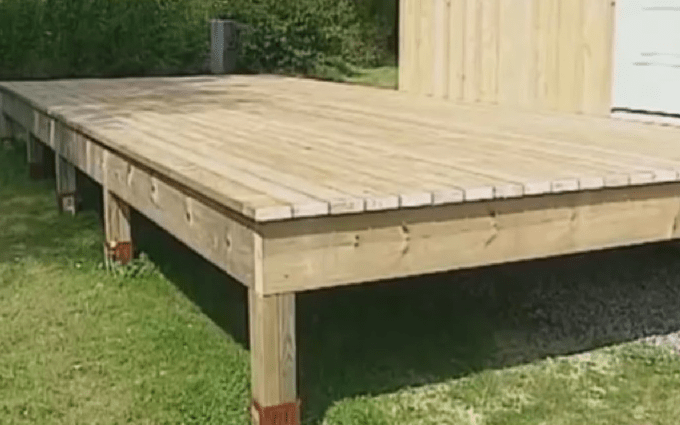
A wooden terrace on a columnar foundation is a traditional and most win-win option. The structure is adjacent to the house and, in fact, makes one whole with it. The columnar foundation is able to raise the platform by 15-60 cm. At the same time, the ventilated space formed under the flooring contributes to effective ventilation of the terrace elements and minimizes the possibility of wood decay.
Step-by-step construction instructions:
1. To connect the future terrace site with the house, the first beam is fixed horizontally (at the level of the terrace) on the adjacent wall. A galvanized steel drain is mounted above the upper edge of the beam.
2. In places where concrete posts are installed, excavations are made. The posts should be installed with a step of 1.5-2 m. The deepenings are made taking into account the desired elevation of the terrace, the height of the posts and the obligatory layer of gravel bedding, 10-15 cm thick.
3. Gravel filling is poured into the grooves, then trapezoidal concrete posts are installed. A metal embedded part for square beams is attached to the upper platform of each column.
4. The support beams are inserted into the embedded parts on the posts, fixed with screws.
5. On top of the support beams, perpendicular to them, the platform beams are mounted at a distance of 40-60 cm from each other.
6. Terrace boards are screwed to the platform beams with screws, observing the gaps of 2-3 mm between them. Clearances are used to prevent rainwater from accumulating on the deck and allowing it to drain freely into the subfloor.
7. If unprepared materials are used for the terrace edged boards, after the installation is completed, the deck surface may appear uneven. Therefore, the floor is leveled with a grinder, bringing all points of the terrace to the same level. After sanding, remove wood dust and treat the boards with impregnation - antiseptic or staining. When using a special decking board, additional surface grinding is not required.

A columnar foundation for a terrace can also be built from flat concrete blocks. A similar option for building a terrace is presented in the video:
Option # 4. WPC terrace on a pile-screw foundation
Sometimes it is irrational to install a terrace on a columnar foundation. For example, at high bedding groundwater, on wet and unstable soils. In this case, the soil will swell and push out the concrete posts. Difficulties in the arrangement of a columnar foundation can also arise in areas with large differences in levels, on slopes. In all these cases, for light buildings, another type of foundation is more successful - pile-screw. Screw piles make it possible to raise the terrace area to the required height (even by 2-3 m!), perfectly hold the wooden flooring with all the necessary furniture. In addition, the screwing of the terrace screw piles takes place within 1 day.
Consider the technology of building a light WPC terrace on screw piles.
Progress:
1. Determine the pile installation points. They are screwed in with a step of 2-3 m, with mandatory installation in the corners of the future site.
2. Screwing in piles is performed using special equipment or manually. When screwing in manually, metal scrap is inserted into the slots on the upper edge of the pile, which serves as a lever. In the process of scrolling this lever, the pile breaks the soil with its blades and falls to the required depth (below the level of soil freezing).
3. The screwed-in piles are cut to the level of the future supporting frame.
4. Inside each screwed pile is poured cement mortar to increase its strength and prevent internal corrosion.
5. A steel metal frame is mounted on top of the piles. shaped pipes... The frame looks like a frame with intermediate elements located in 50-60 cm increments. The finished frame is coated with a primer, paying particular attention to the welding points.
6. Aluminum logs are laid on the piles. Since when aluminum comes into contact with the steel of the frame, the corrosion process starts, it is recommended to lay the logs only through rubber gaskets.
7. Fastening of decking boards to aluminum beams is performed using terminals that are inserted into the slot of the beams. The terminals allow you to mount the boards without the use of self-tapping screws and the need to drill holes in them. If the used aluminum profile does not allow the installation of terminals, the fastening of the decking boards is carried out traditionally - using self-tapping screws.
8. After assembling the composite decking, an aluminum enclosing profile is mounted at the ends of the decking. Now a deck made of composite decking is virtually indistinguishable from an expensive wooden structure!

How the installation of the terrace on screw piles is carried out is shown in the video clip:
A country vacation in the country is, first of all, the opportunity to breathe the fresh air of a garden or forest twenty hours a day. Rest and be in a stuffy box at the same time country house it is impossible, therefore, a summer resident who values his health sooner or later equips a full-fledged summer terrace with an awning or a roof at the dacha with his own hands. Building a terrace with your own hands is much easier than a gazebo or a veranda, so arranging a special area for a table and garden furniture, as a rule, will not require large investments, despite the fact that the effect will be quite impressive.
What is the secret of the terrace
Despite a certain external similarity between the veranda and the terrace, the purpose of these buildings is different, just as the sizes and designs differ. A veranda is a part of a house with closed walls, windows and a full roof. The terrace is a well-maintained open area for relaxing on a sunny day with a canopy, awning or awning. The difference is easier to understand if you look at the photo or drawings of a classic terrace.

When choosing a place and method of how to build a terrace with your own hands, you can use the classic techniques for arranging a recreation area:
- In the immediate vicinity of the house, using the platform and steps as a porch and platform in front of the house;
- Take it out in a separate area and place it in a cozy, sunny and less ventilated place suburban area... Wherein a prerequisite is the arrangement of paths, stairs or steps with which you can quickly get inside the house;
- Build a special type of roof or ceiling of a country house for a terrace with your own hands, on which a recreation area will be located.
Important! It is clear that verandas and gazebos are not built this way, so any drawings and recommendations for the construction of terraces can be reworked creatively, changing the dimensions according to your wishes. The main thing is that the design is comfortable, durable and safe to use.
The dimensions of the terrace areas, as a rule, can be several times larger than the size of the gazebo buildings, and even more so, the verandas. Almost always, the base of the site is built of wood or composite, raising the structure above the ground so that moisture and dampness do not affect the condition of the boardwalk.

Choosing a device, design and dimensions
The terrace is a one-of-a-kind building, not designed to create shade, but on the contrary, aimed at ensuring the possibility of a comfortable and safe stay in the sun. Therefore, when choosing a project and a site for building a terrace with your own hands, drawings and dimensions, it is necessary to take into account the following features:
- In the construction of a site of any size, raised above the ground by more than 18-20 cm, a fence and railing for the terrace must be present. For buildings that include several sites located at different heights, intermediate steps and handrails are provided;
- The floor, railings and railings should be made of wood or a similar material such as polymer composite. The drawing must indicate the quality of wood processing and the type of coating applied - varnish or a protective composition based on epoxy resins;
- In the presence of a canopy or awning, one edge of the roof should be attached to the main wall of the house, the second rests on stationary supports embedded in the ground to a depth of at least 40 cm with pouring a concrete blind area.
Important! Before choosing a scheme for how to make a terrace, it is important to choose the right material that best matches the design in the drawing.
The easiest way is to build a terrace at the corner junction of two walls of the house, as in the photo. In this case, we build a terrace and automatically get a site in front of the entrance to the house.
Corner terrace construction
The simplest version of the terrace would be to build a platform made of wood on a primitive foundation made of concrete blocks or slabs, as in the drawing. The angular arrangement provides protection of the terrace area from wind and rain from both sides, so there is no need for a wind protection device with polycarbonate sheets or wood shields.
If necessary, you can install a fabric awning, curtain or canopy over the terrace, the dimensions of which will be limited only by the dimensions of the walls of the house. The disadvantages of the design include the fact that with an incorrect slope, a wooden platform can affect the distribution of rainwater, therefore, the calculation and size of a slope of 3-4 o must be immediately recorded on the terrace drawing. The size of the foundation supports for the deck must be calculated according to a sketch or drawing, according to the measurements of the entrance opening above the ground level.

For a lightweight frame structure of a terrace area, it will be enough to lay 12-15 concrete blocks or several dozen clinker tiles as a foundation. First, you will need to remove the top layer of soil, sprinkle with fine gravel, tamp and lay a sand cushion. The most difficult thing will be to maintain the size and thickness of the sand base so that the height of the foundation columnar or slab supports does not exceed the calculated value according to the drawing.

Geotextiles can be laid on the sand, which well prevents the growth of weeds and grass. To fill the floor of the terrace, experts recommend pre-tying the supports with a bar with the laying of lagged beams made of wood. But in this case, it is necessary to increase the vertical size of the terrace in height by 20-30 cm, which is not always convenient. In the simplest case, a 60x60 mm timber is laid directly on the tile and fixed with pieces of reinforcement, hammering it directly into the ground.
The most difficult stage in assembling a budget terrace structure will be planking the flooring with boards. Oak or special is best suited terrace board, made of polypropylene and sawdust, 200x30 mm in size.
For your information! The appearance and dimensions of the composite material practically do not differ from the processed natural board. High resistance to moisture and absolute insensitivity to insects and pathogenic microorganisms make decking boards an excellent substitute for expensive oak wood.
When sheathing the frame of the site, it is necessary to carefully follow the recommendations for installing the decking, given in the drawing. In a similar way, flooring can be made from ordinary boards, pre-treated with an antiseptic.
Building a simple terrace on your own
The average size of the site is 4x2 m. We will install the wooden structure on wooden supports in a swinging pattern. Part of the terrace area will be supported by pillars made of paired timber 120 cm long and 100x100 mm in size, the second part of the terrace will be supported by a plank on the wall of the country house. For the installation of the beam, we will drill holes in the ground with a diameter of 90 mm and drive the supports with a sledgehammer.
Further, the supports driven into the ground must be tied with a flat board or a sheet of thick plywood with a section size of 350x40 mm. When fixing the boards, it is necessary to additionally control the horizontal position of the strapping sheet.
We attach the side trim boards directly to the walls wooden house, in the supports, you will need to perform a wash down for the installation of a longitudinal strapping board.
After assembling the strapping, transverse lag beams are installed, 2.5 m in size with a section of 100x40 mm, which will increase the rigidity of the base of the terrace platform and at the same time serve as a support for floorboards.
At the next stage, the fence of the terrace is assembled. Along the outer contour of the platform, grooves are cut out in the floorboards, after which, as in the drawing, supports are nailed under the railing. A vertical beam or board measuring 100x50 mm, 120 cm high is attached to the lower strapping board using self-tapping screws. On the inside of the racks, a groove for the crossbars is cut, after which the lower bar and handrails for the fence of the terrace platform are installed.

Diagonal struts are stuffed between the posts, increasing the strength of the entire structure of the fence.
Conclusion
The above design of the terrace is simple and affordable for building with your own hands. If desired, a fabric awning can be installed over the terrace area small size or a full-fledged canopy made of polycarbonate or light ondulin. A wooden structure must be treated with protective antiseptics, and the floor must be periodically treated with wax or paraffin mastics.
The owners of private houses and summer cottages strive to make their possessions as comfortable as possible for recreation. For this purpose, terraces are intended, allowing you to enjoy the fresh air and garden views in a comfortable environment. If such a recreation area is not provided at the design stage of the house, it can always be done later. Building a terrace with your own hands is not an easy process, but if you have step-by-step instructions, any owner can handle it.
What is a terrace and its types
In the manuals for the construction of residential buildings, a terrace is a flooring that is raised above the ground and has a supporting base. In dictionaries, it is characterized as a summer building without walls, which can be with or without a roof.
Often, a terrace is confused with a veranda and they do not understand what is the difference between these two structures. The first thing you need to pay attention to when understanding this issue is the presence of a common foundation with the building. The terrace can be built next to the house or at a distance from it: by the pond, over the river bank, anywhere on the site. The veranda always has structural elements in common with the building: walls or foundations.
Several types of terraces have been invented and classified, each of which has its own advantages. Diversity constructive solutions recreation areas allows you to choose the best option for a specific situation.
Types of terraces by type of construction
Terraces are classified according to two main characteristics:
- degree of protection from the environment;
- location.
In accordance with the first criterion, three types of structures are distinguished: open, semi-open and closed.
Open
The most simple construction protected only from precipitation. It is a platform raised above ground level, on which supports are located that hold the canopy or roof. The inner space of such a terrace is accessible to all winds. If it is attached to a house, it has a common wall with it.
Outdoor terraces are built in quiet, sunny places, they are great for areas around the pool, and it is pleasant and safe to walk barefoot on a deck made of flooring.
Semi-open
The terrace is a little more complicated in its constructive solution. It differs from the open one by the presence of 1 to 3 walls. They are solid in whole or in part. A railing with balusters is installed along the perimeter or from 1–2 sides. Salient feature half-open terraces - one solid wall that protects the recreation area from the wind. Most often, this structural element is the wall of the house.
Ideal as an extension to the sauna, used for sunbathing
Closed
Terrace protected from wind and precipitation as much as possible. It can fully be called a veranda if there is a base or walls in common with the house. Most often, panoramic glazing is installed on such recreation areas, allowing you to enjoy nature in the most comfortable conditions. On the closed terraces, fresh air is always provided. For this purpose, mount sliding doors, opening windows, hatches in the roof or awning.
On the closed terrace you can relax even in winter or arrange a mini-greenhouse
Types of terraces by location
An important classification feature of terraces is location. The complex depends on it construction works and the choice of materials for the construction of the building.
Ground
The floor of such a terrace is not a wooden flooring, but a base made of mineral or synthetic, non-absorbent materials. The middle part of the structure (between the floor and the roof) can be open, semi-open or closed. This is an expensive building, which is its main disadvantage. To reduce the cost of construction, it is recommended to raise the floor above the ground level by no more than 4–5 cm. Otherwise, unpaved terraces have many advantages:
- easy to use;
- provide ample opportunities for the design of internal and external space;
- aesthetically pleasing.
- are erected on a sand and gravel "cushion" that compensates for seasonal ground movements caused by the processes of its freezing and thawing;
- paving is done with paving slabs or porcelain stoneware;
- a slope is formed along the perimeter for water flow;
- for the same purpose, the floor has a slope of 2-3 °;
- curbs for structures of this type are not provided.
The dirt terrace is quick to install and is inexpensive
Terrestrial
Ground terraces are also called "ground adjacent". They are fundamentally different from soil-type structures. In the case of above ground, the floor is located at a short distance from the ground and is a flooring made of wood or other materials. Terraces of this type are built anywhere on the site. Unlike ground ones, they do not require a significant volume. earthworks, are erected easier and faster.
Disadvantages:
- lack of high-quality ventilation of the space under the flooring, which leads to a gradual dampening of the materials from which it is made;
- the impossibility of installing a canopy or roof if there is no support for them nearby (house walls). Terraces, located at a distance from buildings, protect from precipitation with “umbrella” structures or canopies, the supports of which are located outside the deck.
Highlights of construction:
- the soil is compacted with the formation of a slight slope to drain rainwater;
- an obligatory structural element is drainage, which ensures the durability of the materials from which the flooring is made;
- on moving soils under drainage layer a thin concrete slab is poured;
- installation of the lag of the flooring is possible on the support posts, which will improve the situation with the ventilation of the space under the floor.
Under the finishing of the flooring, voids are necessarily made for natural air circulation - this will prevent log rotting and extend the service life of the structure
Exalted
The most popular type of terraces. Structures of this type are erected at a distance of 15–40 cm from the ground level. The base is a gravel-sand "pillow" and supports in the form of pillars. It is possible to arrange a shallow strip foundation. Unlike the two previous types of terraces (ground and ground), the floor is not a flooring, but a load-bearing frame, sheathed with finishing material from the outside. There are no disadvantages of sublime structures.
Advantages:
- the possibility of constructing a roof or a shed, regardless of whether the terrace is attached to the house, or is located at a distance from it;
- no need to do large volume earthworks;
- choice of open, semi-open or closed terrace construction.
Highlights of construction:
- the supports are installed on a stable base: a concrete "pillow";
- the use of screw piles is possible;
- when installing a strip foundation, it is necessary to provide vents that provide ventilation of the space under the floor.
Sublime terraces - the best option with difficult terrain or placement near a reservoir
Overhanging
The most complex structures in terms of design and construction. Installation of such terraces is carried out only by specialists with experience in this type of work. There are no standard schemes and calculations for overhanging terraces. Each structure is erected according to individual project... The main and only drawback of overhanging terraces is their high cost.
Advantages:
- provide a spectacular "floating" view of the landscape;
- are built using the latest technologies, which guarantees the strength and durability of structures;
- safe;
- easy to operate.
Overhanging terraces are often found in the mountain resort area, in areas with a significant slope
What to build a terrace from
Wide choose building materials allows you to build a terrace for any budget. Specialized items such as Siberian larch decking are also sold. This material is treated with impregnations that increase moisture resistance and is suitable for open-type structures.
Base and floor
The base of the attached terrace must be of such a height that the flooring with facing material(if any), were 2–3 cm below the floor level of the living quarters. This small drop will prevent rainwater and melted snow from entering the house. This requirement does not apply to free-standing structures.
The base of the terrace is of several types:
- screw piles;
- concrete tape;
- the pillars are brick or concrete.
The first option is most successful when the terrain is difficult, where the terrace will be located. Screw piles are screwed to the required depth so that the heads are in the same horizontal plane. If necessary, the trunks of the metal supports are trimmed with a grinder. Piles with a diameter of 10.8 cm with a 30 cm section of the blades are suitable as a base for the terrace. Supports are installed every 200 cm along the length of the building and every 150 cm along its width.
When installing supports of any type, it is necessary to form a shock-absorbing "cushion" consisting of a 5–10 cm layer of sand and 10–15 cm of medium-sized crushed stone (20x40 mm). Each layer is compacted, while the sand is watered.
- cement M400;
- gravel or crushed stone;
- sifted quarry sand (river sand is not used to prepare the solution).
The maximum distance between the lags is 40 cm, then the finish coating will not bend and will withstand all weight loads
Frame
The structure of the terrace frame consists of three main elements:
- strapping that fits on the supports;
- flooring, which is the floor of the building;
- supports to support a roof or canopy.
The lower strapping is made of a bar with a section of 100x100 or 150x150 mm. The larger the terrace, the more durable the timber is needed. The wood must be covered with a solution that prevents rotting and increases moisture resistance by 1–2 layers. The optimal choice is fire-retardant compositions:
- Senezh Ognebio;
- "Senezh Ognebio PROF";
- Neomid 450;
- Pirilax.
Roof supports can be wooden (timber) or metal (profiled or round pipes). The metal is covered with a layer of anti-corrosion protection: special solutions or moisture resistant paints. For the stability of the supports, the upper harness is made of wood or metal products, in accordance with the design of the terrace.
The frame design also includes crossbeams installed between the supports by the upper strapping. They are designed to hold the canopy and prevent sagging.
Connecting and fastening elements required:
- metal perforated corners and plates;
- pins or staples for fixing the lower strapping to the base (posts or concrete tape);
- screws and nails.
All wooden structural elements must be impregnated with antiseptics or varnished for outdoor use or weather-resistant paint
Canopy
The aesthetic appeal of the terrace largely depends on what and how the canopy is built. This structural element performs not only a decorative role: it protects the interior space from precipitation. The following materials are used for the construction of a canopy:
- polycarbonate;
- roofing, similar to those with which the roof is lined (this technique is effective when erecting terraces attached to the house);
- boards, sanded and treated with fire protection;
- high-strength glass.
There are two options for the construction of the canopy:
- solid, consisting of several canvases or sections of material that form a monolith;
- sliding.
The second option is distinguished by a wide variety of design solutions. The most convenient in operation are sliding awnings, controlled by automation. These are expensive structures, the design and construction of which are carried out by specialists.
Closed terrace canopy can be insulated with mineral wool or foam.
For the installation of a light canopy made of roll material no heavy support needed
Partitions
The structures of semi-open and closed terraces provide for the installation of partitions located along one or more walls of the building. These can be balusters, jibs, or solid panels.
Only durable materials are suitable for the construction of partitions: wood or metal. Railings with balusters can be forged, painted in any color you like. Wooden carvings are also popular.
Suitable for the device of solid partitions:
- boards;
- moisture resistant plywood;
- flat slate;
- polycarbonate;
- sandwich panels.
The choice of material depends on the type of terrace and its design.
The openwork partition makes the teraasa lighter and more graceful, solo and refreshes the interior
How to build a terrace with your own hands
After reviewing the information about all the nuances of the choice of materials and technology for the construction of different types of terraces, each owner will be able to make a durable and aesthetically pleasing extension to the house or a free-standing structure.
Drawings and projects
When choosing a project, terraces are primarily determined with its dimensions. Based on the feedback from the owners of houses with such extensions, several conclusions can be drawn:
- a terrace with a length of 250 cm is optimal for the simultaneous presence of 3-4 people and a minimum amount of small furniture;
- comfortable length - 300-350 cm.
When choosing the size of the extension, you can be guided by the standard dimensions of terraces in Europe and the USA:
- minimum width - 181 cm;
- recommended length - 304 cm;
- the flooring is 2.5–4 cm below the floor level in the house.
The easiest way is to build a terrace, which is planned during the design phase of the house. The attached documentation will indicate necessary materials, their sizes, methods of connection and fastening.
The terrace, designed together with the house, will form a single ensemble with the main building
When designing a terrace yourself, several recommendations are followed:
- the drawing is made on graph paper at a scale of 1:20;
- measurements of the territory are performed using a tape measure, level or rangefinder;
- take into account the need for a slope of the flooring in the direction from the wall of the house;
- indicate the dimensions of each structural element.
An open terrace can be built on either side of the building. The floor is made unpaved or in the form of a flooring.
By using special applications by design, you can create a three-dimensional model of the future terrace on a computer
For a closed terrace, a reinforced solid frame with the possibility of insulation is required.
For a closed terrace, a doorway must be provided
For the device of a free-standing terrace, one of the simplest projects in terms of construction and construction can be taken as a basis.
The freestanding terrace in the garden or by the pool is a favorite place for the whole family
Having built a semi-open terrace with a canopy for the summer, you can, if desired, sheathe it with walls made of either boards or other materials at hand
Wooden with a canopy
The most popular way to arrange recreation areas is to build wooden terraces. They are durable, easy to install and beautiful in appearance.
To build a wooden deck you will need:
- bricks for support posts;
- timber 100x100 or 150-150 (for the frame);
- boards or sheets of OSB with a thickness of 12-16 mm (for flooring);
- profiled sheet or other roofing material (for a canopy);
- wooden bars for railings;
- balusters;
- fire-retardant solution;
- cement M400 and sand for preparing a binder for laying bricks.
Semi-open type wooden terraces built of logs are presentable. A similar effect can be achieved by building solid walls of OSB or boards, and sheathing them with a blockhouse.
Tools required:
- hacksaw for wood;
- a circular saw;
- screwdriver or drill;
- container for the preparation of cement-sand mortar;
- paint brush.
A thickness gauge is used to calibrate the lumber.
Substrate and floor preparation
- A plot is marked out, noting the location of each column. Optimal distance between them - 150-200 cm.
- They dig holes 30–40 cm deep.
- The bottom of the pit is tamped.
- 5-10 cm of sand is poured onto the bottom, spilled with water and compacted.
- Pour a 10-15 cm layer of gravel. They ram it down.
- The first row of bricks is laid on the cement-sand mortar.
- The laying is continued until the pillars of the required height are built.
- Stacked on pillars bottom rail from a bar. The elements are interconnected by the thorn-groove method or by means of metal corners. When building attached terraces, the harness is not attached to the wall of the house. This will prevent skewing of the flooring during the shrinkage of the building. Terraces associated with the building are suitable only if there is a single foundation for the house and the extension.
- Mount lags.
- The lower trim is sheathed with the selected material: OSB or boards.
The basis for the lag is concrete point support blocks, they are inexpensive and easy to install
Erection of the frame
The frame of the terrace is a complex of vertical wooden beams, upper strapping made of timber and crossbeams.
- Install corner supports for the canopy.
- They are connected to the wall of the house, taking into account the required angle of the roof slope: at least 4–5 °.
- Install intermediate supports. They are connected together with a horizontally laid beam of the upper harness.
- If the terrace is of a semi-open type, railings and balusters are mounted.
The single-pitched roof of the wooden terrace at an angle will provide a natural drainage of water from the canopy
Canopy
The canopy device is the installation of the selected material on the frame. The canvases are laid starting from one side of the structure from its bottom. Consider the need for overhangs 4–5 cm wide. Sheets roofing material fix on self-tapping screws with a press washer. At the final stage, a gutter is installed.
Polycarbonate
Polycarbonate is a strong and durable material with good light transmission. It is great for creating a canopy over a terrace. Those who have already made a similar design are advised to buy not transparent, but colored polycarbonate, since it better protects the interior of the extension from the hot rays of the sun.
Required materials and tools
An example of calculating materials for a terrace measuring 615x350 cm:
- timber 200x150x350 mm for mounting the frame - 11 pcs .;
- timber 100x100x350 mm - 18 pcs.;
- logs 50x100x350 mm - 8 pcs.;
- moisture resistant plywood 1220x2440 mm for flooring - 22-25 sheets;
- linoleum for the floor;
- slats 50x50 cm for canopy lathing;
- cellular polycarbonate 6 mm thick for a canopy;
- OSB 9 mm thick for walls.
Tools required:
- a circular saw;
- screwdriver;
- hacksaw;
- hammer;
- paint brush.
Substrate and floor preparation
A polycarbonate terrace can be built on columnar, slab or strip foundation... The choice of the type of foundation depends on the estimated weight of the future building. Polycarbonate is a lightweight material and will not exert significant stress on the structure. Therefore, the base can be made ground-adjacent.
Stages of construction of a ground base:
- They make a markup of the site, find the corner points of the future structure.
- Level the ground and form a slope for water drainage. The soil is tamped with a vibrating plate.
- They make a sand dump with a thickness of 7-10 cm, spill it with water from a hose. Align with the slope and tamp.
- In a similar way, a gravel "pillow" with a thickness of 7-15 cm is formed.
- Every 120-150 cm longitudinal depressions (3-5 cm deep) are made in the gravel layer - drainage.
- Logs are laid with a step of 150-200 cm.
- Form the flooring from boards, plywood or OSB.
Erection of the frame
A lightweight polycarbonate deck does not require strong supports. Therefore, the best choice would be a beam with a section of 100x100 mm. Vertical supports are installed on the flooring and combined with the crossbeams of the upper harness. For greater stability of the frame, jibs can be installed on the walls, which at the same time serve as decorative elements of the structure.
The frame for the polycarbonate terrace is made lighter, it is advisable to take into account the dimensions of standard sheets of material
Canopy and walls
The width of the polycarbonate sheet is 210 cm, the length is 300 and 600 cm. It is important to lay the sheets vertically, in the direction of the water flow. For the device of a canopy from this material, the following list of works is sequentially performed:
- The canvases are cut using a circular or band saw, jigsaw.
- the first sheet is laid on the selected side of the canopy, with the UV-protected side of the polycarbonate facing upward, towards the sun.
- The canvas is fastened using self-tapping screws with thermal washers so that the fasteners enter strictly vertically (step 60–70 mm).
- Install the rest of the polycarbonate sheets.
- End cuts are closed with special strips.
If the design of the terrace provides for the construction of walls, the most suitable material: boards, OSB, plywood.
Polycarbonate is available in a wide range of shades, which gives designers the opportunity for a variety of colors.
Arrangement and decor
The most spectacular outwardly and comfortable for relaxation are the closed-type terraces with panoramic glazing. They have all the advantages of open structures (full view of the landscape, good illumination) and at the same time provide reliable protection from wind and precipitation.
Tinted tempered glass and inert gas insulating glass will protect the terrace from rain, cold and direct sun rays, and the sliding mechanism will allow you to open the terrace in good weather
With the help of curtains, they mask the columns and create a cozy inner space of the terrace. Flowerpots and containers with flowers are installed along the walls. A chandelier with a fan is mounted under the canopy, which will save from the summer heat.
For open verandas, special furniture is sold with waterproof upholstery, wicker, easy-to-clean
Dim lighting elegant curtains and properly selected furniture will create a romantic and cozy atmosphere on the terrace.
Terrace lighting is traditionally dim; it is recommended to choose lamps and lamps with warm yellow light
Florists can decorate the terrace with the most different plants... They can be installed on decking or railings. In such conditions, while relaxing, they enjoy not only the beauty of flowers, but also their aroma.
For placing flowers on the terrace, forged floor stands and hanging plastic pots are used.
It is easy to install a hammock or children's swing under a canopy.
A good solution would be to arrange a playroom for children or an area for a leisurely afternoon rest on the terrace.
Photo Gallery: Ideas for Inspiration
A cozy terrace where you can sit with a cup of coffee or with a book There is enough space for everyone on such a spacious terrace It is pleasant to sit on a terrace with a fireplace Here you can retire and dream A small and cozy terrace with exits to the courtyard
f There are many options for organizing a place for recreation in a suburban area. The quickest and easiest way is to attach a wooden deck to the house. This simple structure allows you to comfortably enjoy the fresh air and sunbathe. And if you make a closed terrace, which reliably protects from wind, dust and precipitation, then you can relax in any weather.
The practicality of such an extension has been appreciated by many homeowners. With a sufficient area on the terrace, the whole family will comfortably accommodate with guests, and if you install a barbecue or barbecue, the recreation area turns into a convenient place for cooking and eating. In a word - the possibilities are endless!
Thematic material:
The best option for novice builders would be an open summer terrace adjacent to the house. To build such a structure correctly, you need to understand all the stages - from drawing up a detailed project to finishing and decorative work. Where do you start?
Features of the terrace design
A place to relax in a suburban area can be decorated in the form of a free-standing gazebo, closed veranda at the entrance to the house or an open terrace.
The last option has a number of features that distinguish it from the background of other buildings:

Where to build a terrace
The place for the construction of an open area is chosen taking into account:
- which side of the house is illuminated by the sun;
- view from the terrace;
- soil features - the nature of the soil affects the choice of foundation;
- the landscape of the site - the building should organically fit into the overall design of the yard and be in harmony with the style of the house.
Often, an open area is located near a pool or natural reservoir. The shape of the structure can be different: rectangular, round, asymmetrical, curved.
Interesting multi-level terraces, eliminating the need to make separate steps and providing an effective drain.

The building can be placed:
- next to one of the walls of the building on a common foundation;
- around the whole house;
- separate from the dwelling - in this case, the terrace resembles a gazebo.
Material selection
What is the best way to make a terrace? There are many options.
- Wood. The wooden structure is durable, reliable, provides maximum comfort and a homely atmosphere. Construction will be the most economical and least labor-intensive.
- Stone, concrete, brick. It is more difficult to work with these materials, they are more expensive and do not allow you to implement some of the design ideas.
- Metal. Beautiful railings and struts are made of steel or cast iron. But this option is costly from a financial point of view. Also, not everyone can work with metal on their own - you need to at least own welding machine... In addition, resting on such a terrace will be less comfortable, since the steel heats up strongly in the sun.
- Wood-polymer composite, or WPC. These raw materials are the cheapest and easiest to process. Thanks to the PVC coating, the material does not need to be protected from decay with impregnations, like elements wooden structure... Externally, WPC is attractive - it resembles the texture of natural wood.
When erecting a terrace, it is not necessary to use new materials; you can also make a recreation area from the remains after the construction of the house. The main thing is that the boards, concrete blocks for the foundation and other elements are free from defects and are treated with special impregnations that protect against moisture and temperature changes. Only in this case, the structure will turn out to be strong and durable.
Drawing up drawings
Before you, it is important to understand all the details of the design of the structure. A correctly drawn up and approved construction plan is a guarantee of the quality and legality of the construction.

What should be in the project?
The drawing reflects the following specifications constructions:
- area with exact dimensions;
- materials used;
- the mass of the structure;
- type of foundation.
When drawing up a project, it is important to take into account the peculiarities of the place chosen to place the terrace: the type and structure of the soil, the technical condition of the wall and foundation of the house, climatic factors.
Users often search:
Since it is quite difficult to make a drawing of the terrace on your own, the best solution would be to contact a specialized design organization. Professional engineers will draw up a construction plan, taking into account building codes and the wishes of the customer.
Project approval
Despite the fact that the house is the property of the owner of the land plot, changes in the design of residential premises must be agreed and approved by:
- fire safety service;
- bodies of sanitary and epidemiological control;
- local administration.
Without a complete package of documents, the building will be considered an unauthorized building, which will not allow you to sell, donate, exchange a house in the future, or use the property as a loan collateral.
Stages of construction of an open terrace
An extension to the house of a recreation area is carried out in several steps:

The last stage can be omitted, but additional elements will make the design original and functional.
For a terrace, a strip or columnar base is suitable. However, builders often resort to more simple option- the use of a curbstone under the foundation. In this case, the work is as follows:
- With the help of reinforcement or wooden pegs, they mark the boundaries of the future building. For the convenience of further work, a string is pulled along the perimeter.
- Temporary supports made of bricks with a height of about 40 cm are installed in the corners.
- Logs are laid on top at an angle to the house of about 2 ° (this will ensure a good drainage of precipitation). For leveling, use a building level.
- A string is pulled along the top of the log, the logs are removed.
- Instead of temporary supports, columns are made of concrete.
- Trenches are dug between the racks under the curb and poured with concrete.
- Set the stones.
- When the mixture hardens, the gaps between the foundation elements are covered with expanded clay for thermal insulation.
If the structure is new, the foundations of the house and the terrace should not be rigidly connected - the shrinkage of the building will lead to the destruction of the extension. If the house has been standing for a long time, the foundations are combined using metal fasteners.
Wood flooring construction
Step-by-step instructions for installing a terrace floor:
- Logs are installed on the foundation.
- Mark the places for fixing the timber.
- The crossbeams are fixed with metal corners.
- Boards are mounted. Before this, the tree is carefully treated with impregnations from decay, bacteria and fungus. Small gaps are left between the boards for ventilation and temperature deformations.
- The edges of the flooring are trimmed for aesthetics.
- The surface is varnished or painted.
It is advisable to use larch as it is rich in natural resins and is ideal for outdoor use.
If the deck-terrace seems too simple, the structure can be supplemented with auxiliary elements, for example, a roof.

There are several roofing options for the terrace:
- construction adjacent to the house - fits on the rafters of wooden beam attached to top harness on vertical racks;
- polycarbonate roof;
- transparent slate construction;
- removable canopy in the form of a stretched awning.
However, you don't have to bother with the construction of the roof - simple umbrellas will perfectly protect from the sun. However, in this case, furniture and decor will have to be removed every time heavy rainfall begins.
Terrace decoration
The decorative elements are striking in their variety. For example, on an open recreation area, wooden fences are installed, consisting of three parts: posts, railings and balusters. These elements are attached to the supports on which the roof is held, or to their own vertical beams.
Alternatively wooden fence use lightweight fabric tulle, which creates an airy feeling, decorates the terrace and protects from sunlight.

Mandatory elements of the recreation area are tables, armchairs, sun loungers and other furniture. Additionally, you can decorate the room with potted vegetation or a hedge around the perimeter of the structure.
Thus, the construction of a terrace - the best way for a beginner master. It is not difficult to build an open area with your own hands - you just need to carefully follow the recommendations and follow the technology of work.