What can be cooked from squid: quick and tasty
In an effort to move away from generally accepted standards and give the interior elegance, the owners of the apartments and country houses change the usual doors to arches. This is no longer new, but to this day a popular design highlight. The arch in the doorway is bought ready-made or made by hand. It comes in a variety of configurations, so it allows you to implement any idea.
Forms of arched openings
Interior door arches are selected not only based on taste preferences, but also depending on certain parameters: ceiling height, etc. Structures are made of plasterboard, wood, MDF, PVC. Drywall is easiest to work with, as it is the most flexible material.
Currently, there are a large number of different types of arches, which differ in shape. The most common are:
Arched openings also have various designs and on the basis of this they are subdivided into several varieties:

After taking a closer look at your interior and choosing the desired arch model, you can start the phased implementation of the work.
Step-by-step instructions for self-manufacturing
In order not to spend extra money on finished products, you can do the decoration of the arched opening yourself. To do this, you need to follow a clearly established scheme.
Taking the necessary measurements
Any construction process requires precision, which is achieved by first taking measurements. You need to start from the opening itself, so measure the width and height of it first. The size of the span between the walls of the opening is equal to the width of the arch. In order to make a semicircle as accurately as possible, this indicator must be divided by two.
Before making an arch, you need to decide on its future configuration. If you are going to execute it in classic style, then pre-align the walls. Otherwise, the design will look ugly. You can remove all defects from a vertical surface with putty or plaster using beacons.
Structural framing
To make the installation of the frame, you should perform a number of sequential steps:
- A contour of a metal profile is screwed along the lines of the opening with dowels. The vertical guides are installed with an offset from the surface of the interior wall. The size of the indent is equal to the thickness of the drywall sheet and the plaster layer (about 0.2 cm).
- We install two such profiles parallel to each other on each side.
 For the frame device, two profiles are installed in parallel
 - Having finished working with the profiles, we take up the installation of the first sheet of drywall. If its thickness is 1.25 cm, then it is recommended to fasten it with 3.5x35 self-tapping screws. If the thickness of the gypsum board is not more than 0.95 cm, use smaller screws.
 Drywall is fixed with self-tapping screws
 - Sheathe the other side of the frame with drywall.

- Make an arc-shaped metal profile. To do this, cut the side walls of the profile with special scissors every 7 centimeters. As a result of these actions, it is easier for him to give the required form. For an arched structure, you will need two such blanks.
 An arched arc is made from the profile
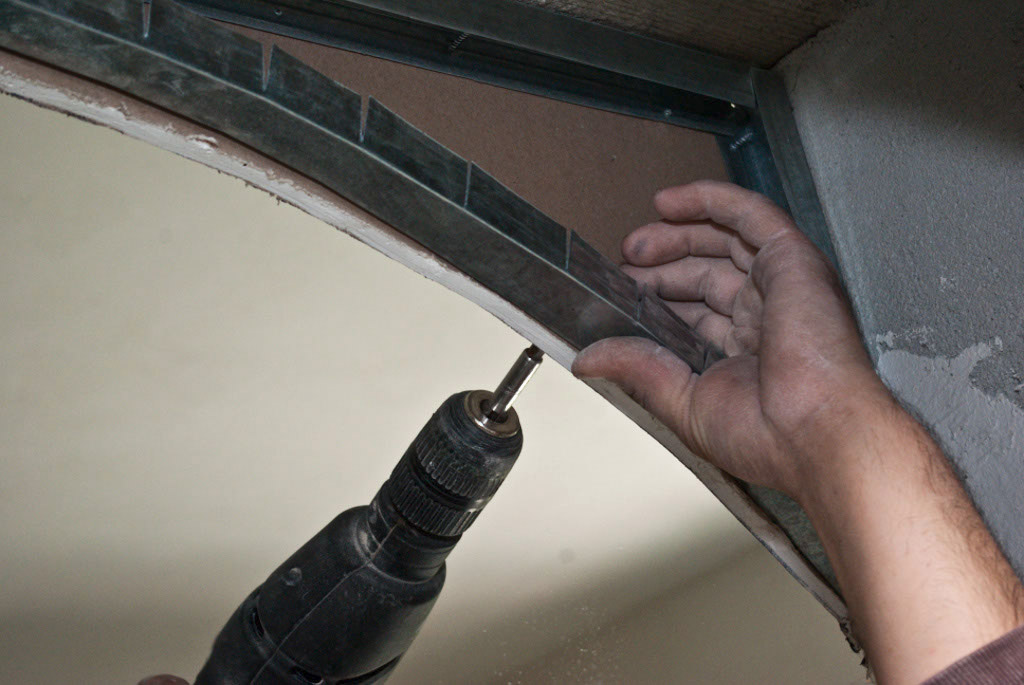
 - Install and fasten the arcuate profiles to the main frame.
 The arcuate profile is attached to the main part of the frame
 - In order for the arcs to be securely fixed, they are attached with hangers to a straight rail located on top. The number of suspensions depends on the width of the opening. Usually three pairs are sufficient.

- In increments of 0.4-0.6 m, attach reinforcing crossbars around the frame perimeter, fixing them on the guides of two contours.
- As a result of the above actions, a reliable metal structure in the form of an arch from a profile. In the future, it will be sheathed with plasterboard or plywood.
If it is assumed that the columns of the arches will not be too large in thickness, then 2 arcs can be changed to a wide profile. Cutting and folding is done in the same way. Only in this case, the installation of crossbars is not required.
Sometimes, instead of a metal profile, wooden slats are used. At the same time, the frame installation technology does not change significantly.
Plasterboard bending
After installing the frame, they are taken for the bending of the gypsum board. Experts recommend using drywall designed specifically for arched structures. It easily takes the desired shape if the material is rinsed in the longitudinal direction.
If you decide to use regular drywall, then you have to tinker with it. The installation element is cut out the right size in the form of a rectangle. It is folded in two ways: wet and dry.
 Bending fabrication scheme
 The wet method is time consuming and not rushed. To prevent the material from cracking when bent, it is moistened with water and punctures are made. In this form, the drywall sheet is left to lie for a while, and then it is folded onto a template of the desired configuration.
The dry method refers to the application of cuts parallel to each other on the seamy side of the gypsum board. The cut goes deep into the sheet, affecting the outer cardboard layer and gypsum. The cardboard layer on the front side remains intact.
With the dry method, the bending of the positioning element takes the correct shape. At the same time, it is important to know that it is better to cut the gypsum board with a jigsaw, and not with a hacksaw. Then the edges will not be torn.
Rough frame sheathing
If the bending was carried out with the wet method, then first of all it is necessary to wait until the drywall sheet is completely dry. The fixation of the material is carried out first with adhesive tape, and then with self-tapping screws. The minimum step between them should be from 5 to 6 centimeters.
 Perforated corner prevents edge chipping
 After fastening the edge sheathing drywall sheet are cleaned. And in order to prevent chipping of the curved edge, a perforated plastic corner is installed on it.
Leveling with putty
To make the surface even, you need to finish the arched structure. First, a primer is applied, and after it dries, a putty. Fiberglass mesh is used to reinforce the second layer and strengthen the corners..
 Fiberglass mesh reinforces the corners of the arch
 The last third layer of putty is applied to the mesh. After about 10 hours, it dries up, after which you can start cleaning the irregularities with sandpaper. With a well-done work, the surface will be without roughness, irregularities, the caps of the self-tapping screws will not be visible in it.
Methods for finishing arches
Those wishing to finish the arches on their own will have to work hard, cutting out each detail separately. However, many do not look for difficulties and choose the simple way - they acquire factory structures from prefabricated elements.
Prefabricated and prefabricated pads
Factory-made overlay is of two types: wood and foam.
Styrofoam elements
Foam arches are often preferred as an alternative to plaster products. The advantages of such designs are as follows:
- Fast installation. Installation speed is much higher than arched structures made of plywood or gypsum board.
- Low price.
- Easy transportation. Styrofoam is a fairly light material, so you do not need to hire movers to deliver the product to your home.
- Low weight. Arches of this type can be installed even on very weak structures.
- Various shapes.
 Foam arches are assembled from ready-made elements and trimmed in place to fit the size of the opening
 The disadvantages of an arched structure made of polystyrene are: fragility, toxicity, rapid flammability.
Wood elements
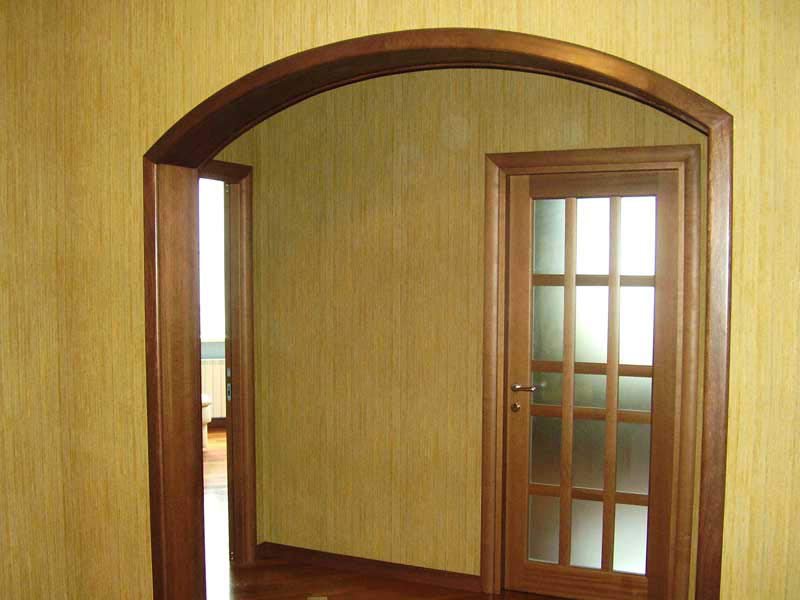
Wooden arched structures do not require advertising. They look rich and rarely do not match any interior style. However, it should be understood that the word "wooden" does not mean that all components are made of pine, oak or other solid wood.
 The arch can be made of natural wood, MDF, chipboard or plywood
 Arched elements are also made from inexpensive MDF, laminated chipboard, veneer-faced plywood. The desired option is selected individually based on the taste and thickness of the wallet.
 Wooden elements are ordered according to the catalog and then cut to length before installation.
 The installation of timber structures is simple. In hardware stores, arches are sold both assembled and disassembled. The first option is considered more reliable, since the work was performed by a specialist.
Decoration with finishing materials
Currently, there are many ways to beautifully and neatly. The decor is selected so that it is in harmony in color, texture, material with the home environment. The most popular options are recognized:
- Simple staining... The arch will look elegant and complete if you just paint it white, Brown color or to match the walls. Such a finish is often complemented with decorative elements, lighting.
 Monochrome painting looks great in combination with backlighting
 - Wallpapering... It is the fastest, most affordable and easy process. For these purposes, vinyl or non-woven options are best suited.
 Wallpaper highlighted slopes - a very stylish design move
 - Finishing with wooden, plastic clapboard. The method guarantees not only an excellent aesthetic appearance, but also ensures the durability of the structure, its protection from moisture and mechanical damage.
 The clapboard option is great for interiors with wall decoration from the same material
 - Decorative plaster... The surface of the arch is beautiful, embossed and durable. True, this finish sometimes needs to be restored, and it requires some maintenance.
 This method looks especially advantageous in deep arches.
 - Stone... An arch in a house made of natural or artificial stone is installed only with the help of a professional. The decoration captivates the eye and makes the interior unusual.
 The ragged edges of the arch can become a highlight of any interior.
 - Cork- it is quite expensive, but environmentally friendly material. It is easily susceptible to mechanical damage, therefore, to prolong its service life, it is recommended to cover the cork with wax.
 Cork finishing brings a sense of environmental friendliness and comfort to the interior
 - Clinker tiles... This finish will last for many years. It does not attract dirt and does not require special maintenance.
 Clinker tiles - unlimited space for interesting solutions
The main characteristic feature of arches is that they always look advantageous in both classic and modern interiors. This architectural element allows you to visually combine several rooms, which to some extent softens the overall impression of small apartments.
The arch in the kitchen is very practical, because with the advent of powerful hoods, the need for a door has disappeared completely. The same element, installed in the opening leading to the warm loggia, actually unites the space and makes the adjacent room noticeably more spacious. Thanks to the expansion of the opening, it is also possible to increase the degree of insolation, which is important.
 In this article we will tell you how to make an arch in a doorway yourself from different materials.
Types of arches
Immediately before you get down to business, you must definitely decide what shape your arch will be. Accurate and correct selection option will ensure the harmony of the overall appearance of the apartment and combine aesthetics with practicality.
When choosing the type of arch, you need to take into account the following points:
- the height of the room;
- the width of the existing opening;
- the material from which the walls are composed.
So the correct (semicircular) arch does not look good in a room where the distance from the floor to the ceiling is 250 cm, unless the opening is narrow (up to 70 cm). This  the option fits perfectly into high rooms (3 or more meters).
A classic arch should have a bend equal in depth to ½ the width of the opening. That is, if the last 80 centimeters, then the radius of the arch will be - 40.
In the presence of a wide passage and low ceilings, it is advisable to build a straight portal, the arched element will look too unnatural here. Alternatively, it can be narrowed by placing open shelves on the sides (or only on one side).
The easiest way is to choose the shape of the arch if the wall is only planned to be built. Here, the choice is practically unlimited. Openings can be wavy, trapezoidal. It is permissible to do it completely round in an Asian style.
Materials (edit)
In reality, the arch is easy to build from a variety of materials:
- brick;
- wood;
- Chipboard and MDF;
- metal;
- drywall;
- plywood;
- plastic.
In the conditions of an apartment, capital arches are not erected, and therefore they are most often made of wood, gypsum board or plastic.
Preparatory work
 First of all, you should free the opening from old door... It is dismantled along with the box. The inner surfaces are cleaned from the remains of the solution, dedusted and carefully primed. If there are irregularities, they are eliminated.
Next, it's time to determine what type of arch is best for your particular case. To do this, you can cut out several options from cardboard and, by attaching them to the opening, see what will look more harmonious.
If you do not have a desire to mess around for a long time yourself - purchase a ready-made arched portal in a hardware store. Currently available products from the following materials:
- plastic;
- wood.
The last option is the most expensive.
Lining
It is not difficult to arrange an arch if the room is trimmed with clapboard. In this case, however, you will have to install it on the wall of an adjacent room, but such accent elements are very popular today.
In this case, the base of the arch is cut out of chipboard (no thinner than 18 mm). It should clearly fit into the dimensions of the opening. There it is strengthened using trim bars installed across the sidewalls. Then the walls are sheathed with decorative strips, cut to shape. The inner vault is sealed with either flexible plywood or pieces of lining. Here you can install the backlight, but only LED bulbs are allowed to be used in it.
Drywall
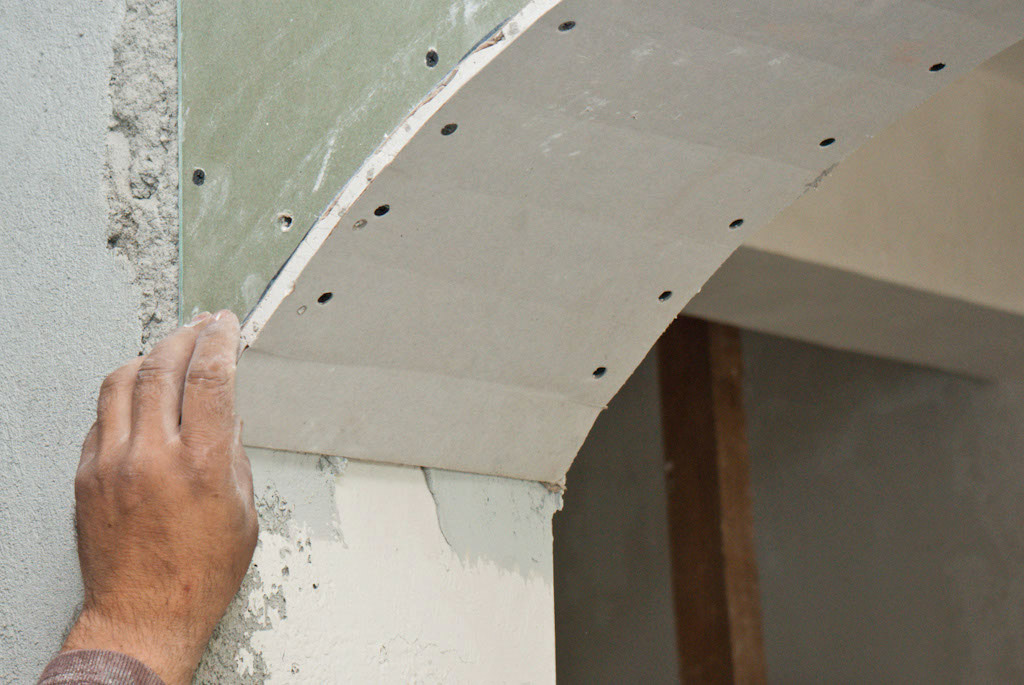
 In order to revet the plasterboard opening correctly, it is necessary to knock down a layer of plaster from the wall above the future arch - this will allow the sheet to be placed flush with it. A drywall blank is cut out so that it protrudes above the opening by at least 15 cm, on the sides - by 5 on each side.
The profile is only needed to stiffen the circle itself. To do this, take the type UD. In it, with the help of scissors, cuts are made at least every 20 mm, so that only one side wall remains intact. The result is a flexible piece that can be easily adjusted to the shape of the arch.
In a rectangle prepared from drywall, whose size is 15 cm larger than the future arch in height and 10 in width, two points are marked 50 mm from the edge.
Next, using a pencil on a string, draw the outlines of the bend, holding the end of the twine in the center of the lower edge of the piece of plasterboard, starting from one of the above marks. If the arch is made incorrect (shallow), then the place of fixation of the thread is pushed back below the edge of the workpiece.
Then, along the drawn line, the drywall is cut with a jigsaw or an ordinary hacksaw blade for metal (it will not work for wood - too large teeth severely damage the edge). It is advisable to put two blanks together at once and cut out the excess in one fell swoop.
A profile is screwed to the rounded end of the gypsum board with self-tapping screws, not reaching the edge of 1.5 cm, so that the strip with which you will close the arch along the end “drowned”.
Further, the surface of the wall, freed from plaster and primed, is covered with a layer of glue (Perlfix is the best) using a notched trowel. A piece of plasterboard is pressed against it and easily slammed with a palm. Additionally, it is fixed with several dowels. On the other side of the wall, a second arch element is installed.
When the glue dries, jumpers are mounted between the profiles for rigidity. The end is sheathed with a strip of drywall, cut from the inside out across, after 2 centimeters and broken.
All seams are sealed with special glue (Fügenfüller) and pasted over with fiberglass. The edges are protected by a flexible corner. The sides of the opening are also lined with plasterboard strips and reinforced.
The last stage of work is filling and painting.
A few years ago, arched openings came into fashion. This design of the entrance to the room is beautiful, original and allows you to do without installing doors. Using modern materials, can be made and trimarched vaultdo it yourself. This work is not too difficult, but it requires great care. In addition, you will need to think in advance how finishing will be carried out openings. You can make decoration in various styles, considerhow to make an arch in a doorway.
The arch is very spectacular way enliven the interior and make it more attractive. A beautifully designed arched opening in the vault will emphasize the beauty of the interior in the room and make the furnishings more original.
A huge variety of arches and harmoniously selected finishes will transform the room. To be sure of this, it is enough to look at the photo of the room before the arch was inserted into the opening, and after the repair. Consider how you can create a niche in the form of an arch, install it in the vault of the wall and finish it yourself.
Types of arches
When decorating interiors, arched openings perform not only decorative, but also practical functions. It is possible to make a niche in the vault of the wall dividing adjacent rooms, or install a partition with an arch-shaped opening in a large room to divide the space into zones without using interior doors.
In most cases, semicircular openings are used, the following types of arches are distinguished:
- A classic arch is a structure in which the bending radius of the arch is half its width.
- Arch modern. It has an original shape, in which the arc is executed with some lift.
- Romantic arch. This is an almost rectangular opening, the edges of which are rounded.
- Elliptical arch. In this case, it is oval, widening in the middle and tapering at the top and bottom.
Advice! How do they look different types arches, can be seen in the photo in magazines on the interior.
Preparing for the installation of the arch
Consider how you can install and decorate a classic drywall arch with your own hands.
Making measurements
It is necessary to start creating an arch by taking measurements from the opening. You will need:
- Take measurements along the two diagonals of the opening. These measurements must match, otherwise, you will first have to carry out work to align it.
- Take a measurement of the width. This measurement is useful for determining the radius of the bend of the arc.
- Measure the height.
We purchase materials
In order to install the arch you will need:
- Arched drywall sheets with a thickness of 6.5 or 8 mm. If the opening in the room standard size, one sheet is enough. This material is very easy to use. You can use plywood, but it is more difficult to work with.
- Metal profile. You will need 2 pieces of a guide profile 50 × 40 and 1 piece of a rack profile 50 × 50 mm.
- Fasteners: dowels with screws (25 pcs.), Self-tapping screws 3.5 × 25 mm and self-tapping screws 3.5 × 11 mm.
After completion of construction, you will need to finish the arch. To do this, you need to stock up on:
- Primer;
- Finishing putty;
- Perforated arched corners.
The rest of the material is purchased depending on the planned design of the opening and the adjacent wall.
Installation work
First, the device of the frame is carried out. Stages of doing this work with your own hands:
- We cut off two sections of the profile along the height of the opening and one in width and fix them in the opening using dowels with screws.
- Now you need to prepare the arcuate part of the frame. The length of the profile for this part is determined by adding two values - the radius of the arch and the height of the offset from the top of the opening.
- To make it possible to bend the profile, you need to make cuts in the parallel side parts of the profile with metal scissors or a grinder. The pitch of the incisions is 4-8 cm. After that, the profile is bent, giving it the required shape.
- We fix the manufactured part of the frame, having previously aligned it.
- We sheathe the finished frame with drywall blanks. First, the pediment parts are sheathed, cutting out the details according to the size of the opening. Then made interior arches. To bend a drywall blank with your own hands, it is necessary to make cuts from the wrong side without damaging the outer layer. The prepared drywall part must be installed by fixing it to the frame with self-tapping screws.
Finishing work
The drywall arch is almost ready. But as you can see in the photo, it doesn't look very attractive without finishing. Consider how you can complete the design and framing of the assembled arched opening with your own hands.
First of all, you need to putty all the seams and locations of the screws. We attach a perforated corner to the outer edges on the putty composition so as not to bother with putting out the form with a putty.
Then apply a layer over the entire surface of the arch finishing putty, and after it dries, we grind the surfaces, achieving smoothness. It remains to prime the surface, after which a fine finish can be carried out.
How can you decorate an arch? The chosen option should be in harmony with the wall decoration. For example, if the walls are covered with wallpaper, the same material can be used to decorate the arch.
Other options can be used to match the wall finish. For example, decorate interior arches with artificial stone, tiles, decorative plaster, you can use a combination of different materials. How beautiful and original the finishing of the arch can be, you can see the photo.
So, interior openings in the form of arches are an original and very attractive way to decorate the interior and arrange the opening between adjacent rooms without installing a door. If you wish, it will not be difficult to make an arch yourself. And how you can interestingly decorate the arch can be seen in the photo in magazines on the interior.
The transformation of the interior of the premises is done different ways... One of them is replacing the door with an arch. There are several technologies for its arrangement, but if you look at it in detail, then almost all of them are similar and quite feasible. on their own... Moreover, you can mount both purchased elements of the "vault", and made independently.

Preparatory activities
Choosing the type of arch
Experts recommend focusing on the height of the ceiling and the general style of finishing the room. There are several options for the execution of arched structures, but most of them reduce the opening by installing the supporting frame by about 150-200 mm.
- With low ceilings, it is hardly worth getting rid of interior doors. At the very least, you should think carefully. The only possible option for finishing the opening after dismantling them is plastering followed by pasting (wallpaper, fabric) to match the walls. It is quite simple to build an arch in this way; it is only necessary to competently process the end parts of the passage. But this option for the design of the room has a significant disadvantage, and therefore does not suit everyone - the absence of a crate makes it impossible to install hidden spotlights in the opening.
- In some articles on the topic of making an arch, there are recommendations for giving the desired geometry to the passage between rooms using cellular blocks, bricks or by concreting. Not to mention the complexity of such work, it is worth considering the additional load on the floor. And since you still have to deal with the solution, it is not the best option for an apartment.
But if the decision is made, then the features of the interior of the home should be taken into account. This will help to correctly determine the optimal type of arch.

- Classical. The upper part is an arc with a constant radius (semicircle). It is relatively easy to do, since it has the correct geometry. But it is advisable to mount it only in the openings between rooms with high ceilings.
- "Modern", "Romatika" are well suited for multi-storey buildings. The latter type of arches has a large width, and therefore are recommended for installation in the opening leading from the hall to the hallway.
- "Portal". The fundamental difference from others is that it is a rectangular arch. It is advisable to install it in private buildings. Applied to the apartment, it looks great, but only if straight lines prevail in the style of the room. A significant plus of this design is that it is mounted without special difficulties even in the absence of skills.
- Ellipse and Trapezium have a more original shape. When deciding how to make an arch in a doorway according to one of these schemes, it is worth considering that the correctness of the geometry largely depends on the accuracy of the calculations of the parameters of all elements and radii (corners).

There are other options for the design of openings: Venetian, Florentine, with "shoulders" and a number of others. But to build an interior arch of any of these varieties is so difficult that for self-assembly you shouldn't choose them.
Choice of materials
- Frame. There are only two options here - wooden slats and metal profiles. It is more difficult to work with the former, especially if the vault has geometry with changing parameters. Bending wood is not only a difficult process, but also a lengthy one. In addition, the tree absorbs moisture well, is prone to drying out, and therefore deformation cannot be avoided. In this regard, a door arch assembled on a metal frame is more durable and reliable.

- Facing. Laminated plastic or chipboard panels look great and do not require any further finishing. The downside is that it is difficult to choose their shade for a specific interior; besides, such an arch will be more expensive. It is better to use elements from fiberboard, plywood (small thickness) or gypsum board. It is much easier to work with these sheet materials (cut, bend). Plus to this - finishing can be done by anyone, at your discretion.
- You need to have experience with wood. It is difficult to bend it, and in some cases to process it. For example, the selection of grooves, quarters without special tools and fixtures is not done.
- The lumber still needs to be correctly selected. First of all, by breed. Each one is different characteristic features, and the use largely depends on the specifics of the room in terms of the microclimate.

Operating procedure
- Dismantling door frame... The opening must be completely cleaned; not only from the frame with the sash, but also sealing / insulation materials.

- Markup. On this point, one nuance should be noted; the ends of the wall must be strong. Therefore, if it does not meet this requirement on a separate site, you will have to think about either strengthening it (for example, with a corner), or additional sampling of a part of the material with subsequent alignment. But in the latter case, the size of the opening will increase. This is typical for houses made of wood, if it is found that rot has developed on a bar (log).

- Measurements should be taken at multiple levels. Even if the skew is visually and imperceptible, then when the door arch is mounted with your own hands, difficulties may arise.
- Many discrepancies raise the question of what to do first - draw up a drawing of the arch or determine the dimensions of the opening. Here it is worth focusing on local specifics. If the material of the walls is easy to process, then it is not difficult to expand the opening. Otherwise, the design parameters will have to be "adjusted" for it.
- Fastening the supporting frame. It is assembled in several stages.
- Arrangement of the main circuit. In accordance with the drawing, all external vertical rails are "fastened" to the wall.
- Fastening the "arch". Additionally, the upper part of the arch is fixed with suspensions, which are located symmetrically over the entire width of the opening.

- Strengthening the frame. For this, transverse elements are used that are installed along the arch along its entire profile. Approximately - 50 ± 10 cm apart. For gypsum board, a maximum is enough (about 55 - 60), but if the cladding is made with a board, then the interval should be reduced to 45 - 50.
- Sealing gaps. In fact, this is one of the ways to insulate the opening. Depending on the material of the wall and frame, an appropriate agent is selected - a solution, polyurethane foam, putty or otherwise.

- Wiring. As a rule, all arched openings are highlighted. That is why the lines are mounted even before the start of the frame finishing.
- Facing the structure. The specificity of fixing the elements of the skin depends on their material. But they are attached to the metal profile slats with self-tapping screws; the simplest and convenient way... It is only necessary to outline the location of the holes and drill the channels for the hardware.

- Finishing the arch
- Putty application. This is necessary to smooth out roughness.
- Soil processing. Such agents simultaneously increase the moisture-repelling properties of the base and the adhesion of the material.
- Reinforcement of finishing (if necessary). The edges of the gypsum board are reinforced with a shallow corner (made of plastic, with perforation), the surface itself is reinforced with a reinforcing mesh that is glued.
- Reapplication of filler and primer.
- Grinding.
- Finish coating. Possible options- paints and varnishes, decorative films, veneer, wallpaper, stucco molding, mirrors. There are no stereotypes - your own imagination itself will tell you what kind to give the opening.

In principle, the very process of installing and finishing the arch for an economic man is not difficult. And if we take into account in advance such a moment as the maintainability of the structure, then they will not arise in the future.
There is an opinion that the arch as an architectural device is more suitable for palaces and museums than for ordinary house and apartments. But this opinion is wrong. A doorway made in an arched style can organically look in the most ordinary apartment, in almost any interior, and serve as its decoration. Manufacturers offer different kinds ready-made arches that can be mounted in doorway, the arch can be made with your own hands.
The advantages of arched openings
Even a person who is ignorant of the intricacies of interior design and architecture is struck by the fact that an arched structure, unlike a door, does not separate rooms, but unites them.
The doors separate the rooms from each other, and the arch creates a common space.
Experts note the following advantages that distinguish interior arched openings:
- They are able to create an effect visual expansion space.
- This architectural solution is versatile: suitable for a variety of interior design styles.
- The versatility of interior arches is also manifested in the fact that they organically fit into both spacious and small rooms.
- An arched doorway is able to give the interior originality and individuality.
In practice, it has been verified that arches look good both in classic-style houses and in Art Nouveau or Techno-style apartments, especially since arched openings allow for numerous design options that enliven them appearance(for example, lighting, a combination of wood with metal inserts, the use of stained-glass windows).

Types of arches
When designing an interior arched structure, qualified specialists take into account the features of both rooms, which are connected by an opening. The height of the ceilings, the width of the opening and other factors are taken into account. This is necessary in order to choose the right type of arch that is suitable for these conditions. Three main types of arched structures can be specified:
- The classic version is characterized by a certain ratio between the bending radius and the width of the opening: the radius is equal to half the width. This option is suitable if the premises have high ceilings (not less than 3 m). The reason for this is purely geometric: with the specified ratio of width and radius, with a door width of, for example, 90 cm, the height of the arch will be 45 cm.
And if the doors are wider, then the height of the arch will be greater, and with a low ceiling, it will either not fit, or it will not look aesthetically pleasing enough.
- The Art Nouveau arch looks like an oval and may well be performed in typical, including small-sized, apartments.
- Romance type: the design has rounded edges and a straight insert, horizontal or oblique.
Of course, the whole variety of possible designs of arched openings is not limited to these three options, but they are the most common and are used in the overwhelming majority of cases.

Materials used
To make an arched interior opening, in principle, can be used various materials... But the real possibilities of their use are far from equal.
In the first place in terms of convenience, accessibility and practicality are sheet materials - fiberboard, plywood, drywall. The technology for making arches from these materials is well developed, and various options finishes are able to give the arch an aesthetic look and arrange it in the desired color scheme and style. Natural wood is also an excellent material for this purpose, and its only drawback compared to sheet materials is the higher price.
Often, interior arched structures are made of concrete, brick or natural stone.
These materials allow you to make an arch of any size and configuration, but it must be borne in mind that these materials are heavy, and the increase in weight interior partitions not always desirable (for example, in old houses).
Metal structures are very original, but not suitable for every style of interior. Besides, stainless steel very expensive, and galvanized iron structures do not look so impressive. In some cases suitable material is plastic - it is relatively inexpensive, practical, durable and does not require finishing.
Making a door arch on your own
The easiest way is to purchase a ready-made interior arch of the desired type and size and mount it in the doorway. But with some skills and necessary tools an interior arch can be made with your own hands.
An example of the process of installing an arch in doorway can be seen in the following video:
The beginning of this work should be the drawing up of a "project": it is necessary to draw the contours of the future structure directly on the wall (on both sides) or to make (for example, from plywood) a template in full size.
You should also think over all the details before starting work, in particular, the location of lamps and other elements, if they are supposed to be built into an arched opening.
The main operations for making arches from sheet materials are:
- Manufacturing and fastening of aluminum profile guides. You can bend the aluminum profile by making cuts on it every 5-6 cm.
- Manufacturing of frame parts. These details must match the template. In order to bend a drywall sheet and give it the desired shape, it must be moistened. To bend plywood or fiberboard at home, the sheets are moistened and heated with an iron.
- Installation of the frame with self-tapping screws.
- Finishing work. They should be started only after all mounted fragments of the arched structure are completely dry.

All these operations are quite capable of a sufficiently experienced home master... To complete them, you need the most common tools - a hammer, drill, hacksaws for metal and wood. But if there is no experience and skills in locksmith and carpentry work, then it is better to turn to specialists in order to get an interior element that is made with high quality and fully meets the requirements of both strength and aesthetics.